Climma Vega MKII Panel manual - Zanshin
Climma Vega MKII Panel manual - Zanshin
Climma Vega MKII Panel manual - Zanshin

Create successful ePaper yourself
Turn your PDF publications into a flip-book with our unique Google optimized e-Paper software.
1 - INSTALLATION<br />
1.1 Electrical connection<br />
It's very easy to connect <strong>Vega</strong> MK II to the powerboard using an eight<br />
poles cable (straight) and a RJ45 connector. The standard length of this<br />
cable is four meters.<br />
1.2 Power On<br />
Power On means that the panel is supplied. In Power On the following information is<br />
given: [r x.x].<br />
1.3 Software relay<br />
The indication looks like the following: [rx.x].<br />
1.4 Program from the powerboard<br />
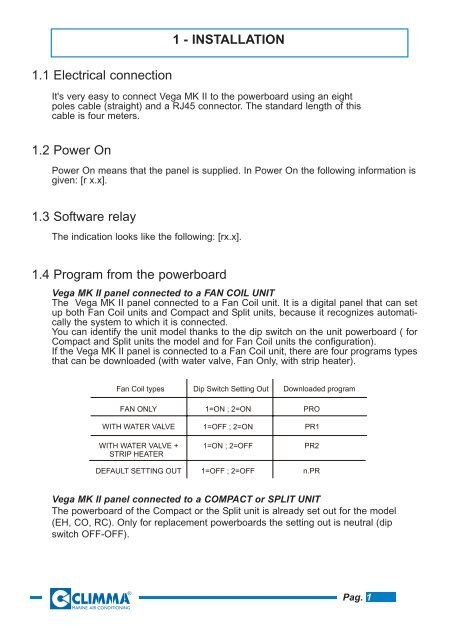
<strong>Vega</strong> MK II panel connected to a FAN COIL UNIT<br />
The <strong>Vega</strong> MK II panel connected to a Fan Coil unit. It is a digital panel that can set<br />
up both Fan Coil units and Compact and Split units, because it recognizes automatically<br />
the system to which it is connected.<br />
You can identify the unit model thanks to the dip switch on the unit powerboard ( for<br />
Compact and Split units the model and for Fan Coil units the configuration).<br />
If the <strong>Vega</strong> MK II panel is connected to a Fan Coil unit, there are four programs types<br />
that can be downloaded (with water valve, Fan Only, with strip heater).<br />
<strong>Vega</strong> MK II panel connected to a COMPACT or SPLIT UNIT<br />
The powerboard of the Compact or the Split unit is already set out for the model<br />
(EH, CO, RC). Only for replacement powerboards the setting out is neutral (dip<br />
switch OFF-OFF).<br />
Pag. 1