5-Cylinder Operating Manual - Zanshin
5-Cylinder Operating Manual - Zanshin
5-Cylinder Operating Manual - Zanshin

Create successful ePaper yourself
Turn your PDF publications into a flip-book with our unique Google optimized e-Paper software.
<strong>Operating</strong> <strong>Manual</strong><br />
5-Cyl. SDI and TDI<br />
Volkswagen Marine<br />
Boat Engines
Youhavedecidedona<br />
Volkswagen Marine Boat Engine<br />
- Thank you for putting your trust in us.<br />
Volkswagen Marine boat engines<br />
have been developed for the special<br />
requirements in boats.<br />
Volkswagen Marine offers a broad<br />
range of variants to meet any specific<br />
requirements.<br />
Volkswagen Marine boat engines are<br />
characterised by many advantages:<br />
● Compact design and low weight<br />
create the conditions for universal<br />
installation.<br />
● A long life and low fuel consumption<br />
ensure economy and environmental<br />
friendliness.<br />
You have decided on a Volkswagen<br />
Marine boat engine that is advanced<br />
in every regard. Your boat engine has<br />
been developed to put the least<br />
possible strain on the environment.<br />
VW Marine Service Partners are<br />
available for support:<br />
The VW Marine Service Partner<br />
TheVWMarineServicePartnerworks<br />
at low cost and professionally according<br />
to factory specifications. It also<br />
guarantees that everything on your<br />
Volkswagen Marine boat engine is in<br />
proper working order. In addition, VW<br />
Marine Service Partners offer an extensive<br />
package of warranties and services.<br />
VW Marine Service Partners will be<br />
happy to provide details on the services<br />
and any processing in individual<br />
countries.<br />
Volkswagen Marine
CONTENTS<br />
MANUAL STRUCTURE<br />
What you should know<br />
before you read this manual ...... 3<br />
OPERATION<br />
General view of engines ......... 4<br />
Starting engine ................. 6<br />
Stopping engine ................. 7<br />
Instruments .................... 8<br />
Warning lamps ................. 13<br />
Switches ...................... 17<br />
Stop switch .................... 18<br />
Ignition/starter switch,<br />
driving lever ................... 19<br />
230 V alternator system ......... 20<br />
DO-IT-YOURSELF<br />
Safety precautions for working<br />
in engine compartment ......... 22<br />
Diesel ........................ 24<br />
Changes and parts replacement .. 25<br />
SELF-HELP<br />
Self-help ...................... 26<br />
Fuses ......................... 31<br />
Checking On/Off switch<br />
of 230 V system ............... 32<br />
INSPECTION SERVICE<br />
Service and care ............... 33<br />
Daily checks ................... 34<br />
End of season ................. 35<br />
Start of season ................ 36<br />
Service scope once yearly<br />
or every 200 operating hours .... 37<br />
Additional work every 5 years<br />
or every 1,000 operating hours ... 38<br />
Motor oil ...................... 39<br />
Checking motor oil level ......... 40<br />
Changing motor oil ............. 41<br />
Circulation filter ................ 44<br />
Fuel inlet filter ................. 47<br />
Seawater filter ................. 49<br />
Cleaning air filter insert .......... 50<br />
Cooling system ................ 52<br />
Seawater pump ................ 55<br />
Reactive anode ................ 57<br />
Reversing-gearbox oil level ...... 58<br />
Checking oil level of aux. steering<br />
hydraulics (only for Z drive) ...... 59<br />
Ribbed V-belt .................. 60<br />
Battery ........................ 61<br />
Engine test run ................ 66<br />
Preserving engine .............. 67<br />
Winter operation ............... 70<br />
Tropical operation .............. 72<br />
TECHNICAL DATA<br />
SDI 55-5 Diesel Engine .......... 73<br />
SDI 75-5 Diesel Engine ........... 74<br />
TDI 100-5 Diesel Engine ......... 75<br />
TDI 120-5 Diesel Engine ......... 76<br />
TDI 150-5 D Diesel Engine ....... 77<br />
TDI 150-5 Diesel Engine ......... 78<br />
Engine characteristic data ....... 79<br />
INDEX<br />
Index ......................... 80
OPERATION<br />
What you should know<br />
before you read this manual<br />
This manual<br />
contains important information on using<br />
your Volkswagen Marine engine. You<br />
should read this manual carefully before<br />
putting the engine into operation to quickly<br />
familiarise yourself with the engine and to<br />
know how it is correctly operated and<br />
treated.<br />
In addition to regular care and maintenance,<br />
the proper treatment of the Volkswagen<br />
Marine engine helps preserve its value and<br />
is in many cases also one of the conditions<br />
for warranty claims.<br />
Additional information on the warranty are<br />
contained in the service schedule.<br />
For safety reasons, please also be<br />
sure to observe the safety precautions<br />
on page 22 and the information<br />
on changes and parts replacement<br />
on page 25.<br />
Equipment scope<br />
The largest possible equipment scope available<br />
at the time of printing is described<br />
here. Some of the equipment may not be<br />
available until a later time.<br />
✱<br />
Equipment marked with a star are<br />
not part of the standard equipment<br />
of the marine engines.<br />
Environmental protection<br />
information<br />
❀<br />
Texts in italics marked with<br />
this symbol provide important<br />
information on environmental<br />
protection.<br />
Table of contents<br />
On the first pages you will find a table of<br />
contents that shows all topics described in<br />
this manual in the order of their occurrence.<br />
Index<br />
At the end of the manual an extensive,<br />
alphabetical index is provided.<br />
With search terms you can specifically find<br />
the desired information.<br />
Warnings<br />
Important<br />
Texts written in this bold print<br />
and on this shaded background<br />
indicate the possible danger of<br />
accidents and injuries.<br />
Texts in this bold print indicate<br />
either dangers that can lead to the<br />
marine engine being damaged or<br />
they contain particularly important<br />
information on the proper use of<br />
your engine.<br />
And finally, we have a request:<br />
When selling your boat or your Volkswagen<br />
marine boat engine, please give this manual<br />
to the new owner, as the literature is part of<br />
the Volkswagen Marine boat engine.<br />
MANUAL STRUCTURE 3<br />
3
OPERATION<br />
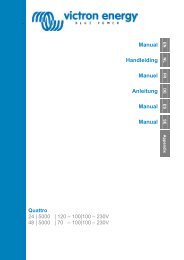
General view of engines<br />
BM5-002M<br />
Description of engines<br />
SDI 55-5 and SDI 75-5<br />
- Four-stroke diesel engine<br />
- 5-cylinder in-line<br />
- 2.5 litre displacement<br />
- Crankshaft mounted on 6 bearings<br />
- Valve control by toothed belt and overhead<br />
cam<br />
- Hydraulically adjusted bucket tappets<br />
- Engine lubrication as pressure circulation<br />
lubrication with geared oil pump and<br />
replaceable oil filter in main flow<br />
- Dry air filter<br />
The engine has two separate cooling<br />
circuits.<br />
1 - The open seawater circuit runs via the<br />
combination radiator, which cools the<br />
fuel flowing back and the hydraulic oil,<br />
the main heat exchanger and the<br />
exhaust manifold.<br />
2 - The coolant circuit runs as a closed<br />
pressurised system through the engine<br />
block, oil cooler, exhaust collector and,<br />
after reaching the operating temperature,<br />
via the main heat exchanger.<br />
Important<br />
Observe the safety precautions<br />
beginning on page 22 before<br />
performing any work on the<br />
engine or in the engine<br />
compartment.<br />
4<br />
4 OPERATION
OPERATION<br />
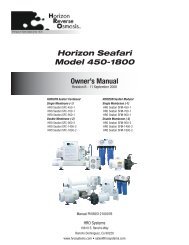
BM5-001M<br />
Description of engines<br />
TDI100-5,TDI120-5,<br />
TDI 150-5 D 1) and TDI 150-5<br />
- Four-stroke diesel engine<br />
- 5-cylinder in-line<br />
- Crankshaft mounted on 6 bearings<br />
- Valve control by toothed belt and overhead<br />
cam<br />
- Hydraulically adjusted bucket tappets<br />
- Engine lubrication as pressure circulation<br />
lubrication with geared oil pump and<br />
replaceable oil filter in main flow<br />
- 2.5 litre displacement<br />
- Dry air filter<br />
1) Version for dual engine systems as per BSO II<br />
The engine has two separate cooling<br />
circuits.<br />
1 - The open seawater circuit runs via the<br />
combination radiator, which cools the<br />
returning fuel and the hydraulic oil, the<br />
main heat exchanger, the exhaust manifold<br />
and the intercooler on the 150-5<br />
and 150-5 D version.<br />
2 - The coolant circuit runs as a closed<br />
pressurised system through the engine<br />
block, oil cooler, exhaust collector and,<br />
after reaching the operating temperature,<br />
via the main heat exchanger and<br />
the turbocharger.<br />
Important<br />
Observe the safety precautions<br />
beginning on page 22 before<br />
performing any work on the<br />
engine or in the engine<br />
compartment.<br />
OPERATION 5<br />
5
OPERATION<br />
Starting engine<br />
Important<br />
● There is a danger of poisoning<br />
when the engine is run in closed<br />
rooms!<br />
The engine exhaust gases<br />
contain carbon monoxide, which<br />
is colourless and odourless.<br />
Inhaling these gases can be<br />
damaging to your health.<br />
● Observe the safety precautions<br />
beginning on page 22<br />
before performing any work on<br />
the engine or in the engine<br />
compartment.<br />
● Never start the engine when<br />
the driving lever(s) has/have been<br />
removed.<br />
Accident danger!<br />
● When restarting the engine, restarting is<br />
not possible until the key has been turned<br />
back completely. The restarting lock<br />
prevents the starter from engaging with the<br />
engine running, as this can damage the<br />
starter.<br />
● Avoid high engine speeds and full throttle<br />
until the engine has reached its operating<br />
temperature.<br />
● After starting the cold engine increased<br />
running noises may occur for a brief period,<br />
as oil pressure must first build up in the<br />
hydraulic valve clearance compensation.<br />
This is normal, and therefore not a cause for<br />
concern.<br />
● When the driving lever is correctly<br />
installed, the engine cannot be started<br />
when the lever is not in the Neutral position.<br />
This is indicated accordingly in the display of<br />
your rev. counter.<br />
● Before starting the engine, check the<br />
motor oil, coolant and hydraulic oil levels,<br />
the fuel supply and the seawater filter, and<br />
make sure that the seawater valve for the<br />
seawater cooling circuit is open.<br />
● As soon as the engine starts, release the<br />
ignition key immediately, as the starter may<br />
not continue to run with the engine.<br />
6<br />
6 OPERATION
OPERATION<br />
Switching off engine<br />
Following longer periods at high<br />
engine loads, do not switch off the<br />
engine immediately, but instead<br />
allow it to run at idle for approx.<br />
2 minutes to prevent heat accumulation.<br />
Important<br />
Observe the safety precautions<br />
beginning on page 22 before<br />
performing any work on the<br />
engine or in the engine<br />
compartment.<br />
OPERATION 7<br />
7
OPERATION<br />
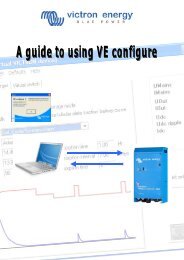
Instruments<br />
The illustration shows the instruments of<br />
the navigating stand panel.<br />
Item<br />
Page<br />
1 - Coolant temperature gauge ....... 8<br />
2 - Rev. counter .................... 9<br />
3 - Voltmeter ....................... 9<br />
4 - Multi-function indicator .......... 10<br />
5 - Engine oil pressure gauge ....... 12<br />
A- Warninglamp<br />
1 - Coolant temperature<br />
gauge<br />
The gauge operates with the ignition<br />
switched on.<br />
When the ignition is switched on, the warning<br />
lamp A lights up for a few seconds as an<br />
operating check.<br />
Note<br />
Avoid high engine speeds and do not subject<br />
the engine to heavy loads while the<br />
coolant temperature is still below 40 °C.<br />
The needle is to settle in the middle area of<br />
thescaleduringnormaldriving.<br />
At heavy engine loads and high outside temperatures,<br />
the needle may also move far<br />
into the upper range.<br />
8<br />
8 OPERATION
OPERATION<br />
This is not a cause for concern as<br />
long as the warning lamp A does not<br />
light up and the acoustic signal does<br />
not sound.<br />
A-Warninglamp<br />
If the lamp lights up during driving, first<br />
check the coolant temperature gauge.<br />
If the gauge is in the normal range, coolant<br />
must be added as soon as possible.<br />
If the needle is above 110 °C, the coolant<br />
temperature is too high. Stop the engine<br />
and determine the cause of the fault - see<br />
page 14.<br />
Important<br />
Observe the safety precautions<br />
beginning on page 22 before<br />
performing any work on the<br />
engine or in the engine<br />
compartment.<br />
The illustration shows the rev. counter of<br />
the flying bridge panel.<br />
2 - Rev. counter<br />
Neverrunthecoldengineathighspeedseither<br />
at idle or during driving.<br />
If the needle ofthe rev. counter goes<br />
above 4,000 rpm, you should cut<br />
back on the throttle to prevent<br />
engine damage.<br />
3- Voltmeter<br />
The voltmeter indicates the voltage in the<br />
on-board electrical system. Normal value:<br />
between 12 and 16 volts. If the gauge drops<br />
below 12 volts with the engine running,<br />
have the power supply (battery and alternator)<br />
chacked by a VW-Marine Service<br />
Partner.<br />
During starting the voltage gauge may drop<br />
below 8 volts.<br />
OPERATION 9<br />
9
OPERATION<br />
4 - Multi-function indicator<br />
The multi-function indicator (MFI) provides<br />
a great deal of information:<br />
● <strong>Operating</strong> hours<br />
● Distance travelled<br />
● Fuel consumption<br />
● Fuel consumption<br />
● Range<br />
● Speed<br />
● Gearbox in Neutral position<br />
Units of measure of indicator<br />
The MFI can display different units of<br />
measure:<br />
Distance travelled:<br />
- Kilometres (km) 1)<br />
- Nautical miles (nm) 1)<br />
- Miles (m) 1)<br />
Fuel quantity:<br />
- Litres (l)<br />
- Gallons (g)<br />
1) When connected to navigation devices as<br />
per NMEA.<br />
A<br />
BM5-010M<br />
Fuel consumption:<br />
- Litres per hour (l/h)<br />
- Litres per kilometre (l/km) 1)<br />
- Litres per nautical mile (l/nm) 1)<br />
- Litres per mile (l/m) 1)<br />
- Gallons per hour (g/h)<br />
- Gallons per kilometre (g/km) 1)<br />
- Gallons per nautical mile (g/nm) 1)<br />
- Gallons per mile (l/m) 1)<br />
Range:<br />
- Kilometres per litre (km/l) 1)<br />
- Nautical miles per litre (nm/l) 1)<br />
- Miles per litre (m/l) 1)<br />
- Kilometres per gallon (km/g) 1)<br />
- Nautical miles per gallon (nm/g) 1)<br />
- Miles per gallon (m/g) 1)<br />
Speed:<br />
- Knots (kn) 1)<br />
- Kilometres per hour (km/h) 1)<br />
- Miles per hour (m/h) 1)<br />
This results in a large number of possibilities.<br />
For the sake of simplicity, we will only<br />
write the following descriptions in nautical<br />
miles for distances, litres for consumption<br />
and knots for speed.<br />
10<br />
10 OPERATION
OPERATION<br />
The memory<br />
The system is equipped with an automatic<br />
memory.<br />
The memory collects the driving data of any<br />
desired number of individual trips up to a<br />
total of 9,999.9 operating hours, a distance<br />
of 9,999 nm and 9,999 litres of consumed<br />
fuel. The driving data are used to calculate<br />
the average consumption and speed values<br />
achieved during all individual trips.<br />
If one of the values named is exceeded, the<br />
memory is cleared and the calculation begins<br />
again.<br />
To display the data, the memory is<br />
selected with the switch A in the instrument<br />
panel:<br />
The following data can be called from the<br />
memory:<br />
● <strong>Operating</strong> hours<br />
● Trip recorder<br />
● Distance travelled 1)<br />
● Fuel consumption<br />
● Fuel consumption<br />
● Range 1)<br />
● Speed 1)<br />
Clearing the memory<br />
The memory can be cleared with the ignition<br />
switched on by pressing the switch A<br />
for longer than five seconds.<br />
If the battery of the on-board electrical<br />
system is disconnected, the memory is<br />
cleared.<br />
The displays<br />
<strong>Operating</strong> hours<br />
The memory shows the total engine operating<br />
hours that cannot be cleared.<br />
The maximum display value is 9,999.9 operating<br />
hours. If this value is exceeded, the<br />
display starts again at zero.<br />
Trip recorder<br />
The memory shows the daily operating<br />
hours of the engine since the memory was<br />
last cleared.<br />
Distance travelled<br />
Here the description for ”<strong>Operating</strong> hours”<br />
also applies to the ”Distance travelled”. The<br />
maximum distance displayed is, for<br />
example, 9,999 nm.<br />
Fuel consumption<br />
Here the description for ”<strong>Operating</strong> hours”<br />
also applies to the ”Fuel consumption”<br />
since the memory was last cleared.<br />
1) When connected to navigation devices as<br />
per NMEA.<br />
OPERATION 11<br />
11
OPERATION<br />
Current fuel consumption<br />
The current consumption is indicated, e.g.<br />
in l/h.<br />
With this display you can adjust your driving<br />
to obtain the desired consumption.<br />
Average fuel consumption<br />
The average consumption is indicated, e.g.<br />
in l/h.<br />
Current speed<br />
The current speed is displayed.<br />
Average speed<br />
Here the description of ”Average fuel consumption”<br />
applies.<br />
5 - Engine oil pressure<br />
gauge<br />
The engine oil pressure gauge only functions<br />
with the engine running and indicates<br />
the existing engine oil pressure.<br />
During driving the engine oil pressure is<br />
between approx. 1 and 5 bar.<br />
At an engine oil pressure below 1 bar the<br />
engine oil-pressure warning lamp can light<br />
up and an acoustic signal can sound.<br />
If the engine oil-pressure warning lamp<br />
lights up (see page 16) and the acoustic<br />
signal sounds:<br />
Switch off engine. Check the oil level -<br />
see page 40.<br />
The engine oil pressure gauge is not<br />
an engine oil level indicator! Therefore,<br />
check the engine oil level at<br />
regular intervals, preferably before<br />
each trip.<br />
Important<br />
Observe the safety precautions<br />
beginning on page 22 before<br />
performing any work on the<br />
engine or in the engine<br />
compartment.<br />
12<br />
12 OPERATION
OPERATION<br />
Warning lamps<br />
1 2<br />
3<br />
5 4 A<br />
BM5-015M<br />
Illustration shows the main panel<br />
3<br />
5 A<br />
1<br />
4<br />
Item<br />
Page<br />
1 - Coolant temperature/<br />
coolant level ................... 14<br />
2 - Display for multi-function<br />
indicator ....................... 15<br />
3 - Alternator ...................... 15<br />
4 - Glow plug system and engine<br />
fault .......................... 16<br />
5 - Engine-oil pressure ............. 16<br />
A- Switch<br />
2<br />
BM5-016M<br />
Illustration shows the flying bridge panel<br />
OPERATION 13<br />
13
OPERATION<br />
1 - Coolant temperature<br />
The warning lamp lights up when the<br />
coolant temperature is too high.<br />
As a additional warning, an acoustic signal<br />
sounds at the same time, which can be<br />
switched off with the switch A.<br />
Should the fault not be eliminated, the<br />
acoustic signal sounds again after a short<br />
time.<br />
In this case, switch off the engine<br />
immediately and check whether ...<br />
- the seawater filter is clogged.<br />
- the sea valve is open.<br />
- sufficient coolant is present. Check the<br />
cooling system for leaks.<br />
- The ribbed V-belt of the seawater pump<br />
is OK.<br />
- The impeller of the seawater pump is OK<br />
- see page 55.<br />
Important<br />
● Exercise caution when<br />
opening the coolant cap! When<br />
the engine is hot, the cooling<br />
system is pressurised - danger of<br />
scalding! Therefore, allow the<br />
engine to cool before unscrewing<br />
the cap.<br />
● When working in the engine<br />
compartment, particular caution<br />
should be exercised!<br />
● Observe the safety precautions<br />
beginning on page 22<br />
before performing any work on<br />
the engine or in the engine<br />
compartment.<br />
If the fault cannot be eliminated, please contact<br />
the nearest VW Marine Service Partner.<br />
14<br />
14 OPERATION
OPERATION<br />
2 - Multi-function indicator<br />
The following faults may be indicated in the<br />
left-hand area of the MFI:<br />
Coolant level<br />
If a fault occurs in the closed cooling system<br />
while driving, this is indicated by a flashing<br />
symbol in the left-hand area of the multifunction<br />
indicator.<br />
In this case, switch off the engine<br />
immediately and check whether ...<br />
- sufficient coolant is present.<br />
- the coolant system is leaky.<br />
Important<br />
● Exercise caution when<br />
opening the coolant cap! When<br />
the engine is hot, the cooling<br />
system is pressurised - danger of<br />
scalding! Therefore, allow the<br />
engine to cool before unscrewing<br />
the cap.<br />
● When working in the engine<br />
compartment, particular caution<br />
should be exercised!<br />
● Observe the safety precautions<br />
beginning on page 22<br />
before performing any work on<br />
the engine or in the engine<br />
compartment.<br />
If the fault cannot be eliminated, consult the<br />
nearest VW Marine Service Partner.<br />
Water separator<br />
This symbol appears when water has<br />
collected in the fuel filter on the engine.<br />
In this case, switch off the engine and drain<br />
the water from the fuel filter - see page 47.<br />
Important<br />
Observe the safety precautions<br />
beginning on page 22 before<br />
performing any work on the<br />
engine or in the engine<br />
compartment.<br />
3- Alternator<br />
The warning lamp lights up when the ignition<br />
is switched on. It must go out after the<br />
engine starts.<br />
If the alternator warning lamp lights<br />
up during operation:<br />
- Switch off the engine immediately and<br />
check the ribbed V-belt.<br />
If the ribbed V-belt is OK, the fault is probably<br />
in the alternator or the regulating<br />
switch. If the damage cannot be repaired,<br />
please contact the nearest VW Marine<br />
Service Partner.<br />
Note<br />
The engine must not:<br />
- be operated with the battery disconnected,<br />
as otherwise the alternator<br />
will be damaged.<br />
- operated without the alternator<br />
ribbed V-belt, as otherwise the<br />
front vibration damper will be<br />
damaged.<br />
OPERATION 15<br />
15
OPERATION<br />
4 - Glow plug system and<br />
engine fault<br />
Glow plug system<br />
When the engine is cold, the warning lamp<br />
lights up when the driving position is activated<br />
(ignition on).<br />
Should the warning lamp fail to light up, a<br />
fault is present in the glow plug system -<br />
please obtain professional help.<br />
Start the engine immediately after the lamp<br />
goes out - see page 6.<br />
The engine can also be started immediately<br />
without preheating, however then a<br />
slightly poorer starting behaviour must be<br />
expected.<br />
When the engine is at operating temperature,<br />
the preheating warning lamp<br />
does not light up - the engine can be started<br />
immediately.<br />
Engine fault<br />
If a fault occurs in the engine control<br />
system during driving, this is indicated by<br />
the warning lamp flashing - the engine<br />
should be checked immediately by a VW-<br />
Marine Service Partner.<br />
5 - Engine oil pressure<br />
The warning lamp lights up when the ignition<br />
is switched on. The lamp must go out<br />
after the engine starts.<br />
If the engine oil-pressure warning<br />
lamp lights up or flickers during<br />
operation:<br />
1 - Switch off the engine immediately, as<br />
the engine lubrication may be interrupted.<br />
2 - Then check the engine oil level (see<br />
page 40).<br />
If the oil level is OK, please contact the<br />
nearest VW Marine Service Partner.<br />
As a additional warning, an acoustic signal<br />
sounds at the same time, which can be<br />
switched off with the switch A.<br />
Should the fault not be eliminated, the<br />
acoustic signal sounds again after a short<br />
time.<br />
On the other hand, occasional flickering of<br />
the warning lamp at idle when the engine is<br />
warm is meaningless if the lamp goes out<br />
again when the engine speed is increased.<br />
The oil-pressure warning lamp is not<br />
an oil level display! Therefore, the<br />
oil level should be checked at<br />
regular intervals, preferably before<br />
each trip.<br />
16<br />
16 OPERATION
OPERATION<br />
Switches<br />
1 2 3<br />
2<br />
1<br />
3<br />
5<br />
4<br />
BM5-004M<br />
The illustration shows the switches of the<br />
navigating stand panel.<br />
Item<br />
Page<br />
1 - Instrument lighting / dimmer ..... 18<br />
2 - Acknowledgement button for<br />
acoustic signal ................. 18<br />
3 - Buttons for multi-function<br />
indicator ....................... 18<br />
BM5-017M<br />
The illustration shows the switches of the<br />
flying bridge panel.<br />
Item<br />
Page<br />
1 - Instrument lighting / dimmer ..... 18<br />
2 - Acknowledgement button<br />
for acoustic signal .............. 18<br />
3 - Button for multi-function<br />
indicator ....................... 18<br />
4 - Stop engine .................... 18<br />
5 - Start engine .................... 18<br />
OPERATION 17<br />
17
OPERATION<br />
Stop switch<br />
1 - Instrument lighting<br />
The brightness of the instrument lighting<br />
can be adjusted by pressing the button.<br />
2 - Acknowledgement button<br />
for acoustic signal<br />
The acoustic signal of a fault message can<br />
be acknowledged with this button.<br />
BM5-018M<br />
3- ButtonforMFI<br />
The MFI is operated with this button. Each<br />
time the button is pressed, the display in the<br />
MFI is advanced.<br />
4 - Stop engine<br />
To stop the engine from the flying bridge,<br />
press the Stop button.<br />
Stop switch<br />
You can stop the engine in case of danger<br />
with the Stop switch on the fuse box/relay<br />
plate.<br />
After the Stop switch is actuated it must be<br />
released again, as otherwise the engine<br />
cannot be started.<br />
To release the Stop switch, turn it in the<br />
direction of the arrow shown on the switch.<br />
5 - Start engine<br />
When the ignition key is inserted and the<br />
ignition is switched on in the navigation<br />
stand panel, you can start the engine by<br />
pressing the Start button.<br />
Important<br />
Always remove the ignition key if<br />
you leave the boat - even for a<br />
short time. This is particularly<br />
important when children remain<br />
on the boat. Otherwise they<br />
could start the engine or operate<br />
the electrical equipment.<br />
Accident danger!<br />
18<br />
18 OPERATION
OPERATION<br />
Ignition switch<br />
Driving lever<br />
1<br />
2<br />
3<br />
1<br />
2<br />
3<br />
4<br />
5<br />
BM5-019M<br />
1 - Fuel supply interrupted,<br />
engine off<br />
2 - Preheating and driving position<br />
As long as the engine is being preheated, no<br />
major consumers should be switched on -<br />
otherwise this will place an unnecessary<br />
load on the battery of the on-board electrical<br />
system.<br />
3 - Starting engine<br />
Important<br />
Always remove the ignition key if<br />
you leave the boat - even for a<br />
short time. This is particularly<br />
important when children remain<br />
on the boat. Otherwise they<br />
could start the engine or operate<br />
the electrical equipment.<br />
Accident danger!<br />
BM5-030M<br />
The illustration shows the pattern of the<br />
driving lever.<br />
1- Forwarddriving<br />
2 - Shifting during forward driving<br />
3- Neutral<br />
4 - Shifting during reverse driving<br />
5- Reversedriving<br />
Always make sure that the driving lever is in<br />
the Neutral position 3 before starting the<br />
engine.<br />
OPERATION 19<br />
19
OPERATION<br />
230 V alternator system*<br />
BM5-039M<br />
The 230 V alternator system* consists of a<br />
special alternator* and related electronics*<br />
- see illustration.<br />
The 230 V alternator* is permanently connected<br />
to the Volkswagen Marine boat<br />
engine and provides a continuous supply of<br />
230 V alternating current with an output of<br />
up to 16 A while the engine is running.<br />
Important<br />
● Never conduct fault finding<br />
with the engine running - danger<br />
to life and limb!<br />
● The voltage present in the<br />
power system is 230 V with the<br />
engine running. Therefore, never<br />
touch live parts - danger to life<br />
and limb!<br />
● We urgently recommend<br />
having all work and repairs<br />
conducted on the 230 V<br />
alternator system carried out by<br />
a VW Marine Service Partner or<br />
an electrician.<br />
BM5-040M<br />
● If work on or repairs to the<br />
electrical system are not carried<br />
out properly or professionally,<br />
other areas in the on-board<br />
electrical system may also be<br />
damaged - accident and fire<br />
danger!<br />
● Observe the safety precautions<br />
beginning on page 22<br />
before performing any work on<br />
the engine or in the engine<br />
compartment.<br />
Please see the power graph in the illustration<br />
for the respectively available power dependent<br />
on the engine speed.<br />
20<br />
20 OPERATION
OPERATION<br />
1<br />
2<br />
BM5-041M<br />
Starting up the 230 V<br />
alternator system*<br />
The 230 V alternator system* is switched<br />
on by pressing the green button* with the<br />
engine running.<br />
To be switched on the alternator requires a<br />
speed of 2,700 rpm, which corresponds to<br />
an engine speed of 850 rpm.<br />
The maximum current draw of 16 A 1)<br />
(equivalent to 3.5 kVA) is possible at an engine<br />
speed of 1,700 rpm. At engine idling<br />
speed approx. 4 A 1) (equivalent to 0.9 kVA)<br />
is available.<br />
The green indicator lamp 1 in the switch*<br />
lights up when the system is ready for<br />
operation.<br />
1) Amperes<br />
During operation<br />
After the 230 V alternator system* is<br />
switched on you can connect your 230 V<br />
devices.<br />
Should the power draw be too high for the<br />
current engine speed, then the red indicator<br />
lamp in the On/Off switch* lights up and the<br />
system is switched off.<br />
In this operating state you can now either<br />
increase the engine speed to remove more<br />
power, or you must switch off a few consumers<br />
to limit the power draw. Then the<br />
230 V alternator system must be restarted.<br />
Should no power be available during operation<br />
and the red indicator lamp 2 in the On/<br />
Off switch* lights up, then there is a fault in<br />
the 230 V power system or in the 230 V<br />
alternator system*.<br />
In this case, see the chapter Self-Help from<br />
page 30.<br />
OPERATION 21<br />
21
DO-IT-YOURSELF<br />
Safety precautions for working in engine compartment<br />
When performing any work on the<br />
engine or in the engine compartment,<br />
e. g. checking and topping up<br />
the operating fluids, there may be a<br />
danger of scalding, injuries, accidents<br />
and fire.<br />
Important<br />
Exercise particular caution<br />
during all work on the engine or<br />
in the engine compartment.<br />
Protect yourself with suitable<br />
work clothing, e.g. gloves, eye<br />
protection etc.<br />
● Never open the engine<br />
compartment cover or perform<br />
work on the engine when you<br />
notice that water vapour or<br />
coolant is escaping - danger of<br />
scalding!<br />
Wait until water vapour or<br />
coolant no longer escapes and<br />
the engine has cooled down.<br />
● Stop the engine, remove the<br />
ignition key and press the Stop<br />
button.<br />
● Move the driving lever into the<br />
Neutral position.<br />
● Allow the engine to cool.<br />
● Keep children away from the<br />
engine compartment.<br />
● Do not open the cap of the<br />
coolant reservoir while the<br />
engine is still at operating<br />
temperature, as the cooling<br />
system is pressurised.<br />
● Never pour liquids over the hot<br />
engine. The liquids could ignite.<br />
If work on the 230 V alternator<br />
system or on the electrical<br />
system is required:<br />
- Never conduct fault finding<br />
with the engine running -<br />
danger to life and limb!<br />
- The voltage present in the<br />
power system is 230 V with the<br />
engine running. Therefore,<br />
never touch live parts - danger<br />
to life and limb!<br />
- We urgently recommend<br />
having all work and repairs<br />
conducted on the 230 V<br />
alternator system carried out<br />
by a VW Marine Service<br />
Partner or an electrician.<br />
- If work on or repairs to the<br />
electrical system are not<br />
carried out properly or<br />
professionally, other areas in<br />
the on-board electrical system<br />
may also be damaged -<br />
accident and fire danger!<br />
● Avoid short circuits in the<br />
electrical system, and in<br />
particular at the battery.<br />
● If maintenance, testing,<br />
repairs or adjustments must be<br />
carried out with the engine<br />
running, there is an additional<br />
danger from rotating parts, e.g.<br />
ribbedV-belt, alternator and the<br />
230 V power system - danger to<br />
life and limb!<br />
Please also observe the warnings<br />
on the following page.<br />
22<br />
22 OPERATING INSTRUCTIONS
DO-IT-YOURSELF<br />
● If work on the fuel system or<br />
the electrical system is required:<br />
- Always disconnect the battery<br />
from the engine.<br />
- Do not smoke.<br />
- Never work near an open<br />
flame.<br />
- Always keep a fire<br />
extinguisher at hand.<br />
Avoid contact with operating<br />
materials. Should operating<br />
materials get into the eyes, flush<br />
the eyes immediately with clean<br />
water and see a doctor at once.<br />
Take along the original container<br />
to the doctor in these cases. You<br />
should be particularly aware of<br />
the following when you want to<br />
carry out work on open water:<br />
- Swells may put you off<br />
balance.<br />
- The danger of spilling operating<br />
materials is increased by<br />
swells.<br />
- If you require a doctor in an<br />
emergency, there will be a<br />
delay.<br />
The warnings in this manual and<br />
the generally applicable safety<br />
rules must be observed.<br />
When topping up fluids, make sure<br />
that they are not confused, as otherwise<br />
serious malfunctions and<br />
engine damage will result.<br />
To ensure that leaks are<br />
❀ detected in due time, the bilge<br />
under the engine should be kept<br />
clean and should be checked<br />
regularly. If soiling by oil or other<br />
operating fluids can be seen there,<br />
the engine should be checked by a<br />
VW Marine Service Partner.<br />
Important note<br />
Of course, coolant additives and<br />
motor oil are constantly being<br />
further developed. Therefore, the<br />
information can only reflect the<br />
status at the time of printing. The<br />
VW Marine Service Partner will be<br />
always be kept up to date on any<br />
changes by the factory. Therefore, it<br />
is best to have operating materials<br />
changed by a VW Marine Service<br />
Partner.<br />
OPERATING INSTRUCTIONS 23<br />
23
DO-IT-YOURSELF<br />
Diesel<br />
The diesel fuel must coply with the standard<br />
DIN EN 1) 590 .<br />
CN 2) not lower than 49.<br />
RME-fuel (biodiesel)<br />
in accordance with DIN 51 606.<br />
Volkswagen Marine boat engines can also<br />
be operated with RME fuel (rape-oil fatty<br />
acids methylester).<br />
Important<br />
It must be ensured that the fuel<br />
tank and the fuel hoses to the<br />
engine are also suitable for RME<br />
fuel.<br />
Special features of RME<br />
● RME is produced from vegetable oil<br />
(primarily rape oil) in a chemical process,<br />
whereby the vegetable oil is converted to<br />
RME with methanol by means of a catalyst.<br />
● RME is virtually sulphur-free. Therefore,<br />
virtually no sulphuric oxide (SO 2 ) is released<br />
when RME is burned.<br />
● The exhaust gas contains less<br />
- carbon monoxide,<br />
- hydrocarbons and<br />
- particles (e.g. soot)<br />
than in operation with ordinary diesel fuel.<br />
All exhaust values are lower than the legal<br />
regulations require.<br />
1) Euro-Standard<br />
2) C-tane-Number. Measure of the ignitability of<br />
diesel fuel.<br />
● The RME fuel is highly biodegradeable.<br />
● Driving performance may be slightly<br />
lower.<br />
● Fuel consumption may be slightly higher.<br />
● RME is suitable for use in winter down to<br />
approx. -10 o C.<br />
● At outside temperatures below approx.<br />
-10 o C diesel fuel must be added to prevent<br />
the RME fuel from flocculating. The mixing<br />
ratio of diesel to RME fuel should be approx.<br />
50 : 50.<br />
If the RME percentage is higher than<br />
50 %, more smoke may be produced.<br />
● RME can be mixed with diesel fuel in any<br />
desired ratio during the warm season..<br />
Winter operation<br />
When using summer diesel, malfunctions<br />
may occur at outside temperatures below<br />
0 o C, as the fuel also becomes too thick due<br />
to paraffin precipitation.<br />
Therefore, ”winter” diesel fuel is available<br />
in Germany at roadside petrol stations during<br />
the cold season which - depending on<br />
the fuel brand - is also safe for operation at<br />
approximately -15 o Cto-22 o C.<br />
In countries with other climatic conditions,<br />
diesel fuels with a different temperature<br />
behaviour are offered.<br />
24<br />
24 OPERATING INSTRUCTIONS
DO-IT-YOURSELF<br />
Changes and parts replacement<br />
The state of the Volkswagen Marine boat<br />
engines when shipped from the factory<br />
may not be changed without careful consideration.<br />
Therefore, if technical changes<br />
are made to the engine, or if parts must be<br />
renewed later, the following instructions<br />
must be observed:<br />
● Before purchasing parts and before<br />
making technical changes, a consultation by<br />
a VW Marine Service Partner should always<br />
take place, as the VW Marine Service<br />
Partner is particularly competent in this area<br />
due to ist close co-operation with us.<br />
Important<br />
● In your own interest we<br />
recommend using only original<br />
Volkswagen Marine parts for<br />
your Volkswagen Marine boat<br />
engine. The reliability, safety and<br />
suitability of these parts<br />
especially for the boat engine is<br />
ensured.<br />
● Other produces can have a<br />
negative influence on the service<br />
life of your Volkswagen Marine<br />
boat engine.<br />
● Despite ongoing observation<br />
of the market, we cannot<br />
evaluate or provide any form of<br />
guarantee for other products,<br />
even if in isolated cases an<br />
approval by an officially<br />
recognised technical testing and<br />
monitoring association or a<br />
government approval has been<br />
granted.<br />
● Original Volkswagen Marine parts are<br />
available from a VW Marine Service Partner.<br />
Of course, proper fitting is also carried out<br />
there.<br />
● Should technical changes be made, our<br />
guideslines must be observed. This<br />
ensures that no damage to the engine<br />
occur, the operating safety is maintained<br />
and the changes are permissible. A VW<br />
Marine Service Partner will also carry out<br />
this work properly or refer you to a specialised<br />
workshop in special cases.<br />
OPERATING INSTRUCTIONS 25<br />
25
DO-IT-YOURSELF<br />
Self-help<br />
The broad network of VW Marine Service<br />
Partners with trained professionals, modern<br />
equipment and all required special tools is<br />
available to your for the care and service of<br />
your Volkswagen Marine boat engine.<br />
Here you will receive professional advice<br />
andfindfast,effectivehelp.<br />
If, for example, the engine should fail to start<br />
or idling faults occur, faults and their<br />
remedies are described in detail in the<br />
following chapter. Should the individual<br />
remedies not solve the problem, your VW<br />
Marine Service Partner will be happy to<br />
provide additional assistance.<br />
If repairs must be made, the engine<br />
should be brought to a VW Marine<br />
Service Partner. It is in good hands<br />
there.<br />
Important<br />
● Observe the safety precautions<br />
beginning on page 22<br />
before performing any work on<br />
the engine or in the engine<br />
compartment.<br />
● Work and repairs on the 230 V<br />
on-board electrical system may<br />
only be carried out by experts.<br />
26<br />
26 SELF-HELP
DO-IT-YOURSELF<br />
Fault<br />
Engine does not start<br />
Starter does not turn<br />
Cause<br />
Driving lever is not in neutral position<br />
Neutral switch in driving lever does<br />
not output signal (only with Z drive)<br />
Neutral switch in gearbox does not<br />
output signal (only with ZF reversing<br />
gearbox)<br />
STOP button pressed<br />
Ignition switched off<br />
Battery discharged or defective<br />
Connections on starter loose<br />
or corroded<br />
Connections on earthing relay loose<br />
or corroded<br />
Connections on ignition/starter<br />
switch loose or corroded<br />
“Fuel pump” LED lights up<br />
Fuse defective<br />
“Glow plug system” LED lights up<br />
Fuse defective<br />
“MDC” LED lights up<br />
Fuse defective<br />
Remedy<br />
Move driving lever into Neutral position<br />
Check operation of neutral switch<br />
Check operation of neutral switch<br />
Release Stop button<br />
Switch on ignition<br />
Check battery and charge;<br />
renew if necessary<br />
Check connections and clean<br />
or renew if necessary<br />
Check connections and clean<br />
or renew if necessary<br />
Check connections and clean<br />
or renew if necessary<br />
Renew fuse<br />
Renew fuse<br />
Renew fuse<br />
Should the individual remedies not solve the problem, your VW Marine Service Partner will<br />
be happy to provide additional assistance.<br />
Important<br />
Observe the safety precautions<br />
beginning on page 22 before<br />
performing any work on the<br />
engine or in the engine<br />
compartment.<br />
SELF-HELP 27<br />
27
DO-IT-YOURSELF<br />
Fault<br />
No or insufficient fuel supply<br />
Cause<br />
Fuel cock closed<br />
No fuel in tank<br />
Tank dirty<br />
Fuel lines clogged<br />
Water level in circulation filter too<br />
high<br />
Circulation filter clogged<br />
Water level in fuel filter too high<br />
Fuel supply filter clogged<br />
Electric fuel pump does not run<br />
“Fuel pump” LED lights up<br />
Engine shakes<br />
See section on fuel supply<br />
Engine dies<br />
See section on fuel supply<br />
Remedy<br />
Open fuel cock<br />
Fill tank<br />
Clean<br />
Check lines and clean if necessary<br />
Drain water from circulation filter<br />
Clean circulation filter<br />
and renew if necessary<br />
Drain water from fuel supply filter<br />
Renew fuel supply filter<br />
Check connections and clean<br />
or renew if necessary<br />
or<br />
Check electric fuel pump<br />
and renew if necessary<br />
Check fuse and renew if necessary<br />
Should the individual remedies not solve the problem, your VW Marine Service Partner will<br />
be happy to provide additional assistance.<br />
Important<br />
Observe the safety precautions<br />
beginning on page 22 before<br />
performing any work on the<br />
engine or in the engine<br />
compartment.<br />
28<br />
28 SELF-HELP
DO-IT-YOURSELF<br />
Fault<br />
Engine becomes too hot<br />
Cause<br />
Seawater valve closed<br />
Seawater filter is clogged<br />
Seawater pump aspirates air<br />
Combination radiator (gear oil/power<br />
steering fluid and fuel) clogged<br />
Ribbed V-belt for seawater pump<br />
loose or defective<br />
Impeller of seawater pump defective<br />
Insufficient coolant in cooling system<br />
- engine circuit<br />
Coolant pump for engine circuit<br />
defective<br />
Remedy<br />
Open seawater valve<br />
Close seawater valve and clean seawater<br />
filter.<br />
Check cover of seawater filter for proper seating<br />
and leaks and check suction hose<br />
Check combination radiator and clean<br />
if necessary<br />
Renew ribbed V-belt and tensioning element<br />
if necessary<br />
Renew impeller<br />
Add coolant (pure water in an emergency).<br />
Check cooling system for leaks and seal off if<br />
necessary.<br />
Thisfaultshouldalwaysbecheckedand<br />
eliminated by a VW Marine Service Partner,<br />
as special tools are required.<br />
Should the individual remedies not solve the problem, your VW Marine Service Partner will<br />
be happy to provide additional assistance.<br />
Important<br />
Observe the safety precautions<br />
beginning on page 22 before<br />
performing any work on the<br />
engine or in the engine<br />
compartment.<br />
SELF-HELP 29<br />
29
DO-IT-YOURSELF<br />
Fault<br />
No 230 V power supply with green warning indicator<br />
Cause<br />
FI switch* has popped out<br />
Fuse* defective or popped out<br />
Disconnecting switch* between land<br />
connection and alternator not in<br />
correct position<br />
Remedy<br />
Check and eliminate the cause and switch on<br />
the FI switch* again.<br />
Check and eliminate the cause and renew<br />
the fuse* or switch on the fuse* again.<br />
Set the disconnecting switch* to the correct<br />
position.<br />
No 230 V power supply with red warning indicator<br />
On/Off switch* defective<br />
Actuate the On/Off switch to reset the 230 V<br />
alternator system*.<br />
If the red warning indicator* continues to<br />
light up afterward, please check the On/Off<br />
switch* - see page 32.<br />
230 V alternator* defective This fault should always be checked and<br />
eliminated by a VW Marine Service Partner.<br />
230 V electronics* defective This fault should always be checked and<br />
eliminated by a VW Marine Service Partner.<br />
Should the individual remedies not solve the problem, your VW Marine Service Partner will<br />
be happy to provide additional assistance.<br />
Important<br />
● Observe the safety precautions<br />
beginning on page 22<br />
before performing any work on<br />
the engine or in the engine<br />
compartment.<br />
● Never carry out fault finding<br />
with the engine running, as it is<br />
a 230 V system that may only be<br />
checked by an electrician -<br />
danger to life and limb!<br />
30<br />
30 SELF-HELP
DO-IT-YOURSELF<br />
Fuses<br />
1<br />
2 3<br />
3<br />
BM5-020M<br />
The individual circuits are protected with<br />
fusible links.<br />
It is advisable to always carry a few replacement<br />
fuses available from VW Marine<br />
Service Partners.<br />
Important<br />
Never ”repair” fuses or replace<br />
with fuses of a higher amperage,<br />
as this may result in damage at<br />
another point in the electrical<br />
system. It may even cause a fire.<br />
Note<br />
If a recently fitted fuse blows again after a<br />
short time, the electrical system must be<br />
checked as soon as possible by a VW<br />
Marine Service Partner.<br />
Replacing fuse<br />
The failure of a fuse is indicated by the<br />
respective LED on the fuse box/relay plate<br />
lighting up.<br />
1 - Fuel pump<br />
2 - Permanent positive (Terminal 30)<br />
3 - Glow plug system<br />
1<br />
2<br />
BM5-009M<br />
The fuses are located in the fuse box/relay<br />
plate behind the cover.<br />
● Switch off the ignition and the affected<br />
consumer.<br />
● Press down the Stop switch on the fuse<br />
box/relay plate.<br />
● Unscrew the screws and remove the<br />
cover from the fuse box/relay plate.<br />
● Determine which fuse belongs to the<br />
failed consumer using the fuse table.<br />
Fuse assignment<br />
No. Consumer A 1)<br />
1- Fuelpump ..................... 15<br />
2- Permanentpositive<br />
(Terminal 30) ................... 15<br />
3 - Glow plug system .............. 50<br />
Colour marking of fuses:<br />
blue: ...................... 15 amperes<br />
● Pull out corresponding fuse.<br />
● Renew blown fuse (recognisable from<br />
melted metal strip) with a new fuse of the<br />
same amperage.<br />
● Secure the cover of the fuse box/relay<br />
plate again with the screws.<br />
● Release the Stop switch.<br />
1) Amperes<br />
SELF-HELP 31<br />
31
DO-IT-YOURSELF<br />
Check the On/Off switch of the 230 V system*<br />
1<br />
Important<br />
BM5-038M<br />
● Never conduct fault finding<br />
with the engine running, as with<br />
the engine running a voltage of<br />
230 V is present in the live parts<br />
- danger to life and limb!<br />
● Observe the safety precautions<br />
beginning on page 22<br />
before performing any work on<br />
the engine or in the engine<br />
compartment.<br />
● Pull the On/Off switch* out of its bracket.<br />
● Disconnect the connector.<br />
● Use the acoustic or optical continuity<br />
tester to check the continuity between<br />
contacts 2 and 3.<br />
● Press the green button* 1 of the switch.<br />
If the switch* functions properly, an acoustic<br />
or optical signal must now be output.<br />
If no signal is output, the switch* is defective.<br />
Renew the switch*.<br />
The On/Off switch is installed in the reverse<br />
order.<br />
To test the On/Off switch* you require an<br />
acoustic or optical continuity tester.<br />
● Switch off the engine and press the Stop<br />
switch.<br />
32<br />
32 SELF-HELP
INSPECTION<br />
Service and care<br />
The broad network of VW Marine Service<br />
Partnern with trained professionals,<br />
modern equipment and all required special<br />
tools is available to your for the care and<br />
service of your Volkswagen Marine boat<br />
engine.<br />
If an inspection service is required, all<br />
checking and adjustment to be carried out in<br />
this context are described in detail in the<br />
following chapter.<br />
Some of the work must be carried out<br />
before each start.<br />
Other work are not required until the end<br />
of a year, at the end of the season or after<br />
200 operating hours.<br />
The work described here are used to maintain<br />
your Volkswagen Marine boat engine.<br />
The specified service intervals are matched<br />
to normal operating conditions.<br />
Under more extreme conditions it is<br />
necessary to have some work carried out<br />
before the next service is due or between<br />
the specified service intervals. This applies<br />
above all to the cleaning the air filter insert<br />
in case of operation under very dusty conditions.<br />
INSPECTION 33<br />
33
INSPECTION<br />
Daily checks<br />
Visual inspection before going out<br />
Before going out you should subject the engine to a check and visual inspection.<br />
Scope of work<br />
Visual inspection for leaks and damage<br />
Check engine oil level 40<br />
Check circulation filter* (Bowle) and drain off water if necessary 44<br />
Check coolant level and top up if necessary 52<br />
Check seawater filter* and clean if necessary 49<br />
Check hydraulic oil level* with Z drive 59<br />
Note<br />
Maintenance must be performed on the<br />
reversing gearbox or the Z drive in accordance<br />
with the specifications of the respective<br />
manufacturer.<br />
Important<br />
Observe the safety precautions<br />
beginning on page 22 before<br />
performing any work on the<br />
engine or in the engine<br />
compartment.<br />
page<br />
34<br />
34 INSPECTION
INSPECTION<br />
End of season<br />
Work at end of season<br />
At the end of the season you should subject the engine to a check and visual inspection.<br />
You should have the service work on your Volkswagen Marine boat engine conducted by<br />
your VW Marine Service Partner, as the work requires specialised knowledge and special<br />
tools.<br />
Important<br />
● Observe the safety precautions<br />
beginning on page 22<br />
before performing any work on<br />
the engine or in the engine<br />
compartment.<br />
● Please be sure to observe the<br />
working sequences and information<br />
on engine preservation<br />
from page 67.<br />
Scope of work<br />
Visual inspection for leaks and damage<br />
Interrogate fault memory of engine electronics<br />
Change motor oil and oil filter 67<br />
Renew fuel filter 48<br />
Check air filter and clean if necessary 50<br />
Check seawater filter* and clean if necessary 49<br />
Check coolant level and top up if necessary 52<br />
Seawater pump: Check impeller and renew if necessary 55<br />
Check reactive anode and renew if necessary 57<br />
Clean and preserve engine 67<br />
Seawater circuit: flush and drain 68<br />
Fill fuel tank until full<br />
Note<br />
Maintenance must be performed on the<br />
reversing gearbox or the Z drive in accordance<br />
with the specifications of the respective<br />
manufacturer.<br />
page<br />
INSPECTION 35<br />
35
INSPECTION<br />
Start of season<br />
Work at start of season<br />
At the start of the season you should subject the engine to a check and visual inspection.<br />
You should have the service work on your Volkswagen Marine boat engine conducted by<br />
your VW Marine Service Partner, as the work requires specialised knowledge and special<br />
tools.<br />
Scope of work<br />
Check condition of ribbed V-belt for seawater pump 60<br />
Check condition of ribbed V-belt for alternator, power steering pump* etc. 60<br />
Check condition of toothed belt for camshaft drive<br />
Check condition of toothed belt for injection pump<br />
Check operation of seawater valve*<br />
Check battery voltage and charge battery* if necessary 61<br />
Note<br />
Maintenance must be performed on the<br />
reversing gearbox or the Z drive in accordance<br />
with the specifications of the respective<br />
manufacturer.<br />
Important<br />
Observe the safety precautions<br />
beginning on page 22 before<br />
performing any work on the<br />
engine or in the engine<br />
compartment.<br />
page<br />
36<br />
36 INSPECTION
INSPECTION<br />
Service scope<br />
once a year or every 200 operating hours<br />
Your Volkswagen Marine boat engine must be serviced once a year at the end of the<br />
season or every 200 operating hours.<br />
You should have the service work on your Volkswagen Marine boat engine conducted by<br />
your VW Marine Service Partner, as the work requires specialised knowledge and special<br />
tools.<br />
The following table shows the scope of service.<br />
Scope of work<br />
Visual inspection for leaks from above and below<br />
Interrogate fault memory<br />
Change motor oil 41<br />
Renew oil filter insert 43<br />
Renew circulation filter insert* 45<br />
Renew fuel filter 48<br />
Check power-steering hydraulic oil level* with Z drive 59<br />
Check coolant level 53<br />
Check air filter and clean if necessary 50<br />
Check condition of ribbed V-belt for seawater pump 60<br />
Check condition of ribbed V-belt for alternator, power steering pump* etc. 60<br />
Check condition of toothed belt for camshaft drive<br />
Check condition of toothed belt for injection pump<br />
Clean seawater filter* 49<br />
Renew seawater pump impeller 55<br />
Check reactive anode and renew if necessary 57<br />
Note<br />
Maintenance must be performed on the reversing<br />
gearbox or the Z drive in accordance<br />
with the specifications of the respective<br />
manufacturer.<br />
Important<br />
Observe the safety precautions<br />
beginning on page 22 before<br />
performing any work on the<br />
engine or in the engine<br />
compartment.<br />
page<br />
INSPECTION 37<br />
37
INSPECTION<br />
Additional work<br />
every 5 years or every 1,000 operating hours<br />
This additional work on your Volkswagen Marine boat engine must be carried out every<br />
5 years or every 1,000 operating hours.<br />
You should have the additional work on your Volkswagen Marine boat engine conducted<br />
by your VW Marine Service Partner, as the work requires specialised knowledge and<br />
special tools.<br />
The following table shows the scope of the additional work.<br />
Scope of work<br />
Clean air filter 50<br />
Renew toothed belt for camshaft drive<br />
Renew toothed belt for injection pump<br />
Check pipe bundles of heat exchanger; remove and clean if necessary<br />
Note<br />
Maintenance must be performed on the<br />
reversing gearbox or the Z drive in accordance<br />
with the specifications of the respective<br />
manufacturer.<br />
Important<br />
Observe the safety precautions<br />
beginning on page 22 before<br />
performing any work on the<br />
engine or in the engine<br />
compartment.<br />
page<br />
38<br />
38 INSPECTION
INSPECTION<br />
Motor oil<br />
Specifications<br />
A special VW Marine Longlife oil that can be<br />
ran as an all-year oil is used in the engine at<br />
the factory.<br />
It has special corrosion protection<br />
properties to protect the engine in an<br />
aggressive environment such as salty sea<br />
air. It also protects the engine from inner<br />
corrosion during long downtimes, e.g.<br />
winter storage.<br />
The container must be labelled with the<br />
specifications on this page must.<br />
Important note<br />
Of course, motor oils are also constantly<br />
being improved. Therefore, the information<br />
in this manual can only reflect the status at<br />
thetimeofprinting.<br />
VW Marine Service Partners will be always<br />
be kept up to date on any changes by the<br />
factory. Therefore, it is best to have the oil<br />
change carried out by a VW Marine Service<br />
Partner.<br />
Multigrade light running oil:<br />
Specification VW Marine Longlife<br />
VW 506 00 (0W30)<br />
Important notes<br />
● The motor oil named above is a<br />
condition for the specified maintenance<br />
intervals. Only this oil should<br />
be used for topping up.<br />
● Avoid mixing with other oils, as<br />
otherwise the condition for the<br />
maintenance intervals specified in<br />
the service schedule will no longer<br />
be met.<br />
● If the special VW Marine Longlife<br />
oil is not available, at least a commercially<br />
available oil in accordance<br />
with VW 506 00 (0W30) should be<br />
used.<br />
INSPECTION 39<br />
39
INSPECTION<br />
Check engine oil level<br />
A<br />
C<br />
Check engine oil level<br />
It is normal for the engine to consume oil.<br />
Therefore, the engine oil level must be<br />
checked at regular intervals.<br />
The boat must be at rest when measuring<br />
the oil level. Wait a few minutes after<br />
switching off the engine so that the oil can<br />
flow back into the oil sump.<br />
Then pull out the oil dipstick, wipe it with a<br />
clean cloth and push in the dipstick again as<br />
far as possible.<br />
B<br />
BM5-044M<br />
Then pull out the dipstick again and read off<br />
the oil level:<br />
A - If the oil level is within the range A, no<br />
oil may be added.<br />
B - If the oil level is within the range B, oil<br />
may be added.<br />
When doing so, the oil level may then be<br />
within the range A.<br />
C - If the oil level is within the range C or<br />
below, oil must be added. It is sufficient<br />
when the oil level is then within the<br />
range B.<br />
However, the oil level may never be<br />
above the range A.<br />
In the case of heavy engine loading, such<br />
as during longer engine operation<br />
(10 - 12 hours), the oil level should at least<br />
lie in the middle of the two markings<br />
(min/max).<br />
The quantity difference between the<br />
min. and max. mark is 1.0 litre.<br />
40<br />
40 INSPECTION
INSPECTION<br />
2<br />
1<br />
Change motor oil<br />
Changing motor oil<br />
Observe the safety precautions<br />
beginning on page 22 before<br />
performing any work on the<br />
engine or in the engine<br />
compartment.<br />
Topping up motor oil<br />
BM5-031M<br />
Unscrew the cap 1 of the oil filler opening in<br />
the cylinder head cover and add oil in small<br />
portions, checking the oil level with the oil<br />
dipstick 2 in the process.<br />
The oil level may never be above the<br />
range A. Otherwise oil may be aspirated<br />
via the crankcase ventilation.<br />
Important<br />
When adding oil, no oil may get<br />
onto hot engine parts - fire<br />
danger.<br />
Carefully close the cap 2 of the filler opening<br />
andpushintheoildipstick1 as far as possible.<br />
Otherwise, oil could escape with the<br />
engine running.<br />
Observe the safety precautions<br />
beginning on page 22 before<br />
performing any work on the<br />
engine or in the engine<br />
compartment.<br />
The properties of VW Marine Longlife oil not<br />
only worsen due to loading during operation,<br />
but also due to ageing. The oil change<br />
date is therefore dependent on both the<br />
mileage and the running time.<br />
If the engine is constantly operated under<br />
extreme operating conditions, the motor oil<br />
should be changed at shorter intervals.<br />
The motor oil must be changed at the intervals<br />
specified on page 35 and 37. Hve the oil<br />
change by a VW Marine Service Partner.<br />
Important<br />
If you want to change the motor<br />
oil yourself, then please be sure<br />
to observe the following points:<br />
● To prevent the danger of burns<br />
from hot motor oil, allow the<br />
engine to cool first.<br />
● Use a suitable container of a<br />
sufficient size to hold the oil<br />
filling quantity of your engine<br />
when draining the oil.<br />
● Wear eye protection.<br />
● If your hands come into<br />
contact with motor oil, they must<br />
then be washed throughly.<br />
● Used oil must be stored in a<br />
safe place away from children<br />
until its proper disposal.<br />
INSPECTION 41<br />
41
INSPECTION<br />
2<br />
BM5-045M<br />
● Remove the cover of the oil filter so that<br />
the return valve opens and the used oil can<br />
flow back into the oil sump.<br />
● Remove the protective cap - arrow - and<br />
fit the oil change hose provided on the<br />
connection of the oil change pump.<br />
● Route the other endof the hose into the<br />
contain intended for the oil change.<br />
BM5-008M<br />
● Press and hold the button 2 on the fuse<br />
box/relay plate with the ignition switched on<br />
until the motor oil is completely pumped<br />
out.<br />
● After completing draining, remove the<br />
hose from the oil change pump again and<br />
refit the protective cap.<br />
● Tighten the oil filter cover with a<br />
tightening torque of 25 Nm.<br />
Oil must never get into waterways,<br />
the sewer system or the<br />
❀<br />
ground.<br />
Due to the disposal problem, it is<br />
best to have the motor oil and filter<br />
change carried out by a VW Marine<br />
Service Partner.<br />
Motor oil additives<br />
No lubricant additives are to be<br />
added to the motor oil.<br />
Damage that result from additives<br />
of this type are excluded from the<br />
warranty.<br />
42<br />
42 INSPECTION
INSPECTION<br />
1<br />
3<br />
2<br />
Pouring in motor oil<br />
For filling quantities see the chapter<br />
”Technical data”.<br />
Check the oil level with the oil dipstick - also<br />
see page 40.<br />
The oil level must be between the<br />
two markings and may never be<br />
above the max. mark.<br />
Renewing oil filter insert<br />
● Uncrew the cover 1.<br />
● Separate the filter insert 3 from the<br />
cover.<br />
● Clean the cover with a clean cleaning<br />
cloth.<br />
● Renew the sealing ring 2.<br />
●<br />
●<br />
BM5-014M<br />
Moisten the new sealing ring with oil<br />
Fit the new filter insert in the cover.<br />
● Tighten the cover with a tightening<br />
torque of 25 Nm.<br />
Important<br />
Used oil must be stored in a safe<br />
place away from children until its<br />
proper disposal.<br />
❀<br />
Oil must never get into waterways,<br />
the sewer system or the<br />
ground.<br />
Due to the disposal problem, it is<br />
best to have the the motor oil and<br />
filter change carried out by a VW<br />
Marine Service Partner.<br />
INSPECTION 43<br />
43
INSPECTION<br />
Circulation filter*<br />
Draining water from circulation<br />
filter*<br />
The circulation filter* can be cleaned simply<br />
by backflushing; this increases the life of the<br />
filter element.<br />
Important<br />
If you want to drain the water<br />
from the circulation filter<br />
yourself, then please be sure to<br />
observe the following points:<br />
● Close the cut-off valve if<br />
present. If the engine is equipped<br />
with a single filter, switch off the<br />
engine. With a double filter it is<br />
sufficient to switch over to the<br />
other filter.<br />
1<br />
2<br />
BM5-026M<br />
● Please make sure that no<br />
diesel fuel gets onto the hoses.<br />
Clean the hoses with water<br />
immediately if necessary.<br />
● Wear eye protection.<br />
● If your hands come into<br />
contact with diesel fuel, they<br />
must then be washed throughly.<br />
● Used fuel must be stored in a<br />
safe place away from children<br />
until its proper disposal.<br />
● Observe the safety precautions<br />
beginning on page 22<br />
before performing any work on<br />
the engine or in the engine<br />
compartment.<br />
Backflushing<br />
● Switch off the engine (single filter) or<br />
switch over to the second filter (double<br />
filter).<br />
● Unscrew the bleeder screw 1.<br />
● Open the drain valve 2 below the bowl<br />
and catch fuel with a suitable container until<br />
the entire dirt is flushed out of the bowl.<br />
● Close the drain valve 2.<br />
● Pour clean fuel into the filter via the<br />
bleeding hole.<br />
● Screw in the bleeder screw 1 again.<br />
44<br />
44 INSPECTION
INSPECTION<br />
● Start the engine and conduct a visual<br />
inspection of the fuel systems for leaks.<br />
Notes<br />
● After draining the fuel it is not necessary<br />
to bleed the fuel system.<br />
● Should a power drop or excessively high<br />
intake resistance not be eliminated by backflushing,<br />
the filter element must be<br />
renewed.<br />
Diesle fuel must never get into<br />
❀ waterways, the sewer system or<br />
the ground.<br />
Due to the disposal problem, it is<br />
best to have the filter change carried<br />
out by a VW Marine Service Partner.<br />
Renewing circulation filter*<br />
Important<br />
If you want to change the<br />
circulation filter insert* yourself,<br />
then please be sure to observe<br />
the following points:<br />
● Close the cut-off valve if<br />
present. If the engine is equipped<br />
with a single filter, switch off the<br />
engine. With a double filter it is<br />
sufficient to switch over to the<br />
other filter.<br />
● Please make sure that no<br />
diesel fuel gets onto the hoses.<br />
Clean hoses immediately if<br />
necessary.<br />
● Wear eye protection.<br />
● If your hands come into<br />
contact with diesel fuel, they<br />
must then be washed throughly.<br />
● The used fuel filter insert must<br />
be stored in a safe place away<br />
from children until its proper<br />
disposal.<br />
● Observe the safety precautions<br />
beginning on page 22<br />
before performing any work on<br />
the engine or in the engine<br />
compartment.<br />
INSPECTION 45<br />
45
INSPECTION<br />
Renewing the filter element<br />
● Switch off the engine (single filter) or<br />
switch over to the second filter (double<br />
filter).<br />
● Unscrew the 4 cover screws and take off<br />
the cover.<br />
● Remove the filter cartridge.<br />
● Take out the filter insert by the hoop.<br />
● Lay in the new filter element.<br />
● Lay the filter cartridge on the filter<br />
element.<br />
● Check the cover gasket for damage and<br />
correct seating in the cover.<br />
Note<br />
Should the gasket be damaged, it must be<br />
replaced.<br />
● Fit the cover with the gasket and tighten<br />
the screws diagonally.<br />
Note<br />
After renewing the filter element it is not<br />
necessary to bleed the fuel system.<br />
● Turn the ignition key to position 2 (ON) -<br />
see page 19 - and leave it in this position for<br />
approx. 1 minute. This causes the electric<br />
fuel pump to operate and the fuel system is<br />
filled with diesel.<br />
● Start the engine and conduct a visual<br />
inspection of the fuel systems for leaks.<br />
❀<br />
Diesle fuel must never get into<br />
waterways, the sewer system or<br />
the ground.<br />
Due to the disposal problem, it is<br />
best to have the filter change carried<br />
out by a VW Marine Service Partner.<br />
46<br />
46 INSPECTION
INSPECTION<br />
Fuel supply filter<br />
1<br />
2<br />
Draining water from<br />
fuel supply filter<br />
BM5-028M<br />
Important<br />
If you want to drain the water<br />
from th fuel supply filter<br />
yourself, then please be sure to<br />
observe the following points:<br />
● Please make sure that no<br />
diesel fuel gets onto the coolant<br />
hoses. Clean hoses immediately<br />
if necessary.<br />
● Wear eye protection.<br />
● If your hands come into<br />
contact with diesel fuel, they<br />
must then be washed throughly.<br />
● Used fuel must be stored in a<br />
safe place away from children<br />
until its proper disposal.<br />
● Observe the safety precautions<br />
beginning on page 22<br />
before performing any work on<br />
the engine or in the engine<br />
compartment.<br />
● Unscrew the bleeder screw 1.<br />
● Open the drain screw 2 by a few turns<br />
and cat approx. 100 cm 3 of fuel with a suitable<br />
container.<br />
● Screw in the drain screw 2 again.<br />
● Screw in the bleeder screw 1 again.<br />
Note<br />
After renewing the filter element it is not<br />
necessary to bleed the fuel system.<br />
● Turn the ignition key to position 2 (ON) -<br />
see page 19 - and leave it in this position for<br />
approx. 1 minute. This causes the electric<br />
fuel pump to operate and the fuel system is<br />
filled with diesel.<br />
● Start the engine and conduct a visual<br />
inspection of the fuel systems for leaks.<br />
Diesle fuel must never get into<br />
❀ waterways, the sewer system or<br />
the ground.<br />
Due to the disposal problem, it is<br />
best to have the filter change carried<br />
out by a VW Marine Service Partner.<br />
INSPECTION 47<br />
47
INSPECTION<br />
2<br />
1<br />
Renewing fuel supply filter<br />
BM5-029M<br />
Important<br />
If you want to renew the fuel<br />
filter yourself, then please be<br />
sure to observe the following<br />
points:<br />
● Please make sure that no<br />
diesel fuel gets onto the coolant<br />
hoses. Clean hoses immediately<br />
if necessary.<br />
● Wear eye protection.<br />
● If your hands come into<br />
contact with diesel fuel, they<br />
must then be washed throughly.<br />
● The used fuel filter must be<br />
stored in a safe place away from<br />
children until its proper disposal.<br />
● Observe the safety precautions<br />
beginning on page 22<br />
before performing any work on<br />
the engine or in the engine<br />
compartment.<br />
● Disconnect the connector 1 on the cable<br />
below the fuel supply filter.<br />
● Screw out the old fuel supply filter 2 and<br />
clean the sealing surface of the holder.<br />
● Drain the fuel supply filter into a suitable<br />
container and screw out the drain screw.<br />
● Remove the drain screw on the new fuel<br />
supply filter and replace it with the drain<br />
screw from the old fuel supply filter.<br />
● Moisten the rubber ring of the new filter<br />
with diesel fuel.<br />
● Fill the fuel supply filter with clean diesel<br />
fuel. This enables the engine to be started<br />
more quickly.<br />
● Screw in the filter and tighten it handtight.<br />
● Connect the connector 1 on the cable<br />
below the fuel filter.<br />
Note<br />
After renewing the filter element it is not<br />
necessary to bleed the fuel system.<br />
● Turn the ignition key to position 2 (ON) -<br />
see page 19 - and leave it in this position for<br />
approx. 1 minute. This causes the electric<br />
fuel pump to operate and the fuel system is<br />
filled with diesel.<br />
● Start the engine and conduct a visual<br />
inspection of the fuel systems for leaks.<br />
Diesle fuel must never get into<br />
❀ waterways, the sewer system or<br />
the ground.<br />
Due to the disposal problem, it is<br />
best to have the filter change carried<br />
out by a VW Marine Service Partner.<br />
48<br />
48 INSPECTION
INSPECTION<br />
Seawater filter*<br />
Cleaning seawater filter*<br />
BM5-006M<br />
Important<br />
● Never open the filter housing<br />
with the seawater valve open to<br />
prevent water from entering.<br />
● Observe the safety precautions<br />
beginning on page 22<br />
before performing any work on<br />
the engine or in the engine<br />
compartment.<br />
If you deterimine soiling, proceed as<br />
follows:<br />
● Close the seawater valve.<br />
● Unscrew the screws - see left illustration<br />
- and remove the cover.<br />
● Remove the filter element, flush it<br />
thoroughly with clean water and refit it.<br />
● Before screwing on the filter cover, the<br />
sealing ring should be lubricated, e.g. with<br />
silicone oil or Teflon spray.<br />
● Check the cover and the gasket for<br />
correct seating.<br />
Important<br />
If a cover is not seated correctly,<br />
air can also be aspirated, causing<br />
the engine to overheat.<br />
● Open the seawater valve again.<br />
● Start the engine and conduct a visual<br />
inspection of the seawater filter* for leaks.<br />
As the degree of soiling of the seawater<br />
filter is depending on the water the engine<br />
is operated in, you should check the filter for<br />
soiling each time before starting the engine.<br />
As the cover of the filter housing is transparent,<br />
you do not need to open the cover.<br />
INSPECTION 49<br />
49
INSPECTION<br />
Cleaning air filter insert<br />
Cleaning air filter insert<br />
BM5-012M<br />
Wash out and oil the filter insert as specified<br />
in the service schedule.<br />
A dirty air filter insert can be recognised<br />
from the fact that it has lost its red colour or<br />
the dust deposit<br />
has reached 3 mm.<br />
If the engine is operated in very dusty areas,<br />
clean the filter insert more frequently.<br />
Removing air filter insert<br />
● Unscrew the three screws - see illustration<br />
- and remove the air filter housing.<br />
● Loosen the clip 1 - see illustration on<br />
page 51.<br />
● Detach the air filter from the intake<br />
manifold.<br />
Cleaning air filter insert<br />
● Blow out the filter insert from the inside<br />
outward with max. 2.0 bar copressed<br />
air.<br />
Important<br />
● Wear protective goggles when<br />
blowing out the filter insert.<br />
Flying dirt particles can get into<br />
the eyes - danger of injury.<br />
● Observe the safety precautions<br />
beginning on page 22<br />
before performing any work on<br />
the engine or in the engine<br />
compartment.<br />
● Clean the filter insert as described in the<br />
instructions on the special cleaning and<br />
service kit available from a VW Marine<br />
Service Partner.<br />
Note<br />
Never use petrol, thinner or other<br />
agents for cleaning. There is a<br />
danger of the filter insert being<br />
destroyed.<br />
●<br />
BM5-035M<br />
Wipe out the air filter housing thoroughly.<br />
50<br />
50 INSPECTION
INSPECTION<br />
1<br />
Installing air filter insert<br />
● Push the air filter insert over the intake<br />
manifold again.<br />
● Tighten the clip 1 .<br />
BM5-013M<br />
● Guide the air filter housing over the air<br />
filter insert.<br />
● Secure the air filter housing with the<br />
3 screws again - see left-hand illustration on<br />
page 50.<br />
INSPECTION 51<br />
51
INSPECTION<br />
Cooling system<br />
The cooling system must be filled with a<br />
mixture of water and a 33 % share of our<br />
coolant additive G 12 A8D (antifreeze on<br />
a glycol basis with corrosion protection<br />
additives).<br />
This mixture not only offers the necessary<br />
frost protection down to -25 o C, it also<br />
primarily protects the alloy parts in the cooling<br />
system against corrosion. In addition, it<br />
prevents lime deposits and considerably<br />
increases the coolant boiling point.<br />
Therefore, the coolant concentration may<br />
not be reduced by adding water even in the<br />
warm season or in warm countries. The<br />
percentage of coolant additive must<br />
be at least 33 %.<br />
If for climatic reasons greater frost protection<br />
is required, the percentage of G 12 A8D<br />
can be increased, however only up to 60 %<br />
(frost protection down to approximately<br />
-40 o C), as otherwise the frost protection is<br />
decreased again and the cooling effect<br />
worsens.<br />
Coolant losses<br />
Coolant loss mainly indicates leaks. In this<br />
case the cooling system should be checked<br />
immediately by a VW Marine Service<br />
Partner. It is not sufficient to just add<br />
coolant.<br />
If the system is free of leaks, losses can<br />
only occur when the coolant boils due to<br />
overheating and is forced out of the cooling<br />
system.<br />
Coolant additive<br />
Only our G 12 A8D coolant additive<br />
(antifreeze on a glycol basis with<br />
corrosion protection additives) or an<br />
additive with the specification<br />
TL-VW 774 D (see contain label) may<br />
be used. The coolant additive is<br />
available from VW Marine Service<br />
Partners.<br />
Other coolant additives can lead to<br />
a considerable reduction in<br />
corrosion protection.<br />
The resulting corrosion damage can<br />
lead to coolant loss and subsequently<br />
to major engine damage.<br />
Important<br />
The coolant additive and the<br />
coolant present a health hazard!<br />
The coolant additive must<br />
therefore be stored in a<br />
particularly safe place out of<br />
reach of children. If the coolant<br />
must be drained, it must be<br />
caught and also stored in a safe<br />
place.<br />
❀<br />
Drained coolant should normally<br />
not be reused; it must be<br />
disposed of under observance of the<br />
applicable environmental protection<br />
regulations.<br />
52<br />
52 INSPECTION
INSPECTION<br />
Checking coolant level<br />
BM5-011M<br />
Important<br />
● Never open the engine<br />
compartment cover when you<br />
see water vapour or coolant<br />
escaping from the engine<br />
compartment - danger of<br />
scalding! Wait until water vapour<br />
or coolant no longer escapes.<br />
● Observe the safety precautions<br />
beginning on page 22<br />
before performing any work on<br />
the engine or in the engine<br />
compartment.<br />
The coolant level can only be checked<br />
properly with the engine stopped.<br />
The right coolant level is important for the<br />
proper operation of the cooling system.<br />
Therefore, the coolant level should be<br />
checked regularly.<br />
With the engine cold, the coolant must be<br />
above the min mark and below the max<br />
mark - arrow -.<br />
Note<br />
A low coolant level is measured with a<br />
sensor and an insufficient coolant level is<br />
shown in the display of the multi-function<br />
indicator, and an acoustic warning sounds.<br />
Visual inspection<br />
Check the coolant hoses for leaks and<br />
porosity.<br />
When operating the engine in the<br />
tropics, the notes on page 72 must<br />
also be observed!<br />
INSPECTION 53<br />
53
INSPECTION<br />
Adding coolant<br />
Important<br />
● Never open the engine<br />
compartment cover when you<br />
see water vapour or coolant<br />
escaping from the engine<br />
compartment - danger of<br />
scalding! Wait until water vapour<br />
or coolant no longer escapes.<br />
● Do not open the cooling<br />
system cap while the engine is<br />
not - danger of scalding: The<br />
coolant system is pressurised!<br />
● Observe the safety precautions<br />
beginning on page 22<br />
before performing any work on<br />
the engine or in the engine<br />
compartment.<br />
Use only new coolant for topping<br />
up.<br />
First stoptheentine andallowit tocool.Then<br />
cover the cap with a cloth and carefully<br />
unscrew the cap anti-clockwise.<br />
If no G 12 A8D or an additive with the specification<br />
TL-VW 774 D (see container label)<br />
is available, no other coolant additive should<br />
ever be used. In this case only use water<br />
and restore the proper mixing ratio with the<br />
specified coolant additive (see page 52)<br />
immediately.<br />
In case of a major loss of coolant,<br />
only add coolant with the engine<br />
cooled down to prevent engine<br />
damage.<br />
Never fill the system above the<br />
max. mark.<br />
Excess coolant is forced out of the cooling<br />
system when it heats up by the overpressure<br />
valve in the cap.<br />
Screw on the cap firmly.<br />
Important note<br />
Please observe the following when<br />
topping off:<br />
G 12 may never be mixed with other<br />
coolant additives (including with<br />
G11).<br />
You can recognise the G 12 from its<br />
red colour. If the liquid is brown,<br />
G12hasbeenmixedwithanother<br />
coolant!<br />
In this case the coolant must be<br />
changed immediately!<br />
Otherwise serious malfunctions or<br />
engine damage may occur!<br />
54<br />
54 INSPECTION
INSPECTION<br />
Seawater pump<br />
1<br />
4<br />
2<br />
1<br />
BM5-025M<br />
3<br />
BM5-024M<br />
Checking impeller of seawater<br />
pump and renewing if<br />
necessary<br />
In accordance with the specifications in the<br />
service schedule, the impeller must be<br />
checked and renewed if necessary.<br />
Note<br />
The impeller can only be cheked with the<br />
seawater pump removed.<br />
● Close the seawater valve<br />
● Disconnect the two coolant hoses 1 by<br />
pulling back the retaining clip from the<br />
seawater pump.<br />
● Mark the running direction of the ribbed<br />
V-belt.<br />
● Tension the tensioner 3 in direction of<br />
arrow - right-hand illustration - with a suitable<br />
spanner and remove the ribbed V-belt<br />
from the rollers.<br />
Important<br />
● Slowly guide the tensioner<br />
back into the relaxed position<br />
with the spanner - danger of<br />
injury!<br />
● Observe the safety precautions<br />
beginning on page 22<br />
before performing any work on<br />
the engine or in the engine<br />
compartment.<br />
● Unscrew the screws 4.<br />
● Pull the seawater pump out of the<br />
bracket to the side.<br />
● Remove the screws 2 - left-hand illustration<br />
- on the back of the Seawater pump<br />
from th housing and take off the cover.<br />
● Mark the running direction of the<br />
impeller and remove the rubber gasket in<br />
the middle of the impeller.<br />
● Pull the impeller off the shaft with a suitable<br />
puller.<br />
● Check the impeller for damage.<br />
Notes<br />
● Theimpellermustalwaysberenewed,<br />
eveninthecaseofminordamage.<br />
● Make sure you always have a reserve<br />
impeller on board.<br />
INSPECTION 55<br />
55
INSPECTION<br />
1<br />
4<br />
2<br />
1<br />
BM5-025M<br />
3<br />
BM5-024M<br />
● Before reinstalling the impeller, grease it<br />
with silicone spray or glycerin.<br />
● Push the impeller onto the shaft and<br />
press the rubber protection cap into the<br />
impeller.<br />
● Screw on the cover again with the<br />
screws 2. Always use a new sealing ring<br />
when mounting the cover.<br />
● Insert the seawater pump in the bracket<br />
and secure it with the screws 4 on the<br />
bracket.<br />
● Press in the retaining clips again and<br />
push the two coolant hoses 1 - left-hand<br />
illustration - onto the seawater pump until<br />
they engage.<br />
● Tension the tensioner 3 with a suitable<br />
spanner and lay the ribbed V-belt on the<br />
rollers in the running direction.<br />
Important<br />
Slowly guide back the tensioner<br />
with the spanner - danger of<br />
injury!<br />
●<br />
Open the seawater valve.<br />
● Start the engine and check the cooling<br />
system for leaks.<br />
56<br />
56 INSPECTION
INSPECTION<br />
Reactive anode<br />
A<br />
BM5-027M<br />
Checking reactive anode of<br />
coolant system and renewing if<br />
necessary<br />
Important<br />
Observe the safety precautions<br />
beginning on page 22 before<br />
performing any work on the<br />
engine or in the engine<br />
compartment.<br />
The reactive anode in the cooling system<br />
must be checked in accordance with the<br />
specifications in the service schedule and<br />
renewed if necessary.<br />
Check the reactive anode, as it protects the<br />
engine from galvanic corrosion.<br />
A new reactive anode has a length<br />
of dimension A = 20 millimeters -<br />
see illustration.<br />
The anode must be replaced with a new one<br />
when more than 50 % (10 millimeters) of it<br />
has been used.<br />
Use only original Volkswagen Marine parts,<br />
as an incorrect composition of the anode<br />
can result in serious corrosion damage in<br />
the engine.<br />
INSPECTION 57<br />
57
INSPECTION<br />
Reversing-gearbox oil level<br />
A<br />
B<br />
C<br />
Check reversing-gearbox<br />
oil level<br />
BM5-007M<br />
Attention<br />
Observe the safety precautions<br />
provided in the Owner’s <strong>Manual</strong><br />
before performing any work on<br />
the engine or in the engine<br />
compartment.<br />
The oil level must be checked, in contrast to<br />
the instructions described in the operating<br />
manual.<br />
The reversing-gearbox oil level must be<br />
checked at regular intervals.<br />
The boat must be at rest when measuring<br />
the oil level. Wait a few minutes after<br />
switching off the engine so that the oil can<br />
flow back.<br />
Then screw out the oil dipstick, wipe it with<br />
a clean cloth and guide the oil dipstick into<br />
the opening again.<br />
Note<br />
The oil dipstick may not be screwed in again,<br />
as then an incorrect oil level would be indicated.<br />
BM5-034M<br />
Then pull out the oil dipstick again and read<br />
off the oil level:<br />
A - If the oil level is within the range A, no<br />
oil may be added.<br />
B - If the oil level is within the range B, oil<br />
may be added.<br />
When doing so, the oil level may then be<br />
within the range A.<br />
C - If the oil level is within the range C or<br />
below, oil must be added. It is sufficient<br />
when the oil level is then somewhere<br />
within the range B.<br />
However, the oil level must never be<br />
above range A.<br />
In the case of especially heavy gearbox<br />
loading, such as during longer engine operation<br />
(10 - 12 hours), the oil level should at<br />
least lie in the middle of the two markings<br />
(min/max).<br />
58<br />
58 INSPECTION
Checking power-steering hydraulic oil level<br />
(only with Z drive)<br />
INSPECTION<br />
A<br />
B<br />
C<br />
Checking power-steering<br />
hydraulic oil level<br />
BM5-032M<br />
Important<br />
Observe the safety precautions<br />
beginning on page 22 before<br />
performing any work on the<br />
engine or in the engine<br />
compartment.<br />
You should not leave the steering wheel at<br />
lock for longer than 15 seconds with the<br />
engine running. The hydraulic oil heats up<br />
considerably when the wheel is continually<br />
at lock.<br />
This can result in damage to the<br />
power steering system.<br />
Noise also indicates the fact that the wheel<br />
is in the steering lock position while the boat<br />
is stationary, as the servo pump is heavily<br />
loaded in the process. In addition, the<br />
engine idling speed is briefly decreased.<br />
The power-steering hydraulic oil level must<br />
be checked at regular intervals.<br />
This test must be conducted with the<br />
engine running and the rudder in the<br />
straight-ahead position.<br />
BM5-033M<br />
Screw out the oil dipstick - left-hand illustration,<br />
wipe it with a clean cloth and screw in<br />
the dipstick again as far as possible.<br />
Then screw out the dipstick again and read<br />
off the oil level:<br />
A - If the oil level is within the range A, no<br />
oil may be added.<br />
B - If the oil level is within the range B, oil<br />
may be added.<br />
When doing so, the oil level may then be<br />
within the range A.<br />
C - If the oil level is within the range C or<br />
below, oil must be added. It is sufficient<br />
when the oil level is then within the<br />
range B.<br />
In the case of heavy steering loading, such<br />
as during longer operation (10 - 12 hours),<br />
the oil level should at least lie in the middle<br />
of the two markings (min/max).<br />
Changing power-steering<br />
hydraulic oil<br />
The power-steering hydraulic oil must be<br />
changed in accordance with the specifications<br />
of the respective manufacturer.<br />
INSPECTION 59<br />
59
INSPECTION<br />
Ribbed V-belt<br />
Checking ribbed V-belt<br />
Important<br />
● The ribbed V-belt may only be<br />
checked or renewed with the<br />
engine stopped - danger of<br />
injury!<br />
● Observe the safety precautions<br />
beginning on page 22<br />
before performing any work on<br />
the engine or in the engine<br />
compartment.<br />
Check the ribbed V-belt for wear, separations<br />
and cracks.<br />
Ribbed V-belts in poor condition must be<br />
replaced.<br />
Should you not be sure whether the ribbed<br />
V-belt is damaged, please contact a VW<br />
Marine Service Partner.<br />
Note<br />
It is always advisable to keep replacement<br />
ribbed V-belts on board.<br />
60<br />
60 INSPECTION
INSPECTION<br />
Battery*<br />
Important<br />
The following warnings and<br />
safety precautions must be<br />
observed when working on the<br />
battery.<br />
Wear eye protection. Do<br />
not allow acidic or lead<br />
particles to get into the<br />
eyes, on the skin or<br />
clothing.<br />
Battery acid is extremely<br />
caustic. Wear protective<br />
gloves and eye<br />
protection. Do not tilt<br />
battery, as acid can escape from<br />
the vent openings.<br />
Flush the eyes with clean water<br />
for several minutes if acid<br />
splashes into them. Then see a<br />
doctor immediately. Neutralise<br />
acid splashed onto the skin or<br />
clothing immediately with a soap<br />
solution and rinse with plenty of<br />
water. If acid is swallowed, see a<br />
doctor immediately.<br />
A highly explosive<br />
electrolytic gas mixture<br />
results when charging<br />
batteries.<br />
Fire, sparks, open flame<br />
and smoking are<br />
prohibited. Avoid the<br />
formation of sparks when<br />
handling cables and electrical<br />
devices. Prevent short circuits.<br />
Never short circuit battery<br />
terminals. Danger of injury from<br />
high-energy sparks.<br />
Keep acid and battery out<br />
of reach of children.<br />
● Always switch off the engine,<br />
the ignition and all electrical<br />
consumers and press the Stop<br />
button before working on the<br />
electrical system. The negative<br />
cable must be disconnected at<br />
the battery.<br />
● When disconnecting the<br />
battery from the on-board<br />
electrical system, the negative<br />
cable must be disconnected first<br />
and then the positive cable.<br />
The battery may not be<br />
disconnected with the engine<br />
running or with the ignition<br />
switched on, as otherwise the<br />
electrical system (electronic<br />
components) will be damaged.<br />
● When reconnecting the battery,<br />
first connect the positive<br />
cable and then the negative<br />
cable. The connection cables<br />
must never be interchanged -<br />
danger of wiring fire!<br />
The battery may not be disconnected<br />
with the ignition switched<br />
on or with the engine running, as<br />
otherwise the electrical system<br />
(electronic components) can be<br />
damaged.<br />
To protect the housing from UV rays,<br />
do not expose the battery to direct<br />
sunlight.<br />
INSPECTION 61<br />
61
INSPECTION<br />
Important<br />
Observe the safety precautions<br />
beginning on page 22 before<br />
performing any work on the<br />
engine or in the engine<br />
compartment.<br />
Acid level<br />
Check the acid level and add distilled waer<br />
if necessary up to the acid level marking or<br />
5 mm above the separators.<br />
Charging state<br />
Determine the battery charging state by<br />
checking the acid density or the battery<br />
voltage.<br />
Acid density (specific weight)<br />
charged = 1.285,<br />
discharged = 1.12<br />
Total voltage<br />
Determine the total voltage only when the<br />
battery is loaded with a voltage tester:<br />
- test duration: 5 to 10 seconds<br />
- nominal voltage 12 volts<br />
- discharged 9.6 volts.<br />
Battery terminals<br />
Clean and grease terminals and note external<br />
condition of battery, e.g. raised plates,<br />
cracked housing.<br />
Observe the instructions on page 61.<br />
Checking acid level<br />
Please observe the warnings on<br />
the previous page.<br />
The battery is virtually maintenance-free<br />
under normal operating conditions.<br />
However, at high outside temperatures or<br />
during long, daily operating hours it is advisable<br />
to check the acid level from time to<br />
time. The acid level must also be checked<br />
after each charging process.<br />
Battery without magic eye<br />
The acid level is always to be at the max.<br />
mark on the long side. Never fill above the<br />
max. mark and do not allow the acid level<br />
to drop below the min. mark.<br />
The concerned battery cells must be filled<br />
up to the max. mark at the latest when the<br />
acid level reaches the min. mark.<br />
Do not overfill the battery cells, as<br />
otherwise the battery acid will<br />
escape via the vent opening. This<br />
can lead to parts and corrosion<br />
damage.<br />
After filling the battery cells concerned<br />
must be sealed tightly with the battery<br />
plugs.<br />
We recommend having the acid level<br />
checked and corrected by a VW Marine<br />
Service Partner.<br />
Note<br />
The use of gel batteries on board is recommended.<br />
62<br />
62 INSPECTION
INSPECTION<br />
DANGER/POISON<br />
6EO 915 105<br />
12V 330A 61Ah DIN<br />
ETN 561 019 054<br />
540A EN/SAE<br />
Betriebsanleitung beachten!<br />
See owners manual!<br />
Removing battery<br />
Before removing the battery, switch off the<br />
ignition and all current consumers.<br />
To remove the battery, first disconnect the<br />
negative cable (usually black or brown) and<br />
then the positive cable (usually red). Then<br />
unscrew the battery mounting.<br />
BIM-023M<br />
Battery with magic eye*<br />
A round inspection window (see arrow) is<br />
provided on top of the battery. This ”magic<br />
eye” changes its colour depending on the<br />
charging state and acid level of the battery.<br />
The colour display serves VW Marine<br />
Service Partnern as a diagnosis aid.<br />
Air bubbles can falsify the colour display.<br />
Carefully tap the magic eye.<br />
If the display in the inspection window is<br />
colourless or light yellow, the battery<br />
acid level is too low. Distilled water must be<br />
added. With batteries older than 5 years we<br />
recommend replacement.<br />
We recommend having the acid level<br />
checked and corrected by a VW Marine<br />
Service Partner.<br />
INSPECTION 63<br />
63
INSPECTION<br />
DANGER/POISON<br />
6EO 915 105<br />
12V 330A 61Ah DIN<br />
ETN XXX XXX XXX<br />
540A EN/SAE<br />
Betriebsanleitung beachten!<br />
See owners manual!<br />
Connecting battery<br />
Before connecting the battery, switch off<br />
the ignition and all current consumers.<br />
Place the battery in the installation location<br />
provided and secure the battery with the<br />
battery bracket.<br />
To connect the battery, first connect the<br />
positive cable (usually red) and then the<br />
negative cable (usually black or brown).<br />
BIM-022M<br />
Renewing battery<br />
If the battery is renewed, the new battery<br />
must have the same voltage (12 V), design<br />
and safety characteristics such as cental<br />
venting and an O-ring seal for the battery<br />
plugs.<br />
The amperage and capacity should match.<br />
VW Marine Service Partner offer a range of<br />
suitable batteries.<br />
When installing the battery, make sure that<br />
the ignition and all current consumers are<br />
switched off.<br />
Due to the disposal problem<br />
❀ regarding used batteries, it is<br />
best to have a battery renewed by a<br />
VW Marine Service Partner. Batteries<br />
contain sulphuric acid, lead<br />
etc and may never be disposed of in<br />
household refuse.<br />
64<br />
64 INSPECTION
INSPECTION<br />
Charging battery<br />
Important<br />
Observe the warnings on page 61<br />
and the information on the<br />
charger manufacturer.<br />
Note<br />
To charge the battery of the onboard<br />
electrical system, the use of<br />
special boat chargers that prevent<br />
gassing.<br />
Switch off the ignition and all current consumers<br />
before charging.<br />
When charging at low amperages (e.g. with<br />
a small charger), the connection cables<br />
normally do not need to be removed. However,<br />
the specifications of the charger<br />
manufacturer must always be observed.<br />
However, prior to quick charging, i. e.<br />
charging at high amperages, both connection<br />
cables must be removed.<br />
The following instructions must be<br />
followed:<br />
Important<br />
● Keep children away from the<br />
battery, battery acid and the<br />
charger.<br />
● Only charge the battery in<br />
well-ventilated rooms. Do not<br />
smoke and keep away open<br />
flames and electric sparks, as a<br />
highly-explosive electrolytic gas<br />
mixture results when charging<br />
batteries.<br />
● Protect your eyes and face. Do<br />
not bend over the battery.<br />
● Flush acid splashes in the eyes<br />
or on the skin with clean water<br />
for several minutes. Then you<br />
should see a doctor immediately.<br />
● Quick charging of a battery is<br />
dangerous and should only be<br />
carried out by a VW Maring<br />
Service Partner, as special<br />
chargers and knowledge are<br />
required.<br />
● Never charge a frozen battery<br />
- danger of explosion! A discharged<br />
battery can already<br />
freeze at temperatures of under<br />
0 o C. A frozen battery must<br />
always be thawed before<br />
charging.<br />
We do not advice the continued use<br />
of thawed batteries, as the battery<br />
housing can be cracked by the<br />
formation of ice and battery acid<br />
can leak out as a result.<br />
● The battery plugs should not be open during<br />
charging.<br />
● The mains cable of the charger may not<br />
be connected until the terminal clamps of<br />
the charger have been properly clamped to<br />
the battery terminals.<br />
red ........................ = positive<br />
black or brown ............. = negative.<br />
● After charging, first switch off the charger<br />
before reconnecting the battery properly.<br />
INSPECTION 65<br />
65
INSPECTION<br />
Engine test run<br />
Important<br />
Observe the safety precautions<br />
beginning on page 22 before<br />
performing any work on the<br />
engine or in the engine<br />
compartment.<br />
Warning lamps<br />
Check the warning lamps for the coolant,<br />
the alternator and the engine oil pressure.<br />
The warning lamps light up when the engine<br />
is shifted into the operating position and<br />
must go out again after the engine is<br />
started.<br />
Starting the engine<br />
Check the starting behaviour of the engine<br />
when doing so.<br />
Leaks<br />
Check the cylinder head cover, oil filter, fuel<br />
system and cooling system for leaks.<br />
Exhaust system<br />
Check the exhaust system for leaks and<br />
damage.<br />
66<br />
66 INSPECTION
INSPECTION<br />
Preserving engine<br />
Preparing engine for winter<br />
Depending on the operating conditions,<br />
Volkswagen Marine boat engines must be<br />
protected against possible corrosion<br />
damage.<br />
It is not necessary to use special corrosion<br />
protection oils (see motor oil specifications<br />
on page 39).<br />
Change the motor oil and the<br />
oil filter insert<br />
For units you shut down for longer<br />
periods - e.g. after the end of the season<br />
- please carry out conservation in the specified<br />
order:<br />
1 - Thoroughly clean all parts to be<br />
preserved.<br />
2 - Allow the engine to warm up.<br />
3 - After switching off the engine, renew<br />
the oil filter insert and pump off the<br />
motor oil - see page 43 and 41.<br />
4 - Add 6.0 litres of motor oil and run the<br />
engine for approximately 30 seconds at<br />
increased idling speed.<br />
5 - Switch the engine off.<br />
6 - Plug all openings (e.g. exhaust pipe, air<br />
filter) to prevent the penetration of dirt<br />
or moist air.<br />
7 - Spray the engine with an anti-corrosion<br />
agent from the outside.<br />
A corresponding anti-corrosion agent is<br />
available from VW Marine Service<br />
Partners.<br />
Note<br />
On engines that run at least 20 minutes<br />
under load every two weeks, no corrosion<br />
protection is required. However, the oil<br />
must be changed at the intervals specified<br />
in the service schedule.<br />
Important<br />
Observe the safety precautions<br />
beginning on page 22 before<br />
performing any work on the<br />
engine or in the engine<br />
compartment.<br />
INSPECTION 67<br />
67
INSPECTION<br />
Rlushing and draining seawater<br />
cooling system<br />
Important<br />
Observe the safety precautions<br />
beginning on page 22 before<br />
performing any work on the<br />
engine or in the engine<br />
compartment.<br />
Flushing and subsequent draining of the<br />
seawater cooling system with fresh water<br />
is very important for preventing corrosion<br />
and frost damage.<br />
The flushing process should be carried out<br />
together with the motor oil change.<br />
Conduct flushing in the specified order:<br />
1 - Close the seawater valve.<br />
2 - Open and clean the seawater filter - see<br />
page 49.<br />
3 - Fill the seawater filter with fresh water<br />
and run the engine at idle.<br />
Make sure that the seawater filter is<br />
always filled with fresh water so<br />
that the seawater pump does not run<br />
dry. This would result in the pump<br />
becoming defective.<br />
1<br />
BM5-042M<br />
It is important that the engine runs for a<br />
while so that all sludge and salt residues are<br />
flushed away that could otherwise promote<br />
corrosion.<br />
4 - Switch off the engine again.<br />
5 - Screw on the cover of the seawater<br />
filter.<br />
6 - Fit a suitable hose on the connection -<br />
see Fig. BM5-042M - of the drain<br />
screw 1.<br />
7 - Open the drain screw 1 - see Fig.<br />
BM5-042M - and catch the water with<br />
a suitable container.<br />
8 - Open the drain screw 2 - see Fig.<br />
BM5-043M - and catch the water with<br />
a suitable container.<br />
9 - After draining is completed, pull the<br />
hose off the drain screw 1 again and<br />
close the two drain screws 1 and 2<br />
again.<br />
2<br />
BM5-043M<br />
68<br />
68 INSPECTION
INSPECTION<br />
Fuel system<br />
The fuel system also requires an inspection<br />
and care at the end of the season.<br />
Please observe the following:<br />
● To prevent condensation water in the<br />
tank, completely fill the tank before the end<br />
of the season.<br />
● Check the fuel system for leaks.<br />
● Drain the water from the circulation filter<br />
- see page 44.<br />
● Renew the fuel filter - see page 48.<br />
Important<br />
There is fire danger with a leaky<br />
fuel system.<br />
If you want to drain the water<br />
from the circulation filter and<br />
renew the fuel supply filter<br />
yourself, then please be sure to<br />
observe the following points:<br />
● Please make sure that no<br />
diesel fuel gets onto the coolant<br />
hoses. Clean hoses immediately<br />
if necessary.<br />
● Wear eye protection.<br />
● If your hands come into<br />
contact with diesel fuel, they<br />
must then be washed throughly.<br />
● The used fuel and the fuel filter<br />
must be stored in a safe place<br />
away from children until their<br />
proper disposal.<br />
● Observe the safety precautions<br />
beginning on page 22<br />
before performing any work on<br />
the engine or in the engine<br />
compartment.<br />
INSPECTION 69<br />
69
INSPECTION<br />
Winter operation<br />
An inspection service should always be conducted<br />
on the Volkswagen Marine boat<br />
engine before the start of the cold season.<br />
In addition, please observe the following<br />
instructions when operating the Volkswagen<br />
Marine boat engine at extremely low<br />
temperatures.<br />
Important<br />
Observe the safety precautions<br />
beginning on page 22 before<br />
performing any work on the<br />
engine or in the engine<br />
compartment.<br />
Battery<br />
The battery capacity decreases as the temperature<br />
drops. This is due to its chemical<br />
and physical properties. This is why an<br />
extremely cold battery, which is also not<br />
well charged, only has a fraction of the starting<br />
power it has at normal temperatures.<br />
We recommend recharging the battery<br />
every 6 to 8 weeks in the winter. The acid<br />
level and density must be checked. The voltage<br />
of the cells must be measured with the<br />
battery loaded.<br />
It is best to have this work conducted by a<br />
VW Marine Service Partner.<br />
If the engine is not used for several<br />
weeks at extremely low sub-zero<br />
temperatures, the battery should be<br />
removed and stored in a frost-proof<br />
room to prevent it from freezing and<br />
being destroyed.<br />
Cable connections<br />
Check and clean all cable connections, as<br />
oxidised connections lead to voltage drops<br />
and starting difficulties.<br />
Cooling system<br />
The coolant consists of 67 % water and<br />
a 33 % share of our coolant additive<br />
G12A8D (antifreeze on a glycol<br />
basis with corrosion protection additives).<br />
It is advisable to use an antifreeze effective<br />
down to -25 o C.<br />
At temperatures down to -30 o C a mixture<br />
in a ratio of 55 % to 45 %, and down to<br />
-35 o C one of 50 % to 50 % should be used.<br />
If for climatic reasons greater frost protection<br />
is required, the percentage of G 12 A8D<br />
can be increased, however only up to 60 %<br />
(frost protection down to approximately<br />
-40 o C), as otherwise the frost protection is<br />
decreased again and the cooling effect<br />
worsens.<br />
Only our G12A8Dor an additive with the<br />
specification TL-VW 774 D (observe<br />
container label) may be used as a coolant<br />
additive. These additives are available from<br />
VW Marine Service Partners.<br />
70<br />
70 INSPECTION
INSPECTION<br />
Other coolant additives can lead<br />
to a considerable reduction in<br />
corrosion protection.<br />
The resulting corrosion damage can<br />
lead to coolant loss and subsequently<br />
to major engine damage.<br />
Important note<br />
Please observe the following when<br />
topping off:<br />
G 12 may never be mixed with other<br />
coolant additives (including with<br />
G11).<br />
You can recognise the G 12 from its<br />
red colour. If the liquid is brown,<br />
G 12 has been mixed with another<br />
coolant!<br />
In this case the coolant must be<br />
changed immediately!<br />
Otherwise serious malfunctions or<br />
engine damage may occur!<br />
Important<br />
Observe the safety precautions<br />
beginning on page 22 before<br />
performing any work on the<br />
engine or in the engine<br />
compartment.<br />
INSPECTION 71<br />
71
INSPECTION<br />
Tropical operation<br />
To protect the engine against heat, dust and<br />
corrosion, the following measures are<br />
required:<br />
Important<br />
Observe the safety precautions<br />
beginning on page 22 before<br />
performing any work on the<br />
engine or in the engine<br />
compartment.<br />
Engine<br />
If th unit is not operated for a longer period,<br />
the engine should be protected against<br />
possible corrosion damage.<br />
See the chapter ”Preserving engine”.<br />
Battery<br />
Check the battery acid level above the upper<br />
edge of the plates weekly. It is approx.<br />
5 mm or can be read off at the existing acid<br />
level marks. In case of losses due to evaporation,<br />
only distilled water may be added.<br />
Observe the instructions on pages 61.<br />
Air filter<br />
If the engine is to be operated in very dusty<br />
areas, check the filter insert more<br />
frequently.<br />
Observe the instructions on page 50 for this<br />
purpose.<br />
Cooling system<br />
The coolant level must be checked daily. If<br />
a coolant loss is determined, the cooling<br />
system must be checked for leaks, as normally<br />
coolant losses hardly occur in the<br />
closed cooling system.<br />
Observe the instructions on the pages 14,<br />
52 and 53.<br />
Fuel filter<br />
Drain the water from the filter weekly.<br />
The fuel filter should be changed earlier<br />
than specified in the service schedule if<br />
necessary.<br />
Observe the instructions on the pages 44<br />
and 47.<br />
72<br />
72 INSPECTION
TECHNICAL DATA<br />
SDI 55-5 Diesel Engine<br />
Engine data<br />
Output at rpm 40 kW (55 bhp) / 2500<br />
Maximum torque in Nm at rpm 155 / 2250<br />
No. of cylinders, displacement 5 cylinders, 2461 cm 3<br />
Compression ratio 19.0<br />
Bore/stroke in mm 81,0 / 95,5<br />
Weight in kg 1) 260<br />
Diesel fuel<br />
Complies with the following emission<br />
legislation<br />
Certificate No. as per BSO 2<br />
Fuel consumption<br />
Min. specific in g/kWh 233<br />
Filling capacities<br />
at least CN 49 as per DIN EN 590 or<br />
bio-diesel as per DIN 51606<br />
Lake Constance<br />
Shipping Code Level 2/<br />
M10330005<br />
Coolant in litres approx. 12.0 G12<br />
Hydraulic oil<br />
Power steering in litres approx. 1.0 ATF<br />
Depending on reversing<br />
gearbox type in litres approx. 2.5 - 3.5<br />
Motor oil 2) with filter change<br />
Theoillevelmustbechecked<br />
when topping up.<br />
Do not overfill!<br />
in litres<br />
VW Marine Longlife oil Specification VW 506 00 (0W30)<br />
1) The weight corresponds to a dry engine, with<br />
ancillary units, cooling system and clutch<br />
flange.<br />
2) For additional information see ”Motor oil” on<br />
page 39.<br />
6,0<br />
DIESEL ENGINES 73<br />
73
TECHNICAL DATA<br />
SDI 75-5 Diesel Engine<br />
Engine data<br />
Output at rpm 55 kW (75 bhp) / 3600<br />
Maximum torque in Nm at rpm 155 / 2250<br />
No. of cylinders, displacement 5 cylinders, 2461 cm 3<br />
Compression ratio 19,0<br />
Bore/stroke in mm 81,0 / 95,5<br />
Weight in kg 1) 260<br />
Diesel fuel<br />
Complies with the following emission<br />
legislation<br />
Certificate No. as per BSO 2<br />
Fuel consumption<br />
Min. specific in g/kWh 233<br />
Filling capacities<br />
at least CN 49 as per DIN EN 590 or<br />
bio-diesel as per DIN 51606<br />
Lake Constance<br />
Shipping Code Level 2/<br />
M10330005<br />
Coolant in litres approx. 12.0 G12<br />
Hydraulic oil<br />
Power steering in litres approx. 1.0 ATF<br />
Depending on reversing<br />
gearbox type in litres approx. 2.5 - 3.5<br />
Motor oil 2) with filter change<br />
The oil level must be checked<br />
when topping up.<br />
Do not overfill!<br />
in litres<br />
VW Marine Longlife oil Specification VW 506 00 (0W30)<br />
1) The weight corresponds to a dry engine, with<br />
ancillary units, cooling system and clutch<br />
flange.<br />
2) For additional information see ”Motor oil” on<br />
page 39.<br />
6,0<br />
74<br />
74 DIESEL ENGINES
TECHNICAL DATA<br />
TDI 100-5 Diesel Engine<br />
Engine data<br />
Output at rpm 74 kW (100 bhp) / 2600<br />
Maximum torque in Nm at rpm 275 / 2500<br />
No. of cylinders, displacement 5 cylinders, 2461 cm 3<br />
Compression ratio 19,0<br />
Bore/stroke in mm 81,0 / 95,5<br />
Turbocharging Exhaust-gas turbocharger VTG 2)<br />
Weight in kg 1) 275<br />
Diesel fuel<br />
Complies with the following emission<br />
legislation<br />
Certificate No. as per BSO 2<br />
Fuel consumption<br />
Min. specific in g/kWh 217<br />
Filling capacities<br />
at least CN 49 as per DIN EN 590 or<br />
bio-diesel as per DIN 51606<br />
Lake Constance<br />
Shipping Code Level 2/<br />
M10330006<br />
Coolant in litres approx. 12.0 G12<br />
Hydraulic oil<br />
Power steering in litres approx. 1.0 ATF<br />
Depending on reversing<br />
gearbox type in litres approx. 2.5 - 3.5<br />
Motor oil 3) with filter change<br />
Theoillevelmustbechecked<br />
when topping up.<br />
Do not overfill!<br />
in litres<br />
VW Marine Longlife oil Specification VW 506 00 (0W30)<br />
1) The weight corresponds to a dry engine, with<br />
ancillary units, cooling system and clutch<br />
flange.<br />
2) Turbocharger with variable turbine geometry<br />
3) For additional information see ”Motor oil” on<br />
page 39.<br />
6,0<br />
DIESEL ENGINES 75<br />
75
TECHNICAL DATA<br />
TDI 120-5 Diesel Engine<br />
Engine data<br />
Output at rpm 88 kW (120 bhp) / 3250<br />
Maximum torque in Nm at rpm 275 / 2500<br />
No. of cylinders, displacement 5 cylinders, 2461 cm 3<br />
Compression ratio 19,0<br />
Bore/stroke in mm 81,0 / 95,5<br />
Turbocharging Exhaust-gas turbocharger VTG 2)<br />
Weight in kg 1) 275<br />
Diesel fuel<br />
Complies with the following emission<br />
legislation<br />
Certificate No. as per BSO 2<br />
Fuel consumption<br />
Min. specific in g/kWh 217<br />
Filling capacities<br />
at least CN 49 as per DIN EN 590 or<br />
bio-diesel as per DIN 51606<br />
Lake Constance<br />
Shipping Code Level 2/<br />
M10330006<br />
Coolant in litres approx. 12.0 G12<br />
Hydraulic oil<br />
Power steering in litres approx. 1.0 ATF<br />
Depending on reversing<br />
gearbox type in litres approx. 2.5 - 3.5<br />
Motor oil 3) with filter change<br />
The oil level must be checked<br />
when topping up.<br />
Do not overfill!<br />
in litres<br />
VW Marine Longlife oil Specification VW 506 00 (0W30)<br />
1) The weight corresponds to a dry engine, with<br />
ancillary units, cooling system and clutch<br />
flange.<br />
2) Turbocharger with variable turbine geometry<br />
3) For additional information see ”Motor oil” on<br />
page 39.<br />
6,0<br />
76<br />
76 DIESEL ENGINES
TECHNICAL DATA<br />
TDI 150-5 D 4) Diesel Engine<br />
Engine data<br />
Output at rpm 108 kW (147 bhp) / 4000<br />
Maximum torque in Nm at rpm 310 / 1900<br />
No. of cylinders, displacement 5 cylinders, 2461 cm 3<br />
Compression ratio 19,0<br />
Bore/stroke in mm 81,0 / 95,5<br />
Turbocharging Exhaust-gas turbocharger VTG 2)<br />
Charge-air cooling<br />
Weight in kg 1) 280<br />
Diesel fuel<br />
Complies with the following emission<br />
legislation<br />
Certificate No. as per BSO 2<br />
Fuel consumption<br />
Min. specific in g/kWh 203<br />
Filling capacities<br />
Seawater pipe-bundle heat exchanger<br />
AtleastCN49asperDINEN590or<br />
bio-diesel as per DIN 51606<br />
Lake Constance<br />
Shipping Code Level 2/<br />
M10330007<br />
Coolant in litres approx. 12.0 G12<br />
Hydraulic oil<br />
Power steering in litres approx. 1.0 ATF<br />
Depending on reversing<br />
gearbox type in litres approx. 2.5 - 3.5<br />
Motor oil 3) with filter change<br />
Theoillevelmustbechecked<br />
when topping up.<br />
Do not overfill!<br />
in litres<br />
VW Marine Longlife oil Specification VW 506 00 (0W30)<br />
1) The weight corresponds to a dry engine, with<br />
ancillary units, cooling system and clutch<br />
flange.<br />
2) Turbocharger with variable turbine geometry<br />
3) For additional information see ”Motor oil” on<br />
page 39.<br />
4) Version for dual engine systems as per BSO II<br />
6,0<br />
DIESEL ENGINES 77<br />
77
TECHNICAL DATA<br />
TDI 150-5 Diesel Engine<br />
Engine data<br />
Output at rpm 111 kW (150 bhp) / 4000<br />
Maximum torque in Nm at rpm 310 / 1900<br />
No. of cylinders, displacement 5 cylinders, 2461 cm 3<br />
Compression ratio 19,0<br />
Bore/stroke in mm 81,0 / 95,5<br />
Turbocharging Exhaust-gas turbocharger VTG 2)<br />
Charge-air cooling<br />
Weight in kg 1) 280<br />
Diesel fuel<br />
Complies with the following emission<br />
legislation<br />
Certificate No. as per BSO 2<br />
Fuel consumption<br />
Min. specific in g/kWh 207<br />
Filling capacities<br />
Seawater pipe-bundle heat exchanger<br />
at least CN 49 as per DIN EN 590 or<br />
bio-diesel as per DIN 51606<br />
Lake Constance<br />
Shipping Code Level 2/<br />
M10330007<br />
Coolant in litres approx. 12.0 G12<br />
Hydraulic oil<br />
Power steering in litres approx. 1.0 ATF<br />
Depending on reversing<br />
gearbox type in litres approx. 2.5 - 3.5<br />
Motor oil 3) with filter change<br />
The oil level must be checked<br />
when topping up.<br />
Do not overfill!<br />
in litres<br />
VW Marine Longlife oil Specification VW 506 00 (0W30)<br />
1) The weight corresponds to a dry engine, with<br />
ancillary units, cooling system and clutch<br />
flange.<br />
2) Turbocharger with variable turbine geometry<br />
3) For additional information see ”Motor oil” on<br />
page 39.<br />
6,0<br />
78<br />
78 DIESEL ENGINES
TECHNICAL DATA<br />
Engine characteristic data<br />
Important note<br />
Please always specify the model with the<br />
engine number or the engine code when<br />
making all queries, any complaints and<br />
when ordering spare parts.<br />
This will prevent misunderstanding when<br />
processing your query.<br />
Before you read of the characteristic<br />
data, stop the engine and allow it to<br />
cool down.<br />
Important<br />
Observe the safety precautions<br />
beginning on page 22 before<br />
performing any work on the<br />
engine or in the engine<br />
compartment.<br />
The identification plate<br />
The identification plate is located in the front<br />
on the toothed belt guard.<br />
Engine code/Engine number<br />
The engine code and the engine number are<br />
stamped on the left-hand side of the cylinder<br />
block next to the fuel pump. In addition,<br />
they can also be found on the identification<br />
plate.<br />
CHARACTERISTIC DATA 79<br />
79
ALPHABETICAL INDEX<br />
A<br />
Air filter insert .................. 50<br />
Alternator ..................... 15<br />
230 V alternator system ...... 20, 21<br />
Antifreeze ..................... 52<br />
B<br />
Battery ........................ 61<br />
-charge ..................... 65<br />
-remove.....................<br />
63<br />
- renew ...................... 64<br />
- tropical operation ............ 72<br />
- winter operation ............. 70<br />
Battery voltage gauge ............ 9<br />
Biodiesel ...................... 24<br />
C<br />
C-tane number ................. 24<br />
Care .......................... 33<br />
Change motor oil ............... 41<br />
Changes ...................... 25<br />
Characteristic data .............. 79<br />
Start of season ................. 36<br />
Clean untreated water filter ...... 49<br />
Coolant additive ................ 52<br />
coolant level ................... 53<br />
Coolant system ................ 57<br />
Coolant temperature ............ 14<br />
Coolant temperature gauge ....... 8<br />
Cooling system ................ 52<br />
D<br />
Daily checks ................... 34<br />
Description of engines ......... 4, 5<br />
Drain water from circulation<br />
filter .......................... 44<br />
Drain water from fuel filter ....... 47<br />
Driving lever ................... 19<br />
80 INDEX<br />
80
ALPHABETICAL INDEX<br />
E<br />
End of season .............. 35, 67<br />
Engine<br />
- checking oil level ............. 40<br />
-oil ......................... 39<br />
- oil change intervals .......... 41<br />
- oil consumption ............. 40<br />
- oil level ..................... 40<br />
- oil pressure ................. 16<br />
- safety precautions ........... 22<br />
- starting ...................... 6<br />
- test run .................... 66<br />
Engine characteristic data ....... 79<br />
Engine code ................... 79<br />
Engine number ................. 79<br />
Engine oil level, - checking ....... 40<br />
Engine oil pressure gauge ....... 12<br />
Environment<br />
-battery ..................... 64<br />
- diesel fuel ........ 45, 46, 47, 48<br />
- motor oil ................ 42, 43<br />
- operating fluids .............. 23<br />
- used oil ................. 42, 43<br />
Exhaust gases ................. 24<br />
F<br />
Fuel .......................... 24<br />
Fuel filter ...................... 48<br />
Fuel filter insert ................ 48<br />
Fuel system ................... 69<br />
Fuses ......................... 31<br />
G<br />
General diagram ................. 4<br />
General view of engine ........... 4<br />
INDEX 81<br />
81
ALPHABETICAL INDEX<br />
I<br />
Identification plate .............. 79<br />
Ignition switch ................. 19<br />
Inspection intervals ............. 41<br />
Inspection service<br />
- changing motor oil ........... 41<br />
- check power-steering<br />
hydraulic oil level ............ 59<br />
- check ribbed V-belt .......... 60<br />
- checking engine oil level ...... 40<br />
- checking reversing-gearbox<br />
oil level ..................... 58<br />
- clean air filter insert .......... 50<br />
- clean untreated water filter ... 49<br />
- cooling system .............. 52<br />
- drain water from circulation<br />
filter ....................... 44<br />
- drain water from fuel filter .... 47<br />
- engine test run .............. 66<br />
- impeller .................... 55<br />
- Renew circulation filter insert . 45<br />
- renew fuel filter ............. 48<br />
Instrument lighting ............. 18<br />
Instruments .................... 8<br />
K<br />
Knock resistance of fuel ......... 24<br />
L<br />
Lubricant additives .............. 42<br />
Lubricants ..................... 39<br />
M<br />
Maintenance ................... 33<br />
Multi-function indicator .......... 10<br />
82 INDEX<br />
82
ALPHABETICAL INDEX<br />
O<br />
Oil ............................ 39<br />
Oil change intervals ............. 41<br />
Oil consumption ................ 40<br />
Oil dipstick<br />
- engine ..................... 40<br />
- power steering .............. 59<br />
- reversing gearbox ............ 58<br />
Oil filter ....................... 43<br />
Oil filter insert .................. 43<br />
Oil pressure ................... 16<br />
Oil specification ................ 39<br />
On-board computer ............. 10<br />
Operation in cold countries ...... 70<br />
Operation in warm countries ..... 72<br />
P<br />
Parts ......................... 25<br />
Parts replacement .............. 25<br />
Power steering<br />
- check oil level ............... 59<br />
- oil level ..................... 59<br />
Power-steering hydraulic<br />
oil level, - check ................ 59<br />
Preheating warning lamp ........ 16<br />
Preserving engine .............. 67<br />
Preserving the engine ........ 68, 69<br />
R<br />
Reactive anode ................. 57<br />
Renew circulation filter insert .... 45<br />
Renew fuel filter ............... 48<br />
Rev. counter .................... 9<br />
Reversing gearbox<br />
- check oil level ............... 58<br />
- oil level ..................... 58<br />
Reversing-gearbox oil level,<br />
- check ........................ 58<br />
Ribbed V-belt .................. 60<br />
RME fuel ...................... 24<br />
INDEX 83<br />
83
ALPHABETICAL INDEX<br />
S<br />
Safety precautions .............. 22<br />
Seawater cooling system ........ 68<br />
Seawater filter ................. 49<br />
Seawater pump ................ 55<br />
Self-help ...................... 26<br />
Service ....................... 26<br />
Service scope ............... 37, 38<br />
Smoking ...................... 24<br />
Starting the engine .............. 6<br />
Stop switch .................... 18<br />
Switches ...................... 17<br />
Switching off engine ............. 7<br />
Switching off the engine .......... 7<br />
230 V system .............. 21, 32<br />
T<br />
Technical changes .............. 25<br />
Technical description ........... 4, 5<br />
Test run ....................... 66<br />
Tropical operation ............... 72<br />
U<br />
Unleaded fuel .................. 24<br />
V<br />
Voltmeter ...................... 9<br />
W<br />
Warning and indicator lamps ..... 13<br />
Warning lamps ................. 13<br />
Winter operation ............... 70<br />
-battery ..................... 70<br />
- cooling system .............. 52<br />
- diesel fuel .................. 24<br />
- motor oil ................... 39<br />
84 INDEX<br />
84
© 2001 Volkswagen Marine<br />
The texts, illustrations and standards of this manual are based on the state of<br />
information at the time of printing. Reprinting, reproduction or translation, in whole or in<br />
part, is not permitted without the written approval of Volkswagen Marine.<br />
All rights according to the applicable copyright laws are expressly reserved for<br />
Volkswagen Marine. Subject to change.<br />
Postfach 31 11 76, 38231 Salzgitter<br />
5 Cyl. SDI and TDI I Operation I Art.-No. 065.992.B05.20<br />
Editorial Deadline: 08.2003 I Edition: English 08.2003<br />
❀ This paper was produced of woodpulp bleached without chlorine.