5-Cylinder Operating Manual - Zanshin
5-Cylinder Operating Manual - Zanshin
5-Cylinder Operating Manual - Zanshin

You also want an ePaper? Increase the reach of your titles
YUMPU automatically turns print PDFs into web optimized ePapers that Google loves.
DO-IT-YOURSELF<br />
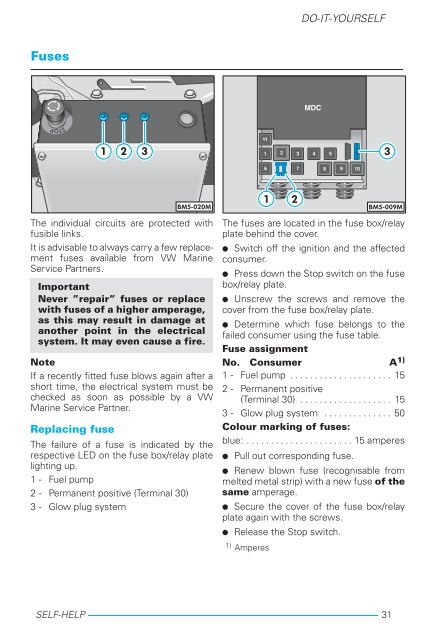
Fuses<br />
1<br />
2 3<br />
3<br />
BM5-020M<br />
The individual circuits are protected with<br />
fusible links.<br />
It is advisable to always carry a few replacement<br />
fuses available from VW Marine<br />
Service Partners.<br />
Important<br />
Never ”repair” fuses or replace<br />
with fuses of a higher amperage,<br />
as this may result in damage at<br />
another point in the electrical<br />
system. It may even cause a fire.<br />
Note<br />
If a recently fitted fuse blows again after a<br />
short time, the electrical system must be<br />
checked as soon as possible by a VW<br />
Marine Service Partner.<br />
Replacing fuse<br />
The failure of a fuse is indicated by the<br />
respective LED on the fuse box/relay plate<br />
lighting up.<br />
1 - Fuel pump<br />
2 - Permanent positive (Terminal 30)<br />
3 - Glow plug system<br />
1<br />
2<br />
BM5-009M<br />
The fuses are located in the fuse box/relay<br />
plate behind the cover.<br />
● Switch off the ignition and the affected<br />
consumer.<br />
● Press down the Stop switch on the fuse<br />
box/relay plate.<br />
● Unscrew the screws and remove the<br />
cover from the fuse box/relay plate.<br />
● Determine which fuse belongs to the<br />
failed consumer using the fuse table.<br />
Fuse assignment<br />
No. Consumer A 1)<br />
1- Fuelpump ..................... 15<br />
2- Permanentpositive<br />
(Terminal 30) ................... 15<br />
3 - Glow plug system .............. 50<br />
Colour marking of fuses:<br />
blue: ...................... 15 amperes<br />
● Pull out corresponding fuse.<br />
● Renew blown fuse (recognisable from<br />
melted metal strip) with a new fuse of the<br />
same amperage.<br />
● Secure the cover of the fuse box/relay<br />
plate again with the screws.<br />
● Release the Stop switch.<br />
1) Amperes<br />
SELF-HELP 31<br />
31