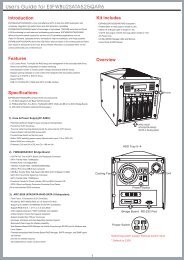
KVM Switch Installation and Quick-Start Manual - SWS a.s.
KVM Switch Installation and Quick-Start Manual - SWS a.s.
KVM Switch Installation and Quick-Start Manual - SWS a.s.

You also want an ePaper? Increase the reach of your titles
YUMPU automatically turns print PDFs into web optimized ePapers that Google loves.
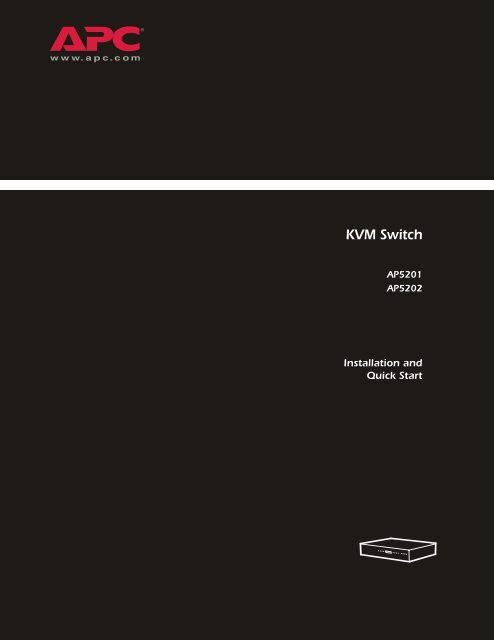
<strong>KVM</strong> <strong>Switch</strong><br />
AP5201<br />
AP5202<br />
<strong>Installation</strong> <strong>and</strong><br />
<strong>Quick</strong> <strong>Start</strong>
Contents<br />
Product Description <strong>and</strong> Inventory . . . . . . . . . . . . . . . . . . . . . . 1<br />
Overview . . . . . . . . . . . . . . . . . . . . . . . . . . . . . . . . . . . . . . . . . 1<br />
Inventory . . . . . . . . . . . . . . . . . . . . . . . . . . . . . . . . . . . . . . . . . 1<br />
Hardware requirements . . . . . . . . . . . . . . . . . . . . . . . . . . . . . . 1<br />
Additional documentation . . . . . . . . . . . . . . . . . . . . . . . . . . . . . 2<br />
Front panel (AP5202 shown) . . . . . . . . . . . . . . . . . . . . . . . . . . 3<br />
Rear panel (AP5202 shown) . . . . . . . . . . . . . . . . . . . . . . . . . . . 4<br />
How to Mount the <strong>KVM</strong> <strong>Switch</strong> . . . . . . . . . . . . . . . . . . . . . . . . . 5<br />
How to Install a Single <strong>KVM</strong> <strong>Switch</strong> . . . . . . . . . . . . . . . . . . . . . . 6<br />
Pre-installation . . . . . . . . . . . . . . . . . . . . . . . . . . . . . . . . . . . . . 6<br />
Single-station installation . . . . . . . . . . . . . . . . . . . . . . . . . . . . . 6<br />
How to Install Multiple <strong>KVM</strong> <strong>Switch</strong>es . . . . . . . . . . . . . . . . . . . . 8<br />
Pre-installation . . . . . . . . . . . . . . . . . . . . . . . . . . . . . . . . . . . . . 8<br />
Serial connection . . . . . . . . . . . . . . . . . . . . . . . . . . . . . . . . . . . 8<br />
How to Apply Power . . . . . . . . . . . . . . . . . . . . . . . . . . . . . . . . 10<br />
Operation . . . . . . . . . . . . . . . . . . . . . . . . . . . . . . . . . . . . . . . . 11<br />
Hot Key mode . . . . . . . . . . . . . . . . . . . . . . . . . . . . . . . . . . . . . 11<br />
Selecting the active port . . . . . . . . . . . . . . . . . . . . . . . . . . . . . 11<br />
Hot Key summary table . . . . . . . . . . . . . . . . . . . . . . . . . . . . . . 12<br />
On Screen Display (OSD) operation . . . . . . . . . . . . . . . . . . . . . 12<br />
OSD Navigation . . . . . . . . . . . . . . . . . . . . . . . . . . . . . . . . . . . 13<br />
OSD functions . . . . . . . . . . . . . . . . . . . . . . . . . . . . . . . . . . . . . 13<br />
Specifications . . . . . . . . . . . . . . . . . . . . . . . . . . . . . . . . . . . . . 14<br />
<strong>KVM</strong> <strong>Switch</strong> — <strong>Installation</strong> <strong>and</strong> <strong>Quick</strong> <strong>Start</strong><br />
i
Product Description <strong>and</strong> Inventory<br />
Overview<br />
The <strong>KVM</strong> <strong>Switch</strong> can connect up to 32 switches to provide direct control of 16 computers or control<br />
of up to 512 computers through serial connections, using only one keyboard, monitor, <strong>and</strong> mouse.<br />
Inventory<br />
Quantity<br />
Item<br />
1 <strong>KVM</strong> <strong>Switch</strong><br />
AP5201 (8 port)<br />
AP5202 (16 port)<br />
1 Configuration cable<br />
1 L5-15 to IEC power cable<br />
2 Brackets for a 19-inch enclosure<br />
1 <strong>Installation</strong> <strong>Manual</strong><br />
1 <strong>KVM</strong> <strong>Switch</strong> Utility CD<br />
1 Warranty card<br />
Hardware requirements<br />
Console. To use the <strong>KVM</strong> <strong>Switch</strong> you will need the following equipment:<br />
• VGA, SVGA, or Multisync monitor capable of the highest resolution that you plan to use on<br />
any computer in the installation<br />
• PS/2-style mouse<br />
• PS/2-style keyboard<br />
Computer. To use <strong>and</strong> access the <strong>KVM</strong> <strong>Switch</strong>, your computer requires the following:<br />
• VGA, SVGA or Multisync card<br />
• 6-pin mini-DIN (PS/2 style) mouse port †<br />
• Keyboard port ‡ :<br />
– 6-pin mini-DIN (PS/2 style) keyboard port with +5VDC on pin 4 <strong>and</strong> ground on pin 3, or<br />
– 5-pin DIN (AT style) keyboard port with +5VDC on pin 5 <strong>and</strong> ground on pin 4<br />
† The <strong>KVM</strong> <strong>Switch</strong> does not support serial mice. You cannot use serial-to-PS/2 adapters with the cables.<br />
‡<br />
If your computer uses an AT-style keyboard socket, purchase a PS/2-to-AT keyboard adapter to plug the cable<br />
into the keyboard port on the computer.<br />
<strong>KVM</strong> <strong>Switch</strong> — <strong>Installation</strong> <strong>and</strong> <strong>Quick</strong> <strong>Start</strong> 1
Product Description <strong>and</strong> Inventory<br />
Cable. To use the <strong>KVM</strong> <strong>Switch</strong>, you need to connect the proper cables to the switch. The following<br />
cables are available for purchase from APC:<br />
APC Part<br />
Number<br />
Cable type<br />
940-0247 PS/2 cable – 6 ft<br />
940-0245 PS/2 cable – 12 ft<br />
940-0246 PS/2 cable – 25 ft<br />
940-0256 USB cable – 6 ft<br />
940-0254 USB cable – 12 ft<br />
940-0255 USB cable – 25 ft<br />
940-0250 SUN (13W3) cable – 6 ft<br />
940-0248 SUN (13W3) cable – 12 ft<br />
940-0249 SUN (13W3) cable – 25 ft<br />
940-0253 SUN (VGA) cable – 6 ft<br />
940-0251 SUN (VGA) cable – 12 ft<br />
940-0252 SUN (VGA) cable – 25 ft<br />
940-0257 Cascade cable for serial connection<br />
Warning<br />
Incorrect installation can cause improper functioning of the device or damage to<br />
hardware. Subst<strong>and</strong>ard cables can produce toxic fumes if a fire occurs.<br />
Additional documentation<br />
The <strong>KVM</strong> <strong>Switch</strong> User’s Guide is available on the supplied CD <strong>and</strong> on the APC Web site<br />
(www.apc.com). The User’s Guide (.\doc\eng\usrguide.pdf) contains additional information about<br />
the following topics related to the <strong>KVM</strong> <strong>Switch</strong>:<br />
• On-Screen Display (OSD) <strong>and</strong> the menu-driven interface<br />
• User accounts<br />
• Hot-plugging<br />
• Hot Key operation<br />
2 <strong>KVM</strong> <strong>Switch</strong> — <strong>Installation</strong> <strong>and</strong> <strong>Quick</strong> <strong>Start</strong>
Product Description <strong>and</strong> Inventory<br />
Front panel (AP5202 shown)<br />
<br />
1<br />
2<br />
3<br />
4<br />
5<br />
6<br />
7<br />
8<br />
LOCAL<br />
F/W UPGRADE<br />
<strong>KVM</strong> <strong>Switch</strong><br />
9<br />
10<br />
11<br />
12<br />
13<br />
14<br />
15<br />
16<br />
RESET<br />
DISABLE<br />
REMOTE<br />
REMOTE<br />
REMOTE CONSOLE<br />
NORMAL RECOVER<br />
POWER<br />
UPGRADE<br />
STATION ID<br />
ON LINE SELECTED<br />
<br />
Item<br />
Description<br />
Port LEDs Each Port LED provides status information about a corresponding computer<br />
port. Each port has a left (Online) <strong>and</strong> right (Selected) LED pair. The<br />
following list describes the LED light indicators:<br />
• A GREEN Online LED indicates the corresponding attached computer port<br />
is up <strong>and</strong> running.<br />
• An ORANGE Selected LED indicates the corresponding attached<br />
computer has the <strong>KVM</strong> focus. Under normal conditions, the LED is steady.<br />
When accessing its port under Auto Scan Mode, the LED flashes.<br />
• Each time the <strong>KVM</strong> <strong>Switch</strong> begins to provide power, it performs a self-test.<br />
The Online <strong>and</strong> Selected LEDs blink once in succession during the selftest.<br />
Reset switch Press the recessed Reset switch with a thin object (the end of a paper clip or<br />
ballpoint pen) to perform a system reset.<br />
Disable Remote button <strong>Switch</strong>es between local <strong>and</strong> remote access to the console.<br />
Remote console To use a remote console, plug the serial cable into the RJ-45 connector. When<br />
both a local <strong>and</strong> remote console are present, both can access the switch (not<br />
simultaneously).<br />
• Push the Disable Remote button to toggle between the remote <strong>and</strong> the local<br />
console.<br />
• When the remote console is in control, you can only view through the local<br />
console. When the local console is in control, you can only view through<br />
the remote console.<br />
•The Local <strong>and</strong> Remote LEDs indicate which console is currently in use.<br />
RJ-11 serial port The firmware upgrade cable plugs into the RJ-11 connector <strong>and</strong> transfers<br />
firmware upgrade data from the administrator's computer to the <strong>KVM</strong><br />
<strong>Switch</strong>.<br />
Power LED Indicates when the <strong>KVM</strong> <strong>Switch</strong> is receiving power.<br />
Station ID LED Displays the station number of the <strong>KVM</strong> <strong>Switch</strong>. The station number is a<br />
two-digit number indicating the switch's position in the cascading sequence.<br />
<br />
Firmware upgrade reset<br />
switch<br />
The reset switch is in NORMAL position during normal operation or while<br />
performing a firmware upgrade. If the firmware upgrade operation does not<br />
succeed, slide the reset switch to the RECOVER position, turn the <strong>KVM</strong><br />
<strong>Switch</strong> off, <strong>and</strong> then restart the <strong>KVM</strong> <strong>Switch</strong>. Slide the reset switch back to<br />
the NORMAL position, turn off the <strong>KVM</strong> <strong>Switch</strong>, <strong>and</strong> then restart the <strong>KVM</strong><br />
<strong>Switch</strong>.<br />
<strong>KVM</strong> <strong>Switch</strong> — <strong>Installation</strong> <strong>and</strong> <strong>Quick</strong> <strong>Start</strong> 3
Product Description <strong>and</strong> Inventory<br />
Rear panel (AP5202 shown)<br />
<br />
<br />
CONSOLE<br />
POWER<br />
CHAIN IN N/A FOR ST No.1 16<br />
15<br />
14<br />
13<br />
12<br />
11<br />
10<br />
9<br />
100-240V--1A, 50/60Hz<br />
CHAIN OUT<br />
8<br />
7<br />
6<br />
5<br />
4<br />
3<br />
2<br />
1<br />
<br />
<br />
<br />
Item<br />
Description<br />
Power inlet 3-pin, AC power inlet<br />
Power switch Rocker-style switch for turning the switch on or off<br />
Mouse connector Connects to a PS/2-style mouse<br />
Chain In port Serially connects one <strong>KVM</strong> <strong>Switch</strong> to another. (This port is not used for<br />
the highest-level <strong>KVM</strong> <strong>Switch</strong> in a cascaded setup.)<br />
Computer connections Monitors connected computers<br />
Chain Out port Serially connects one <strong>KVM</strong> <strong>Switch</strong> to another<br />
Keyboard connector Connects to a PS/2-style keyboard<br />
Monitor connector Connects to a VGA, SVGA, or Multisync monitor capable of the highest<br />
resolution that you plan to use on any computer in the installation<br />
4 <strong>KVM</strong> <strong>Switch</strong> — <strong>Installation</strong> <strong>and</strong> <strong>Quick</strong> <strong>Start</strong>
How to Mount the <strong>KVM</strong> <strong>Switch</strong><br />
Mounting options<br />
You can install the <strong>KVM</strong> <strong>Switch</strong> in the front or the rear of the rack or enclosure. To mount the <strong>KVM</strong><br />
<strong>Switch</strong> horizontally in a NetShelter ® or any other st<strong>and</strong>ard EIA-310 rack or enclosure:<br />
1. Attach the mounting brackets to the front or rear of the <strong>KVM</strong> <strong>Switch</strong>, using flat-head screws<br />
(provided).<br />
2. Insert caged nuts (provided with the rack) on the vertical mounting rails above a number at the<br />
start of a U-space in your enclosure <strong>and</strong> below the same number at the lower end of the<br />
U–space.<br />
21<br />
1 U<br />
20<br />
19<br />
3. Align the mounting holes on the brackets with the caged nuts you installed in step 2, <strong>and</strong> insert<br />
four mounting screws (provided with the rack) to secure the brackets to the enclosure.<br />
<strong>KVM</strong> <strong>Switch</strong> — <strong>Installation</strong> <strong>and</strong> <strong>Quick</strong> <strong>Start</strong> 5
How to Install a Single <strong>KVM</strong> <strong>Switch</strong><br />
Pre-installation<br />
Turn off power to all devices that you plan to connect. To prevent damage to your equipment because<br />
of static-electric discharge, ground all devices on the installation.<br />
Warning<br />
Consult your device manuals or contact the product’s customer support department<br />
for safety <strong>and</strong> grounding instructions.<br />
Single-station installation<br />
In a single-station installation, no additional <strong>KVM</strong> <strong>Switch</strong>es are serially connected to the first switch.<br />
To install:<br />
1. Plug your keyboard, mouse, <strong>and</strong> monitor into the correct ports on the rear of the <strong>KVM</strong> <strong>Switch</strong>.<br />
CONSOLE<br />
POWER<br />
CHAIN IN<br />
N/A FOR ST No.1<br />
100-240V--1A, 50/60Hz<br />
CHAIN OUT<br />
6 <strong>KVM</strong> <strong>Switch</strong> — <strong>Installation</strong> <strong>and</strong> <strong>Quick</strong> <strong>Start</strong>
How to Install a Single <strong>KVM</strong> <strong>Switch</strong><br />
2. Use custom cable sets (see “Cable” on page 2) to connect any available computer port on the<br />
rear of the <strong>KVM</strong> <strong>Switch</strong> to the Keyboard, Video, <strong>and</strong> Mouse ports of the computer you are<br />
installing.<br />
11<br />
10<br />
9<br />
3<br />
2<br />
1<br />
3. Plug the power cable into the port marked Power on the rear of the <strong>KVM</strong> <strong>Switch</strong>, <strong>and</strong> then plug<br />
the power cable into an AC power source.<br />
4. Apply power to the computers.<br />
<strong>KVM</strong> <strong>Switch</strong> — <strong>Installation</strong> <strong>and</strong> <strong>Quick</strong> <strong>Start</strong> 7
How to Install Multiple <strong>KVM</strong> <strong>Switch</strong>es<br />
Pre-installation<br />
Turn off power to all devices that you plan to connect. To prevent damage to your equipment because<br />
of static-electric discharge, ground all devices on the installation.<br />
Warning<br />
Consult your device manuals or contact the product’s customer support department<br />
for safety <strong>and</strong> grounding instructions.<br />
Serial connection<br />
To control additional computers, you can connect up to 31 <strong>KVM</strong> <strong>Switch</strong>es from the first <strong>KVM</strong><br />
<strong>Switch</strong>. In a complete installation, you can control up to 512 computers from a single console.<br />
1. Turn off power to all devices that you plan to connect.<br />
2. Use a serial cable to connect the Chain Out port of the first <strong>KVM</strong> <strong>Switch</strong> to the Chain In port<br />
of the second <strong>KVM</strong> <strong>Switch</strong>. (i.e., first station Chain Out to second station Chain In, second<br />
station Chain Out to third station Chain In, etc.)<br />
Note<br />
Do not use the Chain In port of the first station. The Chain In port is the highestlevel<br />
parent in the chain.<br />
CONSOLE<br />
POWER<br />
CHAIN IN<br />
N/A FOR ST No.1<br />
100-240V--1A, 50/60Hz<br />
CHAIN OUT<br />
CONSOLE<br />
POWER<br />
CHAIN IN<br />
N/A FOR ST No.1<br />
100-240V--1A, 50/60Hz<br />
CHAIN OUT<br />
CONSOLE<br />
POWER<br />
CHAIN IN<br />
N/A FOR ST No.1<br />
100-240V--1A, 50/60Hz<br />
CHAIN OUT<br />
8 <strong>KVM</strong> <strong>Switch</strong> — <strong>Installation</strong> <strong>and</strong> <strong>Quick</strong> <strong>Start</strong>
How to Install Multiple <strong>KVM</strong> <strong>Switch</strong>es<br />
3. Use custom cable sets (see “Cable” on page 2), to connect any available computer port on the<br />
<strong>KVM</strong> <strong>Switch</strong> installation to the Keyboard, Video, <strong>and</strong> Mouse ports of the computers you are<br />
installing.<br />
11<br />
10<br />
9<br />
3<br />
2<br />
1<br />
4. See “How to Apply Power” on page 10 to complete the multi-switch installation.<br />
<strong>KVM</strong> <strong>Switch</strong> — <strong>Installation</strong> <strong>and</strong> <strong>Quick</strong> <strong>Start</strong> 9
How to Apply Power<br />
To apply power for a mutiple-switch system:<br />
1. Plug in the power cable for the first <strong>KVM</strong> station. Wait for the switch to discover <strong>and</strong> display its<br />
station ID on the Station ID LED. (The station ID for the first station is 01, the ID for the<br />
second station is 02, the ID for the third station is 03, <strong>and</strong> so on.)<br />
2. Plug in the power cables for each <strong>KVM</strong> <strong>Switch</strong> on the system in order of second station, third<br />
station, <strong>and</strong> so on. In each case, wait for the station ID to be discovered <strong>and</strong> displayed on the<br />
current <strong>KVM</strong> <strong>Switch</strong> before plugging in the next one.<br />
3. After all the <strong>KVM</strong> <strong>Switch</strong>es are running, apply power to the computers.<br />
Powering off <strong>and</strong> restarting<br />
Always follow this procedure after turning off the <strong>KVM</strong> <strong>Switch</strong>.<br />
1. Remove power from all connected computers.<br />
Note<br />
Unplug the power cord of any computer with the Keyboard Power On function<br />
enabled; otherwise, the station continues to receive power from the computers.<br />
2. Wait 10 seconds, <strong>and</strong> then plug in the <strong>KVM</strong> <strong>Switch</strong>.<br />
3. Apply power to the computers only after the <strong>KVM</strong> <strong>Switch</strong> is running.<br />
Note<br />
If you shut down more then one station, apply power to the highest-numbered<br />
station first, continuing down to the lowest-numbered station.<br />
10 <strong>KVM</strong> <strong>Switch</strong> — <strong>Installation</strong> <strong>and</strong> <strong>Quick</strong> <strong>Start</strong>
Operation<br />
Select ports using one of the following two methods: entering Hot Key combinations from the<br />
keyboard or using the On-Screen Display (OSD).<br />
Hot Key mode<br />
To activate or deactivate Hot Key mode, press NUM LOCK <strong>and</strong> the hyphen key at the same time.<br />
Note<br />
Release the hyphen key within ½ second. Otherwise Hot Key activation stops <strong>and</strong> has<br />
no effect.<br />
When Hot Key mode is active, the following changes occur:<br />
• Caps Lock <strong>and</strong> Scroll Lock LEDs flash in succession. These stop flashing <strong>and</strong> revert to normal<br />
status after you exit Hot Key mode.<br />
• The screen displays the words Hot Keys <strong>and</strong> all subsequent keyed-in Hot Key information.<br />
• Ordinary keyboard <strong>and</strong> mouse function have no effect. You may only input Hot Key-compliant<br />
keystrokes <strong>and</strong> mouse clicks.<br />
Press ESC to exit Hot Key mode.<br />
See also<br />
See the User’s Guide on the provided <strong>KVM</strong> <strong>Switch</strong> Utility CD for additional<br />
information about Hot Key functions.<br />
Selecting the active port<br />
Each computer port is assigned a Port ID. Directly access any computer on the installation with a Hot<br />
Key combination that specifies the Port ID of the connected computer’s port.<br />
To select the active port:<br />
1. Activate Hot Key mode by pressing NUM LOCK <strong>and</strong> the hyphen key at the same time.<br />
2. Enter the Port ID.<br />
Note<br />
The Port ID displays on the Comm<strong>and</strong> Line as you type each number. For<br />
example, enter 0305 to switch to Port 5 of the third <strong>KVM</strong> <strong>Switch</strong> on the chain.<br />
Use BACKSPACE to erase an incorrectly typed number.<br />
Press ENTER. The <strong>KVM</strong> <strong>Switch</strong> will focus on the designated computer <strong>and</strong> exit Hot Key mode.<br />
<strong>KVM</strong> <strong>Switch</strong> — <strong>Installation</strong> <strong>and</strong> <strong>Quick</strong> <strong>Start</strong> 11
Operation<br />
Hot Key summary table<br />
The following table summarizes Hot Key operations on the <strong>KVM</strong> <strong>Switch</strong>:<br />
NUM LOCK +<br />
hyphen<br />
Action<br />
Port ID<br />
T + number<br />
1–255<br />
A<br />
Description<br />
<strong>Switch</strong>es access to the computer corresponding to the Port ID.<br />
Sets the Auto Scan interval to a number of seconds from 1 to 255.<br />
• Activates Auto Scan mode.<br />
• To pause Auto Scan, press P or left-click the mouse.<br />
• To resume Auto Scan, press any key or left-click the mouse.<br />
Activates Skip mode <strong>and</strong> skips from the current port to the preceding<br />
port.<br />
Activates Skip mode <strong>and</strong> skips from the current port to the next port.<br />
Activates Skip mode <strong>and</strong> skips from the current port to the last port<br />
of the previous <strong>KVM</strong> station.<br />
B<br />
Activates Skip mode <strong>and</strong> skips from the current port to the first port<br />
of the next <strong>KVM</strong> station.<br />
Toggles the beeper on or off.<br />
On Screen Display (OSD) operation<br />
To activate the OSD main menu:<br />
1. Press the pre-assigned hotkey, SCROLL LOCK, twice to access the login window.<br />
See also<br />
Optionally, you can assign the control key as the main menu hotkey. See the User’s<br />
Guide on the provided <strong>KVM</strong> <strong>Switch</strong> Utility CD for additional information.<br />
2. Do either of the following:<br />
– Enter a valid password in the password field, <strong>and</strong> press ENTER.<br />
– For a first-time OSD activation, or if the password has not been set, leave the password field<br />
blank, <strong>and</strong> press ENTER.<br />
The OSD main menu appears in Administrator mode. Administrator mode provides access to both<br />
Administrator <strong>and</strong> User functions <strong>and</strong> lets you set up operations (including future password<br />
authorization).<br />
12 <strong>KVM</strong> <strong>Switch</strong> — <strong>Installation</strong> <strong>and</strong> <strong>Quick</strong> <strong>Start</strong>
Operation<br />
OSD navigation<br />
Use any of the following methods to navigate the OSD main menu screen:<br />
• To dismiss the main menu <strong>and</strong> deactivate the OSD, press ESC or click the X at the upper-right<br />
h<strong>and</strong> corner of the screen.<br />
• To log off of the OSD, press F8 or click F8 LOUT at the top of the screen.<br />
• To move up or down through the list one line at a time, press the up or down arrows key or click<br />
the up or down arrow symbols on the OSD’s right scroll bar.<br />
• To move up or down through the list one screen at a time, press the PGUP or PGDN key or click<br />
the up or down arrow symbols on the OSD’s right scroll bar.<br />
• To activate a port, double-click its name in the list or highlight the name, <strong>and</strong> press ENTER.<br />
Each action returns you to the menu.<br />
OSD functions<br />
The OSD provides a series of function keys to configure <strong>and</strong> control various computer operations.<br />
For example, you can switch to any port, scan selected ports, <strong>and</strong> limit the list of ports you want to<br />
view. You can also manage port names or make OSD setting adjustments.<br />
To access any OSD function do one of the following:<br />
• Press the desired function key on your keyboard.<br />
• Click a function key menu option located at the top of the main menu screen.<br />
A submenu appears that corresponds to your selected function key.<br />
Press ESC to return to the previous menu level.<br />
See also<br />
See the User’s Guide on the provided <strong>KVM</strong> <strong>Switch</strong> Utility CD for additional<br />
information on the On Screen Display <strong>and</strong> its functions.<br />
<strong>KVM</strong> <strong>Switch</strong> — <strong>Installation</strong> <strong>and</strong> <strong>Quick</strong> <strong>Start</strong> 13
Specifications<br />
Electrical<br />
Power supply<br />
Connectors<br />
Console VGA<br />
Console K/M<br />
CPU Ports<br />
Serial connection<br />
Remote access<br />
Firmware Upgrade<br />
Power<br />
Emulation<br />
Keyboard<br />
Mouse<br />
Scan interval<br />
Power consumption<br />
100–240 V; 50 or 60 Hz<br />
HDB - 15F<br />
(2) pin mini DIN F (keyboard: purple; Mouse: green)<br />
(16) SPDB - 15F<br />
DB - 25 F, 1 × DB - 25 M<br />
RJ-45<br />
RJ-11<br />
3-pin AC power jack<br />
PS/2<br />
PS/2<br />
User specified: 1 to 255 seconds<br />
DC 9V, 8W (max)<br />
Physical<br />
<strong>Switch</strong>es<br />
Power<br />
Firmware recover<br />
Reset<br />
Remote access<br />
LEDs<br />
On-line<br />
Selected<br />
Power<br />
Station ID<br />
Video<br />
Housing<br />
Weight<br />
Dimensions (L × W × H)<br />
Rocker switch<br />
Slide switch<br />
Semi-recessed push-button<br />
Locking push-button<br />
16 (Green)<br />
16 (Orange)<br />
1 (Blue)<br />
2 7 segments<br />
1920 × 1440, DDC2B<br />
Metal<br />
7.9 lb (3.56 kg)<br />
17 × 8.25 × 1.75 in (43.2 × 21 × 4.5 cm)<br />
Environmental<br />
Temperature<br />
Operating<br />
Storage<br />
Humidity<br />
0 to 50º C (32º to 122º F)<br />
–20 to 60º C (–4º to 122º F)<br />
0–80% RH<br />
14 <strong>KVM</strong> <strong>Switch</strong> — <strong>Installation</strong> <strong>and</strong> <strong>Quick</strong> <strong>Start</strong>
Radio Frequency Interference<br />
Warning<br />
Changes or modifications to this unit not<br />
expressly approved by the party<br />
responsible for compliance could void the<br />
user’s authority to operate this<br />
equipment.<br />
USA—FCC<br />
Canada—ICES<br />
This equipment has been tested <strong>and</strong> found to comply with the limits for a<br />
Class A digital device, pursuant to part 15 of the FCC Rules. These limits are<br />
designed to provide reasonable protection against harmful interference when<br />
the equipment is operated in a commercial environment. This equipment<br />
generates, uses, <strong>and</strong> can radiate radio frequency energy <strong>and</strong>, if not installed<br />
<strong>and</strong> used in accordance with this user manual, may cause harmful<br />
interference to radio communications. Operation of this equipment in a<br />
residential area is likely to cause harmful interference. The user will bear sole<br />
responsibility for correcting such interference.<br />
This Class A digital apparatus complies with Canadian ICES-003.<br />
Cet appareil numérique de la classe A est conforme à la norme NMB-003 du<br />
Canada.<br />
Japan—VCCI<br />
This is a Class A product based on the st<strong>and</strong>ard of the Voluntary Control<br />
Council for Interference by Information Technology Equipment (VCCI). If<br />
this equipment is used in a domestic environment, radio disturbance may<br />
occur, in which case, the user may be required to take corrective actions.<br />
この 装 置 は、 情 報 処 理 装 置 等 電 波 障 害 自 主 規 制 協 議 会 (VCCI)<br />
の 基 準 に 基 づくクラス A 情 報 技 術 装 置 です。この 装 置 を 家 庭<br />
環 境 で 使 用 すると、 電 波 妨 害 を 引 き 起 こすことがあります。こ<br />
の 場 合 には、 使 用 者 が 適 切 な 対 策 を 講 ずるように 要 求 されるこ<br />
とがあります。<br />
a<br />
a
APC Worldwide Customer Support<br />
Customer support for this or any other APC product is available at no charge in any of the following ways:<br />
• Visit the APC Web site to find answers to frequently asked questions (FAQs), to access<br />
documents in the APC Knowledge Base, <strong>and</strong> to submit customer support requests.<br />
– www.apc.com (Corporate Headquarters)<br />
Connect to localized APC Web sites for specific countries, each of which provides customer<br />
support information.<br />
– www.apc.com/support/<br />
Global support with FAQs, knowledge base, <strong>and</strong> e-support.<br />
• Contact an APC Customer Support center by telephone or e-mail.<br />
– Regional centers:<br />
Direct InfraStruXure Customer Support<br />
Line<br />
APC headquarters U.S., Canada<br />
Latin America<br />
Europe, Middle East, Africa<br />
(1)(877)537-0607 (toll free)<br />
(1)(800)800-4272 (toll free)<br />
(1)(401)789-5735 (USA)<br />
(353)(91)702000 (Irel<strong>and</strong>)<br />
Japan (0) 35434-2021<br />
Australia, New Zeal<strong>and</strong>, South Pacific<br />
area<br />
(61) (2) 9955 9366 (Australia)<br />
– Local, country-specific centers: go to www.apc.com/support/contact for contact information.<br />
Contact the APC representative or other distributor from whom you purchased your APC product for<br />
information on how to obtain local customer support.<br />
Entire contents copyright © 2003 American Power Conversion. All rights reserved.<br />
Reproduction in whole or in part without permission is prohibited. APC, the APC logo, <strong>and</strong><br />
NetShelter are trademarks of American Power Conversion Corporation <strong>and</strong> may be<br />
registered in some jurisdictions. All other trademarks, product names, <strong>and</strong> corporate names<br />
are the property of their respective owners <strong>and</strong> are used for informational purposes only.<br />
*990-1744*<br />
990-1744 12/2003