
You also want an ePaper? Increase the reach of your titles
YUMPU automatically turns print PDFs into web optimized ePapers that Google loves.
GETTING STARTED
The information in this document is subject to change without notice and does not represent a<br />
commitment on the part of Native Instruments GmbH. The software described by this document is<br />
subject to a License Agreement and may not be copied to other media. No part of this publication<br />
may be copied, reproduced or otherwise transmitted or recorded, for any purpose, without prior<br />
written permission by Native Instruments GmbH, hereinafter referred to as Native Instruments. All<br />
product and company names are or ® trademarks of their respective owners.<br />
Users Guide written by André Benedix<br />
Version: 1.0 (10/2008)<br />
Special thanks to the Beta Test Team, who were invaluable not just in tracking down bugs, but in<br />
making this a better product.
Germany<br />
NATIVE INSTRUMENTS GmbH<br />
Schlesische Str. 28<br />
D-10997 Berlin<br />
Germany<br />
info@native-instruments.de<br />
www.native-instruments.de<br />
USA<br />
NATIVE INSTRUMENTS North America, Inc.<br />
5631 Hollywood Boulevard<br />
Los Angeles, CA 90028<br />
USA<br />
sales@native-instruments.com<br />
www.native-instruments.com<br />
MASSIVE was designed and developed entirely by Native Instruments GmbH. Solely the name<br />
Massive is a registered trademark of Massive Audio Inc, USA.<br />
© Native Instruments GmbH, 2008. All rights reserved.
1. Driver Installation<br />
Please do not connect the <strong>AUDIO</strong> 4 <strong>DJ</strong> to your computer until the installer asks you to do so.<br />
This chapter provides a step-by-step guide explaining how to install the required drivers<br />
and software, which areneeded for using the <strong>AUDIO</strong> 4 <strong>DJ</strong>.<br />
1.1 Installing the <strong>AUDIO</strong> 4 <strong>DJ</strong> Driver on Windows XP and Windows Vista<br />
1.<br />
2.<br />
3.<br />
Place the installation CD-ROM in your computer’s CD/DVD-ROM drive.<br />
Use the Windows Explorer to browse the content of the CD.<br />
Double-click the installer file named “<strong>AUDIO</strong> 4 <strong>DJ</strong> Driver Setup”.<br />
4. Click “Next.”<br />
<strong>Getting</strong> <strong>Started</strong>: <strong>AUDIO</strong> 4 <strong>DJ</strong> <strong>–</strong> 4
5. To continue, you need to accept the license agreement first. After you have read the<br />
license agreement, check the according checkbox and click “Next.”<br />
6. In the next dialog, choose the destination folder for the driver installation. To use the default<br />
path, just click “Next.” If you wish to select a custom path, click “Change”, browse<br />
to the folder where you want to install the Audio 4 <strong>DJ</strong> Driver and click “Next.”<br />
<strong>Getting</strong> <strong>Started</strong>: <strong>AUDIO</strong> 4 <strong>DJ</strong> <strong>–</strong> 5
7. Now select the folder in the Windows Start dialog to place the <strong>AUDIO</strong> 4 <strong>DJ</strong> Driver<br />
Setup. To use the default path, just click “Next.” To set a custom folder, type in a<br />
name for it, then click “Next.”<br />
8. On the next dialog page, the Install Wizard will prompt you to start the installation<br />
by clicking “Next.” To return to the previous dialog page, click “Back.” To abort the<br />
installation procedure, click “Cancel.”<br />
<strong>Getting</strong> <strong>Started</strong>: <strong>AUDIO</strong> 4 <strong>DJ</strong> <strong>–</strong> 6
9. During the driver installation, a screen will appear with a message that the driver has<br />
not passed Windows Logo Testing; this does not indicate a problem, simply click on<br />
“Continue Anyway” to proceed with the installation.<br />
10. After the TRAKTOR installer has finished running, please connect the <strong>AUDIO</strong> 4 <strong>DJ</strong> to<br />
any available USB port on your computer.<br />
11. After the installation has been performed successfully, click “Finish.”<br />
12. After the TRAKTOR installer has finished running, please connect the <strong>AUDIO</strong> 4 <strong>DJ</strong> to<br />
any available USB port on your computer, using the USB cable included in delivery.<br />
Windows will identify the <strong>AUDIO</strong> 4 <strong>DJ</strong> and begin the final installation process. Choose<br />
“No” if Windows asks you to search the Internet for a driver. Please note that as multiple<br />
driver components are installed, you will see the whole sequence of installer<br />
screens repeated twice; this is not an error, just follow along and make the appropriate<br />
choices to finish the installation.<br />
1.2 Installing the <strong>AUDIO</strong> 4 <strong>DJ</strong> Driver on Mac OS X<br />
1.<br />
2.<br />
3.<br />
Place the installation CD-ROM in your computer’s CD/DVD-ROM drive. Its icon will<br />
appear in the Mac OS X Finder.<br />
Double-click the “<strong>AUDIO</strong> 4 <strong>DJ</strong>” CD icon to display the content of the CD.<br />
Double-click the installer file.<br />
! You cannot install the <strong>AUDIO</strong><br />
! 8 <strong>DJ</strong> on a USB 1.1 port <strong>–</strong> a<br />
USB 2.0 port is required.<br />
You cannot install the <strong>AUDIO</strong><br />
8 <strong>DJ</strong> on a USB 1.1 port <strong>–</strong> a<br />
USB 2.0 port is required.<br />
<strong>Getting</strong> <strong>Started</strong>: <strong>AUDIO</strong> 4 <strong>DJ</strong> <strong>–</strong> 7
4. In the appearing dialog click “Continue” to proceed.<br />
5. Select a destination volume and proceed by clicking “Continue.”<br />
6. Click “Install” to install the driver in the default path or browse to select a custom<br />
installation path by clicking “Change Install Location” and then click “Install.”<br />
<strong>Getting</strong> <strong>Started</strong>: <strong>AUDIO</strong> 4 <strong>DJ</strong> <strong>–</strong> 8
7. The next screen informs you that your computer needs to be restarted when the installation<br />
is done. If you have any other applications running, you should close them<br />
now. To continue, click “Continue Installation.”<br />
8. After a successful installation you will be prompted to restart your Mac. Click “Restart”<br />
to restart your computer.<br />
9. After restarting your computer, connect the <strong>AUDIO</strong> 4 <strong>DJ</strong> to a free USB 2.0 port of your<br />
Mac, using the USB cable included in delivery.<br />
! You cannot install the <strong>AUDIO</strong><br />
! 8 <strong>DJ</strong> on a USB 1.1 port <strong>–</strong> a<br />
USB 2.0 port is required.<br />
You cannot install the <strong>AUDIO</strong><br />
8 <strong>DJ</strong> on a USB 1.1 port <strong>–</strong> a<br />
USB 2.0 port is required.<br />
<strong>Getting</strong> <strong>Started</strong>: <strong>AUDIO</strong> 4 <strong>DJ</strong> <strong>–</strong> 9
2. The <strong>AUDIO</strong> 4 <strong>DJ</strong> Hardware<br />
In this chapter you will learn about the <strong>AUDIO</strong> 4 <strong>DJ</strong>’s controls and connectors. We will refer<br />
to some of the terms introduced here later on, so please use the information provided in<br />
the following sections as a reference.<br />
2.1 Front Panel<br />
1 - Headphone Volume<br />
Use this knob to adjust the level of the Headphone Output. The Headphone Output is<br />
connected to the output channel B.<br />
2 - Headphone Output<br />
Connect your headphones to this ¼” socket.<br />
<strong>Getting</strong> <strong>Started</strong>: <strong>AUDIO</strong> 4 <strong>DJ</strong> <strong>–</strong> 10
2.2 Rear Panel<br />
1 - USB 2.0 Port<br />
Connects the <strong>AUDIO</strong> 4 <strong>DJ</strong> to your computer. The USB 2.0 connection handles data transmission<br />
and provides bus power to your <strong>AUDIO</strong> 4 <strong>DJ</strong>. This means you do not need an<br />
external power supply.<br />
2 - Inputs A & B<br />
You can configure these inputs as 2 stereo pairs of input channels.<br />
3 - Outputs A & B<br />
You can configure these inputs as 2 stereo pairs of output channels.<br />
4 - Ground Screw<br />
Attach your turntable’s grounding wire to this screw to eliminate hum induced by ground<br />
loops from the audio signal.<br />
<strong>Getting</strong> <strong>Started</strong>: <strong>AUDIO</strong> 4 <strong>DJ</strong> <strong>–</strong> 11
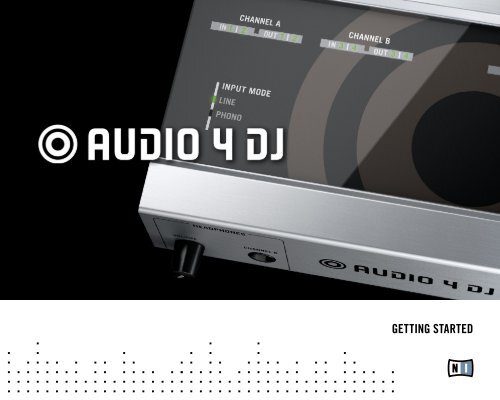
2.3 Status LEDs<br />
1 - CHANNEL A and CHANNEL B:<br />
These LEDs provide information about the <strong>AUDIO</strong> 4 <strong>DJ</strong>’s audio inputs and outputs: they<br />
light up green to indicate that an audio signal is present. If the input signal is too loud<br />
and causes clipping, the LEDs turn red.<br />
2 - USB:<br />
When the <strong>AUDIO</strong> 4 <strong>DJ</strong> is connected, this LED lights up green. If the USB status LED remains<br />
black although the <strong>AUDIO</strong> 4 <strong>DJ</strong> is connected to your computer, please refer to the<br />
“USB Troubleshooting” section in the <strong>AUDIO</strong> 4 <strong>DJ</strong> User Manual.<br />
3 - INPUT MODE (Channel A and Channel B):<br />
Colored LEDs help you identify the Input Mode currently selected.<br />
Use the <strong>AUDIO</strong> 4 <strong>DJ</strong> Settings Tool to select an Input Mode, as explained in chapter 3, and<br />
thus adapt the <strong>AUDIO</strong> 4 <strong>DJ</strong>’s inputs to your line-level or phono devices.<br />
<strong>Getting</strong> <strong>Started</strong>: <strong>AUDIO</strong> 4 <strong>DJ</strong> <strong>–</strong> 12
3. The Settings Tool<br />
This chapter provides an overview of the <strong>AUDIO</strong> 4 <strong>DJ</strong> Settings Tool, which displays the<br />
status of the device as well as itsand for general configuration.<br />
3.1 Open the Settings Tool<br />
►<br />
►<br />
On Mac OS X, double-click on Applications > Audio 4 <strong>DJ</strong> Driver > Settings Tool to<br />
open the Settings Tool.<br />
On Windows, select Start > All Programs > Native Instruments > Audio 4 <strong>DJ</strong> Driver ><br />
Settings Tool to open the Settings Tool.<br />
3.2 Understanding the Settings Tool<br />
<strong>Getting</strong> <strong>Started</strong>: <strong>AUDIO</strong> 4 <strong>DJ</strong> <strong>–</strong> 13
1 - Control Panel<br />
Click on the Control Panel Button to open the Control Panel. The Control Panel is explained<br />
in detail in the <strong>AUDIO</strong> 4 <strong>DJ</strong> User’s Manual.<br />
2 - USB Connection Monitor<br />
This status LED displays whether the <strong>AUDIO</strong> 4 <strong>DJ</strong> is connected to your computer or not.<br />
The USB Connection Monitor LED is black (switched off) if the <strong>AUDIO</strong> 4 <strong>DJ</strong> is not connected<br />
to your computer.<br />
The USB Connection Monitor LED is lit green if the <strong>AUDIO</strong> 4 <strong>DJ</strong> is connected to your<br />
computer.<br />
3 - Input Mode Selector<br />
The InPut Mode SeleCtor selects the mode for the input channels A and B.<br />
Line: Select this if your setup utitilizes line-level audio sources like CD/DVD players, keyboards,<br />
a mixer or other computer audio interfaces.<br />
Phono: Choose this mode for use with a turntable.<br />
4 - Input Gain Selector<br />
This controls the input levels of the Phono Input Mode. It is not available in Line Mode!<br />
! To change any settings, the<br />
! <strong>AUDIO</strong> 4 <strong>DJ</strong> must be connected<br />
to your computer via USB 2.0.<br />
To change any settings, the<br />
<strong>AUDIO</strong> 4 <strong>DJ</strong> must be connected<br />
to your computer via USB 2.0.<br />
<strong>Getting</strong> <strong>Started</strong>: <strong>AUDIO</strong> 4 <strong>DJ</strong> <strong>–</strong> 14
4. Using the <strong>AUDIO</strong> 4 <strong>DJ</strong>: Example Setups<br />
This chapter describes the most common use cases for the <strong>AUDIO</strong> 4 <strong>DJ</strong>. Your personal<br />
setup may differ from what is shown here, but you should easily be able to customize this<br />
information to suit your needs.<br />
4.1 Using the <strong>AUDIO</strong> 4 <strong>DJ</strong> with TRAKTOR<br />
In the following sections you will learn how to set up and use the <strong>AUDIO</strong> 4 <strong>DJ</strong> for <strong>DJ</strong>ing<br />
with the NATIVE INSTRUMENTS’ TRAKTOR product line. Please note that we will refer to<br />
all products from the TRAKTOR product line simply as TRAKTOR, because the functions<br />
described here are identical in all TRAKTOR products.<br />
4.1.1 Simple TRAKTOR Setup<br />
Physical Setup<br />
1.<br />
2.<br />
Connect the output pair 1/2 (Ch. A) of the <strong>AUDIO</strong> 4 <strong>DJ</strong> to your amplifier or powered<br />
speakers.<br />
Connect your headphones to the Headphones Output on the <strong>AUDIO</strong> 4 <strong>DJ</strong>.<br />
To use the <strong>AUDIO</strong> 4 <strong>DJ</strong> for laptop <strong>DJ</strong>ing, connect the devices as pictured in the above diagram.<br />
<strong>Getting</strong> <strong>Started</strong>: <strong>AUDIO</strong> 4 <strong>DJ</strong> <strong>–</strong> 15
Software Setup<br />
1.<br />
2.<br />
3.<br />
4.<br />
5.<br />
6.<br />
7.<br />
8.<br />
9.<br />
Open TRAKTOR.<br />
Open Preferences > Audio Setup > Audio Setup.<br />
From the audIo devICe list, select the <strong>AUDIO</strong> 4 <strong>DJ</strong> entry.<br />
Now open Preferences > Audio Setup > Output Routing.<br />
Choose Internal Mixing Mode.<br />
Choose a channel pair 3/4 for the Output Monitor for pre-listening the Tracks.<br />
Choose a channel pair 1/2 (Ch. A) for the Output Master.<br />
Close the Preferences.<br />
Adjust the headphones volume inside TRAKTOR with the vol KnoB in the Master<br />
Panel and on the <strong>AUDIO</strong> 4 <strong>DJ</strong> front with the Headphone Volume knob to a comfortable<br />
level.<br />
Test the Setup<br />
1.<br />
2.<br />
From TRAKTOR’s list window, drag tracks in both decks and hit the Play/PauSe<br />
ButtonS.<br />
Drag the CroSSfader all the way to the left (Deck A). Click on the Cue Button in the<br />
Mixer Strip of Deck B. You should hear the track playing on Deck B only in your headphones,<br />
while the track in Deck A is playing over your speakers.<br />
! The <strong>AUDIO</strong> 4 <strong>DJ</strong> has to be set to<br />
! Line Mode for use in this setup.<br />
The <strong>AUDIO</strong> 4 <strong>DJ</strong> has to be set to<br />
Line Mode for use in this setup.<br />
<strong>Getting</strong> <strong>Started</strong>: <strong>AUDIO</strong> 4 <strong>DJ</strong> <strong>–</strong> 16
4.1.2 Extended TRAKTOR Setup<br />
Physical Setup<br />
1.<br />
2.<br />
3.<br />
Connect the outputs of the <strong>AUDIO</strong> 4 <strong>DJ</strong> to the mixer inputs. Each stereo output channel<br />
of the <strong>AUDIO</strong> 4 <strong>DJ</strong> connects to one of the stereo channel inputs of the mixer. Use<br />
RCA cables for the connections.<br />
Connect your headphones to the mixer.<br />
Connect the mixer’s outputs to the inputs of the amplifier system driving your speakers<br />
(or to your pair of active monitor speakers, respectively).<br />
To add a mixer to your <strong>DJ</strong> setup, connect the devices as pictured in the above diagram.<br />
Software Setup<br />
1.<br />
2.<br />
3.<br />
4.<br />
5.<br />
6.<br />
7.<br />
Open TRAKTOR.<br />
Open Preferences > Audio Setup > Audio Setup.<br />
Drop down the Audio Device list to select the <strong>AUDIO</strong> 4 <strong>DJ</strong>.<br />
Now open Preferences > Audio Setup > Output Routing.<br />
Choose External Mixing Mode.<br />
For Out Channel A, choose an output pair from the dropdown menu, e.g. Out 1 and<br />
Out 2.<br />
For Out Channel B, choose another output pair from the dropdown menu, e.g. Out 3<br />
and Out 4.<br />
% With the <strong>AUDIO</strong> 4 <strong>DJ</strong> you can<br />
% use 2 Decks in TRAKTORs<br />
External Mode.<br />
With the <strong>AUDIO</strong> 4 <strong>DJ</strong> you can<br />
use 2 Decks in TRAKTORs<br />
External Mode.<br />
<strong>Getting</strong> <strong>Started</strong>: <strong>AUDIO</strong> 4 <strong>DJ</strong> <strong>–</strong> 17
Test the Setup<br />
1.<br />
2.<br />
3.<br />
4.<br />
From the list window, drag tracks in both decks and hit the Play/PauSe Button.<br />
Drag the crossfader of your <strong>DJ</strong> mixer all the way to the left (Deck A or Channel 1).<br />
Set the headphones mix knob/fader of your <strong>DJ</strong> mixer to 0%. If you do not find a headphones<br />
mix knob/fader, please consult the manual of your <strong>DJ</strong> mixer.<br />
Use the cue button/switch/fader of Deck B (Channel 2) of your <strong>DJ</strong> mixer. If you do not<br />
find a cue button/switch/fader, please consult the manual of your hardware mixer. You<br />
should hear the track playing on Deck B only in your headphones, while the track in<br />
Deck A plays over your speakers.<br />
4.2 Using the <strong>AUDIO</strong> 4 <strong>DJ</strong> as Default Device for Recording<br />
You can use the <strong>AUDIO</strong> 4 <strong>DJ</strong> as a recording device for recording from vinyl as well as for<br />
capturing your own musical performance.<br />
4.2.1 Using the <strong>AUDIO</strong> 4 <strong>DJ</strong> as Recording Device on Windows<br />
1.<br />
2.<br />
3.<br />
4.<br />
5.<br />
Open Start > Control Panel > Sounds & Audio Devices.<br />
Click the “Audio” tab.<br />
Set the <strong>AUDIO</strong> 4 <strong>DJ</strong> as your “Default Device for Sound Recording” by selecting the<br />
<strong>AUDIO</strong> 4 <strong>DJ</strong>’s channel pair you want to record from, e.g. <strong>AUDIO</strong> 4 <strong>DJ</strong> (CH. A, In 1/2).<br />
In your recording software’s Options dialog, choose the appropriate input.<br />
Adjust the input level in your recording software and start recording.<br />
4.2.2 Using the <strong>AUDIO</strong> 4 <strong>DJ</strong> as Recording Device on Mac OS X<br />
1.<br />
2.<br />
3.<br />
Open Applications/Utilities/Audio MIDI Setup.<br />
On the “Audio Devices” page, choose <strong>AUDIO</strong> 4 <strong>DJ</strong> as “Default Input”.<br />
Adjust the input level in your recording software and start recording.<br />
<strong>Getting</strong> <strong>Started</strong>: <strong>AUDIO</strong> 4 <strong>DJ</strong> <strong>–</strong> 18
4.3 Recording Audio from a Line-Level Source<br />
The following setup guide uses a CD player as an example for devices using the <strong>AUDIO</strong> 4<br />
<strong>DJ</strong>’s Line Input Mode. The same applies if you want to connect a hardware synthesizer, a<br />
drum machine or another device that outputs a line-level signal.<br />
To record audio from an external CD player, connect the devices as pictured in the above diagram.<br />
1.<br />
2.<br />
3.<br />
4.<br />
Make sure the volume controls of the amplifier are turned down completely!<br />
In the <strong>AUDIO</strong> 4 <strong>DJ</strong> Settings Tool’s Input Mode Selector, select Line.<br />
Use a RCA cable to connect your CD player’s audio outputs to a free input pair of the<br />
<strong>AUDIO</strong> 4 <strong>DJ</strong>, e.g. <strong>AUDIO</strong> 4 <strong>DJ</strong> (CH. A, In 1/2).<br />
Put a CD in your CD-Player and start playing it.<br />
<strong>Getting</strong> <strong>Started</strong>: <strong>AUDIO</strong> 4 <strong>DJ</strong> <strong>–</strong> 19
4.4 Using the <strong>AUDIO</strong> 4 <strong>DJ</strong> with a Turntable<br />
To record audio from a turntable, connect the devices as pictured in the above diagram.<br />
1.<br />
2.<br />
3.<br />
4.<br />
5.<br />
Make sure the volume controls of the amplifier are turned down completely!<br />
In the <strong>AUDIO</strong> 4 <strong>DJ</strong> Settings Tool’s Input Mode Selector, select Phono.<br />
Connect the RCA cable of your turntable to the input pair of channel A or B of the<br />
<strong>AUDIO</strong> 4 <strong>DJ</strong>, e.g. <strong>AUDIO</strong> 4 <strong>DJ</strong> (CH. A, In 1/2).<br />
Attach the grounding wire of your turntable to the <strong>AUDIO</strong> 4 <strong>DJ</strong>’s ground screw.<br />
Put a record on your turntable and start playing it.<br />
% This way you can also use the<br />
% <strong>AUDIO</strong> 4 <strong>DJ</strong> for digitizing your<br />
vinyl.<br />
This way you can also use the<br />
<strong>AUDIO</strong> 4 <strong>DJ</strong> for digitizing your<br />
vinyl.<br />
<strong>Getting</strong> <strong>Started</strong>: <strong>AUDIO</strong> 4 <strong>DJ</strong> <strong>–</strong> 20