

PDF Download - Glidewell Dental Labs
PDF Download - Glidewell Dental Labs
PDF Download - Glidewell Dental Labs

Create successful ePaper yourself
Turn your PDF publications into a flip-book with our unique Google optimized e-Paper software.
Implant Placement<br />
The surgical index proved reliable in<br />
accurately positioning the guide for<br />
surgery (Fig. 16). After administering<br />
mandibular anesthesia, the surgical<br />
guide was placed with the aid of the<br />
index, and fixation pins were installed<br />
to hold the guide firmly in place to<br />
begin the surgery.<br />
After using a gingival tissue punch,<br />
the guide was removed to facilitate<br />
removal of tissue at the implant sites.<br />
The index was again used to position<br />
the guide following tissue removal,<br />
and the fixation pins realigned to their<br />
holes without incident. The surgical<br />
guide was used to prepare the osteotomies<br />
and guide the placement of four<br />
4.7 mm implants. Primary stability of<br />
all four implants was acceptable, and<br />
multi-unit abutments were mounted<br />
on top of the implants (Fig. 17).<br />
The temporary prosthesis was held<br />
in place with a luting index, and cold<br />
cure acrylic was used to fix the prosthesis<br />
to the multi-unit temporary<br />
cylinders (Fig. 18). After curing, the<br />
prosthesis was removed and finished<br />
extraorally before being reattached to<br />
the multi-unit abutments (Fig. 19).<br />
Minimal occlusal adjustments were<br />
made immediately after delivery of<br />
the provisional prosthesis. Because<br />
the patient was still under anesthesia,<br />
obtaining an accurate, repeatable<br />
centric occlusion proved challenging.<br />
The patient’s bite was adjusted during<br />
a routine postoperative check a<br />
few days later, and by the third visit,<br />
her bite was comfortable and stable<br />
(Figs. 20a–20c).<br />
The provisional was designed to<br />
remain out of contact with the periimplant<br />
tissue to allow for cleansing. It<br />
also did not cantilever past the distalmost<br />
implant. This abbreviated design<br />
reduced the forces transmitted to the<br />
implants, even though the patient’s<br />
provisional prosthesis was opposed<br />
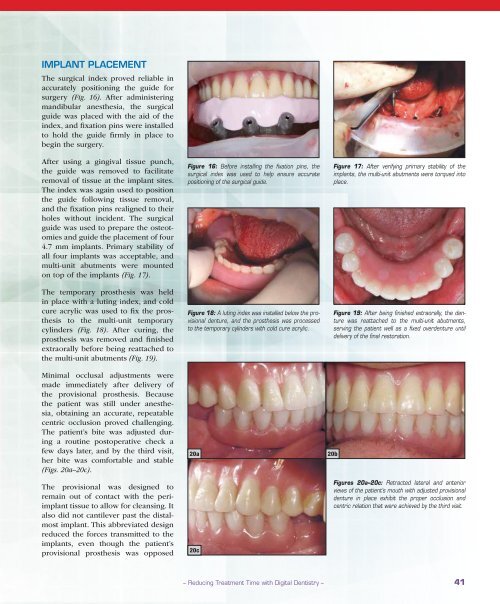
Figure 16: Before installing the fixation pins, the<br />
surgical index was used to help ensure accurate<br />
positioning of the surgical guide.<br />
Figure 18: A luting index was installed below the provisional<br />
denture, and the prosthesis was processed<br />
to the temporary cylinders with cold cure acrylic.<br />
20a<br />
20c<br />
Figure 17: After verifying primary stability of the<br />
implants, the multi-unit abutments were torqued into<br />
place.<br />
Figure 19: After being finished extraorally, the denture<br />
was reattached to the multi-unit abutments,<br />
serving the patient well as a fixed overdenture until<br />
delivery of the final restoration.<br />
20b<br />
Figures 20a–20c: Retracted lateral and anterior<br />
views of the patient’s mouth with adjusted provisional<br />
denture in place exhibit the proper occlusion and<br />
centric relation that were achieved by the third visit.<br />
– Reducing Treatment Time with Digital Dentistry – 41


