

Chairside - Glidewell Dental Labs
Chairside - Glidewell Dental Labs
Chairside - Glidewell Dental Labs

Create successful ePaper yourself
Turn your PDF publications into a flip-book with our unique Google optimized e-Paper software.
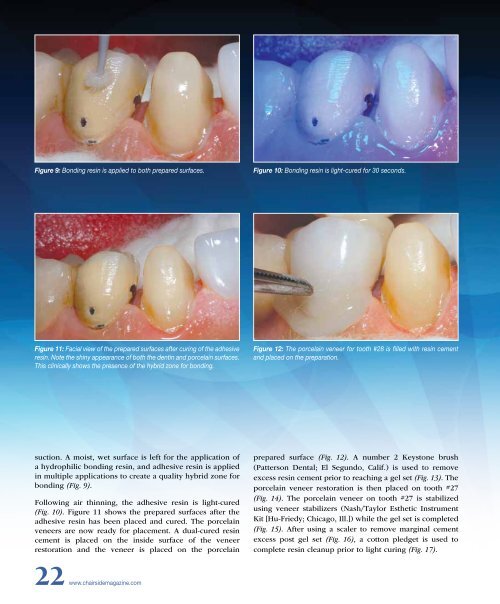
Figure 9: Bonding resin is applied to both prepared surfaces.<br />
Figure 10: Bonding resin is light-cured for 30 seconds.<br />
Figure 11: Facial view of the prepared surfaces after curing of the adhesive<br />
resin. Note the shiny appearance of both the dentin and porcelain surfaces.<br />
This clinically shows the presence of the hybrid zone for bonding.<br />
Figure 12: The porcelain veneer for tooth #28 is filled with resin cement<br />
and placed on the preparation.<br />
suction. A moist, wet surface is left for the application of<br />
a hydrophilic bonding resin, and adhesive resin is applied<br />
in multiple applications to create a quality hybrid zone for<br />
bonding (Fig. 9).<br />
Following air thinning, the adhesive resin is light-cured<br />
(Fig. 10). Figure 11 shows the prepared surfaces after the<br />
adhesive resin has been placed and cured. The porcelain<br />
veneers are now ready for placement. A dual-cured resin<br />
cement is placed on the inside surface of the veneer<br />
restoration and the veneer is placed on the porcelain<br />
prepared surface (Fig. 12). A number 2 Keystone brush<br />
(Patterson <strong>Dental</strong>; El Segundo, Calif.) is used to remove<br />
excess resin cement prior to reaching a gel set (Fig. 13). The<br />
porcelain veneer restoration is then placed on tooth #27<br />
(Fig. 14). The porcelain veneer on tooth #27 is stabilized<br />
using veneer stabilizers (Nash/Taylor Esthetic Instrument<br />
Kit [Hu-Friedy; Chicago, Ill.]) while the gel set is completed<br />
(Fig. 15). After using a scaler to remove marginal cement<br />
excess post gel set (Fig. 16), a cotton pledget is used to<br />
complete resin cleanup prior to light curing (Fig. 17).<br />
22 www.chairsidemagazine.com


