

Chairside - Glidewell Dental Labs
Chairside - Glidewell Dental Labs
Chairside - Glidewell Dental Labs

Create successful ePaper yourself
Turn your PDF publications into a flip-book with our unique Google optimized e-Paper software.
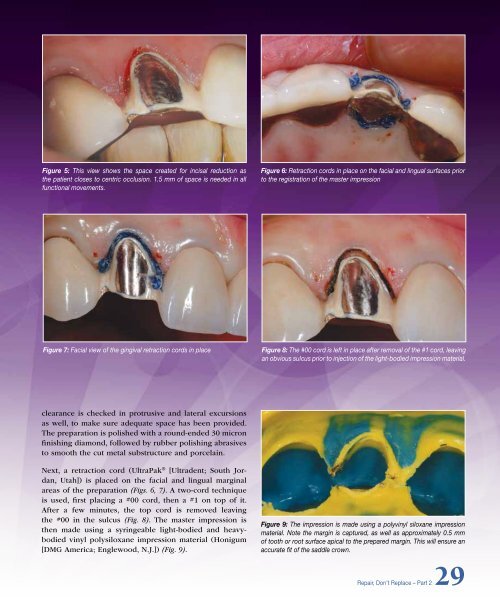
Figure 5: This view shows the space created for incisal reduction as<br />
the patient closes to centric occlusion. 1.5 mm of space is needed in all<br />
functional movements.<br />
Figure 6: Retraction cords in place on the facial and lingual surfaces prior<br />
to the registration of the master impression<br />
Figure 7: Facial view of the gingival retraction cords in place<br />
Figure 8: The #00 cord is left in place after removal of the #1 cord, leaving<br />
an obvious sulcus prior to injection of the light-bodied impression material.<br />
clearance is checked in protrusive and lateral excursions<br />
as well, to make sure adequate space has been provided.<br />
The preparation is polished with a round-ended 30 micron<br />
finishing diamond, followed by rubber polishing abrasives<br />
to smooth the cut metal substructure and porcelain.<br />
Next, a retraction cord (UltraPak ® [Ultradent; South Jordan,<br />
Utah]) is placed on the facial and lingual marginal<br />
areas of the preparation (Figs. 6, 7). A two-cord technique<br />
is used, first placing a #00 cord, then a #1 on top of it.<br />
After a few minutes, the top cord is removed leaving<br />
the #00 in the sulcus (Fig. 8). The master impression is<br />
then made using a syringeable light-bodied and heavybodied<br />
vinyl polysiloxane impression material (Honigum<br />
[DMG America; Englewood, N.J.]) (Fig. 9).<br />
Figure 9: The impression is made using a polyvinyl siloxane impression<br />
material. Note the margin is captured, as well as approximately 0.5 mm<br />
of tooth or root surface apical to the prepared margin. This will ensure an<br />
accurate fit of the saddle crown.<br />
Repair, Don’t Replace – Part 229


