frostskyddskabel frostsikringskabel jäätymissuojakaapeli - Biltema
frostskyddskabel frostsikringskabel jäätymissuojakaapeli - Biltema
frostskyddskabel frostsikringskabel jäätymissuojakaapeli - Biltema

You also want an ePaper? Increase the reach of your titles
YUMPU automatically turns print PDFs into web optimized ePapers that Google loves.
d - dimension of heating cable is 5 x 7 mm<br />
LP<br />
- heating cable length is 2100 cm<br />
LR<br />
- pipe length is 1200 cm<br />
Heating Cable<br />
Fig. 1<br />
o<br />
INSTALLATIONSINSTRUKTIONER 45<br />
Thus, the cable has to be<br />
cable runs is about 11 cm.<br />
Art. 46-365, Art. 46-366<br />
Art. 46-367<br />
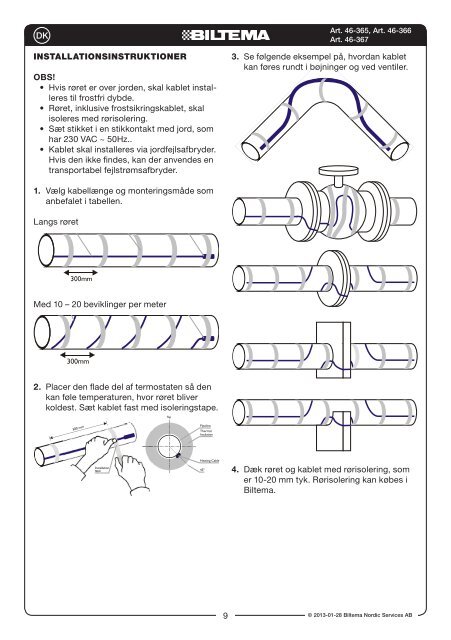
3. Se følgende eksempel på, hvordan kablet<br />
kan føres rundt i bøjninger og ved ventiler.<br />
OBS!<br />
• Hvis røret er over jorden, skal kablet installeres<br />
til frostfri dybde.<br />
• Røret, inklusive frostsikringskablet, skal<br />
isoleres med rørisolering. Thus, the cable has to be wound around the pipe so that the distance between<br />
• Sæt stikket i en stikkontakt cable runs med is about jord, 11 som cm.<br />
har 230 VAC ~ 50Hz..<br />
• Kablet skal installeres via jordfejlsafbryder.<br />
Hvis den ikke findes, kan der anvendes en<br />
transportabel fejlstrømsafbryder.<br />
STAGE 2<br />
The ELEKTRA FreezeTec heating set is laid along the pipe as shown on the<br />
Drawing (Fig. 2a) or helically wound around the pipe (Fig. 2b).<br />
Method used to lay the cable (along or helically around the pipe) depends on the<br />
selected length of heating cable. Cables are attached by means of a tape.<br />
et is laid along the pipe as shown on the<br />
und the 1. Vælg pipe kabellænge (Fig. 2b). og monteringsmåde som<br />
anbefalet i tabellen.<br />
Heating Installation<br />
r helically around the pipe) depends on the<br />
cable<br />
tape<br />
Thermostat<br />
are attached Langs røret by means of a tape.<br />
www.elektra.eu<br />
Heating<br />
cable<br />
Installation<br />
tape<br />
300mm<br />
300mm<br />
Heating Installation<br />
cable<br />
tape<br />
Examples Thermostat of heating cable fitted along the pipe bend and on the valve.<br />
Med<br />
Fig. 2a<br />
10 – 20 beviklinger per meterinstallation tape<br />
heating cable Fig. 2b<br />
Thermostat<br />
Examples of heating cable fitted alo<br />
installation tape<br />
heating cable<br />
The heating cable should surround<br />
the valve from both sides.<br />
www.elektra.eu<br />
300mm<br />
2. Placer den flade del af termostaten så den<br />
Fig. 2b<br />
kan føle temperaturen, hvor røret bliver<br />
koldest. Sæt kablet fast med isoleringstape.<br />
7<br />
5<br />
300 mm<br />
Pipeline<br />
Thermal<br />
Insulation<br />
Fig. 1<br />
Installation<br />
tape<br />
Heating Cable<br />
Examples of heating cable fitted on a pipe flange, suspended pipe bearers and ground suppo<br />
o<br />
45<br />
installation 4. Dæk taperøret og kablet med rørisolering, som<br />
5heating er cable 10-20 mm tyk. Rørisolering kan købes i<br />
<strong>Biltema</strong>.<br />
STAGE 2<br />
The ELEKTRA FreezeTec heating set is laid along the pipe as shown on the<br />
Drawing (Fig. 2a) or helically wound around the pipe (Fig. 2b).<br />
Method used to lay the cable (along or helically around the pipe) depends on the<br />
selected length of heating cable. Cables are attached by means of a tape.<br />
NOTE: Heating cables fitted on valves, flanges or supports cannot come<br />
contact with each other. To prevent possible displacement, the c<br />
should be fitted with extra tape lengths.<br />
Heating<br />
cable<br />
Installation<br />
tape<br />
Thermostat<br />
Heating<br />
cable<br />
Installation<br />
tape<br />
STAGE 3<br />
Thermostat<br />
After the ELEKTRA FreezeTec cable is placed on the pipe, it must be<br />
with self-adhesive aluminium tape along the whole cable length.<br />
Fig. 2a<br />
300mm<br />
Fig. 2b<br />
300mm<br />
8<br />
9<br />
© 2013-01-28 <strong>Biltema</strong> Nordic Services AB