Roof fans - Troges
Roof fans - Troges
Roof fans - Troges

Create successful ePaper yourself
Turn your PDF publications into a flip-book with our unique Google optimized e-Paper software.
RF Fans<br />
Accessories<br />
Fan Accessories Installation<br />
SNK or NDH roof adaptors make the installation of<br />
RF <strong>fans</strong> significantly easier and faster. The roof adaptors<br />
can be used on almost any type of roof.<br />
The opening in the roof construction must not be<br />
larger than the adaptor platform and should be of a precise<br />
square shape. The adaptor platform must be drilled<br />
and screwed to the roof construction.<br />
The contact surfaces of the roof adaptor base and<br />
roof construction must be thoroughly sealed with sealing<br />
cement.<br />
The wiring cable can be led through the roof adaptor<br />
and through the RF fan supporting stud into the terminal<br />
box (see figure # 4).<br />
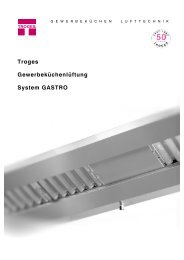
<strong>Roof</strong> hydro-insulation must always be applied on the<br />
roof adaptor up to a height of 30 cm above the roof. The<br />
end of the roof hydro-insulation must be completed with<br />
flashing to prevent water penetration (see fig. # 18).<br />
Standard roof adaptors (without slope) can also<br />
be connected to the air-handling ducting. The details<br />
of the connection are shown in figure #17. Four M8<br />
riveted nuts are situated in the adaptor‘s base plate.<br />
The dimensions of the nut pitches are shown in the figure<br />
in the introduction part.<br />
Figure 17 – <strong>Roof</strong> adaptor on a flat roof<br />
Figure 18 – <strong>Roof</strong> adaptor on a sloping roof<br />
Flashing<br />
<strong>Roof</strong><br />
hydro-insulation<br />
<strong>Roof</strong> adaptor thermal insulation<br />
<strong>Roof</strong> boarding<br />
<strong>Roof</strong> battens<br />
Beam<br />
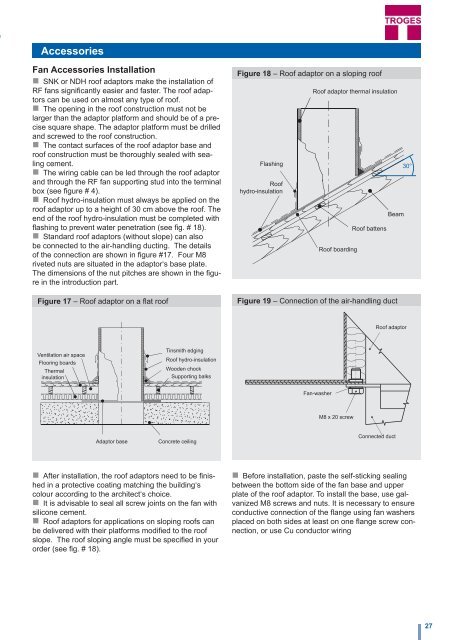
Figure 19 – Connection of the air-handling duct<br />
30°<br />
<strong>Roof</strong> adaptor<br />
Ventilation air space<br />
Flooring boards<br />
Thermal<br />
insulation<br />
Tinsmith edging<br />
<strong>Roof</strong> hydro-insulation<br />
Wooden chock<br />
Supporting balks<br />
Fan-washer<br />
M8 x 20 screw<br />
Adaptor base<br />
Concrete ceiling<br />
Connected duct<br />
After installation, the roof adaptors need to be finished<br />
in a protective coating matching the building‘s<br />
colour according to the architect‘s choice.<br />
It is advisable to seal all screw joints on the fan with<br />
silicone cement.<br />
<strong>Roof</strong> adaptors for applications on sloping roofs can<br />
be delivered with their platforms modified to the roof<br />
slope. The roof sloping angle must be specified in your<br />
order (see fig. # 18).<br />
Before installation, paste the self-sticking sealing<br />
between the bottom side of the fan base and upper<br />
plate of the roof adaptor. To install the base, use galvanized<br />
M8 screws and nuts. It is necessary to ensure<br />
conductive connection of the flange using fan washers<br />
placed on both sides at least on one flange screw connection,<br />
or use Cu conductor wiring<br />
27