

VoiceLive Touch User Manual - TC-Helicon
VoiceLive Touch User Manual - TC-Helicon
VoiceLive Touch User Manual - TC-Helicon

Create successful ePaper yourself
Turn your PDF publications into a flip-book with our unique Google optimized e-Paper software.
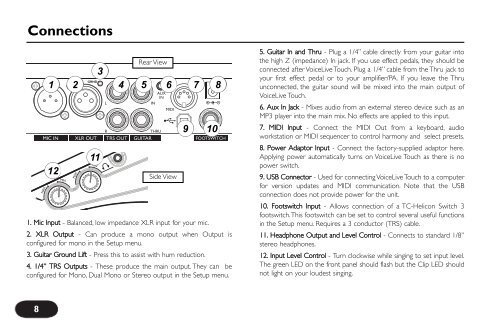
Connections<br />
1 2<br />
12<br />
3<br />
11<br />
Rear View<br />
4 5 6 7 8<br />
Side View<br />
9 10<br />
1. Mic Input - Balanced, low impedance XLR input for your mic.<br />
2. XLR Output - Can produce a mono output when Output is<br />
configured for mono in the Setup menu.<br />
3. Guitar Ground Lift - Press this to assist with hum reduction.<br />
4. 1/4” TRS Outputs - These produce the main output. They can be<br />
configured for Mono, Dual Mono or Stereo output in the Setup menu.<br />
5. Guitar In and Thru - Plug a 1/4” cable directly from your guitar into<br />
the high Z (impedance) In jack. If you use effect pedals, they should be<br />
connected after <strong>VoiceLive</strong> <strong>Touch</strong>. Plug a 1/4” cable from the Thru jack to<br />
your first effect pedal or to your amplifier/PA. If you leave the Thru<br />
unconnected, the guitar sound will be mixed into the main output of<br />
<strong>VoiceLive</strong> <strong>Touch</strong>.<br />
6. Aux In Jack - Mixes audio from an external stereo device such as an<br />
MP3 player into the main mix. No effects are applied to this input.<br />
7. MIDI Input - Connect the MIDI Out from a keyboard, audio<br />
workstation or MIDI sequencer to control harmony and select presets.<br />
8. Power Adaptor Input - Connect the factory-supplied adaptor here.<br />
Applying power automatically turns on <strong>VoiceLive</strong> <strong>Touch</strong> as there is no<br />
power switch.<br />
9. USB Connector - Used for connecting <strong>VoiceLive</strong> <strong>Touch</strong> to a computer<br />
for version updates and MIDI communication. Note that the USB<br />
connection does not provide power for the unit.<br />
10. Footswitch Input - Allows connection of a <strong>TC</strong>-<strong>Helicon</strong> Switch 3<br />
footswitch.This footswitch can be set to control several useful functions<br />
in the Setup menu. Requires a 3 conductor (TRS) cable.<br />
11. Headphone Output and Level Control - Connects to standard 1/8”<br />
stereo headphones.<br />
12. Input Level Control - Turn clockwise while singing to set input level.<br />
The green LED on the front panel should flash but the Clip LED should<br />
not light on your loudest singing.<br />
8


