Wadkin JET Tenoner Manual and Parts List
Wadkin JET Tenoner Manual and Parts List
Wadkin JET Tenoner Manual and Parts List

Create successful ePaper yourself
Turn your PDF publications into a flip-book with our unique Google optimized e-Paper software.
LEICESTER<br />
TENONING & END<br />
JOINTING SYSTEM<br />
www.wadkin.com<br />
info@wadkin.com<br />
INSTRUCTION MANUAL No. 3003
1<br />
Health <strong>and</strong> Safety<br />
Specification<br />
Slinging<br />
Cleaning<br />
Foundation<br />
Wiring Details<br />
Lubrication<br />
Assembly of Machine<br />
Preparation for Operation where Pneumatics<br />
are fitted<br />
Safety Directives<br />
Start <strong>and</strong> Feed Control<br />
Inch Forward/Inch Reverse<br />
Master stop<br />
Adjustable Stops<br />
Fixed Stops<br />
Oversize Timber Pressure Switch<br />
Vertical Adj ustment of Table<br />
Horizontal Adjustment of Table<br />
Front End Stop<br />
<strong>Manual</strong> Shoulder Stops<br />
Pneumatic Shoulder Stops<br />
<strong>Manual</strong> Clamps<br />
Pneumatic Clamps<br />
Drive Belt Replacement<br />
For Replacement parts, Tool <strong>and</strong> Accessories<br />
Contact: <strong>Wadkin</strong> Leicester<br />
Green Lane Works<br />
Leicester. LE5 4PF<br />
Engl<strong>and</strong><br />
Telephone: 0533 769111<br />
Telex: 34646 <strong>Wadkin</strong> G<br />
Fax: 0533 742310<br />
Page 2 & 3<br />
Page 4<br />
Page 8 & 9<br />
Page 9<br />
Page 5, 8 & 9<br />
Page 6, 7 & 9<br />
Page 10 & 22<br />
Page 10<br />
Page 10<br />
Page 10<br />
Page 12<br />
Page 12<br />
Page 12<br />
Page 12<br />
Page 12<br />
Page 12<br />
Page 12<br />
Paga- 12<br />
Page 12<br />
Page 18<br />
Page 18<br />
Page 18<br />
Page 18<br />
Page 20<br />
www.wadkin.com<br />
info@wadkin.com
PREFACE<br />
IMPORTANT<br />
IT IS OUR POLICY AND THAT OF OUR SUPPLIERS TO<br />
CONSTANTLY REVIEW THE DESIGN AND CAPACITY OF OUR<br />
PRODUCTS. WITH THIS IN MIND WE WOULD REMIND OUR<br />
CUSTOMERS THAT WHILE THE DIMENSIONS AND PERFORMANCE<br />
DATA CONTAINED HEREIN ARE CURRENT AT THE TIME OF GOING<br />
TO PRESS, IT IS POSSIBLE THAT DUE TO THE INCORPORATION OF<br />
THE LATEST DEVELOPMENTS TO ENHANCE PERFORMANCE,<br />
DIMENSIONS AND SUPPLIERS MAY VARY FROM THOSE<br />
ILLUSTRATED<br />
THIS MANUAL IS WRITTEN AS A GENERAL GUIDE. A TYPICAL<br />
MACHINE IS SHOWN TO ILLUSTRATE THE MAIN FEATURES.<br />
www.wadkin.com<br />
info@wadkin.com<br />
Failure to comply with instructions in this<br />
book may invalidate the guarantee
2<br />
HEALTH & SAFETY<br />
SAFETY OF WOODWORKING MACHINES<br />
Woodworking machines can be dangerous if improperly used. The wide range of work of which they<br />
are capable, requires adequate safeguarding arrangements against possible hazards.<br />
Many injuries to machinists are caused by carelessness or failure to use the guards provided or to<br />
adjust them correctly.<br />
The Bursgreen Divisions of <strong>Wadkin</strong> plc supply machinery designed for maximum safety which they<br />
believe, as a result of thorough testing, minimizes the risks inevitable in their use. It is the users<br />
responsibility to see that the following rules are complied with to ensure safety at work:<br />
1. The operation of the machine should conform to the requirements of the Woodworking<br />
Machines Regulations 1974. All guards should be used <strong>and</strong> adjusted correctly.<br />
2. Safe methods of working only should be adopted as given in the Health <strong>and</strong> Safety Work<br />
Booklet No. 41, "Safety in the use of Woodworking Machines", (obtainable from Her<br />
Majestey's Stationery Office)<br />
3. Only personnel trained in the safe use of a machine should operate it<br />
4. Before making adjustments or clearing chips, etc., the machine should be stopped <strong>and</strong> all<br />
movement should have ceased.<br />
5. All tools <strong>and</strong> cutters must be securely fixed <strong>and</strong> the speed selected must be appropriate for<br />
the tooling.<br />
Safety is our watchword but the user must comply with the above rules in his own<br />
interest. We would be pleased to advise on the safe use of our products.<br />
www.wadkin.com<br />
Wadkln<br />
info@wadkin.com
3<br />
Safety<br />
CAREFULLY READ INSTRUCTION MANUAL WITH PARTICULAR REFERENCE TO THE<br />
FOLLOWING INSTRUCTIONS:-<br />
1) SLINGING, ie, SAFE LIFTING LIMITS FOR SLINGS ETC.<br />
2) INSTALLATION AND FOUNDATION, le, SAFE WORKING AREA OF MACHINE<br />
AND BOLT POSITIONS, ETC.<br />
3) WIRING DETAILS, 1e, WIRING DIAGRAM AND INSTRUCTIONS FOR SAFE<br />
WIRING OF MACHINE.<br />
4) MACHINE CONTROLS AND OPERATING INSTRUCTIONS.<br />
5) SELECT CORRECT SPEED FOR CUTTER EQUIPMENT AND ENSURE CUTTERS<br />
ARE SECURELY LOCKED IN POSITION.<br />
6) SET GUARDS CORRECTLY TO COVER CUTTER EQUIPMENT AS MUCH AS<br />
POSSIBLE.<br />
7) NOTE START/STOP CONTROL POSITION AND ISOLATOR SWITCH POSITION<br />
(IF FITTED) BEFORE OPERATING MACHINE.<br />
8) USE FEEDING DEVICES WHERE POSSIBLE.<br />
9) REFER TO HEALTH AND SAFETY AT WORK BOOKLET No.41 (IN U.K.)<br />
FOR SAFETY IN THE USE OF WOODWORKING MACHINERY.<br />
www.wadkin.com<br />
info@wadkin.com
4<br />
J<br />
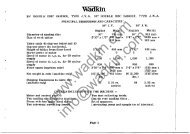
SPEC I F I CA T ION<br />
Cutter Spindle Diameter<br />
Cutter Sleeve Diameter<br />
Usable Length of Sleeve<br />
Maximum Tooling Diameter<br />
NOTE: 320mm Diameter Tooling available with throwaway<br />
Minimum Tooling Diameter<br />
Maximum Timber Thickness<br />
Maximum Timber Width (Each Table)<br />
Maximum Length of Tenon<br />
Vertical Movement of Tables<br />
Horizontal Xovement of Tables<br />
Power of Cutter Kotor<br />
Speed of Cutterhead 50 HZ<br />
I<br />
I r<br />
Speed of Cutterhead 60 HZ<br />
Feed speeds (Cutting Stroke) 50 & 60 HZ<br />
(Return Stroke) 50 & 60 HZ<br />
Length of Fence Bars - St<strong>and</strong>ard<br />
- Optional Extra<br />
- Optional Extra<br />
Floor space - st<strong>and</strong>ard<br />
- optional<br />
- optional<br />
Approx. net weight of machine<br />
Approx. gross weight of machine<br />
Shipping dimension<br />
40mm<br />
60mm<br />
240mm<br />
300mm<br />
tipped cutters<br />
250mm<br />
150mm<br />
150mm<br />
120mm<br />
230mm<br />
25mm<br />
7.5kw<br />
www.wadkin.com<br />
3000 rpm<br />
3600 rpm<br />
4 mfmin<br />
8 mfm1n<br />
1500 mm<br />
2200 mm<br />
3200 mm<br />
2150 x 2020mm<br />
2150 x 2720mm<br />
2150 x 3720mm<br />
Fig 1<br />
9.7116 in<br />
12 in<br />
only<br />
10 in<br />
6 in<br />
6 in<br />
4lin<br />
9 in<br />
1 in<br />
10 hp<br />
info@wadkin.com<br />
13 ft/min<br />
26 ft/min<br />
5 ft<br />
7 ft 6 in<br />
10 ft 6 in<br />
8516 x 79IQ in<br />
85Y.! x 107IQ in<br />
85* X 148* in
150 OIA. IlL-<br />
OUTLE-=f1 1<br />
VOLUME OF AIR TO BE<br />
[XTRACTED= 350 LP S<br />
( 740[ FM)<br />
////'<br />
100 DIA OUTLET /<br />
EXTRA WHEN MACHINE IS<br />
FITTED WITH TRIMMING HEAD.<br />
VOLUr1E OF AIR TO BE<br />
EXTRACTED= 180 LPS<br />
(375CFM)<br />
2150 STANDARD MACHINE<br />
3000 WITH TRIMMING HEAD<br />
i'<br />
.,<br />
'J<br />
~:;~-t..<br />
!-I<br />
'~:"f ~d ~: ':.i1~1<br />
:: ... -='--.:1 ~;<br />
": ... __ .,.: ~_:: __ C:~<br />
I f '-~i--rJ<br />
, ,<br />
~.<br />
~!:: ~,<br />
, . ,<br />
" .<br />
10, ?:":.<br />
\. ...... --.,<br />
!.J •<br />
::,._ -.,..1<br />
I<br />
j-.J<br />
: 617CRSSTD. i 645CRSTD. 1<br />
~---~-----~<br />
917 CRS.TRIM. 945 CRTRIM.<br />
o o o<br />
.'~"<br />
I[;~~---~==I--------------<br />
. 1 '- .-' - -'-' ,<br />
.J<br />
eT-: . -T-r---<br />
_* __ ______ .J-__ ~<br />
I<br />
POWER<br />
IN<br />
2200 CAP STANDARO::2720<br />
3200 CAP.EXTRA =3720<br />
4 -16 DIA HOLES---<br />
www.wadkin.com<br />
<strong>JET</strong> FOUNDATION PLAN<br />
-,<br />
---=---L-~<br />
I<br />
50<br />
o<br />
N<br />
en<br />
o<br />
Lr'I<br />
co<br />
'- _ !___..L-~_<br />
GI----i- I<br />
-20 380 i<br />
L :, ... --------~<br />
CRS." CR.<br />
52 0 ----l ...... 90<br />
---<br />
~ ... C RS<br />
, [K.<br />
Cl er:<br />
:r~<br />
.------- .. -.--~~<br />
I I ~lg<br />
I VI VI<br />
: ~~!~ ,... ~<br />
i<br />
BASE PLAN<br />
info@wadkin.com<br />
.L _l _____ ~ 0-.<br />
fig 2 I U'I
c::<br />
~~0~<br />
"""<br />
5.<br />
::::<br />
I ~<br />
3:'"<br />
0><br />
~:~<br />
3 6~<br />
1'-.-- "'~<br />
:E:
TRAVERSE<br />
MOTOR<br />
U1 I vll W1L ~ 'dL<br />
V2<br />
W2<br />
L1 L2 L3<br />
dJ<br />
STAR DELTA WIRING DIAGRAM<br />
U2<br />
',12<br />
V2<br />
M<br />
.,11 vll U1<br />
C{BLOCK<br />
MOTOR<br />
)<br />
5<br />
'6<br />
(Q~TACTQB ~QIIE1(ATIQI::l<br />
K1-BLOCK MOTOR [MAIN]<br />
K3-BLOCK MOTOR [STAR]<br />
KS-BLOCK M OTOR !DELTA]<br />
K4- SLOW FORWARD TRAVERSE<br />
K6-BRIDGING<br />
K7- FAST REVERSE TRAVERSE<br />
KB- INCH FORWARD<br />
K9- INCH REVERSE<br />
THESE O'AC,fi""~" ARE CH'EP.t,LlSEJ FOR<br />
nEFE;:;£hCE i.;SE OiiLY. REFER lG ElEC1RICAl<br />
CIRCUIT OiAGj:'(.4~ LOCMEO i'~ ::LECTRICAl<br />
C;.i3l f JE T FOO SPECIFIC lU:;;C)Rt,l":'-~Oh,<br />
6A<br />
68<br />
6C<br />
60<br />
6E<br />
6F<br />
60<br />
GUARD<br />
LIHIT SWITCH<br />
t-<br />
rp<br />
!<br />
&.--01<br />
4<br />
46<br />
14<br />
LIt-HT SWITCH<br />
6C 52<br />
www.wadkin.com<br />
N{O TIMER<br />
J<br />
AUX ON<br />
K7<br />
Kit<br />
51<br />
OVERLOADS<br />
AS REQUIRED<br />
• •<br />
49<br />
K7<br />
L 1<br />
20A<br />
L2<br />
50 20B<br />
53 54<br />
C>--..-'l: ~-'" 56 -- 20C<br />
K7 K4 K 8<br />
57 58 59<br />
Ch --Jl 0---- --<br />
FAST STOP K4<br />
LIHIT SWlTCH<br />
info@wadkin.com<br />
FAST START<br />
LlH1TSWiTCH 61<br />
V--~- O 62<br />
KB<br />
K9<br />
K9<br />
--Fig 41 Fj
DIAGRAM OF<br />
LEVELLING SCREW<br />
www.wadkin.com<br />
info@wadkin.com<br />
M25 LOCK~NUT r-<br />
,t--,c<br />
~ ...... i,..J-----<br />
• =<br />
ADJUST LEVELLING SCREW UNTIL<br />
IT TOUCHES FLOOR THEN LOCK<br />
M 25 LOCKNUT<br />
FLOOR LEV L<br />
fig5<br />
~NOTE :-POSITION LEVELLING<br />
OVER RAWL BOLT<br />
SCREW<br />
figS
9<br />
SLINGING<br />
Always use a sling within safe working load of machine weight.<br />
Approximate net ",eight of machine<br />
Approximate gross weight of machine -<br />
KG<br />
KG<br />
Attach slings to lifting hooks in FIG.5 (return lifting hooks to<br />
WADKIN DURHAM for credit) ensuring damage will not be caused to<br />
machine during slinging operations.<br />
IMPORTANT:<br />
OPERATION.<br />
INSTALLATION<br />
DO NOT WALK OR STAND UNDER MACHINE DURING SLINGING<br />
Remove protective coating from bright parts by applying a cloth<br />
soaked in paraffin, turpentine or other solvent. Machine should be<br />
so placed that the traffic of men <strong>and</strong> materials to <strong>and</strong> from it fits<br />
smoothly into the general scheme of traffic. Machine should be so<br />
placed that it will not be necessary for the operator to st<strong>and</strong> in or<br />
near an aisle as to cause a hazard. The minimum clearance on each<br />
working side of machine should be at least 750mm greater than the<br />
length of the largest material worked on the machine.<br />
FOUNDATION<br />
Ensure floor is level, then mark to suit 4 - M12 rawl bolts, refer<br />
to the foundation plan FIG.2. Drill floor to suit rawl bolts.<br />
These bolts are not supplied with the machine, but can be supplied<br />
at an additional charge. To obtain access to foundation bolts <strong>and</strong><br />
levelling screw, remove plinth.<br />
Position machine over rawl bolts <strong>and</strong> adjust levelling screw until it<br />
touches floor FIG.5. Fully tighten rawl bolts. Replace plinth.<br />
WIRING DETAILS<br />
The motor <strong>and</strong> control gear have been wired in before despatch. All<br />
that is required is to connect the power supply to the starter or<br />
isolating switch when fitted.<br />
Points to note when connecting power supply:-<br />
www.wadkin.com<br />
1) Check the voltage, phase <strong>and</strong> frequency correspond to those on the<br />
motor plate, also the correct coils <strong>and</strong> heaters are fitted to the<br />
starter.<br />
2) It is important that the correct cable is used to give the<br />
correct voltage to the starter as running on low voltage<br />
will damage the motor.<br />
info@wadkin.com<br />
3) Check the main line fuses are of the correct capacity. See fuse<br />
list inside front cover of instruction manual.<br />
4) Connect the line leads to the apppropriate terminals. See wiring<br />
diagrams FIGS 3 & 4.<br />
5) Check all connections are sound.
10<br />
6) Check the rot~tion of ~ll motors for the correct direction. if<br />
these are incorrect, reverse any two of the line lead<br />
connections.<br />
ASSEMBLY OF MACHINE<br />
For ease of transportation the fences, clamps <strong>and</strong> stops are removed.<br />
The fence is fitted to the rear of each table <strong>and</strong> is located in<br />
holes at inner <strong>and</strong> outer end of each table, secured by 2 - MI0<br />
hexagon head bolts.<br />
Fit clamps to posts 'A' FIG.7 <strong>and</strong> turnover stops"<br />
shoulder stops" FIG.17 to fence.<br />
PREPARATION FOR OPERATION WHERE PNEUMATICS ARE FITTED<br />
FIG.16 or<br />
The machine must be connected at point 'B' FIG.8 to a compressed<br />
'air' supply.<br />
This is for operation of clamps <strong>and</strong> shoulder stops.<br />
Check the bottles 'C' to ensure that they have not been cracked or<br />
damaged during transit.<br />
Check that oil is up to level mark 'D' <strong>and</strong> if necesseary remove<br />
filler plug 'E' <strong>and</strong> top up using correct grade of oil. (See<br />
approved lubricants, Page).<br />
Oil drip rate should be approximately 15 second intervals, pressure<br />
is regulated by knob 'F', adjust until a pressure of
11<br />
www.wadkin.com<br />
info@wadkin.com<br />
Fig 8
12<br />
START AND FEED CONTROL<br />
Individual start <strong>and</strong> feed buttons FIG.9, are situated on front panel<br />
on beam.<br />
When isolator (optional), which is situated on rear beam support, is<br />
fitted, proceed as follows:-<br />
To start, turn isolator to '1', then press button 'H' FIG.9 to start<br />
cutterhead, then press feed button 'J'.<br />
Where no isolator is fitted, control is simply via the panel start<br />
<strong>and</strong> feed buttons.<br />
NOTE: HEAD MUST BE STARTED IN THIS SEQUENCE AND SHOULD BE LEFT<br />
RUNNING AFTER EACH CUT AS REPEATED STARTING AND STOPPING MAY CREATE<br />
EXCESSIVE HEAT IN THE MOTOR AND RAPID BRAKE WEAR.<br />
INCH FORVARD/INCH REVERSE CONTROL<br />
For ease of tooling changes, inch forward/inch reverse buttons 'K'<br />
are situated on front panel on beam FIG.9.<br />
MASTER STOP CONTROL<br />
A Master Stop button 'L' FIG.9, is situated on front panel on beam.<br />
Depression of Master Stop button shuts down all electrics. Master<br />
Stop button stays in the OFF position until released by pulling<br />
button.<br />
ADJUSTABLE STOPS<br />
Two adjustable stops 'M' FIG.10 are fitted to rail 'N' <strong>and</strong> are<br />
positioned according to length of traver~ required.<br />
FIXED STOPS<br />
Fixed stops 'P' FIG.11 are fitted at either end of rail to safeguard<br />
overiding of adjustable stop when using inch forward/inch reverse.<br />
OVERSIZE TIMBER PRESSURE SWITCH<br />
A pressure switch 'R' FIG.12 is situated on cutter guard'S' <strong>and</strong> is<br />
actuated when an oversize piece of timber is clamped onto the<br />
roachi ne. Once actuated tha traverse is. imme.d.iately-_wppQd.<br />
www.wadkin.com<br />
VERTICAL ADJUSTMENT OF TABLE<br />
Set each table vertically by loosening locking h<strong>and</strong>le 'T' FIG.13 <strong>and</strong><br />
position table by vertical adjustment h<strong>and</strong>le 'U' in conjunction with<br />
digital readout 'V' FIG.12. Relock locking h<strong>and</strong>le "<br />
HORIZONTAL ADJUSTMENT OF TABLE<br />
info@wadkin.com<br />
Set each table horizontal by means of screw 'A' FIG.17.<br />
FRONT END STOP -<br />
STANDARD<br />
To set tenon length use adjusting screw 'W' FIG.14. To set <strong>and</strong> stop<br />
'X' FIG.15 use h<strong>and</strong>le 'Y' FIG.14 <strong>and</strong> push through table <strong>and</strong> turn<br />
approximately 30· to locate on adjusting screw ·W·.<br />
Continued on Page 18
13<br />
www.wadkin.com<br />
info@wadkin.com<br />
Fig9<br />
Fig 10
www.wadkin.com<br />
info@wadkin.com<br />
Fig11<br />
Fig12
15<br />
• •<br />
• •<br />
\\T<br />
j ~<br />
www.wadkin.com<br />
info@wadkin.com<br />
Fig13
16<br />
, ~ "~::l. ,I .,<br />
.'
17<br />
www.wadkin.com<br />
info@wadkin.com<br />
fig17<br />
fig18
18<br />
Clamp wood for first pass of timber.<br />
NOTB:<br />
MACHINB VILL NOT TRAVERSE UNTIL END STOP IS WITHDRAWN.<br />
Release clamps.<br />
Turn timber for second pass <strong>and</strong> use either end stop or turnover stop<br />
'Z' FIG.16.<br />
MANUAL SHOULDER STOPS -<br />
EXTRA<br />
Set pointer 'B' FIG.17 on crosscut fence to shoulder distance by<br />
locking h<strong>and</strong>l~ 'C'.<br />
To set tenon length. loosen locking h<strong>and</strong>le 'D' <strong>and</strong> locking screw<br />
'E', adjust length with adjusting screw 'F' in conjunction with<br />
painter 'G' <strong>and</strong> scale 'H'. Relock locking h<strong>and</strong>le 'D' <strong>and</strong> locking<br />
screw' E' .<br />
Set shoulder height to sui t with stop 'J' <strong>and</strong> locking knob 'K'.<br />
Clamp wood for first pass of ti.mber.<br />
Release clamps.<br />
Turn timber for second pass <strong>and</strong> move stop 'J' to shoulder distance.<br />
Clamp wood <strong>and</strong> continue with second pass of timber.<br />
PNEUMATIC SHOULDER STOPS -<br />
EXTRA<br />
Set pointer 'L' FIG.l8 on crosscut fence to should distance by<br />
locking h<strong>and</strong>le 'M'.<br />
To set tenon length loosen locking screw 'N' <strong>and</strong> adjust length with<br />
adjusting screw 'P' in conjunction with ppinter 'R' <strong>and</strong> scale'S'.<br />
Relock locking screw 'N'.<br />
Set shoulder height to suit with stop 'T' <strong>and</strong> locking knob 'U'.<br />
Clamp wood for first pass of timber.<br />
Release clamps.<br />
Turn timber for second pass <strong>and</strong> move stop 'T' pneumatically to<br />
shoulder distance with toggle switch 'V' FIG.l9.<br />
MANUAL CLAMPS<br />
www.wadkin.com<br />
For vertical <strong>and</strong> swivel adjustment of clamps. loosen locking h<strong>and</strong>le<br />
'W' FIG.19 <strong>and</strong> adjust to required position. Relock locking h<strong>and</strong>le<br />
'W' .<br />
info@wadkin.com<br />
For operation of clamp use h<strong>and</strong>le 'X'.<br />
For fine adjustment of pressure to clamp 'Y', loosen locking nut '2'<br />
<strong>and</strong> turn knurled 'A' to required pressure. Relock locking nut.<br />
PNEUMATIC CLAMPS -<br />
EXTRA<br />
To operate pneumatic clamps press buttons OB & C' FIG.IQ<br />
Simultaneously. To release clamps press ;buttons 'B' <strong>and</strong> 'D'.
a-e<br />
I ,~ ,<br />
www.wadkin.com<br />
info@wadkin.com<br />
fig 20
20<br />
For vertical <strong>and</strong> swivel adjuGtment of clamps, loosen locking h<strong>and</strong>le<br />
'E' FIG.20 <strong>and</strong> adjust to required position. Relock locking h<strong>and</strong>le<br />
'E' .<br />
For horizontal adjustment of clamps, loosen screw 'F' <strong>and</strong> adjust to<br />
required position. Relock screw 'F'.<br />
NOTE:<br />
DIAGRAMS FOR PNEUMATIC SHOULDER STOPS AND PNEUMATIC CLAMPS ARE<br />
ON PAGES 22.<br />
DRIVE BELT REPLACEMENT OR TENSIONING<br />
Traverse of cutter head is through drive motor <strong>and</strong> belt to lead<br />
screw. To adjust belt or Change, proceed as followsj<br />
1) Isolate machine electrically.<br />
2) Remove drive belt cover at rear of machine.<br />
3) Release tension on pulleys by 4 - MiD hexagon head bolts 'G'<br />
FIG.21.<br />
4) Position new belt over pulleys <strong>and</strong> tension belt by sliding plate<br />
'H'. Correct tension will have been achieved when belt can be<br />
pulled iDmm in centre span.<br />
--.. ------------<br />
www.wadkin.com<br />
info@wadkin.com
21<br />
www.wadkin.com<br />
info@wadkin.com<br />
Fig21
SOLENOro<br />
VALVE ~S7-ASA<br />
43018<br />
--,<br />
'-',....a-.. I<br />
I<br />
• FILTER REGULATOR &<br />
"'--LUBRICATOR c/W GAU(jE<br />
8-9252-2111G<br />
PNEUMATIC CIRCUI T<br />
DIAGRAM<br />
B 3213H<br />
"""'----- ---------- SQUARE SLEEVE<br />
www.wadkin.com<br />
M/n063-160<br />
info@wadkin.com<br />
(Yl IN DE R<br />
-SHORT STROKE<br />
CYLINDER<br />
QIB 50 20 OA<br />
~ I
~<br />
Application A P PRO V E 0 L U B R I CAN T S<br />
I<br />
Castrol B. P. Shell Esso Texaco/Caltex <strong>Wadkin</strong><br />
Worm Boxes ZN220 Energol CS320 Vitrea 320 Spartan EP220 Regal Oil 320 L2<br />
General<br />
Lubrication<br />
Pneumatic<br />
Lubricators<br />
Magna 68 Energol HP58 Vitrea 5B Nuray Ursa Oil P6B L4<br />
Hyspin AWS32 Energol HL32 Tellus 37 Nuto H32 R<strong>and</strong>o Oil HD32<br />
Grease Spheerol AP3 Energrease L53 Alvania R3 Beacon 3 Regal Starfalk L6<br />
Premium 3<br />
Brake Cables<br />
Brake Cable Energrease<br />
Alvania R3<br />
Esso Multigrease<br />
L2lM p u rp os e g r El a s e<br />
--- --- -<br />
www.wadkin.com<br />
info@wadkin.com<br />
I<br />
~--________________________________________________________________________________________________________________________________ ~J<br />
~