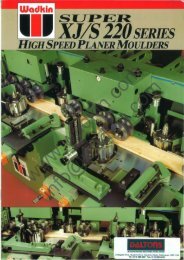
Wadkin JET Tenoner Manual and Parts List
Wadkin JET Tenoner Manual and Parts List
Wadkin JET Tenoner Manual and Parts List

You also want an ePaper? Increase the reach of your titles
YUMPU automatically turns print PDFs into web optimized ePapers that Google loves.
10<br />
6) Check the rot~tion of ~ll motors for the correct direction. if<br />
these are incorrect, reverse any two of the line lead<br />
connections.<br />
ASSEMBLY OF MACHINE<br />
For ease of transportation the fences, clamps <strong>and</strong> stops are removed.<br />
The fence is fitted to the rear of each table <strong>and</strong> is located in<br />
holes at inner <strong>and</strong> outer end of each table, secured by 2 - MI0<br />
hexagon head bolts.<br />
Fit clamps to posts 'A' FIG.7 <strong>and</strong> turnover stops"<br />
shoulder stops" FIG.17 to fence.<br />
PREPARATION FOR OPERATION WHERE PNEUMATICS ARE FITTED<br />
FIG.16 or<br />
The machine must be connected at point 'B' FIG.8 to a compressed<br />
'air' supply.<br />
This is for operation of clamps <strong>and</strong> shoulder stops.<br />
Check the bottles 'C' to ensure that they have not been cracked or<br />
damaged during transit.<br />
Check that oil is up to level mark 'D' <strong>and</strong> if necesseary remove<br />
filler plug 'E' <strong>and</strong> top up using correct grade of oil. (See<br />
approved lubricants, Page).<br />
Oil drip rate should be approximately 15 second intervals, pressure<br />
is regulated by knob 'F', adjust until a pressure of