Image processing using ZEN software
Image processing using ZEN software
Image processing using ZEN software

You also want an ePaper? Increase the reach of your titles
YUMPU automatically turns print PDFs into web optimized ePapers that Google loves.
Different ways of displaying the data – whilst these controls<br />
require the image to be ‘processed’ the <strong>processing</strong> cannot<br />
be exported unless you choose to file/export/contents of<br />
image window
A 3D reconstruction of the data. If the image has not been<br />
rotated this will give the same result as a maximum<br />
intensity projection. Otherwise it can be rotated to ‘see’<br />
around the specimen in 3D
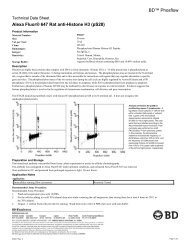
<strong>Image</strong> <strong>processing</strong> is filed under the <strong>processing</strong><br />
tab (everything that is done ‘post acquisition’)<br />
Tab to produce a MIP<br />
from the selected data<br />
Ensure the dataset you are<br />
interested is the one selected<br />
<strong>using</strong> the ‘select’ tab
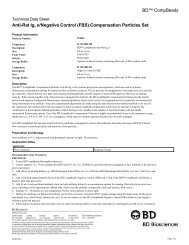
To produce a subset of the dataset (this could be time or z) click the ‘copy’ option<br />
and then select ‘subset’. Again, ensure the dataset you are interested is the one<br />
selected <strong>using</strong> the ‘select’ function
Expand the ‘subset’ menu <strong>using</strong> the arrow and ensure you are taking a subset of z by<br />
expanding the z menu. Press for the Gallery view of your dataset in the main window
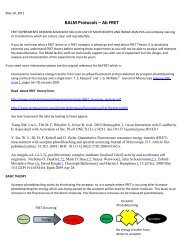
Press ‘mouse click’ for the start of your new, clipped dataset and then click on the z-position you would<br />
like to start with (you will still be in Gallery mode). Repeat with the End Z-position. The image window<br />
will display the data in 2D mode (i.e. just one z-plane at a time) once you press ‘Apply’. This is now a new<br />
image
Display your new image dataset as you<br />
wish <strong>using</strong> the same controls as before
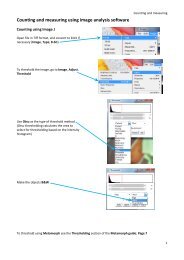
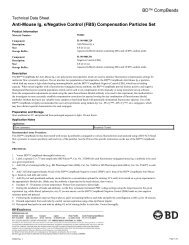
Beneath any image there will be an option to ‘Display’. This shows the options for<br />
altering brightness and contract etc
In 3D mode, the ‘Appearance’ tab gives options for how to display your 3D data. If<br />
you click on ‘Transparent’ this brings up all the tools you should need for altering<br />
the appearance of your data