Counting and measuring using image analysis software
Counting and measuring using image analysis software
Counting and measuring using image analysis software

You also want an ePaper? Increase the reach of your titles
YUMPU automatically turns print PDFs into web optimized ePapers that Google loves.
<strong>Counting</strong> <strong>and</strong> <strong>measuring</strong> <strong>using</strong> <strong>image</strong> <strong>analysis</strong> <strong>software</strong><br />
<strong>Counting</strong> <strong>and</strong> <strong>measuring</strong><br />
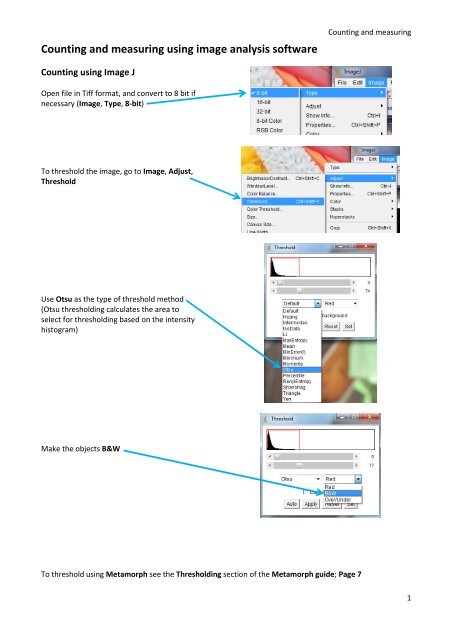
<strong>Counting</strong> <strong>using</strong> Image J<br />
Open file in Tiff format, <strong>and</strong> convert to 8 bit if<br />
necessary (Image, Type, 8-bit)<br />
To threshold the <strong>image</strong>, go to Image, Adjust,<br />
Threshold<br />
Use Otsu as the type of threshold method<br />
(Otsu thresholding calculates the area to<br />
select for thresholding based on the intensity<br />
histogram)<br />
Make the objects B&W<br />
To threshold <strong>using</strong> Metamorph see the Thresholding section of the Metamorph guide; Page 7<br />
1
<strong>Counting</strong> <strong>and</strong> <strong>measuring</strong><br />
If some of your objects are touching each other, go<br />
to Process, Binary, Make Binary<br />
Ok<br />
Then go to Process, Binary, Watershed<br />
You can also separate objects manually<br />
Make sure the Draw Tools are visible by clicking the<br />
>> icon <strong>and</strong> selecting Draw Tools<br />
Use the colour picker tool <strong>and</strong> click on the<br />
background<br />
2
Select the pencil tool, <strong>and</strong> double click the icon to<br />
adjust the line width<br />
<strong>Counting</strong> <strong>and</strong> <strong>measuring</strong><br />
Draw lines through adjacent objects to separate<br />
them<br />
NB. You can also use the draw tools to colour in, or<br />
erase objects you don’t want to count, just make<br />
them the same colour as the background<br />
When you are finished, make sure the background is<br />
black <strong>and</strong> the objects are white.<br />
If this is not the case you can select tick the Dark<br />
Background option in the Threshold box<br />
To count the number of objects, click on Analyse,<br />
Analyse Particles<br />
Adjust the parameters of the objects you want to<br />
count. Make sure the Summarize box is ticked<br />
A summary window will appear. The Count column<br />
tells you the number of objects<br />
3
Measuring <strong>using</strong> Image J<br />
<strong>Counting</strong> <strong>and</strong> <strong>measuring</strong><br />
Start by opening the Region of Interest Manager by<br />
going to Analyse, Tools, ROI Manager<br />
Or click the ROI Manager icon<br />
Then you need to select something to measure, so<br />
pick one of the selection tools <strong>and</strong> draw a region of<br />
interest<br />
In the ROI Manager window click Add, <strong>and</strong> your<br />
selection will appear in the list<br />
NB. You can rename your selections to help you<br />
identify them<br />
When <strong>measuring</strong> intensity it is best to use 16-bit <strong>image</strong>s, <strong>and</strong> make sure your channels are split, otherwise<br />
you will just record an average intensity across all the different channels.<br />
If you are <strong>measuring</strong> area or length you may want to set the scale of your <strong>image</strong>, so your measurements are<br />
in microns instead of pixels. See Set the Scale section.<br />
4
<strong>Counting</strong> <strong>and</strong> <strong>measuring</strong><br />
You can draw multiple regions of interest <strong>using</strong> the different drawing tools, just remember to Add each one<br />
to the ROI Manager. To delete a selection click Delete<br />
You then need to decide what measurements you<br />
want to record.<br />
Go to Analyse, Set Measurements<br />
And pick what you want in the Set Measurements<br />
window<br />
This is the average<br />
intensity within the<br />
region selected<br />
5
<strong>Counting</strong> <strong>and</strong> <strong>measuring</strong><br />
In the ROI Manager window, select one of your<br />
regions of interest <strong>and</strong> click Measure<br />
A Results window will appear. This contains the measurements you requested.<br />
The Label column displays the name of the <strong>image</strong> <strong>and</strong> the name of the region of interest<br />
The Area <strong>and</strong> Perimeter are<br />
measured in pixels, unless you<br />
have set the scale of your <strong>image</strong><br />
The Mean column is the average<br />
intensity within the region<br />
selected (Mean Gray Value)<br />
Min <strong>and</strong> Max are the minimum<br />
<strong>and</strong> maximum intensity values<br />
within the region selected<br />
To save these results you will need to copy <strong>and</strong> paste them into Excel<br />
To transfer a region of interest to another <strong>image</strong>, select the <strong>image</strong> you want to transfer to, <strong>and</strong> then select<br />
the region from the ROI Manager. You can then make the same measurements on this <strong>image</strong> by clicking<br />
Measure<br />
6
<strong>Counting</strong> <strong>and</strong> <strong>measuring</strong><br />
The measurements from this new <strong>image</strong> are distinguishable from your previous ones, as the Label tells you<br />
which <strong>image</strong> has been used<br />
To select multiple areas <strong>and</strong> group them as one region of interest, hold down the shift key when making<br />
selections. Once you have finished selecting things, add the selection to the ROI Manager as a single item<br />
Now when you hit Measure, the area will be a sum of all the selections, <strong>and</strong> the Mean will be the average<br />
intensity across all the selections<br />
7
<strong>Counting</strong> <strong>and</strong> <strong>measuring</strong><br />
Quick measurements<br />
To make a quick measurement on just one <strong>image</strong><br />
you don’t have to use the ROI Manager. You can just<br />
use the selection tools, draw your selection, <strong>and</strong><br />
click Analyse, Measure<br />
See instructions above on how to change what measurements are displayed (Analyse, Set Measurements)<br />
To remove a selection go to Edit, Selection, Select<br />
None<br />
<strong>Counting</strong> <strong>and</strong> <strong>measuring</strong> <strong>using</strong> Metamorph<br />
• To count the number of cells see the Cell Scoring section of the Metamorph guide; Page 12<br />
Cell scoring uses a maximum of 2 colours, one of which needs to be DAPI nuclei staining.<br />
See also the Nuclei counting section of the Metamorph guide; Page 15, to count just nuclei.<br />
• To count <strong>using</strong> two or more wavelengths, see the Multi-Wavelength cell scoring section of the<br />
Metamorph guide; Page 13<br />
• To measure distance or area in Metamorph you will need to calibrate your <strong>image</strong>s. See the<br />
Calibrating Images section of the Metamorph guide; Page 7<br />
• To make measurements from different regions of interest see the Region Measurements section of<br />
the Metamorph guide; Page 8<br />
8