The Clean Microscope
The Clean Microscope
The Clean Microscope

You also want an ePaper? Increase the reach of your titles
YUMPU automatically turns print PDFs into web optimized ePapers that Google loves.
<strong>The</strong> <strong>Clean</strong> <strong>Microscope</strong>Dr. Michael ZölffelCarl Zeiss MicroImaging GmbH · Carl-Zeiss-Promenade 10 · 07745 Jena · Germany
Contents4 <strong>The</strong> Effect of Dirt on the Image5 How to Recognize Dirt6 Different Types of Soiling7 Different Optical Surfaces8 <strong>Clean</strong>ing Agents and Methods10 <strong>Clean</strong>ing Procedure12 <strong>Clean</strong>ing External (Non-Optical) <strong>Microscope</strong> Parts12 Perfect Preparation13 How Soiling Can Be Avoided14 Suppliers and Recipes15 Subject Index16 Imprint17 What to Watch Out for when<strong>Clean</strong>ing <strong>Microscope</strong> OpticsTitle photo:Toad liver, stained with AzanPlan-APOCHROMAT 63/1.4, brightfield2
Recognizing and <strong>Clean</strong>ingSoiled Optics<strong>Clean</strong> optics are essential for successful microscopy andperfect images.A variety of cleaning procedures have been recommendedin the course of decades, leaving many users uncertain asto which method will yield the best results.<strong>The</strong> choice of the best cleaning method depends on thenature of the optical surface concerned, and the type ofdirt to be removed.3
<strong>The</strong> Effect of Dirt on the Image<strong>The</strong> closer any dirt is to the object or to a camera sensor,the greater is its effect on the visual or recorded image.<strong>The</strong> following surfaces are critical:■ <strong>The</strong> external surface of the front lens of the objective■ <strong>The</strong> surface of the camera sensor and its protectiveglass cover■ Both surfaces of the cover slip■ <strong>The</strong> surface of the specimen slide■ <strong>The</strong> surfaces of the camera adapter optics■ <strong>The</strong> surfaces of the condenser front lens■ <strong>The</strong> outer and inner surfaces of the eye lensof the eyepiece and the surfaces of graticules■ <strong>The</strong> outer surface of the protective glass covering thelight exit opening of the illuminated field diaphragm■ Other glass surfaces in the light path, e.g., the bulbsof halogen or high-pressure lamps, fluorescence filtersand beam splitters, collector lenses, contrast and heatfilters.Some optical surfaces are more sensitive to dirt than others.<strong>The</strong> front lens of the objective is particularly critical; therefore,it is discussed in greater detail herein.For any dry objective, the smaller the free working distanceand the smaller the surface area of the concave front lens,the greater is the danger of the front lens being soiled withembedding media, immersion liquids or dust.Examples of such objectives are:EC Plan-NEOFLUAR 40x/0.75EC Plan-NEOFLUAR 63x/0.95 corr.N-Achroplan 63x/0.80, 63x/0.95 o.D.Fluar 20x/0.75Plan-APOCHROMAT 20x/0.80Plan-APOCHROMAT 40x/0.95 corr.All EC Epiplan and EC Epiplan-NEOFLUAR dry objectivesEC Epiplan-APOCHROMAT objectives with 20x, 50x, 100x and150x magnifications.Exposure of the front lens of any objective to dust is greaterin case of an inverted microscope than an upright microscope.In particular, all LD dry objectives with magnificationsof 32x, 40x and 63x need to be checked regularly.<strong>The</strong> front lens of an immersion objective should be cleanedto remove residue both after use and, additionally, beforefresh immersion liquid is applied. <strong>The</strong> mixing of differentimmersion media or different batches of the same medium(e.g., the immersion oil IMMERSOL F) may result in blurredimages.<strong>Microscope</strong> cameras must always be handled with utmostcare and protected from dust by all available methods.Before any critical application,check the objective front lens for any dirt.4
How to Recognize DirtTo recognize dirt on optical surfaces, you should havean idea of the best result you can expect from a specificmicroscopy method and a specific application. If you thencompare your expectation with the visual image in termsof maximum definition, best contrast and cleanness, youwill immediately recognize whether or not your microscopeis soiled anywhere.If the sharpness or contrast of the image is lessthan optimum, there is a high probability that yourmicroscope optics are not clean.To locate the dirt, proceed as follows:Carefully rotate objectives or cameras by a small amountwithin their thread.Check specimen slide and cover slip by moving the specimenwhile focusing on the upper and lower surfaces insuccession.Check the condenser by moving it up and down and, ifpossible, slightly swiveling or turning the front lens.<strong>The</strong> affected optical surface is identified when the dirt followsthe movement of the suspected optical component.<strong>The</strong> camera is the only exception to this rule: dirt withinthe camera will not move when you move the camera.A macroscopic check for larger dust particles and scratcheson optical surfaces can be carried out with a 3x to 6xmagnifier, or an eyepiece held the wrong way up.Dirt on the front lens of an objective is easily detected ifyou look at an evenly lit surface from the rear end of theobjective. <strong>The</strong> inner lens components produce an enlargedimage of even the smallest bit of dirt on the front lens.<strong>The</strong> final check should always be an assessment of the imagequality improvement achieved.<strong>Clean</strong> (left) and oil-soiled (right) front lensof a Plan-APOCHROMAT 20/0.80 objective.Toad kidney, trichrome staining, brightfield5
Different Types of SoilingWe must differentiate between dust particles (e.g., glassabraded from specimen slides, flakes of the microscopist‘sskin, fluff from clothing, pollen) and other kinds of soiling(e.g., liquid or dried-up embedding or immersion media,culture solutions residue from improper cleaning attempts,fingerprints, grease).Dust may either rest loosely on optical surfaces or more orless stick to them. Other dirt may be soluble in water orneed organic solvents for complete removal.A blurred image may not always be due to dirt:Using an objective with a large numerical aperture in conjunctionwith a cover slip of the wrong thickness may resultin blurred images (spherical aberration).Dry objectives of this type normally have a correction collar,which permits compensation for spherical aberration.Turn the correction collar (while continuously adjustingthe focus) until the best image contrast and sharpness isachieved.Many highly corrected immersion objectives also requirespecially selected cover slips of a thickness of 0.17 mm, ifthe best image is required.Immersion objectives should only be used in conjunctionwith a suitable, bubble-free immersion liquid. Use oil immersionobjectives with IMMERSOL from Carl Zeiss only.For the C-APOCHROMAT water immersion objective, ideallyuse distilled water or IMMERSOL W only.<strong>The</strong> occasionally recommended use of anisole as an immersionmedium results in loss of sharpness and contrast.Moreover, anisole may attack the cement of front lenses,especially of objectives of older make.A dull image despite clean opticsis caused by spherical aberration:Correction collar of the Plan-APOCHROMAT40/0.95 objective adjusted correctly (left) andincorrectly (right). Small intestine of a frog,stained with Azan, brightfield6
Different Optical SurfacesConcave or convex surfaces (e.g., front lenses of dry objectivesand dry condensers, eye lenses of some eyepieces)should be distinguished from plane or plane-parallel surfaces(e.g., front lenses of most immersion objectives andcondensers, filters, the protective glasses covering camerasensors or light exit openings).<strong>Clean</strong> concave or convex surfaces using the familiar cottonswabs or the new polyester ones as described on page 8.<strong>Clean</strong> easily accessible flat surfaces with similar means orsimply with soft facial tissue.<strong>Microscope</strong> optics may consist of optical glass, fusedquartz or polymers. <strong>The</strong> surfaces of all of them are coatedto minimize stray light. Some antireflection coatingsare wipe-resistant (e.g., the eye lenses of eyepieces), whileothers are too soft to be wipeable. Most antireflectioncoatings are composed of layers of magnesium fluorideand should only be cleaned with agents free from ammoniaand acids.Sometimes, household glass cleaning agents (e.g.,SIDOLIN, SPARKLE, Blue WINDEX) are recommended.However, as they contain diluted ammonia, they shouldnot be used routinely.Some optical components are surrounded by black antireflectivelacquer surfaces, which are sensitive to organicsolvents. <strong>The</strong> plastic and rubber parts of eyepieces will likewisebe attacked by some organic solvents (e.g., acetone,chloroform).<strong>The</strong> lenses of older microscopes are cemented with alcohol-solublecements such as Canada balsam. Most lenscements used today are polyacrylic synthetic resins, whichdo not have this problem.<strong>The</strong> internal optical surfaces of the microscope, componentsof the fluorescence filter sets, cameras and cameraadapters should never be cleaned by the user but by experiencedservice staff of the original manufacturer only.<strong>The</strong> user may clean the external surface of the objectivefront lens, the condenser front lens, the eyepiece eye lens,full-glass color and conversion filters, and the externalsurface of the protective glass covering the light exit openingof the illuminated-field diaphragm.<strong>Clean</strong> optics (left), dust on the cover of the lightexit opening of the illuminated field diaphragm(top right), and extremely soiled camera (bottomright). Small intestine of a frog, stained with Azan.Plan-APOCHROMAT 10/0.45, brightfield7
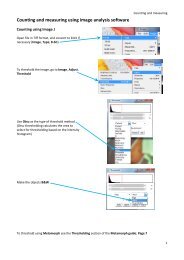
<strong>Clean</strong>ing Agents and Methods<strong>The</strong> goal is the complete removal of dust and dirt withoutleaving any residue of the cleaning agent and withoutdamaging the surfaces.<strong>The</strong> following utensils and agents are required:■ Long, thin wooden sticks, preferably of bamboo(obtain able from Chinese restaurant suppliers) ora comparable, not too flexible material■ High purity cotton (cotton wool) such as used, e.g.,in ophthalmology (available from KERMA, Germany),or WHATMAN Lens <strong>Clean</strong>ing Tissue 105■ Absorbent polyester swabs for optical cleaning (ITWTexwipe <strong>Clean</strong>Tips®). <strong>The</strong>y are a very good alternativeto cotton swabs and can be re-used■ Soft facial tissues (e.g., Kim Wipes soft, KLEENEX).■ Dust blower (available from labware suppliers orpharmacies)For the quick-and-easy cleaning of flat surfaces (e.g. removingimmersion media from cover slips or the front lenses ofimmersion objectives), use soft facial tissue (e.g. Kleenex)soaked in diluted dishwashing liquid.Caution: <strong>The</strong> commonly available lens tissue, also sometimescalled Joseph paper, is not intend ed for cleaningbut only for the dust-free storage and protection of opticalcomponents. With the single exception of WHATMANLens <strong>Clean</strong>ing Tissue 105, such lens papers are too harshfor cleaning; also, they do not absorb the dirt efficiently orquickly enough.For cleaning all other optical surfaces, use either freshlymade cotton swabs or the new polyester swabs (ITWTexwipe <strong>Clean</strong>Tips®). <strong>The</strong>se absorb dirt through theirmicrofiber surfaces. <strong>The</strong>ir cleaning capacity is limited intime, though.■ Distilled water■ Freshly prepared solution of 5-10 drops of adish washing liquid (e.g. Fairy Ultra, Fit) in 10 mldistilled water<strong>Clean</strong>ing devices■ Solvent for the removal of greasy or oily dirt, such asthe in-house Carl Zeiss recipe (Optical <strong>Clean</strong>ingSolution), or analytical-grade n-hexane.Only for cover slips: Pure acetone.Note: <strong>Clean</strong>er‘s naphtha, white spirit, petroleum etherand others are trivial names of benzine (light gasoline)fractions containing n-hexane8
Preparation of cotton swabs■ Wash your hands (powdered latex gloves are not suitable).■ Dip the bamboo stick into the (aqueous or organic) cleaningsolution. This makes the cotton fibers attach better to the stick.■ Get the stick into contact with the cotton.Do not press the cotton; otherwise it will not as easily windaround the stick.■ Turn the stick to wind up a few cotton fibers at first, thengradually more, so that an evenly growing, approximatelyelliptical cotton bud forms at the tip.■ To keep the cotton tip clean, the stick should be kept in apolyethylene bag until it is used. Do not touch the tip withyour fingers, as perspiration and grease from your skin willconsiderably affect the cleaning capacity.■ Remove the cotton tip after every stroke and replace it with afreshly made cotton bud.■ <strong>The</strong> stick can be used for a long time. Use separate sticks forwater-based solutions and organic solvents.If you prefer the use of WHATMAN Lens <strong>Clean</strong>ing Tissue 105, foldthe sheet around the stick so that a sharp point is formed. Do nottouch the point. Replace the tissue after every completed stroke.<strong>The</strong> ITW Texwipe <strong>Clean</strong>Tips® polyester swabs can be used until theircleaning power starts to diminish.9
Not all solvents can be recommended for cleaning microscopeoptics. Among those that clean very efficiently, someare toxic (e.g., chloroform, acetone); others are unfriendlyto the environment (e.g., Freon®, carbon tetrachloride);still others will leave residues on the surface (e.g., xylene,toluene, diethyl ether).Residue forms particularly with the use of xylene and nonanalyticalgrade ethanol and, above all, if the dirt containswater-soluble components.Acetone can be recommended when oil and grease are tobe removed from cover slips. Acetone attacks most typesof plastic as well as rubber, so its use for cleaning, e.g.,eyepieces can be problematic. One cannot exclude thepossibility that acetone attacks cemented optical components(e.g., objectives, camera adapters, eyepieces) whenused frequently.Acetone may also dissolve special organic coatings.For cleaning, move the utensil in a spiral motion fromthe center to the rim. Never wipe in a zigzag pattern, asthis will merely spread the dirt.With larger optical surfaces (e.g., tube lenses), first wipein a spiral motion starting at the rim and proceedingtoward the center; then execute another spiral movementfrom the center to the rim.As a rule, several spiral wipes will be required.We recommend pure, volatile n-hexane or the Optical<strong>Clean</strong>ing Solution from Carl Zeiss.Do not wipe in a zigzag pattern, but in a spiral movement!wrong correct11
<strong>Clean</strong>ing External(Non-Optical) <strong>Microscope</strong> Parts<strong>The</strong> painted surfaces of micro scopes from the AXIO rangeare powder-coated and extremely durable. <strong>The</strong>y can becleaned with a very slightly moistened microfiber cloth.Loose dust and other dirt can be removed with a soft hairbrush (marten hair) used exclusively for that purpose.Thin, clean live specimenof the freshwater protozoan Dimorpha mutans.Plan-APOCHROMAT 63/1.4, phase contrastPerfectPreparationOptimum results in microscopy depend not only onthe cleanness of the microscope optics but also onperfect specimen preparation:■ Thickness of the specimen■ Staining intensity■ Refractive index and dispersion of the embeddingor immersion medium■ In high-resolution microscopy: distance of a live cellfrom the cover slip■ Correct cover slip thickness (e.g., 0.17 ± 0.01 mm)to avoid spherical aberration12
How SoilingCan Be Avoided<strong>The</strong> openings of the binocular viewing tubes must alwaysbe closed. Unless the eyepieces are in, use dust stoppers.If no dust stoppers have come with the microscope, wrapbits of aluminum foil around the apertures.<strong>The</strong> best fundamental method against dust accumulationis to first cover the microscope with two plastic bags ofsuitable size and then with the dust cover supplied by themanufacturer.In tropical climate regions, this method is not recommended,as it can frequently lead to the grows of fungus.Fungus contamination can best be avoided by dry roomair produced either by air conditioning or installing aninfrared lamp above the microscope (minimum distance150 cm or 5 feet).Carl Zeiss microscope optics are impregnated with anapproved antifungus agent (manufacturer: Bayer).However, there is no 100% protection against fungus.Also, there is hardly any remedy once fungus infestationhas happened.Never locate the microscope in a place where it could beaffected by corrosive acidic or alkaline vapors.Fungus mycelium on coated glass,reflected light illumination.13
Suppliers and RecipesKerma ophthalmic cotton N 1, DAB 6<strong>The</strong> cotton wool used in ophthalmology is 100% purecotton (DIN 61 640-A, Ph.Eur., DAB). It is absolutely pure,highly absorbent and soft. <strong>The</strong> fibers can be blown awayfrom optical surfaces.www.kerma.deWHATMAN Lens <strong>Clean</strong>ing Tissue 10510 cm x 15 cm lens tissue in packs containing 25 walletsof 25 sheets each, Catalog No. 2105 841.<strong>The</strong> only lens tissue recommended by Carl Zeiss. It ischemically pure and silicon-free, and contains absolutelyno additives. This product is also sold by other suppliers,e.g. KODAK.www.whatman.comRubber blowerThis is a particularly powerful blower:Giotto‘s, Type GTAA 1900.www.giottos.comCarl Zeiss optical cleaning solutionRecipe: 85% n-hexane, 15% isopropanol.<strong>The</strong> solution is not sold by Carl Zeiss MicroImagingGmbH.<strong>The</strong> n-hexane should be analytical grade. Some benzinefractions (petroleum ether) are not suitable, as they leavean insoluble film on the optical surface. Acetone, whichis recommendable exclusively for the occasional cleaningof oil-contaminated cover slips, should also be analyticalgrade.Cover glasses of specified thickness D = 0.17 mmTo avoid spherical aberration use cover glassesD = 0.17 mm. <strong>The</strong>y are available from Carl Zeiss.Item discription: High-precision cover glasses,D = 0.17 mm, 18 x 18 mm, 1000 Pieces,Order-Nr. 474030-9000.ITW Texwipe <strong>Clean</strong>TipsAbsorbent polyester swabs forcleaning optical components(Alpha, <strong>Clean</strong> Foam or Absorbond series)Available in different sizes and absorption grades, e.g.,from Basan under designation TEXWIPE TX743B.www.texwipe.comwww.basan.comSAFETY WARNINGWhen working with chemicals, solvents andother possible hazards, be sure to follow thecurrent safety regulations applicable in yourcountry and/or institution.14
Subject IndexPageAcetone . . . . . . . . . . . . . . . . . . . . . . . . . . . . . . 7, 8, 11, 17Acid vapors . . . . . . . . . . . . . . . . . . . . . . . . . . . . . . . 13, 17Anisol . . . . . . . . . . . . . . . . . . . . . . . . . . . . . . . . . . . . . . . 6Antireflection coatings . . . . . . . . . . . . . . . . . . . . . . . . 7, 11Benzine . . . . . . . . . . . . . . . . . . . . . . . . . . . . . . . . . . . 8, 14Blue WINDEX . . . . . . . . . . . . . . . . . . . . . . . . . . . . . . . . . . 7Camera adapters . . . . . . . . . . . . . . . . . . . . . . . 4, 7, 11, 17Cameras . . . . . . . . . . . . . . . . . . . . . . . . . . . 4, 5, 7, 10, 17Chloroform . . . . . . . . . . . . . . . . . . . . . . . . . . . . . . . . 7, 11<strong>Clean</strong>er‘s naphtha . . . . . . . . . . . . . . . . . . . . . . . . . . . . . . 8<strong>Clean</strong>ing movement . . . . . . . . . . . . . . . . . . . . . . . . . . . . 11<strong>Clean</strong>ing procedure . . . . . . . . . . . . . . . . . . . . . . . . . . . . 10Cotton. . . . . . . . . . . . . . . . . . . . . . . 7, 8, 9, 10, 11, 14, 17Cover slips . . . . . . . . . . . . . . . . . . . . . 4, 5, 6, 8, 11, 12, 14Diethyl ether . . . . . . . . . . . . . . . . . . . . . . . . . . . . . . 11, 17Dirt – loose, water-soluble, oily, greasy . . . . . . . . . . . . . . 10Dirt on cameras . . . . . . . . . . . . . . . . . . . . . . . . . . . . 4, 5, 7Dirt on front lens . . . . . . . . . . . . . . . . . . . . . . . . . . . 4, 5, 7Dry objectives. . . . . . . . . . . . . . . . . . . . . . . . . . . . . . 4, 6, 7Dry objective with correction collar . . . . . . . . . . . . . . . . . . 6Dust. . . . . . . . . . . . . . . . . . . . . . . . . . 5, 6, 7, 8, 10, 12, 13Ethanol . . . . . . . . . . . . . . . . . . . . . . . . . . . . . . . . . . 11, 17Fluorescence filter sets . . . . . . . . . . . . . . . . . . . . . . . . . 4, 7Fungus. . . . . . . . . . . . . . . . . . . . . . . . . . . . . . . . . . . . . . 13IMMERSOL. . . . . . . . . . . . . . . . . . . . . . . . . . . . . . . . . . 4, 6Isopropanol . . . . . . . . . . . . . . . . . . . . . . . . . . . . . . . 10, 14JENA <strong>Microscope</strong>s 250 CF . . . . . . . . . . . . . . . . . . . . . . . 17Kleenex . . . . . . . . . . . . . . . . . . . . . . . . . . . . . . . . . . . . . . 8Locating dirt . . . . . . . . . . . . . . . . . . . . . . . . . . . . . . . . . . 5MIKROVAL microscopes . . . . . . . . . . . . . . . . . . . . . . . . . 17n-hexane . . . . . . . . . . . . . . . . . . . . . . . . . . . . 8, 10, 11, 14Optical cleaning solution (Carl Zeiss) . . . . . . . . 8, 10, 11, 14Optical surfaces . . . . . . . . . . . . . . . . . . . . . . . . . 4, 7, 8, 17Painted surfaces . . . . . . . . . . . . . . . . . . . . . . . . . . . . . 7, 12Petroleum ether . . . . . . . . . . . . . . . . . . . . . . . . . . . . . 8, 14Polyester swabs . . . . . . . . . . . . . . . . . . . . . . . . . 7, 8, 9, 10Polystyrene sticks . . . . . . . . . . . . . . . . . . . . . . . . . . . . . . 17Rubber blower . . . . . . . . . . . . . . . . . . . . . . . . 8, 10, 14, 17SIDOLIN . . . . . . . . . . . . . . . . . . . . . . . . . . . . . . . . . . . . . . 7Solvents . . . . . . . . . . . . . . . . . . . . . . 6, 7, 8, 10, 11, 14, 17SPARKLE . . . . . . . . . . . . . . . . . . . . . . . . . . . . . . . . . . . . . 7Spherical aberration . . . . . . . . . . . . . . . . . . . . . . . 6, 12, 14STANDARD microscopes . . . . . . . . . . . . . . . . . . . . . . . . . 17Swabs . . . . . . . . . . . . . . . . . . . . . . . 7, 8, 9, 10, 11, 14, 17WHATMAN tissue. . . . . . . . . . . . . . . . . . . . . . . . . . 8, 9, 14White spirit . . . . . . . . . . . . . . . . . . . . . . . . . . . . . . . . . . . 8Xylene . . . . . . . . . . . . . . . . . . . . . . . . . . . . . . . . . . . . . . 1115
Please contact the local Carl Zeissrepresentative on all questionsregarding maintenance and service.Carl Zeiss MicroImaging GmbH07740 Jena, GermanyPhone : +49 3641 64 3400Telefax : +49 3641 64 3144E-Mail : micro@zeiss.dewww.zeiss.de/microInformation subject to change.Printed on environmentally friendly paperbleached without chlorine.50-1-0025/e – printed 06.11ISBN: 978-3-940885-03-616
What to Watch Outfor when <strong>Clean</strong>ing<strong>Microscope</strong> Optics1. When starting to clean, don‘t forget to use a dust blowerfirst, except when liquids (such as immersion oil) have to beremoved.2. Never wipe lenses with dry swabs or tissue – this will causescratches!3. Don‘t use abrasive materials such as dry leather wipers, drylinen cloths or polystyrene sticks as recommended by somemanufacturers.4. Don‘t apply any solvents before trying distilled water,except when grease has to be removed. (A film of distilledwater can be created by breathing on the surface.)5. Don‘t use ethanol, diethyl ether or acetone for cleaningolder microscopes(e.g., the STANDARD line from Carl Zeiss Oberkochen,or the MIKROVAL and JENA-<strong>Microscope</strong>s 250 CF linesfrom Carl Zeiss Jena).6. Don‘t use any disposable cotton swabs (e.g., Q-Tip®)instead of the cotton or ITW Texwipe <strong>Clean</strong> Tips® swabsrecommended herein, as the former are not free fromcontaminations.7. Beginners should not use any of the occasionally recommendedmetal rods instead of the wooden (bamboo)sticks, as the front lenses may easily get damaged by theformer.8. Don‘t use any of the optical spray cans containing pressurizedliquid air. <strong>The</strong> pressurized air from these cans mayeasily leave a residue that is difficult to remove, if at all.9. Never use acids or ammonia to clean objective front lenses,which are sensitive to acid and alkaline vapors.10. Never try to clean internal optical surfaces, cameras oradapter optics.17
<strong>Clean</strong> optics are essentialfor successful microscopy andperfect images.Methods and Principles<strong>The</strong> <strong>Clean</strong> <strong>Microscope</strong>