for all vehicles with above-spring factory overloads - SuperSprings
for all vehicles with above-spring factory overloads - SuperSprings
for all vehicles with above-spring factory overloads - SuperSprings

Create successful ePaper yourself
Turn your PDF publications into a flip-book with our unique Google optimized e-Paper software.
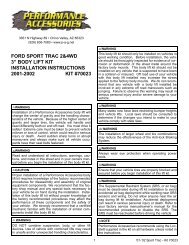
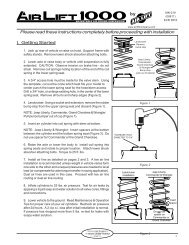
Inst<strong>all</strong>ation Instructions<br />
For easy inst<strong>all</strong>ation, you will need to:<br />
• READ ALL the instructions completely be<strong>for</strong>e beginning.<br />
• Have the necessary tools available<br />
Tools required:<br />
• 1 – 1 1/16” wrench / socket<br />
• 1 – 1 1/8” wrench / socket<br />
• 1 – Industrial strength steel clamp/press or <strong>SuperSprings</strong> Inst<strong>all</strong>ation tool.<br />
SAFETY NOTICE: WE RECOMMEND THAT THIS INSTALLATION BE DONE BY A PROFESSIONAL<br />
OR PERSONS WITH SOUND MECHANICAL KNOWLEDGE.<br />
SUPERSPRINGS are designed to work in conjunction <strong>with</strong> original equipment (<strong>factory</strong>) <strong>spring</strong>s in<br />
good condition only. Please consult <strong>SuperSprings</strong> <strong>factory</strong> (866-898-0720) if original <strong>spring</strong>s have<br />
been replaced <strong>with</strong> an after-market product.<br />
WARNING: These instructions are meant to be a general guide <strong>for</strong> inst<strong>all</strong>ing <strong>SuperSprings</strong>. <strong>SuperSprings</strong><br />
International assumes no liability <strong>for</strong> the actual inst<strong>all</strong>ation process. Consumers should apply common<br />
automotive safety practices when raising and working on any <strong>vehicles</strong>. Do NOT put yourself in a position where<br />
if the vehicle should move unexpectedly, you may be seriously hurt. <strong>SuperSprings</strong> are designed to improve<br />
vehicle carrying capacity and road handling. Do NOT load any vehicle beyond the manufacturer’s<br />
specifications.<br />
LIMITED WARRANTY<br />
See separate warranty in<strong>for</strong>mation page.<br />
<strong>SuperSprings</strong> International Corporation<br />
5055 Sixth Street, Carpinteria, CA 93013<br />
Support: 866-898-0720<br />
Support Email: gerry@super<strong>spring</strong>s.com<br />
Web: www.super<strong>spring</strong>s.com<br />
PLEASE NOTE:<br />
Remember to ensure emergency brake cables are not touching the <strong>SuperSprings</strong> blade(s). Secure them out of the<br />
way <strong>with</strong> zip ties or re-routing. Also, avoid <strong>all</strong> air conditioning lines, fuel filler hoses and brake lines / cables.<br />
1/30/2013
Inst<strong>all</strong>ation Instructions<br />
<strong>SuperSprings</strong> Model # SSA23 (PSP-7) ~SSA24 (PSP-1) <strong>with</strong> Poly Spring Pad<br />
Ford F250/F350 Pick-up [2008 ~ 2010] and F450 Pickup <strong>with</strong> PSP-1 [2011 ~ present]<br />
Optional P5KT <strong>for</strong> rough road conditions on a F450 Pickup [2011 ~ present]<br />
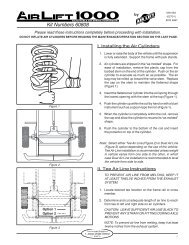
Step 1: Elevate vehicle at rear by the chassis/frame until the back wheels are slightly off the ground. The <strong>factory</strong><br />
<strong>spring</strong> pack must be at its most “relaxed / unloaded” position.<br />
Step 2: Remove the <strong>SuperSprings</strong> roller bolts, steel rollers & sleeves from shackles. Super<strong>spring</strong> eye bolt torque is<br />
pre-set at <strong>factory</strong> so no adjustment is needed. To ease inst<strong>all</strong>ation swing the shackles par<strong>all</strong>el to the <strong>spring</strong> blade[s].<br />
The <strong>SuperSprings</strong> will mount on top of <strong>factory</strong> top overload blades where applicable.<br />
Step 3: SSA-23 Applications: Ford F250/350 - Place the included Poly Spring Pad PSP-7<br />
lengthwise on the folded <strong>factory</strong> <strong>spring</strong> plate <strong>with</strong> the side <strong>with</strong> the sm<strong>all</strong> knobs facing<br />
downward into the Ford <strong>spring</strong> plate (Ref Fig. A). Ford F450 - likewise place PSP-7 on top of<br />
the flat <strong>factory</strong> <strong>spring</strong>-plate (Ref Fig.2).<br />
SSA-24 Applications: Ford F250/350/450 - Inst<strong>all</strong> the included Poly Spring Pad PSP-1, <strong>with</strong><br />
the flat side facing up (Ref Fig 2) onto the <strong>factory</strong> <strong>spring</strong>-plate.<br />
Note: On F-450 Pickup (2008~present <strong>with</strong> <strong>factory</strong> <strong>overloads</strong> on rough roads)<br />
Two secure the center of the <strong>SuperSprings</strong> <strong>for</strong> rough road conditions you can purchase the<br />
P5KT kit and inst<strong>all</strong> in between the downturned <strong>factory</strong> ubolts. To secure the <strong>spring</strong>, use the<br />
hardware provided, to clamp <strong>SuperSprings</strong> to the P5KT block. [Fig. 1] [Fig. 1]<br />
Ford PickupF250/350/450<br />
[Fig. 2] [Fig. 3] [Fig. 4]<br />
Step 4: While there is no designated front or rear side / left or right side, its best to insert the Super<strong>spring</strong> <strong>with</strong> the<br />
eye bolts threads facing outward and bolt-head towards the frame. Position the <strong>SuperSprings</strong> directly on top of the<br />
Poly Spring Pad. [Fig. 2]<br />
Step 5: Rear Side: Adjust the <strong>spring</strong> position until the shackle assembly is approximately located as shown in [Fig.2]<br />
<strong>above</strong>. Optimum <strong>spring</strong> action is obtained when there is a sm<strong>all</strong> gap remaining between the rear roller & the nearest<br />
obstacle (end of the next leaf or a <strong>spring</strong>-clip) in the direction of the axle. Note: Removal of plastic tab protruding<br />
from below <strong>factory</strong> <strong>spring</strong> leaf is suggested if it conflicts <strong>with</strong> roller placement. Swing shackles down into place as<br />
shown. Using a heavy duty clamp or a <strong>SuperSprings</strong> inst<strong>all</strong>ation tool; compress down the rear side of the<br />
SuperSpring, then re-assemble the steel roller, sleeve and bolt under the <strong>factory</strong> leaf pack and secure <strong>with</strong> nut.<br />
[Fig. 3 –Complete rear view)] See “Shackle hole selection” below <strong>for</strong> options.<br />
Step 6: Front Side: Inst<strong>all</strong> as in Step 5 <strong>above</strong>, swing shackle into position, compress SuperSpring, select desired<br />
shackle hole, re-assemble and secure the shackle. (Fig. 4 – Complete front view)<br />
Step 7: To inst<strong>all</strong> opposite side, repeat <strong>above</strong> inst<strong>all</strong>ation method. Ensure <strong>spring</strong> eye bolts threads are facing outward.<br />
Step 8: Lower the vehicle, test drive and/or load test the vehicle. Check <strong>for</strong> SuperSpring clearance to frame, <strong>spring</strong><br />
hangers, brake or other cables/lines. Ensure inst<strong>all</strong>ed nuts are tightened. If needed, make any desired adjustments to<br />
vehicle level via shackle hole re-selection at this time.<br />
Shackle hole selection: Use of top/upper shackle bolt holes will induce maximum preload tension and result in the<br />
greatest “lift” to the rear of the vehicle. Use of bottom/lower shackles bolt holes will induce minimum preload<br />
tension and least “lift” possible. Use of different combinations of upper/ lower shackle bolt holes, either back to front<br />
or side to side <strong>all</strong>ows <strong>for</strong> leveling adjustments to be made to the rear of vehicle to accommodate varying fixed load<br />
configurations.<br />
1/30/2013
Inst<strong>all</strong>ation Instructions<br />
<strong>SuperSprings</strong> Model # SSA23 (PSP-7) ~SSA24 (PSP-2) <strong>with</strong> Poly Spring Pad<br />
Dodge 2500/3500 Pickup [2003 ~ present]<br />
Dodge 3500/4500/5500HD Chassis Cab [2007 ~ present]<br />
Step 1: Elevate vehicle at rear by the chassis/frame until the back wheels are slightly off the ground. The<br />
<strong>factory</strong> <strong>spring</strong> pack must be at its most “relaxed / unloaded” position.<br />
Step 2: Remove the <strong>SuperSprings</strong> roller bolts, steel rollers & sleeves from shackles. Super<strong>spring</strong> eye bolt<br />
torque is pre-set at <strong>factory</strong> so no adjustment is needed. To ease inst<strong>all</strong>ation swing the shackles par<strong>all</strong>el to<br />
the <strong>spring</strong> blade[s]. The <strong>SuperSprings</strong> will mount on top of <strong>factory</strong> top overload blades where applicable.<br />
Step 3: SSA-23 Applications: Place the included Poly Spring Pad PSP-7 lengthwise on the <strong>spring</strong> plate<br />
<strong>with</strong> the side <strong>with</strong> the larger knobs facing down onto the <strong>spring</strong>-plate between the u-bolts. The cut-outs<br />
front and rear of the PSP-7 accommodate the two <strong>factory</strong> <strong>spring</strong>-pack centre bolts.<br />
SSA-24 Applications: Inst<strong>all</strong> the Poly Spring Pad PSP-2 <strong>with</strong> the flat side facing up between the <strong>factory</strong> u-<br />
bolts <strong>with</strong> the cut-outs front and rear accommodating the two <strong>factory</strong> <strong>spring</strong>-pack centre-bolts [Fig. A & 1]<br />
Dodge Cab Chassis images<br />
[Fig. 1] [Fig. 2] [Fig. 3] [Fig. 4]<br />
Step 4: While there is no designated front or rear side / left or right side, its best to inst<strong>all</strong> the Super<strong>spring</strong><br />
<strong>with</strong> the bolts threads facing outward and bolt head towards the frame. Position the <strong>SuperSprings</strong> directly<br />
on top of the Poly Spring Pad. [Fig. 1]<br />
Step 5: Rear Side: Adjust the <strong>spring</strong> position until the shackle assembly is approximately located as shown<br />
in [Fig.2/3] <strong>above</strong>. Optimum <strong>spring</strong> action is obtained when there is a sm<strong>all</strong> gap remaining between the rear<br />
roller & the nearest obstacle (end of the next leaf or a <strong>spring</strong>-clip) in the direction of the axle. Note:<br />
Removal of plastic tab protruding from below <strong>factory</strong> <strong>spring</strong> leaf is suggested if it conflicts <strong>with</strong> roller<br />
placement. Swing shackles down into place as shown. Using a heavy duty clamp or a <strong>SuperSprings</strong><br />
inst<strong>all</strong>ation tool; compress down the rear side of the SuperSpring, then re-assemble the steel roller, sleeve<br />
and bolt under the <strong>factory</strong> leaf pack and secure <strong>with</strong> nut. See “Shackle hole selection” below. Note:* Rear<br />
upper hole use requires trimming of <strong>SuperSprings</strong> shackle on cab chassis models to ensure clearance to<br />
<strong>factory</strong> <strong>spring</strong> hanger as seen [Fig. 2 & 3]. Dodge pickup inst<strong>all</strong>ation requires minimum ¾” clearance on roller.<br />
Step 6: Front Side: Inst<strong>all</strong> as in Step 5 <strong>above</strong>, swing shackle into position, compress SuperSpring, select<br />
desired shackle hole, re-assemble and secure the shackle. (Fig. 4 – Complete cab chassis front view)<br />
Step 7: To inst<strong>all</strong> opposite side, repeat <strong>above</strong> inst<strong>all</strong>ation method ensuring <strong>spring</strong> eye bolts threads are<br />
facing outward.<br />
Step 8: Lower vehicle, test drive and/or load test the vehicle, check <strong>for</strong> SuperSpring clearance to frame,<br />
<strong>spring</strong> hangers, brake or other cables/lines. Ensure inst<strong>all</strong>ed nuts are tightened. If needed, make any desired<br />
adjustments to vehicle level via shackle hole re-selection at this time.<br />
Shackle hole selection: Use of top/upper shackle bolt holes will induce maximum preload tension and<br />
result in the greatest “lift” to the rear of the vehicle. Use of bottom/lower shackles bolt holes will induce<br />
minimum preload tension and least “lift” possible. Use of different combinations of upper/ lower shackle<br />
bolt holes, either back to front or side to side <strong>all</strong>ows <strong>for</strong> leveling adjustments to be made to the rear of<br />
vehicle to accommodate varying fixed load configurations.<br />
1/30/2013
Inst<strong>all</strong>ation Instructions<br />
<strong>SuperSprings</strong> Model[s] # SSA23 (PSP-7)~SSA24 (PSP-2) <strong>with</strong> Poly Spring Pad<br />
For Chevrolet/GMC 3500HD Pickup [2002 ~2010]<br />
For Chevrolet/GMC 3500HD Chassis Cab [2001 ~ present]<br />
Step 1: Elevate vehicle at rear by the chassis/frame until the back wheels are slightly off the ground.<br />
The <strong>factory</strong> <strong>spring</strong> pack must be at its most “relaxed / unloaded” position.<br />
Step 2: Remove the <strong>SuperSprings</strong> roller bolts, steel rollers & sleeves from shackles. Spring eye bolt<br />
torque is pre-set at <strong>factory</strong> so no adjustment is needed. To ease inst<strong>all</strong>ation swing the shackles par<strong>all</strong>el<br />
to the <strong>spring</strong> blade[s]. The <strong>SuperSprings</strong> will mount on top of <strong>factory</strong> top overload blades.<br />
Step 3: SSA23 Applications: Place the included Poly Spring Pad PSP-7 lengthwise on the <strong>spring</strong> plate<br />
<strong>with</strong> the large knobs facing down [Fig. A and 1] between the <strong>factory</strong> u-bolts.<br />
SSA24 Applications: Inst<strong>all</strong> the Poly Spring Pad PSP-2 [Fig. C], <strong>with</strong> the flat side facing up between<br />
the <strong>factory</strong> u-bolts.<br />
[Rear only *] [Fig. 1] [Fig. 2] [Fig. 3]<br />
Step 4: While there is no designated front or rear side / left or right side, its best to inst<strong>all</strong> the Super<strong>spring</strong><br />
<strong>with</strong> the bolts threads facing outward and bolt head towards the frame. Position the <strong>SuperSprings</strong> directly<br />
on top of the Poly Spring Pad. [Fig. 1]<br />
Step 5: Rear Side: Adjust the <strong>spring</strong> position until the shackle assembly is approximately located as shown<br />
in [Fig.2] <strong>above</strong>. Optimum <strong>spring</strong> action is obtained when there is a sm<strong>all</strong> gap remaining between the rear<br />
roller & the nearest obstacle (end of the next leaf or a <strong>spring</strong>-clip) in the direction of the axle. Note:<br />
Removal of plastic tab protruding from below <strong>factory</strong> <strong>spring</strong> leaf is suggested if it conflicts <strong>with</strong> roller<br />
placement. Swing shackles down into place as shown. Using a heavy duty clamp or a <strong>SuperSprings</strong><br />
inst<strong>all</strong>ation tool; compress down the rear side of the SuperSpring, then re-assemble the steel roller, sleeve<br />
and bolt under the <strong>factory</strong> leaf pack and secure <strong>with</strong> nut. See “Shackle hole selection” below. Note:* On<br />
rear shackle, if using lower bolt hole, remove <strong>factory</strong> overload frame contact perch [Fig. B].<br />
Step 6: Front Side: Inst<strong>all</strong> as in Step 5, swing shackle into position, compress <strong>SuperSprings</strong>, select<br />
desired shackle hole, re-assemble and secure the shackle. (Fig. 3 – Complete front view)<br />
Step 7: To inst<strong>all</strong> opposite side, repeat <strong>above</strong> inst<strong>all</strong>ation method. Ensure <strong>spring</strong> eye bolts threads are<br />
facing outward.<br />
Step 8: Lower the vehicle and test drive and/or test load vehicle, check <strong>for</strong> SuperSpring clearance to<br />
frame, <strong>spring</strong> hangers, brake or other cables/lines. Ensure inst<strong>all</strong>ed nuts are tightened. If needed, make<br />
any desired adjustments to vehicle level via shackle hole re-selection at this time.<br />
Shackle hole selection: Use of top/upper shackle bolt holes will induce maximum preload tension and<br />
result in the greatest “lift” to the rear of the vehicle. Use of bottom/lower shackles bolt holes will<br />
induce minimum preload tension and least “lift” possible. Use of different combinations of upper/<br />
lower shackle bolt holes, either back to front or side to side <strong>all</strong>ows <strong>for</strong> leveling adjustments to be made<br />
to the rear of vehicle to accommodate varying fixed load configurations.<br />
1/30/2013