Installation Instructions - Rough Country
Installation Instructions - Rough Country
Installation Instructions - Rough Country

You also want an ePaper? Increase the reach of your titles
YUMPU automatically turns print PDFs into web optimized ePapers that Google loves.
92127300<br />
99-06 YUKON / SUBURBAN 2” KIT<br />
Thank you for choosing <strong>Rough</strong> <strong>Country</strong> Off Road Gear for your suspension needs.<br />
<strong>Rough</strong> <strong>Country</strong> recommends a certified technician install this system. In addition to these instructions, professional<br />
knowledge of disassemble/reassembly procedures as well as post installation checks must be known. Attempts to install<br />
this system without this knowledge may jeopardize the integrity and/or operating safety of the vehicle.<br />
Please read instructions before beginning installation.<br />
PRODUCT USE INFORMATION<br />
As a general rule, the taller a vehicle is, the easier it will roll. Offset, as much as possible, what is lost in rollover resistance<br />
by increasing tire track width. In other words, go "wide" as you go "tall".<br />
Do not add, alter, or fabricate any factory or after-market parts to increase vehicle height over the intended height of the<br />
<strong>Rough</strong> <strong>Country</strong> product purchased. Mixing component brands, lifts, and/or combining body lift with suspension lifts<br />
voids all warranties. <strong>Rough</strong> <strong>Country</strong> makes no claims regarding lifting devices and excludes any and all implied claims.<br />
We will not be responsible for any product that is altered.<br />
Braking performance and capability are decreased when significantly larger/heavier tires and wheels are used. Take<br />
this into consideration while driving.<br />
The required installation time for this system is approximately 2 hours (see recommended tool list shown below). This<br />
kit is usually sold as a front end leveling kit, but can be sold in combination with rear blocks and u-bolts or a rear add-aleaf.<br />
Shocks with longer travel are recommended.<br />
This suspension system was developed using 285x75R16 tire on an 8” wheel. Before installing other combinations,<br />
please consult your local tire and wheel specialist.<br />
If questions exist we will be happy to answer any questions concerning the design, function, and correct use of our<br />
products.<br />
NOTICE TO DEALER AND VEHICLE OWNER<br />
Any vehicle equipped with any <strong>Rough</strong> <strong>Country</strong> product should have a “Warning to Driver” decal installed on the inside of<br />
the windshield or on the vehicle’s dash. The decal should act as a constant reminder for whoever is operating the vehicle<br />
of its unique handling characteristics.<br />
INSTALLING DEALER - it is your responsibility to install the warning decal and forward these installation instructions<br />
on to the vehicle owner for review. These instructions should be kept in the vehicle for its service.<br />
Kit Contents<br />
1273 kit box<br />
2-Fr shocks ( 658520)<br />
2-Rr shocks ( 657342)<br />
2-Torsion bar Keys<br />
2-3/4” rear coil spacers<br />
2-Shock poly bags<br />
Tools Needed<br />
21mm wrench<br />
18mm wrench<br />
19mm Wrench<br />
15mm wrench<br />
Jack<br />
Jack Stands<br />
Torsion bar tool<br />
Torque Specs<br />
Size Grade 5 Grade 8<br />
5/16” 15 ft/lbs 20 ft/lbs<br />
3/8” 30 ft/lbs 35 ft/lbs<br />
7/16” 45 ft/lbs 60 ft/lbs<br />
1/2” 65 ft/lbs 90 ft/lbs<br />
9/16” 95 ft/lbs 130 ft/lbs<br />
5/8” 135 ft/lbs 175 ft/lbs<br />
3/4” 185 ft/lbs 280 ft/lbs
FRONT INSTALLATION INSTRUCTIONS<br />
1. Place the vehicle in neutral. Raise the front of the vehicle with a jack to slightly raise the tires of the ground and support<br />
the frame with jack stands beneath each frame rail behind the lower control arms. <strong>Installation</strong> is done one side<br />
at a time, starting with the driver side. The torsion bar adjusters are under the cab of the vehicle at the rearward end<br />
of the torsion bars.<br />
2. Measure or make a note of how much thread is remaining on the torsion bar adjuster bolt. You will reset the bars at<br />
this same location with the new adjusters. See Photo 1. Use extreme caution when loading and unloading the torsion<br />
bars; there is a tremendous amount of energy stored in them. Keep your hands and body clear of the adjuster<br />
arm assembly and the puller tool in case anything slips or breaks. Note: Because of the extreme loads generated<br />
by the torsion bars on these vehicles, a standard tow-jaw puller may bend the “lips” of the cross member<br />
and my pop out of place. For best results use a c-clamp type puller tool. <strong>Rough</strong> <strong>Country</strong> offers a torsion<br />
bar tool part # 1069 for purchase. Please call <strong>Rough</strong> <strong>Country</strong> @800-222-7023 or ask your dealer for details<br />
on this tool.<br />
Photo 1<br />
Photo 2<br />
<strong>Rough</strong> <strong>Country</strong> Tool shown to remove adjuster<br />
3. On the driver side, using a torsion bar removal tool, remove<br />
the stock torsion bar adjuster. Load the torsion bar<br />
Photo 3<br />
using the tool and remove the bolt and threaded block.<br />
See Photo 3. Remove the adjuster.<br />
4. Unload the bar; slide the torsion bar forward allowing the<br />
OE torsion key to fall out.<br />
5. Install the new torsion bar adjuster using the torsion bar<br />
tool. Reinstall the threaded block and adjuster bolt.<br />
6. Repeat steps for passenger side. Making sure the driver<br />
and passenger side torsion bar adjuster bolts are adjusted<br />
the same amount. Fine-tuning is done in a later step.<br />
7. After the torsion bar adjusters have been installed; tighten<br />
to the factory measurement taken in Step #2.<br />
8. Jack up the front of the vehicle and remove the jack<br />
Remove the threaded adjuster block<br />
stands.<br />
9. Lower the vehicle to the ground to where the torsion bars are supporting the weight of the vehicle. Check for level.<br />
10. Additional adjustment may need to be performed to level the vehicle by either tightening or loosening the torsion<br />
bars. This is done with a floor jack supporting the side of the vehicle that is being adjusted, raising the tires slightly of<br />
the ground and only adjusting the bolt 1-2 turns at a time to ensure the leveling of the truck. After adjustment lower<br />
the vehicle to the ground and recheck for level. This may take several attempts.<br />
11. Remove the stock front shock absorbers at this time an install new <strong>Rough</strong> <strong>Country</strong> shock absorbers, part # 658725.
REAR INSTALLATION INSTRUCTIONS<br />
1. Chock the front wheels and jack up the rear of the vehicle with a floor jack.<br />
2. Place the rear of the vehicle on jack stands. Lower floor jack but do not remove a this time. Never work under an<br />
unsupported vehicle.<br />
3. Remove the stock shock absorbers using a 21mm wrench. Retain the factory hardware.<br />
4. Using a 18 & 19MM wrench, remove the sway bar link from the sway bar on both sides on the axle. See Photo 1.<br />
5. Lower the axle down to allow the coil spring to be removed.<br />
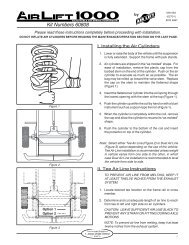
6. Remove coils and install the 3/4” poly spacer on top of the coil spring. See Photo 2. Install the coil with spacer back<br />
into mount.<br />
Photo 1 Photo 2<br />
7. Jack up the rear axle.<br />
8. Install the supplied bushings /sleeves into the new <strong>Rough</strong> <strong>Country</strong> shock, part # 658695 and install in the factory<br />
mounts using factory hardware with a 21mm wrench.<br />
9. Reinstall the sway bar link back into the sway bar with factory hardware using a 18 & 19mm wrench.<br />
10. Install the tire / wheels and remove the jack stands.<br />
11. Lower the vehicle to the ground.
POST INSTALLATION NOTES<br />
This kit will level the vehicle without a substantial difference in ride quality. Most customers adjust the front to 2" higher than<br />
stock, and are satisfied with the ride quality. Ride quality is inversely proportional to heights ABOVE a 2" adjustment. This<br />
leveling kit works within the range of the FACTORY droop, or downward suspension cycle. It does NOT bind the CV axles or<br />
ball joints, just as none of these conditions occur with the truck supported on a hoist and the front wheels hanging freely in the<br />
air. As with any lift installed, adjustment of the front headlights is required after installation. Note – the air dam on the front<br />
may need to be trimmed for additional clearance, depending on the tire size.<br />
A front-end alignment should ALWAYS be checked after installing ANY vehicle suspension lift. This kit typically requires<br />
a slight toe-in adjustment. Record the ride height measurement at the time of alignment. If, in the future the torsion bars<br />
settle excessively, alignment can be restored by adjusting-up the bars to their original ride height.<br />
Thank you for purchasing a <strong>Rough</strong> <strong>Country</strong> Suspension Lift Kit.<br />
Please visit our website @ www.roughcountry.com for your off road vehicle needs