64-80 TOYOTA LANDCRUISER INSTALLATION - Rough Country
64-80 TOYOTA LANDCRUISER INSTALLATION - Rough Country
64-80 TOYOTA LANDCRUISER INSTALLATION - Rough Country

You also want an ePaper? Increase the reach of your titles
YUMPU automatically turns print PDFs into web optimized ePapers that Google loves.
92756702<br />
<strong>64</strong>-<strong>80</strong> <strong>TOYOTA</strong> <strong>LANDCRUISER</strong> <strong>INSTALLATION</strong><br />
<strong>Rough</strong> <strong>Country</strong> recommends a certified technician install this system. In addition to these instructions, professional knowledge<br />
of disassemble/reassemble procedures as well as post installation checks must be known. Attempts to install this system<br />
without this knowledge and expertise may jeopardize the integrity and/or operating safety of the vehicle.<br />
Please read instructions before beginning installation. Check the kit hardware against the parts list. Be sure you have all<br />
needed parts and know where they go.<br />
With the installation of all lift kits and larger tires it is important to check the condition of your steering stabilizer. If the<br />
stabilizer is worn or is leaking it should be replaced. Steering stabilizers are designed to restrain “bump steering” and front-end<br />
vibration, giving added life to tires, ball joints, and other steering components. A multiple stabilizer kit is recommended for<br />
vehicles equipped with a snowplow, winch, or larger tires<br />
PRODUCT USE INFORMATION<br />
As a general rule, the taller a vehicle is, the easier it will roll. Offset, as much as possible, what is lost in rollover resistance by<br />
increasing tire track width. In other words, go "wide" as you go "tall". Many sportsmen remove their mud tires after hunting<br />
season and install ones more appropriate for street driving; always use as wide a tire and wheel combination as possible to<br />
enhance vehicle stability.<br />
We strongly recommend, because of rollover possibility, that the vehicle be equipped with a functional roll-bar and cage<br />
system. Seat belts and shoulder harnesses should be worn at all times. Avoid situations where a side rollover may occur<br />
Generally, braking performance and capability are decreased when significantly larger/heavier tires and wheels are used. Take<br />
this into consideration while driving.<br />
Do not add, alter, or fabricate any factory or after-market parts to increase vehicle height over the intended height of the <strong>Rough</strong><br />
<strong>Country</strong> product purchased. Mixing component brands is not recommended.<br />
<strong>Rough</strong> <strong>Country</strong> makes no claims regarding lifting devices and excludes any and all implied claims. We will not be responsible<br />
for any product that is altered.<br />
If question exist we will be happy to answer any questions concerning the design, function, and correct use of our products.<br />
NOTICE TO DEALER AND VEHICLE OWNER<br />
Any vehicle equipped with any <strong>Rough</strong> <strong>Country</strong> product should have a “Warning to Driver” decal installed on the inside of the<br />
windshield or on the vehicle’s dash. The decal should act as a constant reminder for whoever is operating the vehicle of its<br />
unique handling characteristics.<br />
INSTALLING DEALER - it is your responsibility to install the warning decal and forward these installation instructions on to<br />
the vehicle owner for review. These instructions should be kept in the vehicle for its service<br />
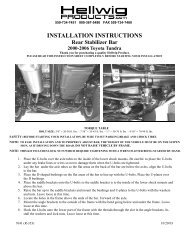
<strong>INSTALLATION</strong> INSTRUCTIONS<br />
1. Park the vehicle on a level surface. Check the vehicle height from side to side and front to back. This is done by<br />
measuring from the ground up to the fender using the hub as a centering point.<br />
2. Apply a thin coat of grease to the polyurethane bushings and insert into each eye of the new front springs. Now<br />
apply a thin coat of grease on outside of bushings. This will help you to insert the bushing into the spring mount.<br />
3. Raise the front of the vehicle and support securely with jack stands under the frame behind the front springs, and<br />
block the rear wheels. Remove the tires, shocks, u-bolts, and loosen the sway bar bolts. (Caution: the front axle<br />
will now be free to move, so support securely on floor jack.)<br />
4. With a floor jack supporting the axle, unbolt each end of leaf springs and remove from both sides. (If new shackle<br />
bushings were purchased, grease and install them in the frame at this time.) Install new front springs, part # <strong>80</strong>41.<br />
When installing the front springs that the fat part of the shim on the bottom of the spring pack should be pointing<br />
toward the rear of the vehicle. Notice the tie bolt in the front leaf springs is not in the center of the leaf spring, but<br />
there is a long end and short end. Install the springs with the short end towards the rear, and long end towards the<br />
front bumper. Do not tighten spring eyebolts at this time.<br />
Page 1
INSTRUCTION SHEET<br />
5. Using the floor jack, lower the front axle down to the leaf springs. Be sure the tie bolts align and fit into the tie<br />
bolt holes in the front axle housing. Install and tighten new u-bolts. Torque u-bolts to 75-90 ft.lbs.<br />
6. Install new shocks and tires then lower the vehicle to the ground. Tighten spring eyebolts at this time. NOTE: The<br />
drag link that goes along side of the frame from the gear box to the bell crank may require slight bending for<br />
clearance of the new shock. Bending this drag link will not affect it, but do not kink the bar.<br />
7. Raise the rear of the vehicle. Support securely with jack stands and block the front wheels. Remove the tires,<br />
shocks, and u-bolts. (CAUTION: the rear axle will be free to move, so support securely on a floor jack.<br />
8. Apply a thin coat of grease to the polyurethane bushings and insert into each eye of the new rear springs. Now<br />
apply a thin coat of grease on outside of bushings. This will help you to insert the bushing into the spring mount.<br />
9. With a floor jack supporting the rear axle, unbolt each end of the rear leaf spring and remove from both sides. (If<br />
new shackle bushings were purchased, grease and install them in the frame at this time.) Install new springs, part<br />
# <strong>80</strong>42. When installing the rear springs the fat part of the shim on the bottom of the spring pack should be<br />
pointing toward the front of the vehicle. Notice the tie bolt in the rear leaf springs is not in the center of the leaf<br />
springs, but there is a long end and a short end. Install the springs with the short end towards the front and longer<br />
end towards the rear bumper. Do not tighten spring eyebolts at this time.<br />
10. Using a floor jack, lower the rear axle down to the leaf springs. Be sure tie bolts align and fit into the tie bolt<br />
holes in the axle housing. Install and tighten new u-bolts, shocks and tires then lower vehicle to the ground.<br />
Torque u-bolts to 75-90 ft.lbs. Tighten spring eyebolts at this time.<br />
Installation is now complete. Check brake line length to make sure there is plenty of line left for free play. The steering wheel<br />
can be adjusted by adjusting the drag link. Adjust each end of the drag link out making the link longer being sure that the drag<br />
link ends do not come past the clamps.<br />
POST <strong>INSTALLATION</strong> INSTRUCTIONS<br />
1. Check all fasteners for proper torque. Check to ensure there is adequate clearance between all rotating, mobile, fixed and<br />
heated members. Check steering gear for interference and proper working order. Test brake system.<br />
2. Perform steering sweep. Check to ensure brake hoses have sufficient slack and will not contact rotating, mobile, or fixed<br />
members, adjust lines/brackets to eliminate interference and maintain proper working order. Failure to perform<br />
inspections may result in component failure.<br />
3. Bump stops and extensions must be in place on all vehicles! Note: allowing suspension to over extend by neglecting to<br />
install or maintain stops and extensions may cause serious damage to OE and related components.<br />
4. Re torque all fasteners after 500 miles. Visually inspect components and re torque fasteners during routine vehicle service.<br />
MAINTENANCE INFORMATION<br />
It is the ultimate buyers responsibility to have all bolts/nuts checked for tightness after the first 100 miles and then every<br />
1000 miles. Wheel alignment steering system, suspension and driveline systems must be inspected by a qualified<br />
Professional mechanic at least every 3000 miles.<br />
Technical Assistance - (731) 285-9000 Page 2