7641 TOYOTA TUNDRA.pub (Read-Only) - SD Truck Springs
7641 TOYOTA TUNDRA.pub (Read-Only) - SD Truck Springs
7641 TOYOTA TUNDRA.pub (Read-Only) - SD Truck Springs

You also want an ePaper? Increase the reach of your titles
YUMPU automatically turns print PDFs into web optimized ePapers that Google loves.
559-734-7451 800-367-5480 FAX 559-734-7460<br />
INSTALLATION INSTRUCTIONS<br />
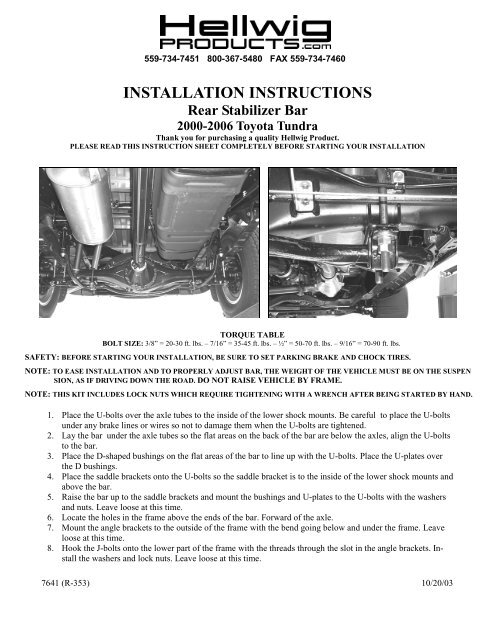
Rear Stabilizer Bar<br />
2000-2006 Toyota Tundra<br />
Thank you for purchasing a quality Hellwig Product.<br />
PLEASE READ THIS INSTRUCTION SHEET COMPLETELY BEFORE STARTING YOUR INSTALLATION<br />
TORQUE TABLE<br />
BOLT SIZE: 3/8” = 20-30 ft. lbs. – 7/16” = 35-45 ft. lbs. – ½” = 50-70 ft. lbs. – 9/16” = 70-90 ft. lbs.<br />
SAFETY: BEFORE STARTING YOUR INSTALLATION, BE SURE TO SET PARKING BRAKE AND CHOCK TIRES.<br />
NOTE: TO EASE INSTALLATION AND TO PROPERLY ADJUST BAR, THE WEIGHT OF THE VEHICLE MUST BE ON THE SUSPEN<br />
SION, AS IF DRIVING DOWN THE ROAD. DO NOT RAISE VEHICLE BY FRAME.<br />
NOTE: THIS KIT INCLUDES LOCK NUTS WHICH REQUIRE TIGHTENING WITH A WRENCH AFTER BEING STARTED BY HAND.<br />
1. Place the U-bolts over the axle tubes to the inside of the lower shock mounts. Be careful to place the U-bolts<br />
under any brake lines or wires so not to damage them when the U-bolts are tightened.<br />
2. Lay the bar under the axle tubes so the flat areas on the back of the bar are below the axles, align the U-bolts<br />
to the bar.<br />
3. Place the D-shaped bushings on the flat areas of the bar to line up with the U-bolts. Place the U-plates over<br />
the D bushings.<br />
4. Place the saddle brackets onto the U-bolts so the saddle bracket is to the inside of the lower shock mounts and<br />
above the bar.<br />
5. Raise the bar up to the saddle brackets and mount the bushings and U-plates to the U-bolts with the washers<br />
and nuts. Leave loose at this time.<br />
6. Locate the holes in the frame above the ends of the bar. Forward of the axle.<br />
7. Mount the angle brackets to the outside of the frame with the bend going below and under the frame. Leave<br />
loose at this time.<br />
8. Hook the J-bolts onto the lower part of the frame with the threads through the slot in the angle brackets. Install<br />
the washers and lock nuts. Leave loose at this time.<br />
<strong>7641</strong> (R-353) 10/20/03
559-734-7451 800-367-5480 FAX 559-734-7460<br />
9. Raise the ends of the bar up to the angle brackets and mount the end links between the angle brackets and the<br />
bar ends. DO NOT OVERTIGHTEN. Tighten the end links only until the bushings begin to bulge slightly.<br />
10. Align the bar under the axles to be centered as well as possible and to have the end links as straight up and<br />
down as possible. Rotate the axle U-bolts as needed. Double check the brake lines.<br />
11. Torque all mounting hardware to the specified rate. Torque axle U-bolts to 40 ft. lbs. then double nut. Torque<br />
J-Bolts to 25 ft. lbs. Check for clearance on all undercarriage components, brake lines, fuel hoses, Etc. Test<br />
drive and recheck.<br />
12. Recheck installation after one (1) week of driving and every thirty (30) days thereafter.<br />
ATTENTION INSTALLER: PLEASE MAKE SURE CUSTOMER RECEIVES THIS INSTRUCTION SHEET,<br />
ALL IMPORTANT NOTE CARDS, WARNING CARDS AND THE WARRANTY<br />
FORM<br />
<strong>7641</strong> (R-353) 10/20/03