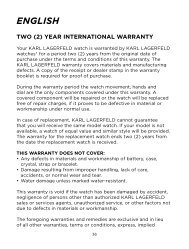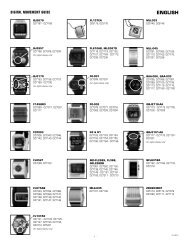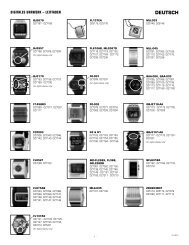
English - Watch Station
English - Watch Station
English - Watch Station

You also want an ePaper? Increase the reach of your titles
YUMPU automatically turns print PDFs into web optimized ePapers that Google loves.
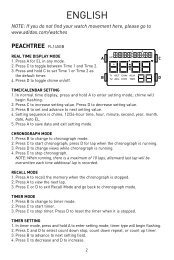
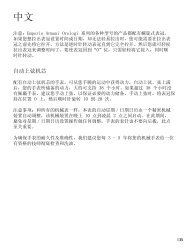
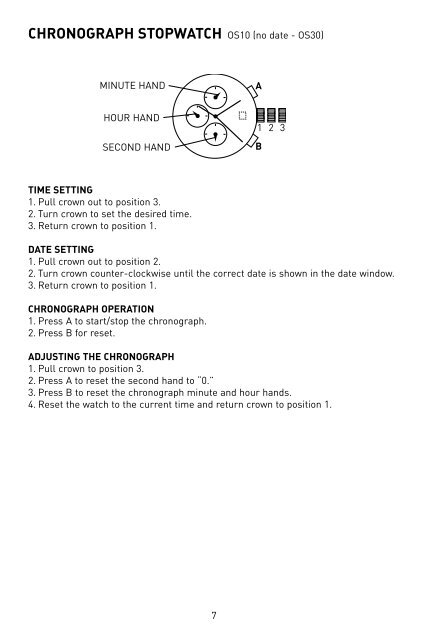
Chronograph Stopwatch OS10 (no date - OS30)<br />
Minute Hand<br />
A<br />
Hour Hand<br />
Second Hand<br />
1 2 3<br />
B<br />
Time Setting<br />
1. Pull crown out to position 3.<br />
2. Turn crown to set the desired time.<br />
3. Return crown to position 1.<br />
Date Setting<br />
1. Pull crown out to position 2.<br />
2. Turn crown counter-clockwise until the correct date is shown in the date window.<br />
3. Return crown to position 1.<br />
Chronograph Operation<br />
1. Press A to start/stop the chronograph.<br />
2. Press B for reset.<br />
Adjusting The Chronograph<br />
1. Pull crown to position 3.<br />
2. Press A to reset the second hand to “0.”<br />
3. Press B to reset the chronograph minute and hour hands.<br />
4. Reset the watch to the current time and return crown to position 1.<br />
7
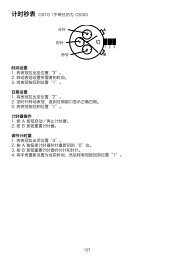
Chronograph Stopwatch VD55 (with date - VD57)<br />
1/10 Second Hand<br />
A<br />
Minute Hand<br />
Second Hand<br />
1 2 3<br />
B<br />
Time Setting<br />
1. Pull crown out to position 3.<br />
2. Set time by turning the crown clockwise.<br />
3. Push back to position 1 to start the watch.<br />
Using the Stopwatch<br />
1. Press A to start/stop the stopwatch.<br />
2. Press B to control the split time and reset.<br />
Stopwatch Hand Adjustment<br />
1. Pull crown out to position 3.<br />
2. Press A to reset the stopwatch 1/10 second hand to the “0” position.<br />
3. Press B to reset the second and minute hands. The hands only move clockwise.<br />
4. With each press of A or B, the hands move one position. They move quickly if the<br />
buttons are kept pressed.<br />
NOTE: If the stopwatch hands function improperly, pull out crown and press A and B<br />
at the same time for over 2 seconds. When the buttons are released, the stopwatch<br />
second and 1/10 second hands will spin around and return to “0.” This will indicate<br />
that the internal circuit has been reset.<br />
Date Setting (on some models only)<br />
1. Pull crown out to position 2.<br />
2. Turn clockwise until desired date appears in window.<br />
3. Push crown back to position 1.<br />
8
DURAMO / FURANO / URAHA / PARUKO QFL312BA /<br />
QFL259BB / QFL235FA / QFL311BA<br />
TIME MODE<br />
1. Press B to change modes.<br />
2. Press A for EL.<br />
3. Press C to select 12/24 hour format.<br />
4. Press D to enable/disable hourly chime.<br />
TIME SETTING<br />
1. In time mode, press and hold A for 2 seconds<br />
to enter time setting.<br />
2. Press C to increase setting value. Press D to<br />
decrease setting value.<br />
3. Press B to enter next setting field.<br />
4. Press pusher A to exit setting mode.<br />
ALARM MODE<br />
1. Press B to enter alarm mode.<br />
2. Press A for EL.<br />
3. Press C to select alarm 1 or alarm 2.<br />
4. Press D to enable/disable alarm.<br />
ALARM SETTING<br />
1. Press and hold A for 2 seconds to enter<br />
alarm setting.<br />
2. Press C to increase setting value. Press D to<br />
decrease setting value.<br />
3. Press B to enter next setting field.<br />
4. Repeat steps 2 and 3 until desired time is<br />
selected.<br />
5. Press A to exit setting mode.<br />
NOTE: Alarm turns on automatically when<br />
exiting setting mode.<br />
A<br />
B<br />
A<br />
B<br />
A<br />
B<br />
C<br />
D<br />
C<br />
D<br />
C<br />
D<br />
CHRONO MODE<br />
1. Press B to enter chrono mode.<br />
2. Press C to start chrono.<br />
3. Press D to stop chrono.<br />
4. Press and hold D for 2 seconds to reset chrono.<br />
NOTE: Maximum chrono time is 23 hours, 59 minutes, and 59 seconds. When chrono<br />
reaches maximum time, it will stop running. Press and hold D to reset value to run<br />
chrono. 1/00s resolution for first 59 minutes and 59.99 seconds.<br />
9
RESPONSE / FITNESS CONTROL / NALOA / LAHAR<br />
NORMAL TIME DISPLAY<br />
1. Press A for EL.<br />
2. Press B to change modes. Mode sequence is time,<br />
my log, alarm, timer.<br />
3. Press D to flash to TIME 2; press and hold D to<br />
toggle TIME 1 and TIME 2.<br />
4. Press E to toggle chime on/off. Press and hold E<br />
for chronograph mode on 50 Lap Digital Models.<br />
On 10-30 Lap Digital Models, press and hold E for<br />
timer mode.<br />
5. Press and hold A, B, D and E for 5 seconds to<br />
master reset the watch. All data will be erased,<br />
and all settings will be set to default.<br />
a<br />
B<br />
C<br />
E<br />
D<br />
TIME/CALENDAR SETTING<br />
1. In normal time display, press and hold A to enter<br />
setting mode; hour will begin flashing.<br />
2. Press E to increase setting value. Press D to<br />
decrease setting value.<br />
3. Press B to set and advance to next setting value.<br />
4. Setting sequence is hour, minute, second, year,<br />
month, date, 12/24-hour time, date format.<br />
5. Press A to save data and exit setting mode.<br />
A<br />
B<br />
C<br />
E<br />
D<br />
ALARM MODE<br />
1. Press B to change to alarm mode.<br />
2. Press D to toggle between alarms 1 and 2.<br />
3. Press E to toggle alarm on/off.<br />
ALARM SETTING<br />
1. In alarm mode, press and hold A to enter setting mode; hour will begin flashing.<br />
2. Press D to decrease; press E to increase.<br />
3. Press B to set and advance to next setting value.<br />
4. Setting sequence is hour, minute, T1/T2.<br />
5. Press A to save data and exit setting mode.<br />
NOTE: Alarm status will be ON automatically after exit the ALARM SETTING mode.<br />
No button operation for 30 seconds will auto-exit with changes saved, but alarm<br />
status OFF.<br />
TIMER MODE<br />
1. Press B to change to timer mode on 50 Lap Digital Models. On 10-30 Lap Digital<br />
Models, press and hold E to change to timer mode.<br />
2. Press C to start timer.<br />
3. Press D to stop timer. Press and hold D to reset the timer when it is stopped.<br />
4. Press E for next timer.<br />
NOTE: For 50 Lap Digital Models, there are 3 timers. For 10-30 Lap Digital Models,<br />
there are 5 timers.<br />
10
TIMER SETTING<br />
1. In timer mode, press and hold A to enter setting mode; timer type will begin<br />
flashing.<br />
2. Press D and E to select count up timer, count down stop, or count down repeat, or<br />
interval timer (see interval timer setting for separate instructions).<br />
3. Press B to advance to next setting field.<br />
4. Press D to decrease and E to increase.<br />
5. Press B to set and advance to next setting value.<br />
6. Setting sequence is timer type, hour, minute, second.<br />
7. Press A to save data and exit setting mode.<br />
INTERVAL TIMER SETTING<br />
1. In timer mode, press and hold A to enter setting mode; timer type will begin<br />
flashing.<br />
2. Press D or E to select interval timer.<br />
3. Press B to advance to next setting field.<br />
4. Press D to decrease and E to increase.<br />
5. Press B to set and advance to next setting value.<br />
6. Setting sequence is timer type (interval), hour, minute, second.<br />
7. Press A to save data and advance to the next segment.<br />
8. Repeat steps 5 and 6 until desired number of segments have been set (5<br />
maximum for 50 Lap Digital Models, 6 maximum for 10-30 Lap Digital Models).<br />
NOTE: When running, segments loop maximum 99 times.<br />
CHRONOGRAPH MODE<br />
1. From any mode, press and hold E for 2 seconds to change to chronograph mode<br />
on 50 Lap Digital Models. On 10-30 Lap Digital Models, press B to change to<br />
chronograph mode.<br />
2. Press C to start chronograph; press C for lap when the chronograph is running.<br />
3. Press E to change views while chronograph is running. Select between current<br />
lap, total, or both.<br />
4. Press D to stop chronograph when it is running; press and hold D to reset to zero<br />
when the chronograph is stopped or press and hold A to save data to MY LOG.<br />
NOTE: On 50 Lap Digital Models, the maximum number of laps is 50. On 10-30 Lap<br />
Digital Models, the maximum number of laps is 10 or 30.<br />
MY LOG MODE<br />
1. Press B to change to my log mode.<br />
2. Press E to view data within the selected SET.<br />
3. Press D to advance through saved sets. Press and hold D to clear selected set.<br />
Continue holding to clear all sets.<br />
4. Press and hold E to race against any SET. This will put you in SHADOW RACE mode.<br />
SHADOW RACING (only on 50 Lap Digital Models)<br />
This function allows you to easily race against yourself from a previously stored<br />
session of data that can be found under “MY LOG.” Take a lap reading at the marker<br />
and the watch will tell you how you compare to your previous race.<br />
1. Press B to change to MY LOG mode.<br />
11
2. Press D and E to select set of data to race against.<br />
3. Press and hold E to enter shadow racing chronograph.<br />
NOTE: See chronograph mode instructions for chronograph operation.<br />
4. Press and hold A to save run data when the chronograph is stopped.<br />
5. Press B to return to normal time display.<br />
STOPWATCH<br />
NORMAL TIME DISPLAY<br />
1. Press A to show alarm time.<br />
2. Press A+C to toggle alarm on/off.<br />
3. Press C to show month and date.<br />
4. Press D for EL.<br />
5. Press and hold A, then press B to toggle<br />
chime on/off. All day marks will be<br />
displayed when the chime is on.<br />
A<br />
B<br />
D<br />
TIME AND CALENDAR SETTING<br />
NOTE: In setting mode, (TU) will flash.<br />
1. In normal time display, press B three times; seconds will begin flashing.<br />
2. Press C to reset seconds to zero.<br />
3. Press A to advance to next setting value.<br />
4. Press C to increase digits; press and hold C for fast advance.<br />
5. Setting sequence is: seconds, minutes, hour, date, month, weekday.<br />
6. Press B to exit setting mode.<br />
C<br />
ALARM SETTING<br />
1. In normal time display, press B twice; hour will begin flashing.<br />
2. Press C to increase digits; press and hold C for fast advance.<br />
3. Press A to advance to minutes.<br />
4. Press C to increase digits; press and hold C for fast advance.<br />
5. Press B to exit setting mode and return to normal time display.<br />
NOTE: Alarm will sound for 60 seconds. Press A to silence alarm, or D for 5<br />
minute snooze.<br />
CHRONOGRAPH MODE<br />
1. Press B one time to change to chronograph mode.<br />
NOTE: When in chronograph mode, (SU), (FR), (SA) will flash.<br />
2. Press C to start/stop the chronograph.<br />
NOTE: (SU) and (SA) will flash while the chronograph is running.<br />
3. Press A when the chronograph is stopped to reset to zero.<br />
4. Press B to return to normal time display.<br />
12
LAP COUNTING<br />
1. Press A while the chronograph is running for lap counting.<br />
NOTE: When counting laps, (SU), (TH), (SA) will flash.<br />
2. Press A again to return to chronograph.<br />
3. Press C to stop chronograph.<br />
4. Press A to reset to zero.<br />
5. Press B to return to normal time display.<br />
ADIZERO QFL651AB<br />
NORMAL TIME DISPLAY<br />
B<br />
C<br />
1. Press A to change mode. Mode<br />
sequence is: normal time, alarm, timer,<br />
chronograph, and my log.<br />
2. Press B for EL.<br />
A<br />
D<br />
3. Press C to toggle chime on/off.<br />
E<br />
4. Press D to flash time zone 2; press and<br />
hold D to toggle normal time display/time<br />
zone 2.<br />
5. Press E for EL; press and hold E to toggle auto EL on/off. When auto EL is on,<br />
press any key for EL.<br />
6. Press and hold A,B,C and D to reset the watch. All data will be erased, and all<br />
settings returned to default.<br />
NOTE: At any point in any setting mode, press B to exit setting mode.<br />
NOTE: In any setting mode, if no pusher is operated for 30 seconds, all changes will<br />
be saved and the setting will automatically return to normal time display.<br />
TIME AND CALENDAR SETTING<br />
1. In normal time display, press and hold B, hour will begin flashing.<br />
2. Press C to increase digit; press D to decrease digit. Press and hold C or D for fast<br />
increment/decrement.<br />
3. Press A to advance to next setting value.<br />
4. Setting sequence is: hour, minute, second, year, month, date, 12/24-hour format,<br />
month/date or date/month format, and sound on/off.<br />
5. Press B to exit setting mode.<br />
ALARM MODE<br />
1. Press A to change to alarm mode.<br />
2. Press C to toggle alarm on/off.<br />
3. Press D to toggle alarm 1/alarm 2.<br />
ALARM SETTING<br />
1. In alarm mode, press and hold B; hour will begin flashing.<br />
2. Press C to increase digit; press D to decrease digit. Press and hold C or D for fast<br />
increment/decrement.<br />
13
3. Press A to advance to next setting value.<br />
4. Setting sequence is: hour, minute, normal time/time zone 2.<br />
5. Press B to exit setting mode.<br />
NOTE: Alarm will automatically be set to “on” after pressing B to exit alarm setting<br />
mode. However, if no pusher is operated for 30 seconds and the display auto-exits,<br />
alarm status will be “off.”<br />
TIMER MODE<br />
1. Press A to change to timer mode.<br />
2. Press E to start timer.<br />
3. Press D to stop timer.<br />
4. Press and hold D to reset the timer to preset value.<br />
NOTE: Alarm will sound for 20 seconds when countdown reaches zero. Press any<br />
pusher to silence alarm.<br />
TIMER SETTING<br />
In timer mode, press C to select timer type: regular timer, training timer, or<br />
interval timer.<br />
REGULAR TIMER<br />
1. In regular timer mode, press and hold B to enter setting mode; timer sub-type<br />
will begin flashing.<br />
2. Press C to select countdown-stop, countdown-repeat, or count up timer.<br />
3. Press A to advance to next setting value.<br />
4. Press C to increase digit; press D to decrease digit. Press and hold C or D for fast<br />
increment/decrement.<br />
5. Setting sequence is: timer type, hour, minute, seconds.<br />
6. Press B to exit setting mode.<br />
TRAINING TIMER<br />
1. In training timer mode, press and hold B to enter setting mode; TR1 minute will<br />
begin flashing.<br />
2. Press C to increase digit; press D to decrease digit. Press and hold C or D for fast<br />
increment/decrement.<br />
3. Press A to advance to next setting value.<br />
4. Setting sequence is: TR1 minute, TR1 second, TR2 minute, TR2 second, and<br />
number of cycles (up to 50).<br />
5. Press B to exit setting mode.<br />
INTERVAL TIMER<br />
1. In interval timer mode, press and hold B to enter setting mode; interval segment<br />
will begin flashing.<br />
2. Press C to increase digit; press D to decrease digit. Press and hold C or D for fast<br />
increment/decrement.<br />
3. Press A to advance to next setting value.<br />
4. Repeat steps 2 and 3 until desired number of segments have been set (up to 60).<br />
5. Setting sequence is: segment, minute, second.<br />
6. Press B to exit setting mode.<br />
14
CHRONOGRAPH MODE<br />
1. Press A to change to chronograph mode.<br />
2. Press E to start chronograph; press D to stop chronograph.<br />
3. When the chronograph is stopped, press and hold B to save data to MY LOG, or<br />
press and hold D to reset chronograph to zero.<br />
LAP COUNTING<br />
1. Press E while the chronograph is running for lap counting (up to 100 laps).<br />
2. Press C while the chronograph is running to toggle current lap view/total time view.<br />
3. Press D to stop chronograph.<br />
4. When the chronograph is stopped, press and hold B to save data to MY LOG, or<br />
press and hold D to reset chronograph to zero.<br />
MY LOG<br />
1. Press A to change to my log mode.<br />
2. Press C to view data in the selected set.<br />
3. Press D to scroll through saved sets.<br />
4. Press and hold D to clear selected set. Continue holding to clear all sets.<br />
NOTE: Memory can save up to 9 sets and 100 laps.<br />
15
REFEREE / ADIPOWER TR QFL683AB / QFL683DB<br />
B<br />
C<br />
B<br />
C<br />
A<br />
D<br />
A<br />
D<br />
E<br />
E<br />
NORMAL TIME DISPLAY<br />
1. Press A to change mode. Mode sequence is: normal time, referee, alarm, timer,<br />
chronograph, and my log.<br />
2. Press B for EL.<br />
3. Press C to toggle chime on/off.<br />
4. Press D to flash time zone 2; press and hold D to toggle normal time display/time<br />
zone 2.<br />
5. Press E for EL; press and hold E to toggle auto EL on/off. When auto EL is on,<br />
press any key for EL.<br />
6. Press and hold A,B,C and D to reset the watch. All data will be erased, and all<br />
settings returned to default.<br />
NOTE: At any point in any setting mode, press B to exit setting mode.<br />
NOTE: In any setting mode, if no pusher is operated for 30 seconds, all changes will be<br />
saved and the setting will automatically return to normal time display.<br />
TIME AND CALENDAR SETTING<br />
1. In normal time display, press and hold B, hour will begin flashing.<br />
2. Press C to increase digit; press D to decrease digit. Press and hold C or D for fast<br />
increment/decrement.<br />
3. Press A to advance to next setting value.<br />
4. Setting sequence is: hour, minute, second, year, month, date, 12/24-hour format,<br />
month/date or date/month format, and vibrate/sound on/off.<br />
NOTE: Vibrate only applies to “Referee” digital.<br />
5. Press B to exit setting mode.<br />
REFEREE MODE<br />
1. Press A to change to Referee mode.<br />
2. Press D to select desired game time.<br />
3. Game timers are: 0-45, 0-15, 0-40, 0-35, 0-30, 0-25, 0-20, 0-10, 0-5, SET1, SET2,<br />
SET3.<br />
4. Press E to start game time.<br />
5. Press E again to stop game time. Total game time will continue to run at the bottom.<br />
6. Press E again to start game time.<br />
16
7. Press C to flash stoppage time.<br />
8. Press D to stop the game time and total game time.<br />
9. When game time and total game time are stopped, press and hold D to reset.<br />
REFEREE TIME SETTING<br />
1. In referee mode, press D to advance to SET1, SET2 or SET3.<br />
2. Press and hold B to enter setting mode; hour will begin flashing.<br />
3. Press C to increase digit; press D to decrease digit. Press and hold C or D for fast<br />
increment/decrement.<br />
4. Press A to advance to next setting value.<br />
5. Setting sequence is: hour, minute, second.<br />
6. Press B to exit setting mode.<br />
ALARM MODE<br />
1. Press A to change to alarm mode.<br />
2. Press C to toggle alarm on/off.<br />
3. Press D to toggle alarm 1/alarm 2.<br />
ALARM SETTING<br />
1. In alarm mode, press and hold B; hour will begin flashing.<br />
2. Press C to increase digit; press D to decrease digit. Press and hold C or D for fast<br />
increment/decrement.<br />
3. Press A to advance to next setting value.<br />
4. Setting sequence is: hour, minute, normal time/time zone 2.<br />
5. Press B to exit setting mode.<br />
NOTE: Alarm will automatically be set to “on” after pressing B to exit alarm setting<br />
mode. However, if no pusher is operated for 30 seconds and the display auto-exits,<br />
alarm status will be “off.”<br />
TIMER MODE<br />
1. Press A to change to timer mode.<br />
2. Press E to start timer.<br />
3. Press D to stop timer.<br />
4. Press and hold D to reset the timer to preset value.<br />
NOTE: Alarm will sound for 20 seconds when countdown reaches zero. Press any<br />
pusher to silence alarm.<br />
TIMER SETTING<br />
1. In timer mode, press C to select timer type: regular timer, training timer, or<br />
interval timer.<br />
REGULAR TIMER<br />
1. In regular timer mode, press and hold B to enter setting mode; timer sub-type will<br />
begin flashing.<br />
2. Press C to select countdown-stop, countdown-repeat, or count up timer.<br />
3. Press A to advance to next setting value.<br />
4. Press C to increase digit; press D to decrease digit. Press and hold C or D for fast<br />
increment/decrement.<br />
17
5. Setting sequence is: timer type, hour, minute, seconds.<br />
6. Press B to exit setting mode.<br />
TRAINING TIMER<br />
1. In training timer mode, press and hold B to enter setting mode; TR1 minute will<br />
begin flashing.<br />
2. Press C to increase digit; press D to decrease digit. Press and hold C or D for fast<br />
increment/decrement.<br />
3. Press A to advance to next setting value.<br />
4. Setting sequence is: TR1 minute, TR1 second, TR2 minute, TR2 second, and<br />
number of cycles (up to 50).<br />
5. Press B to exit setting mode.<br />
INTERVAL TIMER<br />
1. In interval timer mode, press and hold B to enter setting mode; interval segment<br />
will begin flashing.<br />
2. Press C to increase digit; press D to decrease digit. Press and hold C or D for fast<br />
increment/decrement.<br />
3. Press A to advance to next setting value.<br />
4. Repeat steps 2 and 3 until desired number of segments have been set (up to 60).<br />
5. Setting sequence is: segment, minute, second.<br />
6. Press B to exit setting mode.<br />
CHRONOGRAPH MODE<br />
1. Press A to change to chronograph mode.<br />
2. Press E to start chronograph; press D to stop chronograph.<br />
3. When the chronograph is stopped, press and hold B to save data to MY LOG, or<br />
press and hold D to reset chronograph to zero.<br />
LAP COUNTING<br />
1. Press E while the chronograph is running for lap counting (up to 100 laps).<br />
2. Press C while the chronograph is running to toggle current lap view/total time view.<br />
3. Press D to stop chronograph.<br />
4. When the chronograph is stopped, press and hold B to save data to MY LOG, or<br />
press and hold D to reset chronograph to zero.<br />
MY LOG<br />
1. Press A to change to my log mode.<br />
2. Press C to view data in the selected set.<br />
3. Press D to scroll through saved sets.<br />
4. Press and hold D to clear selected set. Continue holding to clear all sets.<br />
NOTE: Memory can save up to 9 sets and 100 laps.<br />
18
USE PRECAUTIONS - RESISTANCE TO WATER<br />
All adidas timepieces are designed to withstand use as indicated on the<br />
following chart.<br />
INDICATION WATER-RELATED USE<br />
Light spray<br />
Skin diving, Scuba diving,<br />
Level of<br />
Bathing, Swimming,<br />
Caseback marking perspiration,<br />
(without oxygen (with air<br />
resistance<br />
etc. etc.<br />
light rain, etc.<br />
cylinder) cylinder)<br />
3 ATM 30 METERS 3 ATM OK NO NO NO NO<br />
5 ATM 50 METERS 5 ATM OK NO NO NO NO<br />
10 ATM 100 METERS 10 ATM OK OK OK NO NO<br />
20 ATM 200 METERS 20 ATM OK OK OK OK NO<br />
30 ATM 300 METERS 30 ATM OK OK OK OK OK<br />
Always set the crown in position 1 (the normal position).<br />
Tighten screw-down crown completely, if applicable.<br />
19