ENGLISH
ENGLISH
ENGLISH

You also want an ePaper? Increase the reach of your titles
YUMPU automatically turns print PDFs into web optimized ePapers that Google loves.
DIGITAL MOVEMENT GUIDEBJ2679DZ7187 - DZ7188FL137EADZ5175, DZ5176MLL033DZ5145, DZ5146<strong>ENGLISH</strong>BJ2957DZ7196, DZ7208, DZ7209(for digital display only)FL610AB, MLG367DDZ7118, DZ7119, DZ7120,DZ7121, DZ7169 - DZ7172,DZ7235, DZ7236MLL-045DZ7091, DZ7092, DZ7109,DZ7110, DZ7162, DZ7176,DZ7237, DZ7238BJ3170DZ7153, DZ7156, DZ7157,DZ7189 - DZ7192(for digital display only)FO-001DZ7206, DZ7207(for digital display only)QAA-006, QAA-033DZ7095, DZ7096, DZ7097,DZ7098, DZ7105, DZ7106,DZ7113, DZ7115, DZ7116,DZ7117, DZ7189 - DZ7190F145GR3DZ7069 - DZ7071, DZ7087,DZ7117FO-002DZ7076, DZ7077, DZ7078,DZ7083, DZ7093, DZ7094QBJ2718-AADZ7173 - DZ7175, DZ7195,DZ7202 - DZ7205FDT003DZ7006, DZ7043, DZ7046,DZ7142, DZ7143, DZ7144G3 & G1DZ7122, DZ7123, DZ7124,DZ7152, DZ7154, DZ7155,DZ7180, DZ7184 - DZ7186QBJ3101-AADZ7177 - DZ7179, DZ7197 -DZ7201(for digital display only)FL0521DZ7099, DZ7100MD-FL298X, FL388,QFL226DBDZ7081, DZ7082, DZ7130 -DZ7136, DZ7145, DZ7146,DZ7149 - DZ7151, DZ7181 -DZ7183, DZ7211 - DZ7213QFL631BADZ7162 - DZ7168, DZ7176,DZ7218FL075ABDZ7033, DZ7034, DZ7066,DZ7068, DZ7089, DZ7137,DZ7138, DZ7139, DZ7140,DZ7141, DZ7147, DZ7148MLG-035DZ7107, DZ7108ZD0603B01DZ5173, DZ5174, DZ7079,DZ7080, DZ7111, DZ7112FL137AXDZ7101 - DZ7103, DZ7125 -DZ7127, DZ7193, DZ7194,DZ7214, DZ7221(for digital display only)- 1 -2 / 2011
IMPORTANT TO KNOW!• When the watch is underwater or wet, never use the pushers/bezels, or set the time. Watch cases and metal bracelets should be rinsed thoroughly in fresh water after being in salt water.• No hot tub/sauna. Please do not take your DIESEL watch into the hot tub/sauna. The combination of extreme heat and water may cause your watch to lose some of its water-resistance.• No backward hand, or date, adjustments should be made when the analog hands read between 8pm and 3am. At these times, the gears are too close together and such a change couldcause damage.• Tighten screwlock crown completely.• Always set the crown in the normal position.RESISTANCE TO WATERDepth WATER-RESISTANT 3 BAR (30 M) WATER-RESISTANT 5 BAR (50 M) WATER-RESISTANT 10 BAR (100 M)Caseback marking 3 ATM 5 ATM 10 ATMLight spray, perspiration, light rain, etc. OK OK OKBathing, etc. NO OK OKSwimming, etc. NO NO OKSkin diving (diving without oxygen cylinder) NO NO OKWater-resistant characteristics Normal daily water contact. Suitable for bathing, but cannot be worn for swimming or diving. Suitable for skin diving.Automatic Winding MovementsA timepiece with an automatic winding movement obtains the power to wind itself by the movement of your wrist, there is no battery. Therefore, not wearing the timepiece for several consecutive dayscould exhaust the power reserve. If your watch stops, it is recommended that you manually wind the movement by rotating the crown clockwise to achieve the necessary power reserve.It is important that your timepiece is adjusted to match the size of your wrist. A loose fit may result in a loss in capacity of the timepiece to wind itself. When fully wound, your timepiece has a powerreserve of approximately 38 hours.Automatic 6T511. To start time-keeping, rotate the crown clockwise 15-20 times in position 1.2. Pull crown out to position 2 and rotate clockwise to set time. Push crown back to position 1.3. Pull crown out to position 2. Then pull crown out from position 2 to position 3 to advance date by one day. Each time thecrown is pulled from position 2 to position 3 the date is advanced by one increment. Return crown to position 1.(1) (2) (3)DATETV Automatic MovementWINDINGWith the crown in the position 1, turn the crown 15-20 times and the movement will start after shaking the watch slightly.After approximately 40-42 hours, the timepiece will need to be wound.SETTING THE TIME1. Pull crown out to position 2.2. Turn crown to set hour and minute hands.3. Push crown back to position 1.SETTING THE DATE1. Pull the crown to position 2.2. Pull the crown from position 2 to position 3, then date advance one day.3. After the date has been set, push the crown back to position 1.HOUR HANDSECOND HANDMINUTE HAND(1) (2) (3)DATEAutomatic Winding Movement 8215WINDINGWith the crown in the position 1, turn the crown 15-20 times and the movement will start after shaking the watch slightly.After approximately 40-42 hours, the timepiece will need to be wound.SETTING THE TIME1. Pull the crown out to position 3.2. Turn the crown to set the hour and minute hands.3. Push the crown back to position 1.SETTING THE DATE1. Pull the crown out to position 2.2. Turn the crown counter-clockwise to set the date.3. Push the crown back to the position 1.HOUR HANDSECOND HANDMINUTE HAND(1) (2) (3)DATE- 2 -
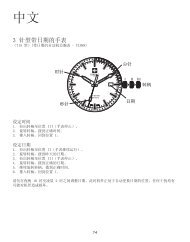
Date Watch GL10, IS13, VJ32A11, VJ32A31, 9T13, 505.2-3, 515.1-3, 515.2-3, 585.2, 715-2, 2115, 2315Date Setting1. Pull the crown out to position 2.2. Turn counter-clockwise and set the date for the previous day.Time Setting1. Pull crown out to setting 3.2. Turn counter-clockwise to advance the time and continue until the day/date changes to the present day.3. Set the correct time.4. Push crown back to position 1.(1) (2) (3)DATEDay/Date Watch IS02, 507.2-3, 517.2, 2105, 2305, 2405Date Setting1. Pull the crown out to position 2.2. Turn clockwise and set the date for the previous day.Day SettingWith crown still in position 2, turn counter-clockwise and set the day for the previous day.DAY(1) (2) (3)DATETime Setting1. Pull crown out to setting 3.2. Turn counter-clockwise to advance the time and continue until the day/date changes to the present day.3. Set the correct time.4. Push crown back to position 1.3 Hand with EL Watch 6N30/OU30EL FUNCTIONThe EL (light-up) button is located above the crown. Pressing it once will activate the light-up function of the display making thedisplay face visible in low-light situations for 3 seconds.EL BUTTONCROWNDZ1065 and DZ1066 hold rights covered under U.S. Patent numbers: 6,106,127, 6,299,321, and 6,486,561.Dual Time Watch K62/132buttonSTime Setting1. Push buttons to move hands.2. Set correct time.FRONTBACKSub-Second 1L45Time SettingPull crown out to position 2 and rotate to set time.(1) (2)NOTE: When crown is pushed back to position 1, small second hand begins to run.SMALL SECOND HAND2 Eye Day/Date Multifunction VX36A1(1 crown)DATE SETTING1. Pull crown out to position 2.2. Turn clockwise to advance date hand.3. Push crown back to position 1.DAYDATE(1) (2) (3)DATE AND TIME SETTING1. Pull crown out to position 3.2. Turn clockwise to advance hour and minute hands.The hand showing days of the week will also move with the hour and minute hands. Keep turning until you havereached the desired day.- 3 -
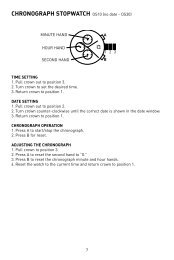
Two Eye Multifunction 6P25, 6P75Date Setting1. Pull crown out to position 2.2. Turn counter-clockwise to select date.Day and Time Setting1. To set time, pull crown out to position 3.2. Turn clockwise to set hour and minute hands. The hand showing days of the week will also move with the hour and minutehands. Keep turning until you have reached the desired day.3. Push crown back to position 1.DATE(1)(2) (3)DAYDATE(1)(2) (3)DAYMultifunction 6P27TIME AND WEEKDAY SETTING1. Pull crown out to position 3, stopping the second hand at 12 o’clock.2. Turn crown clockwise to set weekday (hour, minute, and 24-hour hands will also move).Note: Do not set the day by turning the crown counter-clockwise, or the date may not change correctly.3. Turn hour and minute hands clockwise to set the time. To ensure the time is set accurately, first turn the minute-hand 5minutes ahead of the correct time, then turn back (counter-clockwise) to the correct time.4. Return crown to position 1.Note: Make sure you have correctly set AM/PM time by checking the 24-hour hand.DATE SETTING1. Pull crown out to position 2.2. Turn crown counter-clockwise to set date.Note: Do not set the date between 9:00 p.m. and 12:30 a.m. or the date may not change correctly.DATEDAY24-HOUR HAND(1) (2) (3)Three Eye Multifunction VX3J(1 crown)Date Setting1. Pull crown out to position 2.2. Turn clockwise to advance the date hand.3. Push crown back to position 1.Day and Time Setting1. Pull crown out to position 3.2. Turn clockwise to advance hour and minute hands.The hand showing days of the week will also move with the hour and minute hands. Keep turning until you havereached the desired day.24-Hour Sub-Dial SettingThe 24-hour hand moves correspondingly with the hour and minute hands. When setting the time be sure to check that the24-hour hand is set properly.DAY24-HOUR(1) (2) (3)DATEChronograph 5020B(1 crown/2 pushers)DATE AND TIME SETTING1. Pull crown out to position 2.2. Turn counter-clockwise and set the date for the previous day.3. Pull crown out to position 3. All chronograph hands will return to zero position. Do not return the crown to its normalposition while the hand is returning to zero, or else the position the hand is in when this is done will be recognized as thenew zero position.4. Turn crown clockwise until correct date is displayed in date window.5. Turn crown to set the time.6. Return crown to position 1.CHRONOGRAPH OPERATION1. Push A to start/stop the chronograph.2. Push B to reset the chronograph.SPLIT TIME MEASUREMENT1. Press B while the chronograph is running; timing will continue in background.2. Press B again to start the next interval; the three chronograph hands will advance to the ongoing measured time.3. Press A to stop chronograph.4. Press B to reset.CHRONOGRAPH ZERO RESET1. Pull crown out to position 3.2. Press and hold A and B simultaneously for 2 seconds until chronograph second hand rotates around the dial.3. Press A to reset the chronograph second hand to 12:00 (zero) position. Each press advances the chronograph second handone mark. If A is held down for over 2 seconds, the chronograph second hand advances continuously.4. Press B to set and advance to the chronograph minute and hour hands.5. Repeat step 3 to reset chronograph minute and hour hands.6. Return crown to position 1 when chronograph hands are reset to zero.CHRONOGRAPH SECOND HANDCHRONOGRAPH HOURAND MINUTE HANDSDATE(A)SECOND HAND(1) (2) (3)(B)- 4 -
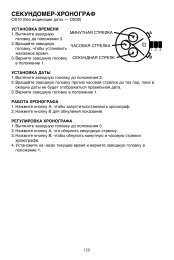
Chronograph OS60(1 crown/2 pushers)SETTING THE TIME1. Pull the crown out to position 3. Chronograph second hand and 1/20 second hand will return to zero position. Do not returnthe crown to its normal position while the hands are returning to zero, or else the position the hands are at when this isdone will be recognized as the new zero position.2. Turn the crown to set the desired time.3. Return the crown to its normal position.SETTING THE DATE1. Pull the crown out to position 2.2. Turn the crown counter clockwise until the correct date is shown in the date window.3. Return the crown to its normal position.CHRONOGRAPH ZERO RESET1. Pull the crown out to position 3. Chronograph second hand and 1/20 second hand will return to zero. Do not return thecrown to its normal position while the hands are returning to zero. Doing so will cause the position of the hands to berecognized as the new zero position.2. Push (A) to set the chronograph second hand to 12:00 (zero) position. Each press of (A) advances the chronograph secondhand one mark. If (A) is held down for over 2 seconds, the chronograph second hand advances continuously.3. Push B to set the chronograph 1/20 second hand to 12:00 (zero) position. Each press of (B) advances the 1/20 secondhand one mark. If (B) is held down for over 2 seconds, the 1/20 second hand advances continuously.4. Return crown to its normal position.5. Press (B) to reset all hands to the zero position.CHRONOGRAPH OPERATION1. Push (A) to start/stop the chronograph.2. Push (B) to reset the chronograph.3. When the measured time is over 30 seconds, the 1/20-second hand stops; however, the watch continues measuring theelapsed time. The exact time elapsed is indicated when A is pressed to stop the chronograph, and the 1/20-second handmoves to the actual time. The hand returns to the “0” position when B is pressed and the chronograph is reset.4. If (B) is pressed again after chronograph is reset, the 1/20-second hand changes to measure each second.MINUTEHANDHOURHAND1/20SECOND HAND(A)(1) (2) (3)(B)Chronograph Stopwatch VD55B, VD57B(1 crown/2 pushers)Time Setting1. Pull crown out to position 3.2. Set time by turning the crown clockwise.3. Push back to position 1 to start the watch.Using the Stopwatch1. Press A to start/stop the stopwatch.2. Press B to control the split time and reset.Stopwatch Hand Adjustment1. Pull crown out to position 3.2. Press A to reset the stopwatch 1/10 second hand to the “0” position.3. Press B to reset the second and minute hands. The hands only move clockwise.4. With each press of A or B, the hands move one position. They move quickly if the buttons are kept pressed.Note: If the stopwatch hands function improperly, pull out crown and press A and B at the same time for over 2seconds. When the buttons are released, the stopwatch second and 1/10 second hands will spin around andreturn to “0.” This will indicate that the internal circuit has been reset.Date Setting (on some models only)1. Pull crown out to position 2.2. Turn clockwise until desired date appears in window.3. Push crown back to position 1.1/10 SECOND HANDMINUTE HANDSECOND HAND(A)(1) (2) (3)(B)- 6 -
Chronograph ISA 8161/202(1 crown/2 pushers)Setting the time1. Pull crown out to position 3.2. Set time by turning the crown.3. Push the crown back to position 1.Setting the Date1. Pull crown out to position 2.2. Set date by turning the crown.3. Push the crown back to position 1.Resetting Chronograph (after battery exchange or mishandling only)1. Press both A and B pushers at the same time.2. Next press B to reset the minutes.3. Then press A to reset seconds.4. To exit press both A and B pushers at the same time.Measuring Cumulative Times1. Press A pusher to start.2. Press A pusher to stop.3. Press B pusher to reset.Measuring Split Times1. Press A pusher to start.2. Press B pusher to split.3. Press B pusher to restart.4. Press A pusher to stop.5. Press B pusher to reset.(A)(B)MINUTE HANDSECOND HAND(1)(2) (3)DATEChronograph ISA 8171/201Time and date setting1. Pull crown out to position 2.2. Rotate crown clockwise until the previous day’s date is shown in the date window.3. Pull crown out to position 3.4. Rotate crown clockwise until the correct date is shown in the date window.5. Continue to rotate crown to set correct am/pm time.6. Return crown to position 1.Note: Do not set the date between 9:00 p.m. and 12:30 a.m. to ensure accuracy.Chronograph operation1. Press A to start/stop the chronograph.2. Press B to restart/reset.Note: After 2 hours of continuous running, the chronograph will automatically stop and reset to save the battery.Split time1. Press B while the chronograph is running.2. Press B again to return to the chronograph.3. Press A to finalize timing.4. Press B to reset.Chronograph zero reset1. If either of the chronograph hands is not at the zero (12:00) position, pull crown out to position 2.2. Press B to reset chronograph minute hand. Each press of B will advance the chronograph minute hand by one increment orpress and hold B for fast advance.3. Press A to reset chronograph 1/5 second hand. Each press of B will advance the chronograph 1/5 second hand by oneincrement or press and hold B for fast advance.Chronograph1/5 second handChronographminute handDate(A)SECOND HAND(1) (2) (3)(B)- 7 -
Chronograph Stopwatch VD54 (with date - VD53)(1 crown/2 pushers)Time and Date Setting1. Before setting the time, make sure the chronograph is stopped and set to zero (12:00) position.2. Pull crown out to position 2.3. Turn crown clockwise until the previous day’s date is displayed.4. Pull crown out to position 3 when the second hand is at the 12:00 position.5. Turn crown to set time.Note: 24-hour hand moves correspondingly with the hour and minute hands. When setting the time be sure tocheck that the 24-hour hand is set properly.6. Return crown to position 1.Note: When the crown is in position 2, do not press the pushers. Otherwise the chronograph hands will move.Chronograph1. Press A to start/stop the chronograph.2. Press B to reset to zero.Split Time1. Press B while the chronograph is running.2. Press B again to return to the chronograph.3. Press A to finalize timing.4. Press B to reset.Chronograph Zero Reset1. If either of the chronograph hands is not at the zero (12:00) position, pull crown out to position 3.2. Press A to move hands clockwise; press B to move hands counter-clockwise.3. Return crown to position 1.MINUTE HANDSECOND HAND(A)24-HOUR HAND(1) (2) (3)(B)Digital BJ3170Normal Time Display1. Press A to change mode. Mode sequence is: normal time, chronograph, alarm, time setting.2. Press B to display alarm.3. Press C to display date.4. Press A+B to toggle chime on/off (all days of the week will display for “on”).5. Press B+C to toggle alarm on/off. Alarm will sound for 60 seconds; press B to silence alarm or press D for snooze function(alarm will sound 5 minutes later).Chronograph Mode1. Press A to change to chronograph mode.2. Press C to start/stop the chronograph.3. Press B when the chronograph is stopped to reset.Note: When the chronograph is running, press A to return to normal time display. Chronograph will continue tocount time.(A)(B)(C)Split Time1. Press B while the chronograph is running.2. Press C to finalize timing.3. Press B to display all counts.4. Press B again to reset.Alarm Mode1. Press A to change to alarm mode; hour will begin flashing.2. Press C to increase digits; press and hold C for fast advance.3. Press B to advance to minutes.4. Press C to increase digits; press and hold C for fast advance.5. Press B to save data.6. Press A to exit and return to normal time display.Time And Date Setting1. Press A to change to time setting mode; seconds will begin flashing.2. Press C to reset seconds to zero.3. Press B to advance to minutes.4. Press C to increase digits; press and hold C for fast advance.5. Press B to set and advance to next setting value.6. Setting sequence is: seconds, minute, hour, date, month, weekday.Note: When setting the hour, “H” will display for 24-hour format, “A” or “P” will display for 12-hour format.- 8 -
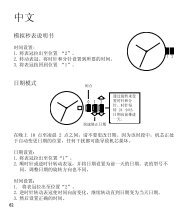
Digital FL137AX / FL137EA / FL137ABNORMAL TIME DISPLAY1. Press A to change display. Display sequence is time, calendar, seconds.2. Press B to toggle 12/24-hour format.SIMPLE ANALOG(1 crown)SIMPLE ANALOG(1 crown)TIME AND DATE SETTING1. Press and hold B for 2 seconds to enter setting mode; year will begin flashing.2. Press A to advance digit; press and hold A for fast advance.3. Press B to set and advance to next setting value.4. Setting sequence is year, month, date, hour, minute.5. Press B to exit setting mode.Note: Hour will be displayed in 24-hour format in time setting mode.Note: If no pusher/button is operated for 30 seconds, all changes will be saved and thesetting will automatically return to display mode.(A)Digital FL137AX(A)(B)(B)DIGITALFL137AX(2 pushers)Digital FL137EAAna-Digi FL052INORMAL TIME DISPLAY1. Press A to change mode. Mode sequence is: normal time, world time, alarm, chronograph,memory recall, timer.2. Press B for EL.3. Press C to toggle chime on/off.4. Press D to toggle DST on/off for the selected city.5. In any mode or setting, if no pusher is operated for 60 seconds, setting will be returned tonormal time display.(B)(A)(C)(D)TIME AND CALENDAR SETTING1. Press and hold B for 2 seconds to enter setting mode. 12/24-hour time will begin flashing.2. Press C to select 12/24-hour time.3. Press A to set and advance to seconds.4. Press C to reset seconds to zero.5. Press A to set and advance to minute.6. Press C to increase the digit; press D to decrease the digit.7. Press A to set and advance to next setting value.8. Setting sequence is: 12/24-hour format, seconds, minute, hour, year, month, date, and city.9. Press B to exit setting mode.Note: Weekday will automatically update upon exiting setting mode.WORLD TIME MODE1. Press A to change to world time mode.2. Press C to select city.3. Press D for DST on/off for the selected city.WordsMDYHNLANCLAXDENCHINYCCCSRIO-2H-1HLONCityMidwayHonoluluAnchorageLos AngelesDenverChicagoNew YorkCaracasRio de Janeiro-2H-1HLondonHourDifference-11 hours-10 hours-9 hours-8 hours-7 hours-6 hours-5 hours-4 hours-3 hours-2 hours-1 hour0 hoursWordsPARCAIMOWDXBKHIDACBKKHKGTYOSYDNOUAKLCityParisCairoMoscowDubaiKarachiDaccaBangkokHong KongTokyoSydneyNoumeaAuchlandALARM MODE1. Press A to change to alarm mode.2. Press C to scroll through alarms (3 alarms).3. Press D to toggle alarm on/off.4. Alarm will sound for 30 seconds; press any pusher to silence alarm.HourDifference+1 hour+2 hours+3 hours+4 hours+5 hours+6 hours+7 hours+8 hours+9 hours+10 hours+11 hours+12 hoursALARM SETTING1. Press and hold B for 2 seconds to enter setting mode; minutes will begin flashing.2. Press C to increase the digit; press D to decrease the digit.3. Press A to set and advance to hour.4. Press C to increase the digit; press D to decrease the digit.5. Press B to exit setting mode.Note: Alarm is automatically turned on when setting is changed.CHRONOGRAPH MODE1. Press A to change to chronograph mode.2. Press C to start the chronograph; press D to stop the chronograph.3. Press D again to reset.SPLIT TIME1. Press C while the chronograph is running for split time (will record up to 20 laps).2. Press D to finalize timing.MEMORY RECALL MODE1. Press A to change to recall mode when information is recorded in the chronograph.2. Press C to view next lap; press D to view previous lap.TIMER MODE1. Press A to change to countdown timer mode.2. Press C to start/stop the timer.3. Press D to reset the timer when it is not running.4. Timer will sound for 30 seconds upon reaching zero; press any pusher to silence alarm.TIMER SETTING1. Press and hold B for 2 seconds to enter setting mode; seconds will begin flashing.2. Press C to increase digit; press D to decrease digit.3. Press A to set and advance to next setting value.4. Setting sequence is: seconds, minutes, hours.- 9 -
Digital FL291OVERVIEWFeatures include TIME/DATE, CHRONO, TIMER, ALARM, and LIGHT-UP EL.LIGHT-UP ELPress (A) to activate light-up function for 3 seconds.TIME OF DAY MODE- To set Time, press (B) until hour flashes. Use (C) and (D) buttons to select hour. Press (B) to advance. Press and hold (B) tocomplete set mode.- Press (C) to view the Time and Date Display.- Press and hold (C) to change the time from 12 hour to 24 hour.- Press (D) to toggle hourly chime.CHRONO MODE- Press (C) to start time. Press (D) to stop time. Press (C) twice to enable split time. Press (D) to stop time.- Press and hold (D) to reset CHRONO mode.TIMER MODE- To set TIMER, press and hold (B) until hour flashes. Use (C) and (D) Buttons to select hour. Press (B) to advance to minutes/seconds. Press and hold (B) to complete TIMER mode.- Press (C) to start TIMER.- 10 Beeps will be sounded when timer value reaches zero.ALARM MODE- To set ALARM, press and hold (B) until hour flashes. Use (C) and (D) Buttons to select hour. Press (B) to advance to minutes.Press and hold (B) to set ALARM mode.- Press (D) to toggle alarm.- ALARM will sound for 20 seconds.- Press any button to stop ALARM.(A)(B)(C)(D)Hourly chime/Key toneAlarm enable/disableChrono iconTimer iconBUTTONSMODEOPERATIONALIGHTBMODECSTART/SPLITDRESET/STOPTIME OF DAYCHRONOTIMERALARMSETTINGPRESS ONCE EL CHRONO TOGGLE TIME/DATE CHIME ON/OFFPRESS AND HOLD – SETTING TIME FORMAT –PRESS ONCE EL TIMER START/SPLIT STOPPRESS AND HOLD – – – RESETPRESS ONCE EL ALARM START STOPPRESS AND HOLD – SETTING – RESETPRESS ONCE EL TIME OF DAY – ALARM ON/OFFPRESS AND HOLD – SETTING – –PRESS ONCE EL NEXT FIELD INCREMENT DECREMENTPRESS AND HOLD – CONFIRM/EXIT FAST INCREMENT FAST DECREMENTNOTE:- Analog time and digital time may not be in sync.- The key tone enable/disable will be dependent on the HOURLY CHIME enable/disable status.Digital FO-001NORMAL TIME DISPLAYPress A to change display. Display sequence is normal time, date, seconds.TIME AND CALENDAR SETTING1. In normal time display, press B twice; month will begin flashing.2. Press A to increase digits.3. Press B to advance to next setting value.4. Setting sequence is: month, date, hour, and minute.5. Press B to exit setting mode.NOTE: At any point in setting mode, press A to exit setting mode and return to normal time display.(A)(B)- 10 -
Digital FDT003 / BD3000Alarm Version FDT003 / BD3000OVERVIEWThis instruction book is set-up to mirror the logic of the digital module. The features DUALTIME, ALARM, CHRONOGRAPH and TIMER are described in the order they appear as in themodule. Therefore almost all setting instructions fall under the OPTIONS section. Each modeof operation is covered in detail below; however, there are a number of unique innovationsthat need to be explained first.BADCEMode Icon LegendTIME 1,2OPTIONSAUTO ELALARMWeek,1,2ALARMmode icon/onHourly chime onCHRONOCOUNTDOWNTIMERLIGHT-UP ELThe EL (light-up) button is (C). Pressing it once will activate the light-up function of thedisplay making the display face visible in low-light situations for 3 seconds. Press and hold the EL button for 2 seconds and the AUTO EL functionis turned on, marked by the Auto EL icon. This function enables the EL to be activated with the pressing of any function buttons. To turn thisfunction off, press and hold the EL button again for 2 seconds.Time 1 displayTime 2 displayAlarm Weekday displayDUAL TIMESet two different time zones and move easily between the two by pressing button (A) while in Time mode, alarms switch over accordingly. UnderT2 setting, no 12/24 hour mode adjustment.ALARMAlarm-week is a daily reminder Monday through Sunday.Alarms 1 and 2 may be used for one time or as repeat reminders:One Time Reminder:To use as a one-time reminder, simply set all the data fields for the specific time, date, & month.Repeat Daily Reminder:To use the repeat reminder for the same time every day, simply fill in the time field only, leaving the date, and month field empty (--). The reminderwill repeat at the same time every day.Repeat Date Reminder:To use the repeat reminder for the same calendar date every month, simply fill in the date and time fields only, leaving the month field empty (--).The reminder will repeat on the same calendar date & time every month.Alarms are automatically turned on after setting. To interrupt any alarm while sounding, press any button.Alarms on/off:The Alarm mode can be accessed by repeatedly pressing (B) till the Alarm icon is activated.1. To confirm an alarms settings press (A) to advance through them.2. To turn an alarm “on/off,” press (D) while that alarm is displayed, the word “on” will appear.3. Press (D) again to turn the alarm “off,” and (--) will appear.Alarm Weekday displayAlarms 1,2 displayAlarms 1,2 displayChronograph displayCHRONOGRAPHThe smallest measure of time it can measure is 1/100th of a second and the largest is 9 hours, 59 minutes, 59 seconds, and 99 1/100th of asecond. The chrono will keep on timing after this measurement, however the hour counter will reset to “0.” The Chrono mode can be accessed byrepeatedly pressing (B) till the Chrono icon is activated.START/STOP TIMING1. To begin timing press (D), the chronograph will begin timing.2. To stop timing press (D), while the chronograph is stopped you may resume timing by pressing (D) or reset to “0:00:00:00” by pressing (E).3:00 Timer display FREE Timer displayTIMERThis module has a countdown mode with 3 preset times: 3 minutes, 5 minutes, and 10. In addition to the preset timers, there is one FREE spacefor the user to set and store a custom timer setting. The timer will measure in increments of 1 second. Set the countdown timer anywherebetween 5 seconds and 9 hours 59 minutes and 59 seconds. Upon reaching “0” the countdown timer will reset and begin counting down againautomatically, keeping track of the number of times it does so with the repeat counter (up to 99 times). Any timer set will continue to countdownrepeatedly for 14-15 hours before stopping and resetting itself.1. To begin timing press (D), the timer will begin timing.2. To stop timing press (D), while the timer is stopped you may resume timing by pressing (D) or reset the timer to its start value by pressing (E).OPTIONS MODEThis module has an additional mode within which all the module settings can be adjusted not unlike a television or VCR. The OPTIONS mode can beaccessed by repeatedly pressing (B) till the Options icon is activated.1. While in Options mode press (D) to scroll up through the menu and (E) to scroll down through the menu.2. Press (A) to select the highlighted menu item. This process is repeated throughout the Options menu selections. If at anytime you desire toreturn to a previous menu press (B). By pressing and holding (B) for 3 seconds you will exit the Options mode and go directly to TIME mode.SETTING TIME/DATE1. Press (B) till Options icon is activated. Press either (D) or (E) till “Tm/Dt” is highlighted, press (A) to select. The Time 1, 2 icons will begin toflash. (see Fig. 1)2. Press (D) or (E) to highlight either Time 1 or 2, “Tm1 or Tm2” and press (A) to select. Either the Time 1, 2 icon will begin to flash dependingon your selection.3. The Time default view will display with the SECONDS flashing while setting “T1” and begin with minutes flashing while setting “T2”. To resetthe seconds to “00” press (D). Press (A) to select and advance to the MINUTE setting.4. Pressing (D) will “+” the minute while pressing (E) will “–” the minute. Press (A) to select and advance to the HOUR setting.5. Pressing (D) will “+” the hour while pressing (E) will “–” the hour. Press (A) to select and advance to the MONTH setting.6. Pressing (D) will “+” the month while pressing (E) will “–” the month. Press (A) to select and advance to the DATE setting.7. Pressing (D) will “+” the date while pressing (E) will “–” the date. Press (A) to select and advance to the YEAR setting. (see Fig. 2)8. Pressing (D) will “+” the year while pressing (E) will “–” the year. Press (A) to select and advance to the 12/24 HOUR setting.9. Press (D) or (E) to highlight either 12 or 24 hour mode, “12H or 24H” and press (A) to select. (see Fig. 3) At this point blinking seconds willappear again on the display and you may go through and change any of the settings again or press (B) to EXIT and return to the “Tm1, Tm2”menu. Pressing (B) again will take you back to the Options menu.REMEMBER if you press and hold (B) at anytime during the above operation, any settings you have made will be saved and you will goback to TIME mode.Options displayFigure 1 Figure 2Figure 3~ continued on next page ~- 11 -
CHIMEWhen Chime is “on,” your watch will chime once on the hour every hour: A chime will also accompany mode changes, with a higher pitched chimesignaling the TIME mode.1. To set Chime “on or off,” press (B) till Options is activated. Press either (D) or (E) till “Alrms” is highlighted, press (A) to select.2. Press either (D) or (E) till “Chime” is highlighted, press (A) to select. The Chime icon will activate indicating that the chime is on. (see Fig. 1)3. Press (A) again to turn chime off.Figure 1 Figure 2SETTING ALARMS1. Press (B) till Options icon is activated. Press either (D) or (E) till “Alrms” is highlighted, press (A) to select (see Fig. 2). The Alarm W, 1, 2icons will begin to flash.2. Press either (D) or (E) to highlight, Alarm Weekday, 1 or 2, “AL-wk, AL-1 or AL-2” and press (A) to select. Either the Alarm W, 1, or 2 icon will begin to flashdepending on your selection.ALARM- WEEK, “AL-wk”1. Pressing (D) will “+” the minute while pressing (E) will “–” the minute. Press (A) to select and advance to the HOUR setting.2. Pressing (D) will “+” the hour while pressing (E) will “–” the hour. Press (A) to select. At this point blinking minutes will appear again on the display and you may gothrough and change any of the settings again or press (B) to EXIT and return to the “AL-wk, AL-1, AL-2 or Chime” menu. Pressing (B) again will take you back to theOptions menu.REMEMBER if you press and hold (B) at anytime during the above operation, any settings you have made will be saved and you will go back to TIME mode.ALARM 1, 2, “AL-1, AL-2”1. Press either (D) or (E) to highlight Alarm 1 or 2, “AL-1 or AL-2” and press (A) to select. Either the Alarm 1, 2 icon will begin to flash depending on your selection.2. The Alarm 1 or 2 default view will display with the MINUTES flashing. Pressing (D) will “+” the minute while pressing (E) will “–” the minute. Press (A) to select andadvance to the HOUR setting.3. Pressing (D) will “+” the hour while pressing (E) will “–” the hour. Press (A) to select and advance to the MONTH setting.4. Pressing (D) will “+” the month while pressing (E) will “–” the month. Press (A) to select and advance to the DATE setting.5. Pressing (D) will “+” date while pressing (E) will “–” the date. Press (A) to select. At this point blinking minutes will appear again on the display and you may gothrough and change any of the settings again or press (B) to EXIT and return to the “AL-wk, AL-1, AL-2 or Chime” menu. Pressing (B) again will take you back tothe Options menu.REMEMBER if you press and hold (B) at anytime during the above operation, any settings you have made will be saved and you will go back to TIME mode.Alarm Weekday displayAlarms 1,2 displayTIMER1. To set the FREE Timer, press (B) till Options is activated. Press either (D) or (E) till “Timer” is highlighted, press (A) to select. The timer icon will begin to flash.2. The Timer default view will display with the SECONDS flashing. Pressing (D) will “+” the seconds while pressing (E) will “–” the seconds. Press (A) to select 3:00 and Timer advance display FREE Timer displayto the MINUTE setting.3. Pressing (D) will “+” the minute while pressing (E) will “–” the minute. Press (A) to select and advance to the HOUR setting.Basic view4. Pressing (D) will “+” the hour while pressing (E) will “–” the hour. Press (A) to select. At this point blinking seconds will appear again on the display and you may gothrough and change any of the settings again or press (B) to EXIT and return to the Options menu.REMEMBER if you press and hold (B) at anytime during the above operation, any settings you have made will be saved and you will go back to TIME mode.VIEWS, “Views”This module allows for different display views while in TIME mode. There are (5) five views total to choose from and once set they will remain as the Time view until reset.BASIC VIEWThis is the default view for the module. It features a prominent time with seconds, day and date.DATE/TIME, “Dt/Tm”This view features a prominent month and date, the day and year and current time.TIME1/TIME2, “T1/T2”This view features both time zones simultaneously, with emphasis on time 2. The time zone emphasis can be changed by pressing (A) while in Time mode.TIME ONLY, “Tm”This view features a large hour, minutes and seconds. While in this view the Dt/Tm view can be accessed by pressing (D). It will display thisalternate view only while (D) is being pressed, once released Time only view returns.SETTING VIEWS1. Press (B) till Options icon is activated. Press either (D) or (E) till “Views” is highlighted, press (A) to select.2. Press (D) or (E) to highlight the desired view and press (A) to select, setting the new Time view and returning you to the Options menu.TIPS, “Tips”This module features “tips for successful living.” Tips can only be accessed while in Time mode, by pressing (E). The tip will scroll (2) two timesbefore reverting back to the Time mode display. Repeatedly pressing (E) will scroll through the tips quickly interrupting any currently scrolling tip.The modules default tips setting is Random, “Rndm,” however there are (2) alternate settings, All and Top10.RANDOM TIPS, “Rndm”This setting randomly selects a different tip from the list, with every press of the (E) button while in Time mode.ALL TIPS, “All”This setting displays the tips in numerical order from the list, with every press of the (E) button while in Time mode.Basic viewDt/Tm viewT1/T2 viewDt/Tm viewTm viewFigure Figure 1TOP 10 TIPS, “Top10”This setting allows you to choose up to 10 of your favorite tips and only select from that list and in the order that you set them with every press of the (E) button while inTime mode.SETTING TIPS1. Press (B) till Options icon is activated. Press either (D) or (E) till “Tips” is highlighted, press (A) to select. (See Fig. 1)2. Press (D) or (E) to highlight either All, Random or Top 10, “All, Rndm or Top10” and press (A) to select.Figure Figure 2SETTING TOP 10, “Top10”1. The Top 10 view will display with the first underscore flashing. (See Fig. 2)2. Pressing (D) will advance to the “next” Tip while pressing (E) will bring up the “previous” Tip.3. Press (A) to select and advance to the next Tip setting. This can be repeated for up to 10 tips. At this point the first Tip you set will appear again blinking on the displayand you may go through and change any of the Tip settings again or press (B) to EXIT and return to the “All, Rndm or Top10” menu. Pressing (B) again will take you backto the Options menu.REMEMBER if you press and hold (B) at anytime during the above operation, any settings you have made will be saved and you will go back to TIME mode.- 12 -
Digital FL075ABDISPLAY MODESThe digital portion of the module has (3) three display views which are selected by pressing (A).1. While in TIME view, whether in 12 or 24 hour display is irrelevant, press (A) once and the DATE view will appear.2. To have alternating views between TIME and DATE press (A) a second time and each view will display for 1 second.3. To return to TIME only view press (A) for a third time.AMSECONDSETTING TIME/DATE1. Press (C) to enter SET mode. The YEAR will begin flashing, press (A) to change the year. This module features an autocalendar from 2000 to 2050.2. Press (C) to advance to the MONTH setting. The month will begin flashing, press (A) to change the month.3. Press (C) to advance to the DATE setting. The day will begin flashing, press (A) to change the date.4. Press (C) to advance to the 12hr/24hr setting. The 12h characters will begin flashing, press (A) to change to 24h.5. Press (C) to advance to the HOUR setting. The hour will begin flashing, press (A) to change the hour.6. Press (C) to advance to the MINUTE setting. The minute will begin flashing, press (A) to change the minute.7. Press (C) to advance to the SECONDS reset. The seconds will begin flashing, press (A) to reset to 00.8. Press (C) to exit SET mode.HOUR MINUTETIME DISPLAY MODEDAYDATEMONTHSHOWING DATEDigital MLG367D, FL610ABNORMAL TIME DISPLAY1. Press A to change mode. Mode sequence is normal time, alarm, time zone 2, timer,and chronograph.2. Press B for EL.Note: At any point in any setting mode, press D to exit setting mode.Note: In any setting mode, if no pusher is operated for 2 minutes, all changes will besaved and the setting will automatically return to display mode.(B)LIGHT(C)START/STOPTIME AND CALENDAR SETTING1. In normal time display, press D; seconds will begin flashing.2. Press C to set seconds to zero.3. Press A to advance to hour.4. Press C to advance digit, press and hold C for fast advance.5. Press A to set and advance to next setting value.6. Setting sequence is: seconds, hour, minute, year, month, and date.7. Press D to exit setting mode.Note: Weekday is automatically updated upon exiting setting mode.Note: At any point in setting mode, press B to toggle 12/24 hour format.ALARM MODE1. Press A to change to alarm mode.2. Press B to toggle alarm/chime on/off.3. Alarm will sound at preset time for 20 seconds; press any pusher to silence alarm.ALARM SETTING1. Press A to change to alarm mode.2. Press D to enter setting mode; hour will begin flashing.3. Press C to advance digit; press and hold C for fast advance.4. Press A to set and advance to next setting value.5. Setting sequence is: hour, minutes, month, date. For daily alarm, leave month and date setat “----“6. Press D to exit setting mode.TIME ZONE 21. Press A to change to time zone 2.Note: In time zone 2 display, normal time is shown in the upper portion of the display.2. Press D to enter setting mode; hour will begin flashing.3. Press C to advance digit, press and hold C for fast advance.4. Press A to set and advance to minutes.5. Press C to advance digit, press and hold C for fast advance.6. Press D to exit setting mode.Note: At any point in setting mode, press B to toggle 12/24 hour format.(A)MODECOUNTDOWN TIMER1. Press A to change to timer mode.2. Press B to clear countdown and reset timer.3. Press C to start/stop the timer.(D)LAP/RESETTIMER SETTING1. Press D to enter setting mode; hour will begin flashing.2. Press C to advance digit; press and hold C for fast advance.3. Press A to set and advance to next setting value.4. Setting sequence is: hour, minutes, seconds.5. Press D to exit setting mode.Note: At any point in setting mode, press B to toggle auto reset on/off. When autoreset is on, timer will automatically re-start upon reaching zero.CHRONOGRAPH MODE1. Press A to change to chronograph mode.2. Press C to start/stop the chronograph.3. Press B to reset to zero.SPLIT TIME1. Press B while the chronograph is running for split time.2. Press B again to return to chronograph.3. Press C to finalize timing.4. Press B to reset to zero.- 13 -
Digital QAA-006, QAA-033NORMAL TIME DISPLAY1. Press A for EL.2. Press B to change mode. Mode sequence is time, time zone 2, alarm, timer.Note: In any setting mode, if no pusher is operated for 10 seconds, all changes willbe saved and the setting will automatically return to display mode.TIME AND DATE SETTING1. Press and hold A for 3 seconds to enter setting mode; 12/24-hour format will begin flashing.2. Press B to change 12/24-hour format.3. Press A to set and advance to seconds.4. Press B to reset seconds to zero.5. Press A to set and advance to hour.6. Press B to increase digits; press and hold B for fast advance.7. Press A to set and advance to next setting value.8. Setting sequence is 12/24-hour format, seconds, hour, minutes, year, month, date.9. Press A to exit setting mode.Note: Weekday will automatically update upon exiting setting mode.TIME ZONE 21. Press B to change to time zone 2.2. Press and hold A for 3 seconds to enter setting mode; hour will begin flashing.3. Press B to increase digit; press and hold B for fast advance.4. Press A to set and advance to minutes.5. Press B to increase digit; press and hold B for fast advance.6. Press A to exit setting mode.ALARM MODE1. Press B to change to alarm mode.2. Press and hold B for 3 seconds to toggle alarm/chime on/off.3. Alarm will sound for 10 seconds. Press any pusher to silence alarm.ALARM SETTING1. In alarm mode, press and hold A for 3 seconds to enter setting mode; hour will beginflashing.2. Press B to increase digit; press and hold B for fast advance.3. Press A to set and advance to minute.4. Press B to increase digit; press and hold B for fast advance.5. Press A to exit setting mode.COUNTDOWN TIMER1. Press B to change to timer mode.2. Press A to start/stop the timer.3. When timer reaches zero, alarm will sound for 15 seconds. Press any pusher to silencealarm.TIMER SETTING1. Press and hold A for 3 seconds to enter setting mode; hour will begin flashing.2. Press B to increase digit; press and hold B for fast advance.3. Press A to set and advance to next setting value.4. Setting sequence is hour, minute, second.5. Press A to exit setting mode.(A)(B)Digital G1, G3Normal Time Display1. Press A to change mode. Mode sequence is normal time, recall, alarm, and countdown timer.2. Press and hold A 3 seconds to toggle auto EL on/off.3. Press B for EL.4. Press C to toggle hourly chime on/off.5. Press D to flash time zone 2. Press and hold D 3 seconds to toggle normal time display/timezone 2.Note: In any mode, press and hold C 3 seconds to change to chronograph mode.Note: At any point in any setting mode, press B to exit setting mode.Note: In any setting mode, if no pusher is operated for 30 seconds, all changes willbe saved and the setting will automatically return to display mode.(B)(A)(C)(D)Time and Calendar Setting1. In normal time display, press and hold B 3 seconds; hour will begin flashing.2. Press C to increase digit; press D to decrease digit. Press and hold C or D for fastincrement/decrement.3. Press A to set and advance to next setting value.4. Repeat steps 2 and 3 through setting sequence. Setting sequence is: hour, minute, second,year, month, date, 12/24-hour format, month/date or date/month format.5. Press B to exit setting mode.6. To set Time Zone 2, press and hold D 3 seconds to change to Time Zone 2. Then use steps1-5 to set.Note: Weekday is automatically updated upon exiting setting mode.Recall Mode1. Press A to change to recall mode.Note: If no data is stored, display will show NO DATA. If data is saved, display willshow the current set (1-9).2. Press C to toggle through set data: total time, best time, average time, and each lap (up to100 laps).3. Press D to display current set; press D again to scroll to next set.4. Press and hold D 3 seconds to delete all stored data in the current set.Note: At any point in recall displays, press A to exit and change to alarm mode.Alarm Mode1. Press A to change to alarm mode.2. Press C to toggle alarm on/off.3. Press D to toggle alarm 1/alarm 2.Alarm Setting1. In alarm mode, press and hold B 3 seconds; hour will begin flashing.2. Press C to increase digit; press D to decrease digit. Press and hold C or D for fastincrement/decrement.3. Press A to set and advance to next setting value.4. Repeat steps 2 and 3 through setting sequence. Setting sequence is: hour, minute, time zone1/time zone 2.5. Press B to exit setting mode.Note: Alarm will sound for 20 seconds. Press any pusher to silence alarm.Countdown Timer1. Press A to change to timer mode. Default setting is 5 minutes.2. Press C to start timer; press D to stop the timer.3. Press and hold D 3 seconds to clear the countdown and reset the timer.Note: Alarm will sound for 20 seconds when countdown reaches zero. Press anypusher to silence alarm.Timer Setting1. In timer mode, press and hold B 3 seconds to enter setting mode; hour will begin flashing.2. Press C to increase digit; press D to decrease digit. Press and hold C or D for fastincrement/decrement.3. Press A to set and advance to next setting value.4. Repeat steps 2 and 3 through setting sequence. Setting sequence is: hour, minute, seconds.5. Press B to exit setting mode.Chronograph Mode1. In any mode, press and hold C 3 seconds to change to chronograph mode.2. Press C to start the chronograph; press D to stop the chronograph.3. Press and hold D 3 seconds to reset to zero.Lap Counting1. Press C while the chronograph is running for lap reading.Note: If no other pusher is pressed after C is pressed, display will automatically showtotal chronograph time after 5 seconds, then next lap running time after another 5seconds.2. Press B to return to chronograph next lap (up to 100 laps).3. Press D to stop chronograph.4. Press and hold B 3 seconds to save set data, or press and hold D 3 seconds to reset tozero.Note: Upon saving, display will show next empty set available (1-9) or MEMORYFULL. Change to Recall Mode to scroll through saved data.- 14 -
Digital MD-FL298X, FL388, QFL226DBDigital FL145GR3(B)(C)(A)(C)(A)(D)(B)(D)Alarm onHourly chime onAutomatic ELKey toneChronographCount stopCount repeatCount upMODEREAL TIMEASET/ELSET (hold for2 seconds)BMODECSTART/STOPDLAP/RESETTO CHRONOGRAPH TOGGLE TIME1/TIME2 KEY TONE ON/OFFTIME SETTING EXIT NEXT ADVANCE DECREMENTCHRONOGRAPH MEMORY RECALL TO TIMER START/STOP LAP/RESETMEMORY RECALL NEXT LAP TO TIMER TO CHRONOGRAPH TO CHRONOGRAPHTIMERSET (hold for2 seconds)TO ALARM START/STOP RESETTIMER SETTING EXIT NEXT ADVANCE DECREMENTALARM TIMESET (hold for2 seconds)TO REAL TIME NEXT ALARM ALARM ON/OFFALARM SETTING EXIT NEXT ADVANCE DECREMENTOVERVIEWFeatures include DUAL TIME/DATE, CHRONO, TIMER, ALARM, and LIGHT UP EL.LIGHT-UP ELPress (A) to activate light-up function for 3 seconds.TIME OF DAY MODE- Press (C) to toggle between Time 1 and Time 2.- Hold (C) for two seconds to set Time 1 or 2 as default.- Press (D) to turn on/off key tone.Time 1- To set Time, press (A) until hour flashes. Press (B) to select the setting item. Use (C) and (D) buttons to adjust the values up or down. Press (A) to exit set mode.Time 2- To set Time, press (A) until hour flashes. Press (B) to select the setting item. Use (C) and (D) buttons to adjust the values up or down. Press (A) to exit set mode- The range difference between Time 1 and Time 2 is 23 hours.CHRONO MODE- Press (C) to start and stop chronograph.- Press (D) to Split/Reset the chronograph.- Press (A) to recall the memory if Chronograph is stopped.- Press (A) again to view the next lap.- Press (C) or (D) to exit Recall mode and go back to Chronograph mode.- There are a total of 10 lap memories.TIMER MODE- There are 3 different modes of timer: Count Down-Stop, Count Down-Repeat, Count Down-and Up.- Press (C) to start/stop the timer counting.- Press (D) to reset the counter to the preset value if timer is stopped.- Press and hold (A) for 2 seconds to enter Timer Setting Mode.Timer Setting Mode- Press (B) to cycle around the setting item: timer-type, hour, minute, second and to back timer-type again.- Press (C) and (D) to increase/decrease the setting value.- Press (A) to exit the setting mode.Timer Alarm- Timer alarm will beep 2 times a second for 30 seconds.ALARM MODE- Press (C) to select the alarm.- Press (D) to enable/disable the alarm.- Press (B) to change to Time mode again.Alarm Setting Mode- Press and hold (A) for 2 seconds to enter the alarm settings mode.- Press (C) and (D) to increase or decrease the settings value.- Press (A) to exit the settings mode.- 15 -
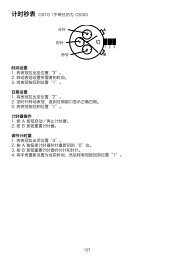
Digital BJ2718, BJ2679, BJ2957NORMAL TIME DISPLAY1. Press A to change mode. Mode sequence is normal time, chronograph, alarm, and time setting.2. Press B for EL.3. Press C to display date.4. Press D to display alarm.5. Press A+D to toggle chime on/off. (all days of week will display for “on”.)6. Press C+D to toggle alarm on/off.CHRONOGRAPH MODE1. Press A to change to chronograph mode.2. Press C to start/stop the chronograph.3. Press D to reset to zero.NOTE: Press A while the chronograph is running to return to normal time display; chronograph will continue running.(B)(A)(C)(D)SPLIT TIME1. Press D while the chronograph is running for split time.2. Press D again to measure multiple split times.3. Press C to finalize timing.4. Press D to scroll through all counts.5. Press D again to reset to zero.(B)(A)(C)(D)ALARM SETTING1. Press A to change to alarm setting mode; hour will begin flashing.2. Press C to increase digit; press and hold C for fast advance.3. Press D to confirm.4. Press D again to toggle to minutes.5. Press C to increase digit; press and hold C for fast advance.6. Press A to save data and return to normal time display.NOTE: Alarm will sound at preset time for 60 seconds. Press D to silence alarm, or press C for 5 minute snooze.TIME AND CALENDAR SETTING1. Press A to change to time and calendar setting; seconds will begin flashing.2. Press C to set seconds to zero.3. Press D to advance to minutes.4. Press C to advance digit; press and hold C for fast advance.5. Press D to advance to next setting value.6. Setting sequence is: seconds, minutes, hour, date, month, weekday.7. Press D to exit setting mode.NOTE: When setting the hour, “H” will be displayed for 24-hour format; “A” or “P” for 12-hour format.(A)(B)(D)(C)Digital BJ3101NORMAL TIME DISPLAY1. Press A for EL.2. Press A to display date.TIME AND DATE SETTING1. Press B to enter setting mode; seconds will begin flashing.2. Press A to set seconds to zero and return to normal time display.3. Press B twice to set hour.4. Press A to increase digit; press and hold A for fast advance.5. Setting sequence is hour, minutes, month and date.6. Press B to exit setting mode.(A)(B)CURVED LED QFL631NORMAL TIME DISPLAY1. Press B for time display.2. Press B again immediately for date display.3. After time or date display, message will scroll. Display will automatically turn off after message scrolling is complete.(A)(B)TIME AND DATE SETTING1. Press and hold A for 2 seconds to enter setting mode; 12/24-hour format will begin flashing.2. Press B to select 12/24 hour format.3. Press A to advance to hour.4. Press B to increase digits; press and hold B for fast advance.5. Press A to advance to next setting value.6. Setting sequence is: 12/24-hour format, hour, minutes, year, month, date7. Press A to save and exit setting mode.NOTE: If no pusher is operated for 7 seconds, settings will be saved and the display will automatically turn off.MESSAGE SETTING1. In calendar mode, press and hold A for 2 seconds to enter setting mode; first character will begin flashing.2. Press B to change the character.3. Press A to advance to next character.NOTE: Maximum message length is 10 characters.- 18 -