PA5585 - 8085TM Series - Operator Manual - McConnel
PA5585 - 8085TM Series - Operator Manual - McConnel
PA5585 - 8085TM Series - Operator Manual - McConnel

Create successful ePaper yourself
Turn your PDF publications into a flip-book with our unique Google optimized e-Paper software.
Publication 639<br />
June 2010<br />
Part No. 22674.39<br />
Revision: 07.11.12<br />
McCONNEL<br />
85HP Contractor <strong>Series</strong> Hedgecutters<br />
<strong>PA5585</strong> – PA<strong>8085TM</strong> Range<br />
<strong>Operator</strong> <strong>Manual</strong>
IMPORTANT<br />
VERIFICATION OF WARRANTY REGISTRATION<br />
DEALER WARRANTY INFORMATION & REGISTRATION VERIFICATION<br />
It is imperative that the selli ng dealer registers this machine with <strong>McConnel</strong> Limited before<br />
delivery to the end user – failure to do so may affect the validity of the machine warranty.<br />
To register machines go to t he <strong>McConnel</strong> Limited web site at www.mcconnel.com, log<br />
onto ‘Dealer Inside’ and select the ‘ Machine Registration button’ which can be found in<br />
the Service Section of the si te. Confirm to the customer that the machine has bee n<br />
registered in the section below.<br />
Should you experience any problems registering a machine in this manner p lease contact<br />
the <strong>McConnel</strong> Service Department on 01584 875848.<br />
Registration Verification<br />
Dealer Name: ……………………..…………………………………………………………….<br />
Dealer Address: …….………………………………………………………………………….<br />
Customer Name: ……………………..…………………………………………………………<br />
Date of Warranty Registration: ……/……/...…… Dealer Signature: ………………..……<br />
NOTE TO CUSTOMER / OWNER<br />
Please ensure that the above section above has been completed and signed by the selling<br />
dealer to verify that your machine has been registered with <strong>McConnel</strong> Limited.<br />
IMPORTANT: During the initial ‘bedding in’ period of a new machine it is the customer’s responsibility<br />
to regularly inspect all nuts, bolts and hose connections for tightness and re-tighten if required. New<br />
hydraulic connections occasionally weep small amounts of oil as the seals and joints settle in – where<br />
this occurs it can be cured by re-tightening the connection – refer to torque settings chart below. The<br />
tasks stated above should be performed on an hourly basis during the first day of work and at least<br />
daily thereafter as part of the machines general maintenance procedure.<br />
TORQUE SETTINGS FOR HYDRAULIC FITTINGS<br />
HYDRAULIC HOSE ENDS<br />
PORT ADAPTORS WITH BONDED SEALS<br />
BSP Setting Metric BSP Setting Metric<br />
1/4” 18 Nm 19 mm 1/4” 34 Nm 19 mm<br />
3/8” 31 Nm 22 mm 3/8” 47 Nm 22 mm<br />
1/2” 49 Nm 27 mm 1/2” 102 Nm 27 mm<br />
5/8” 60 Nm 30 mm 5/8” 122 Nm 30 mm<br />
3/4” 80 Nm 32 mm 3/4” 149 Nm 32 mm<br />
1” 125 Nm 41 mm 1” 203 Nm 41 mm<br />
1.1/4” 190 Nm 50 mm 1.1/4” 305 Nm 50 mm<br />
1.1/2” 250 Nm 55 mm 1.1/2” 305 Nm 55 mm<br />
2” 420 Nm 70 mm 2” 400 Nm 70 mm
WARRANTY POLICY<br />
WARRANTY REGISTRATION<br />
All machines must be registered, by the selling dealer with <strong>McConnel</strong> Ltd, before delivery to the end<br />
user. On receipt of the goods it is the buyer’s re sponsibility to check that the Verification of Warranty<br />
Registration in the <strong>Operator</strong>’s <strong>Manual</strong> has been completed by the selling dealer.<br />
1. LIMITED WARRANTIES<br />
1.01. All machines supplied by <strong>McConnel</strong> Limited are warranted to be free from defects in material<br />
and workmanship from the date of sal e to the original purchaser for a period of 1 2 months,<br />
unless a different period is specified.<br />
1.02. All spare parts supplied by <strong>McConnel</strong> Limited are warranted to be free from defects in material<br />
and workmanship from the date of sale to the original purchaser for a period of 6 months.<br />
1.03. The manufacturer will replace or rep air for the p urchaser any part or pa rts found, upon<br />
examination at its factory, to be defective under normal use a nd service due to defects in<br />
material or workmanship. Returned parts must be complete and unexamined.<br />
1.04. This warranty does not apply to any part of the goods, which has been subjected to improper or<br />
abnormal use, negligence, alteration, modification, fitment of non-genuine parts, accid ent<br />
damage, or damage resulting from contact with overhead power lines, dam age caused by<br />
foreign objects (e.g. stones, iron, ma terial other than vegetati on), failure due to lack of<br />
maintenance, use of incorrect oil or lubricants, contamination of the oil, or which has served its<br />
normal life. This warranty does not ap ply to any expendable items such as blades, flails, flap<br />
kits, skids, soil engaging parts, shields, guards, wear pads or pneumatic tyres.<br />
1.05. Temporary repairs an d consequential loss - i.e. oil, do wntime and associated parts are<br />
specifically excluded from the warranty.<br />
1.06. Warranty on hoses is limit ed to 12 months and does not include hoses w hich have suffere d<br />
external damage. Only complete hoses may be returned under warranty, any which have been<br />
cut or repaired will be rejected.<br />
1.07. Machines must be repaired immediately a problem arises. Continued use of the machine after a<br />
problem has occurred can result in furt her component failures, for which <strong>McConnel</strong> Ltd ca nnot<br />
be held liable, and may have safety implications.<br />
1.08. Except as provided herein, no employee, agent, dealer or other person is authorised to give any<br />
warranties of any nature on behalf of <strong>McConnel</strong> Ltd.<br />
1.09. For machine warranty periods in excess of 12 months the follo wing additional exclusions shall<br />
apply:<br />
1) Hoses, external seals, exposed pipes and hydraulic tank breathers.<br />
2) Filters.<br />
3) Rubber mountings.<br />
4) External electric wiring.<br />
1.10. All service work, particularly filter c hanges, must be carried out in accordance with the<br />
manufacturer’s service schedule. Failure to comply will invalidate the warranty. In the event of a<br />
claim, proof of the service work being carried out may be required.<br />
NB Warranty cover will be invalid if any non-genuine parts have been fitted or used. Use of<br />
non-genuine parts may seriously affect the machine’s performance and safety. <strong>McConnel</strong> Ltd<br />
cannot be held responsible for any failures or safety implications that arise due to the use of<br />
non-genuine parts.
2. REMEDIES AND PROCEDURES<br />
2.01. The warranty is not effective unless the Selling Dealer registers the machine, via the <strong>McConnel</strong><br />
web site and confirms the registration to the purchaser by completing the confirmation form in<br />
the operator’s manual.<br />
2.02. Any fault must be reported to an authorised <strong>McConnel</strong> dealer as soon as it o ccurs. Continued<br />
use of a m achine, after a f ault has occurred, can result in further component failure for which<br />
<strong>McConnel</strong> Ltd cannot be held liable.<br />
2.03. Repairs should be undertaken within two days of the failure. Claims submitted for re pairs<br />
undertaken more than 2 weeks after a failure ha s occurred, or 2 days after the pa rts were<br />
supplied will be rejected, unless the delay has been authorised by <strong>McConnel</strong> Ltd.<br />
2.04. All claims must be submitted, by an aut horised <strong>McConnel</strong> Service Dealer, within 30 days of the<br />
date of repair.<br />
2.05. Following examination of the claim an d parts the manufacture will pay, at their discretio n, for<br />
any valid claim the cost of any parts and an appropriate labour allowance if applicable.<br />
2.06. The submission of a claim is not a guarantee of payment.<br />
2.07. Any decision reached by <strong>McConnel</strong> Ltd. is final.<br />
3. LIMITATION OF LIABILITY<br />
3.01. The manufacturer disclaims any express (exc ept as set forth herein) an d implied warranties<br />
with respect to the goods including, but not limited to, merchantability and fitness for a particular<br />
purpose.<br />
3.02. The manufacturer makes no warranty as to the design, capability, capacity or suitability for use<br />
of the goods.<br />
3.03. Except as provi ded herein, the m anufacturer shall have no liability or responsibility to the<br />
purchaser or any other person or entity with respect to any liability, loss, or damage caused o r<br />
alleged to be caused directly or indirectly by the goods including, but not limited to, any indirect,<br />
special, consequential, or incidental damages resulting from the use or operation of the goods<br />
or any breach of this warranty. Notwithstanding the above limitations and warranties, the<br />
manufacturer’s liability hereund er for d amages incurred by the purchase r or others shall not<br />
exceed the price of the goods.<br />
3.04. No action arising out of any claimed breach of this warranty or transactions under this warranty<br />
may be brought more than one (1) year after the cause of the action has occurred.<br />
4. MISCELLANEOUS<br />
4.01. The manufacturer may waive compliance with any of the terms of this limited warranty, but no<br />
waiver of any terms shall be deemed to be a waiver of any other term.<br />
4.02. If any provision of this limited warranty shall violate any applic able law and is held to be<br />
unenforceable, then the invalidity of such provis ion shall not invalidate any other provisions<br />
herein.<br />
4.03. Applicable law may provide rights an d benefits to the purchaser in addition to those provided<br />
herein.
DECLARATION OF CONFORMITY<br />
Conforming to EU Machinery Directive 2006/42/EC<br />
We,<br />
McCONNEL LIMITED, Temeside Works, Ludlow, Shropshire SY8 1JL, UK<br />
Hereby declare that:<br />
The Product; Tractor Mounted Hedgecutter / Grass Mower<br />
Product Code; P608<br />
Serial No. & Date ………………………………… Type …………………………<br />
Manufactured in; United Kingdom<br />
Complies with the required provisions of the Machinery Directive 2006/42/EC<br />
The machinery directive is supported by the following harmonized standards;<br />
BS EN ISO 14121-1 (2007) Safety of machinery - Risk assessment, Part 1:<br />
Principles Part 2: practical guide and examples of methods.<br />
BS EN ISO 12100-1 (2010) Safety of mach inery - Part 1: Basic terminology and<br />
methodology Part 2: Technical principles.<br />
BS EN 349(1993)+ A1 (2008) Safety of machinery - Minimum distances to avoid the<br />
entrapment with human body parts.<br />
BS EN 953 (1998) Safety of machinery - Guards General requirements for the<br />
design and construction of fixed and movable guards.<br />
BS EN 982(1996)+ A1 (2008) Safety requirements for fluid power systems and their<br />
components. Hydraulics<br />
McCONNEL LIMITED operates an IS O 9001:2008 quality management system,<br />
certificate number: FM25970.<br />
This system is continually assessed by the;<br />
British Standards Institution (BSI), Beech House, Milton Keynes, MK14 6ES, UK<br />
BSI is accredited by UK Accreditation Service, accreditation number: UKAS 003.<br />
The EC declaration only applies if the machine stated above is used in<br />
accordance with the operating instructions.<br />
Signed …………………................ Responsible Person<br />
CHRISTIAN DAVIES on behalf of McCONNEL LIMITED<br />
Status: General Manager Date: May 2011
POWER ARM INSPECTION AND MAINTENANCE<br />
A daily equipment inspection of the tractor and mower should be conducted before the<br />
equipment is used. You may use the inspection sheets to assist with these daily<br />
inspections. Any damaged or missing guards should be repaired or replaced before<br />
operating the mower. Failure to repair the damaged shield can result in objects being<br />
thrown from the mower and possibly hitting the operator or bystander.<br />
Inspect the Mower for Safe Operating Condition<br />
<br />
Make sure the driveline guards and shielding are in place and in good repair.<br />
Inspect the flexible thrown object shielding to assure that they are in place on the<br />
front and rear of the mower head and in good repair. Repair or replace any<br />
damaged or missing thrown object shields.<br />
Ensure the mower cutting height is set high enough to reduce the possibility of the<br />
mower blades contacting the ground. Actual height will be dependent on the ground<br />
conditions. Increase the height when working in rough or undulating conditions.<br />
Inspect for broken, chipped, bent, missing, or severely worn blades. Replace<br />
damaged blades before operating the mower. Ensure the blade retaining bolts and<br />
fasteners are secure and tight.<br />
Ensure all head bolts and nuts are tight.<br />
Lubricate the driveline universal joints and telescoping members daily.<br />
Grease the rotor and roller bearings and inspect their condition.<br />
Inspect for any oil leaks or damaged hoses<br />
Inspect for worn or damaged decals and safety instructions. Replace unreadable,<br />
damaged or missing safety decals.<br />
Follow the operator’s manual(s) inspection and maintenance instructions for<br />
lubricating parts, and keeping thrown object shielding, driveline guards, rotating<br />
parts shields, mower blades and decals in good repair.<br />
Inspect the Tractor for Safe Operating Condition:<br />
Inspect the controls, lights, SMVs (Slow Moving Vehicle sign), seat belts, and<br />
ROPS to assure that they are in place and in good working order.<br />
Be sure the tires, wheels, lug bolts/nuts are in good condition.<br />
Make sure the tractor brakes and steering are in proper operating condition.<br />
Follow the operator’s manual(s) inspection and maintenance procedures for<br />
keeping the tractor in good and safe condition before operating.<br />
The inspection sheet on the following page should be kept in this book as a record. A<br />
second sheet is included for you to cut out and photocopy or the inspection sheets can be<br />
downloaded from our website at;<br />
http://www.mcconnel.com/support/aftersales/default.aspx?nav=After Sales
POWER ARM PRE-OPERATION Inspection<br />
Power Arm ID ________________ Date: _______________ Shift: _______________<br />
WARNING<br />
Before conducting the inspection, make sure the tractor engine is off, the key removed, all<br />
rotation has stopped and the tractor is in park with the parking brake engaged. Make sure<br />
the mower head is resting on the ground or is securely blocked up and supported and all<br />
hydraulic pressure has been relieved.<br />
Item<br />
The <strong>Operator</strong>’s <strong>Manual</strong> is in the Canister on the mower<br />
All Warning Decals are in place, clean and legible<br />
All Lights are clean and working<br />
The Mounting frame bolts are in place and tight<br />
The Arm pivot pins are tight and correctly secured<br />
There are no cracks in the arms<br />
The Hyd. Cylinder pins are tight and correctly secured<br />
The Hyd Cylinder hose connections are tight<br />
The Hyd. Pump hose connections are tight<br />
The Hyd. Valve hose connections are tight<br />
The Hyd. Valve controls function properly<br />
There are no damaged hoses<br />
The Oil level is to the green mark on the tank sight glass<br />
There is no evidence of Hydraulic oil leaks<br />
Flails are not missing, chipped, broken or excessively worn<br />
The Flail bolts are tight<br />
The Front & Rear Flaps are fittrd and in good condition<br />
The Front hood is in place and in good condition<br />
The Wire Trap is in good condition<br />
The Skid shoes are in good condition & tight<br />
There are no cracks or holes in flail casing<br />
The Hyd. motor mounting bolts are tight<br />
All Flail Head Nuts and Bolts are tight<br />
The Rotor Bearings are in good condition and greased<br />
The Roller bearings are in good condition and greased<br />
The drive line Shaft guard is in good condition<br />
The drive line shaft guard is correctly secured<br />
Controls are securely mounted in the cab<br />
With engine running check arm operation<br />
Have a spare pack of flails, bushes, bolts and nuts<br />
Condition at<br />
start of shift<br />
Specific Comments if not O.K.<br />
<strong>Operator</strong>s Signature: ___________________________________________<br />
DO NOT OPERATE an UNSAFE TRACTOR or MOWER
TRACTOR PRE-OPERATION Inspection<br />
Power Arm ID ________________ Date: _______________ Shift: _______________<br />
WARNING Before conducting the inspection, make sure the tractor engine is off, the key is removed<br />
all rotation has stopped and the tractor is in park with the parking brake engaged. Any<br />
implement attached to the tractor is firmly on the ground.<br />
Item<br />
The flashing lights function properly.<br />
All lights are clean and working correctly<br />
All cab windows are clean and wipers working correctly<br />
The SMV sign, where required, is clean and visible.<br />
The tyres are in good condition with correct pressure.<br />
The wheel nuts are tight.<br />
The tractor brakes are in good condition.<br />
The steering linkage is in good condition.<br />
There are no visible oil leaks.<br />
The hydraulic controls function properly.<br />
The ROPS or ROPS cab is in good condition.<br />
The seatbelt is in place and in good condition.<br />
The 3-point hitch is in good condition.<br />
The drawbar/pick up hook is secure & in good condition<br />
The PTO master shield is in place.<br />
The engine oil level is full.<br />
The brake fluid level is full.<br />
The power steering fluid level is full.<br />
The fuel level is adequate.<br />
The engine coolant fluid level is full.<br />
The radiator & oil cooler are free of debris.<br />
The air filter is in good condition<br />
Condition at<br />
start of shift<br />
Specific Comments if not O.K.<br />
<strong>Operator</strong>s Signature: ___________________________________________<br />
DO NOT OPERATE an UNSAFE TRACTOR or MOWER
For Safety and Performance…<br />
ALWAYS READ THIS BOOK FIRST<br />
McCONNEL LIMITED<br />
Temeside Works<br />
Ludlow<br />
Shropshire<br />
England<br />
Telephone: 01584 873131<br />
www.mcconnel.com<br />
NOISE STATEMENT<br />
The equivalent daily personal noise exposure from this machine measured at the operators’ ear is<br />
within the range 78 – 85 dB, these figures apply to a normal distribution of use where the noise<br />
fluctuates between zero and maximum. The figures assume that the machine is fitted to a tractor with a<br />
‘quiet’ cab with the windows closed in a generally open environment. We recommend that the windows<br />
are kept closed. With the cab rear window open the equivalent daily personal noise exposure will<br />
increase to a figure within the range 82 – 88 dB. At an equivalent daily noise exposure level of 85 – 90<br />
dB ear protection is recommended and must always be used if any window is left open.
LIST OF CONTENTS<br />
Page No.<br />
General Information 1<br />
Features and Specifications 2<br />
Safety Information 3<br />
Tractor Requirements 7<br />
Vehicle/Tractor Preparation 8<br />
Axle Bracket & Catch Assembly Fitment 9<br />
Delivery & Pre-Attachment 10<br />
Machine Attachment – Axle Mounted Models 10<br />
Machine Attachment – Linkage Mounted Models 16<br />
PTO Driveshaft Installation 20<br />
Fitting <strong>Operator</strong> Control Units 21<br />
Hydraulic Oil 22<br />
Detachment – Axle Mounted Models 23<br />
Detachment – Linkage Mounted Models 24<br />
Electric Monolever Controls 25<br />
XTC Proportional Switchbox Controls 29<br />
V4 Proportional Controls 33<br />
Flailhead Attachment 46<br />
Operation 47<br />
<strong>Operator</strong> Guard 47<br />
Slew & Lift Locks 48<br />
Moving into the Transport Position 49<br />
Transport Position 50<br />
Moving from Transport to Work Position 51<br />
Cab Protection System 52<br />
Breakaway, Auto Reset & Slew 53<br />
Powered Slew 54<br />
Parallel Arm Geometry 54<br />
Easy Drive System (EDS) 55<br />
Angle Float 55<br />
Lift Float 56<br />
Lift Float Kit 57<br />
Telescopic Arm 57<br />
Pre-Work Preparation & Precautions 58<br />
Running Up Procedure 59<br />
Emergency Stopping 59<br />
Operating Speeds 60<br />
Hazards & Dangers 61<br />
Overhead Power Lines 62<br />
Hedge Cutting Procedure 64<br />
Flail Types 65<br />
General Maintenance 67<br />
Hydraulic System 69<br />
Hydraulic Hoses 70<br />
Top Link Damper 71<br />
Electrical Connections 72<br />
Auxiliary Box Wiring Diagram 73<br />
PTO Shaft Maintenance 74<br />
Torque Chart 75
For best performance …<br />
USE ONLY GENUINE McCONNEL SERVICE PARTS<br />
To be assured of the latest design improvements purchase your<br />
‘Genuine Replacements’ from the ‘Original Equipment Manufacturer’<br />
McCONNEL LIMITED<br />
Through your local Dealer or Stockist<br />
Always quote:<br />
• Machine Type<br />
• Serial Number<br />
• Part Number<br />
Design improvements may alter some of the parts listed in this manual –<br />
the latest part will always be supplied when it is interchangeable with an earlier one.
GENERAL INFORMATION<br />
Always read this manual before fitting or operating the machine – whenever any doubt exists<br />
contact your dealer or the <strong>McConnel</strong> Service Department for advice and assistance.<br />
Use only <strong>McConnel</strong> Genuine Service Parts on <strong>McConnel</strong> Equipment and Machines<br />
DEFINITIONS – The following definitions apply throughout this manual:<br />
WARNING<br />
An operating procedure, technique etc., which –<br />
can result in personal injury or loss of life if not observed carefully.<br />
CAUTION<br />
An operating procedure, technique etc., which –<br />
can result in damage to either machine or equipment if not observed carefully.<br />
NOTE<br />
An operating procedure, technique etc., which is –<br />
considered essential to emphasis.<br />
LEFT AND RIGHT HAND<br />
This term is applicable to the machine when attached to the tractor and is viewed from the<br />
rear – this also applies to tractor references.<br />
Note: The illustrations in this manual are for instructional purposes only and may on occasion not<br />
show some components in their entirety. In some instances an illustration may appear slightly different<br />
to that of your particular model but the general procedure will be the same. E&OA.<br />
MACHINE & DEALER INFORMATION<br />
Record the Serial Number of your machine on this page and always quote this number when<br />
ordering parts. Whenever information concerning the machine is requested remember also<br />
to state the make and model of tractor to which the machine is fitted.<br />
Machine Serial Number:<br />
Machine Model details:<br />
Dealer Name:<br />
Dealer Address:<br />
Dealer Telephone No:<br />
Dealer Email Address:<br />
Installation Date:<br />
1
FEATURES & SPECIFICATIONS<br />
All models<br />
○<br />
○<br />
○<br />
○<br />
○<br />
○<br />
○<br />
○<br />
○<br />
○<br />
○<br />
○<br />
○<br />
Linkage or Axle Mounted<br />
Right or Left Hand Cutting<br />
Choice of Controls<br />
Choice of Flailheads<br />
Cast Iron Gearbox<br />
Hydraulic Breakaway<br />
Head Angle Float Kit<br />
100° Powered Slew<br />
225 Litre Hydraulic Tank<br />
85HP Hydraulic System<br />
<strong>Operator</strong> Guard<br />
Cab Protector Kit<br />
Rear Lighting<br />
Control Options<br />
○ Monolever<br />
○ XTC<br />
○ Revolution Proportional<br />
Arm Options<br />
○<br />
○<br />
○<br />
○<br />
○<br />
○<br />
Standard Arm<br />
Midcut Arm (1.0m Forward Extension)<br />
Midcut Arm (1.5m Forward Extension)<br />
VFR Arm (Variable Forward Reach)<br />
Tele Arm<br />
Midcut / Tele Arm<br />
Additional Options<br />
○ Lift Float Kit<br />
○ Easy Drive System (Option on V4 Proportional Controls only)<br />
○ Debris Blower<br />
2
SAFETY SECTION<br />
This machine has the potential to be extremely dangerous - in the wrong hands it can kill or<br />
maim; It is therefore imperative that both owner and operator of the machine reads and<br />
understands the following section to ensure they are fully aware of the dangers that do, or<br />
may exist, and their responsibilities surrounding the use and operation of the machine.<br />
The operator of this machine is responsible not only for their own safety but equally for the<br />
safety of others who may come into the close proximity of the machine, as the owner you are<br />
responsible for both.<br />
When the machine is not in use the cutting head should be lowered to rest on the ground. In<br />
the event of any fault being detected with the machine’s operation it must be stopped<br />
immediately and not used again until the fault has been corrected by a qualified technician.<br />
POTENTIAL SIGNIFICANT DANGERS ASSOCIATED WITH THE USE OF THIS MACHINE:<br />
▲ Being hit by debris thrown by rotating components.<br />
▲ Being hit by machine parts ejected through damage during use.<br />
▲ Being caught on a rotating power take-off (PTO) shaft.<br />
▲ Being caught in other moving parts i.e.: belts, pulleys and cutting heads.<br />
▲ Electrocution from Overhead Power Lines (by contact with or ‘flashover’ from).<br />
▲ Being hit by cutting heads or machine arms as they move.<br />
▲ Becoming trapped between tractor and machine when hitching or unhitching.<br />
▲ Tractor overbalancing when machine arm is extended.<br />
▲ Injection of high-pressure oil from hydraulic hoses or couplings.<br />
▲ Machine overbalancing when freestanding (out of use).<br />
▲ Road traffic accidents due to collision or debris on the road.<br />
3
BEFORE USING THIS MACHINE YOU MUST:<br />
▲ Ensure you read all sections of the operator handbook.<br />
▲ Ensure the operator is, or has been, properly trained to use the machine.<br />
▲ Ensure the operator has been issued with and reads the operator handbook.<br />
▲ Ensure the operator understands and follows the instructions in operator handbook.<br />
▲ Ensure the tractor front, rear and sides are fitted with metal mesh or polycarbonate<br />
guards of suitable size and strength to protect the operator against thrown debris or<br />
parts.<br />
▲ Ensure tractor guards are fitted correctly, are undamaged and kept properly maintained.<br />
▲ Ensure that all machine guards are in position, are undamaged, and are kept maintained<br />
in accordance with the manufacturer’s recommendations.<br />
▲ Ensure flails and their fixings are of a type recommended by the manufacturer, are<br />
securely attached and that none are missing or damaged.<br />
▲ Ensure hydraulic pipes are carefully and correctly routed to avoid damage by chaffing,<br />
stretching or pinching and that they are held in place with the correct fittings.<br />
▲ Always follow the manufacturer’s instructions for attachment and removal of the machine<br />
from the tractor.<br />
▲ Check that the machine fittings and couplings are in good condition.<br />
▲ Ensure the tractor meets the minimum weight recommendations of the machine’s<br />
manufacturer and that ballast is used as necessary.<br />
▲ Always inspect the work area thoroughly before starting to note obstacles and remove<br />
wire, bottles, cans and other debris.<br />
▲ Use clear suitably sized warning signs to alert others to the nature of the machine<br />
working within that area. Signs should be placed at both ends of the work site. (It is<br />
recommended that signs used are of a size and type specified by the Department of<br />
Transport and positioned in accordance with their, and the Local Highways Authority,<br />
guidelines).<br />
▲ Ensure the operator is protected from noise. Ear defenders should be worn and tractor<br />
cab doors and windows must be kept closed. Machine controls should be routed through<br />
proprietary openings in the cab to enable all windows to be shut fully.<br />
▲ Always work at a safe speed taking account of the conditions i.e.: terrain, highway<br />
proximity and obstacles around and above the machine. Extra special attention should be<br />
applied to Overhead Power Lines. Some of our machines are capable of reach in excess<br />
of 8 metres (26 feet) this means they have the potential to well exceed, by possibly 3<br />
metres (9’ 9”), the lowest legal minimum height of 5.2 metres from the ground for 11,000<br />
and 33,000 volt power lines. It cannot be stressed enough the dangers that surround this<br />
capability, it is therefore vital that the operator is fully aware of the maximum height and<br />
reach of the machine, and that they are fully conversant with all aspects regarding the<br />
safe minimum distances that apply when working with machines in close proximity to<br />
Power Lines. (Further information on this subject can be obtained from the Health &<br />
Safety Executive or your Local Power Company).<br />
4
▲ Always disengage the machine, kill the tractor engine, remove and pocket the key before<br />
dismounting for any reason.<br />
▲ Always clear up all debris left at the work area, it may cause hazard to others.<br />
▲ Always ensure when you remove your machine from the tractor that it is left in a safe and<br />
stable position using the stands and props provided and secured if necessary.<br />
WHEN NOT TO USE THIS MACHINE:<br />
▲ Never attempt to use this machine if you have not been trained to do so.<br />
▲ Never use a machine until you have read and understood the operator handbook, are<br />
familiar with it, and practiced the controls.<br />
▲ Never use a machine that is poorly maintained.<br />
▲ Never use a machine if guards are missing or damaged.<br />
▲ Never use a machine on which the hydraulic system shows signs of wear or damage.<br />
▲ Never fit, or use, a machine on a tractor that does not meet the manufacturer’s minimum<br />
specification level.<br />
▲ Never use a machine fitted to a tractor that does not have suitable front, rear and side(s)<br />
cab guarding made of metal mesh or polycarbonate.<br />
▲ Never use the machine if the tractor cab guarding is damaged, deteriorating or badly<br />
fitted.<br />
▲ Never turn a machine cutting head to an angle that causes debris to be ejected towards<br />
the cab.<br />
▲ Never start or continue to work a machine if people are nearby or approaching - Stop and<br />
wait until they are at a safe distance before continuing. WARNING: Some cutting heads<br />
may continue to ‘freewheel’ for up to 40 seconds after being stopped.<br />
▲ Never attempt to use a machine on materials in excess of its capability.<br />
▲ Never use a machine to perform a task it has not been designed to do.<br />
▲ Never operate the tractor or machine controls from any position other than from the<br />
driving seat, especially whilst hitching or unhitching the machine.<br />
▲ Never carry out maintenance of a machine or a tractor whilst the engine is running – the<br />
engine should be switched off, the key removed and pocketed.<br />
▲ Never leave a machine unattended in a raised position – it should be lowered to the<br />
ground in a safe position on a level firm site.<br />
▲ Never leave a tractor with the key in or the engine running.<br />
▲ Never carry out maintenance on any part or component of a machine that is raised<br />
unless that part or component has been properly substantially braced or supported.<br />
▲ Never attempt to detect a hydraulic leak with your hand – use a piece of cardboard.<br />
▲ Never allow children near to, or play on, a tractor or machine under any circumstances.<br />
5
ADDITIONAL SAFETY ADVICE<br />
Training<br />
<strong>Operator</strong>s need to be competent and fully capable of operating this machine in a safe and<br />
efficient way prior to attempting to use it in any public place. We advise therefore that the<br />
prospective operator make use of relevant training courses available such as those run by<br />
the Agricultural Training Board, Agricultural Colleges, Dealers and <strong>McConnel</strong>.<br />
Working in Public Places<br />
When working in public places such as roadsides, consideration should be paid to others in<br />
the vicinity. Stop the machine immediately when pedestrians, cyclists and horse riders etc.<br />
pass. Restart only when they are at a distance that causes no risk to their safety.<br />
Warning Signs<br />
It is advisable that any working area be covered by suitable warning signs and statutory in<br />
public places. Signs should be highly visible and well placed in order to give clear advanced<br />
warning of the hazard. Contact the Department of Transport or your Local Highways<br />
Authority to obtain detailed information on this subject. The latter should be contacted prior<br />
to working on the public highway advising them of the time and location of the intended work<br />
asking what is required by way of signs and procedure. – ‘Non-authorised placement of road<br />
signs may create offences under the Highways Act’.<br />
Suggested Warning Signs Required<br />
‘Road Works Ahead’ warning sign with a supplementary ‘Hedge Cutting’ plate. ‘For 1<br />
mile’ or appropriate shorter distance may be added to the plate.<br />
‘Road Narrows’ warning signs with supplementary ‘Single File Traffic’ plate.<br />
White on blue ‘Keep Right’ (*) arrow sign on rear of machine.<br />
* Note – this applies to UK Market machines where traffic passes to the right of a machine working in<br />
the same direction as the traffic flow. The direction, use and colour of the arrow sign will depend on the<br />
country of use and the Local Highway Authorities regulations in the locality.<br />
Use of Warning Signs<br />
▲ On two-way roads one set of signs is needed facing traffic in each direction.<br />
▲ Work should be within 1 mile of the signs.<br />
▲ Work only when visibility is good and at times of low risk e.g. NOT during ‘rush-hour’.<br />
▲ Vehicles should have an amber-flashing beacon.<br />
▲ Ideally, vehicles should be conspicuously coloured.<br />
▲ Debris should be removed from the road and path as soon as practicable, and at regular<br />
intervals, wearing high visibility clothing and before removing the hazard warning signs.<br />
▲ Collect all road signs promptly when the job is completed.<br />
Although the information stated here covers a wide range of safety subjects it is impossible to predict<br />
every eventuality that can occur under differing circumstances whilst operating this machine. No<br />
advice given here can replace ‘good common sense’ and ‘total awareness’ at all times, but will go a<br />
long way towards the safe use of your <strong>McConnel</strong> machine.<br />
6
VEHICLE / TRACTOR REQUIREMENTS<br />
Minimum Tractor Weights - including ballast weights if necessary<br />
PA6085 & PA6585 models – 4000kg<br />
PA7085 & PA8085 models – 4500kg<br />
Minimum HP requirements<br />
All models – 75 HP<br />
Linkage Type<br />
Category 2<br />
PTO Shaft<br />
The tractor must be equipped with a ‘live drive’ PTO to allow the flailhead to continue to<br />
operate when tractor forward motion is stopped.<br />
7
VEHICLE / TRACTOR PREPARATION<br />
Guarding: We recommend vehicles are fitted<br />
with cabs using safety glass windows and<br />
protective guarding when used with our<br />
machines. Fit <strong>Operator</strong> Guard (part no. 7313324)<br />
using the hooks provided. Shape mesh to cover<br />
all vulnerable areas. Remember the driver must<br />
be looking through mesh and/or polycarbonate<br />
glazing when viewing the flail head in any<br />
working position - unless the vehicle/ cab manufacturer can demonstrate that the penetration<br />
resistance is equivalent to, or higher than, that provided by mesh/polycarbonate glazing. If<br />
the tractor has a roll bar only, a frame must be made to carry both mesh and polycarbonate<br />
glazing. The operator should also use personal protective equipment to reduce the risk of<br />
serious injury such as; eye protection (mesh visor to EN1731 or safety glasses to EN166),<br />
hearing protection to EN352, safety helmet to EN297, gloves, filter mask and high visibility<br />
clothing.<br />
Vehicle Ballast: It is imperative when attaching ‘third-party’ equipment to a tractor that the<br />
maximum possible stability of the machine and tractor combination is achieved – this can be<br />
accomplished by the utilisation of ‘ballast’ in order to counter-balance the additional<br />
equipment added.<br />
Front weights may be required to place 15% of total outfit weight on the front axle for stable<br />
transport on the road and to reduce ‘crabbing’ due to drag of the cutting unit when working<br />
on the ground.<br />
Rear weights may be required to maintain a reasonable amount of rear axle load on the<br />
opposite wheel from the arms when in work; for normal off-ground work i.e. hedge cutting<br />
this should be 20% of rear axle weight or more for adequate control, and for ground work i.e.<br />
verge mowing with experienced operators, this can be reduced to 10%.<br />
All factors must be addressed in order to match the type and nature of the equipment added<br />
to the circumstances under which it will be used – in the instance of Power Arm hedgecutters<br />
it must be remembered that the machine’s centre of gravity during work will be constantly<br />
moving and will differ from that during transport mode, therefore balance becomes critical.<br />
Factors that effect stability<br />
• Centre of gravity of the tractor/machine combination.<br />
• Geometric conditions, e.g. position of the cutting head and ballast.<br />
• Weight, track width and wheelbase of the tractor.<br />
• Acceleration, braking, turning and the relative position of the cutting head during these operations.<br />
• Ground conditions, e.g. slope, grip, load capability of the soil/surface.<br />
• Rigidity of implement mounting.<br />
Suggestions to increase stability:<br />
• Increasing rear wheel track; a tractor with a wider wheel track is more stable.<br />
• Ballasting the wheel; it is preferable to use external weights but liquid can be added to around 75% of the tyre<br />
volume – water with anti-freeze or the heavier Calcium Chloride alternative can be used.<br />
• Addition of weights – care should be taken in selecting the location of the weights to ensure they are added to<br />
a position that offers the greatest advantage.<br />
• Front axle locking; a ram can be used to ‘lock’ the front axle in work only – locking the axle moves the<br />
‘balance line’ and can be used to transfer weight to the front axle from the rear (check with tractor<br />
manufacturer).<br />
NOTE; The advice above is offered as a guide for stability only and is not a guide to tractor strength - it is therefore<br />
recommended that you consult your tractor manufacturer or local dealer to obtain specific advise on this subject,<br />
additionally advice should be sought from a tyre specialist with regard to tyre pressures and ratings suitable for<br />
the type and nature of the machine you intend to fit.<br />
8
TRACTOR AXLE BRACKETS / CATCH ASSEMBLY – Fitting by Dealer<br />
Bolt axle plates to the tractor axle at either 1.0m or 1.1m apart - this may necessitate the<br />
removal of the tractor's check chains and/or assister ram brackets, if this is the case, the axle<br />
plate will include replacement brackets for these functions.<br />
The axle brackets supplied will be accompanied by a fitting sheet with instruction for their<br />
attachment to your tractor, follow the instructions exactly as they are specific to your<br />
particular make and model of tractor. Replace assister ram(s) if fitted.<br />
Hook the catch assemblies onto the rear of the<br />
axle plates, push firmly against the plate and<br />
vigorously pivot the catch in a forward and up<br />
direction until the spring loaded hook 'snaps' into<br />
position. Pass the release cords up into the cab.<br />
NOTE: On some tractors fitted with auxiliary fuel<br />
tanks, there is insufficient space for the spring<br />
catches to be fitted, in these instances special<br />
axle brackets and catches with a 'pin on' facility<br />
are available on request.<br />
Ensure catch-locking pin 'A' is removed.<br />
9
DELIVERY & PRE-ATTACHMENT (Dealer Reference)<br />
Delivery<br />
The machine will be delivered in a partially dismantled condition secured with transport<br />
straps and banding. Select a firm level site on which to place the machine before removing<br />
the straps, banding and other loose items.<br />
Handling the Machine<br />
Handling of the machine should always be performed using suitable overhead lifting<br />
equipment with a minimum safe lifting capacity over and above the maximum weight of the<br />
machine. Always ensure the machine is balanced during the lifting procedure and that all<br />
bystanders are kept well clear of the raised machine.<br />
Lifting Points<br />
To ensure even weight distribution when handling the machine it should be lifted using the<br />
sling eye at location ‘A’ and the sling shackle fitted at location ‘B’ for machines without a<br />
flailhead attached or location ‘C’ for machines with a flailhead attached – see illustration<br />
below.<br />
10
Post Delivery Assembly<br />
To allow for a compact shipping state the<br />
machine will be delivered with the tension<br />
link disconnected from the rocker and the<br />
stand legs retracted – these items will need<br />
to be correctly installed before initial<br />
attachment to a tractor; the procedure is as<br />
follows:<br />
Stand Legs<br />
Raise the machine using suitable overhead<br />
lifting equipment.<br />
Lower stand legs and secure in position<br />
using pins and locking pins – the hole<br />
position selected should be at a height that<br />
places the gearbox stub axle approximately<br />
3” (75mm) below the height of the tractor’s<br />
PTO shaft when the machine is at rest on<br />
the ground. Note the hole position used and<br />
ensure the equivalent one is used on both<br />
sides of the machine<br />
Tension Link Attachment<br />
Request assistance for this task.<br />
Operate ‘lift up’ on machine controls<br />
sufficient only for dipper arm to clear the<br />
ground.<br />
Pivot out the dipper arm until the tension<br />
link can be connected and secure in<br />
position with pin and fixings supplied.<br />
Axle Mounted Machines<br />
If the machine is axle<br />
mounted, connect the<br />
mounting arms to the<br />
main frame using the nuts<br />
and bolts supplied.<br />
Tighten nuts when the<br />
correct holes have been<br />
determined.<br />
See following page for<br />
details of mounting hole<br />
selection.<br />
11
Positioning Axle Mounting Brackets<br />
The correct mounting position is determined by the formula outlined below -<br />
Note: in some cases certain tractors have a low PTO and/or small wheels and therefore<br />
have limited ground clearance, where this is the case, the operator must decide what is<br />
sufficient ground clearance for his needs; where there is insufficient ground clearance the<br />
latch arms can be pivoted down to a lower position. When doing this be aware that it will<br />
cause the PTO shaft to become mis-aligned - Ensure you do not exceed the angular misalignment<br />
allowed by the PTO shaft manufacturer and remember that this will reduce the<br />
working life of the shaft.<br />
With the frame in the vertical position, measure dimensions 'A' and 'B', subtract 'B' from 'A' to<br />
obtain measurement 'X'. Measure dimension 'C'.<br />
Select mounting holes which position the mounting bars in the end of the latch arms so that<br />
dimension 'D' equals dimension 'C' minus measurement 'X' and also when the draft link is<br />
horizontal and the rocking draft pin is in the upright position dimensions 'E' and 'F' are equal.<br />
12
MACHINE ATTACHMENT – Axle Mounted Models<br />
Reverse tractor squarely into position<br />
adjacent to the machine and connect the<br />
draft links to the machine - manoeuvre tractor<br />
until both draft pin rockers are vertical.<br />
Generic illustrations used<br />
The lifting equipment may now be removed.<br />
Raise the machine on the tractors linkage<br />
sufficient only for the latch bar to fully engage<br />
in the axle catch.<br />
WARNING!<br />
The quadrant lever or machine controls<br />
must only be operated from the tractor<br />
seat. Ensure no one is standing close to<br />
or within the linkage arms or bars.<br />
NOTE<br />
Be aware - as lift occurs the machinery<br />
may tilt slightly.<br />
Insert catch lock pins.<br />
13
Raise the machine on the tractors linkage<br />
until the frame is vertical.<br />
Fit top link.<br />
On initial installation; measure PTO shaft and<br />
cut to the dimension shown opposite Refer to<br />
specific PTO section for additional information<br />
on this subject.<br />
NOTE:<br />
For subsequent use on a different tractor the PTO will need to be re-measured to ensure a<br />
minimum 6" (150mm) of shaft overlap, if unsuitable a replacement shaft will be required.<br />
14
Fit PTO shaft in position.<br />
Attach the torque chains to a convenient<br />
location to prevent rotation of the shaft<br />
guards.<br />
Fit machine controls into the cab.<br />
Raise stand legs and stow into the work<br />
position, secure with locking pins.<br />
NOTE: On these models the stand legs are<br />
stowed in a storage cavity within the<br />
mainframe<br />
Tighten check chains and/or stabiliser bars.<br />
NOTE: VFR Models with security lock tap<br />
Where fitted this lock tap must be opened<br />
before attempting to operate the machine –<br />
refer to page 21 for further details.<br />
The machine should now be carefully operated throughout its full range of movements to<br />
check hoses are not being strained, pinched, chafed or kinked, and that all movements are<br />
functioning correctly. The machine can now be folded into the transport position ready to<br />
proceed to the work site - refer to transport section for details on this subject.<br />
15
MACHINE ATTACHMENT – Linkage Mounted Models<br />
Attachment of the machine should always be performed on a firm level site.<br />
CAUTION: During the attachment procedure bystanders must be kept at a safe distance from the<br />
machine at all times. Never operate the tractors linkage system or machine controls when persons are<br />
standing on, or working between, the tractor and machine.<br />
PTO NOTE: Due to the close coupled design of the machine it is advisable to fit the PTO shaft to the<br />
machines gearbox stub axle prior to attaching the machine to the tractor. On initial installation the<br />
machine will need to be attached without the PTO fitted in order to measure for the required shaft<br />
length – In some cases the machine will then need to be removed from the tractor and subsequently<br />
refitted with the PTO pre-attached.<br />
Attach stabiliser to machine frame at points ‘A’ -<br />
selecting a mid-point position initially – secure<br />
with nuts and bolts provided. Fit top link at<br />
points ‘B’ and secure with pins & lock pins.<br />
Fit lower link balls and spacers into lower frame<br />
connection points and secure with linkage and<br />
lock pins – place spacers to position lower link<br />
balls for best alignment with tractor lower links.<br />
Fit PTO shaft to the stub axle of the machines<br />
gearbox – NOTE: for initial installation of a new<br />
machine or attachment to a different tractor refer<br />
to PTO note at top of page.<br />
Adjust the drop arms so that lower links are level.<br />
16
3<br />
1<br />
2<br />
Reverse tractor squarely and centrally to the<br />
machine - set tractor lower links to a height that<br />
will permit attachment to lower frame attachment<br />
points.<br />
Reverse fully in to attachment points then raise<br />
the tractor linkage until it locks onto the lower<br />
link balls on both sides of the machine.<br />
2<br />
1<br />
3<br />
Adjust top link to position the stabiliser tongue<br />
for attachment to the tractors top link clevis.<br />
NOTE: Alternative tongues for stabilisers are<br />
available for differing applications.<br />
Attach stabiliser tongue to highest suitable clevis<br />
position that does not interfere with or foul tractor<br />
components - secure with pin and lock pin.<br />
IMPORTANT: Rear of stabiliser tongue should be as close as possible to the bottom of the stabiliser<br />
slot with the machine at rest on the ground – if required change the stabiliser lower attachment points<br />
and/or clevis attachment position to achieve this setting. This is a vital requirement to ensure the<br />
tongue is located at the slots mid-point when the machine is raised to the work position thus allowing<br />
float in each direction.<br />
17
Feed control lines into tractor cab – avoid sharp<br />
bends and keep lines well clear of all moving<br />
parts on the machine or tractor.<br />
Connect control lines to the machines control<br />
unit in the tractor cab.<br />
Tighten tractor stabilisers - raise tractor linkage<br />
to lift the machine to its working height.<br />
Attach PTO shaft to the output shaft of the<br />
tractor.<br />
Attach torque chains to convenient locations to<br />
prevent rotation of PTO shaft guarding.<br />
18<br />
Remove stand legs from both sides of the<br />
machine.
Stow legs upright in the storage cavity within the mainframe - secure in position with pins and ‘R’ clips.<br />
Remove and stow the slew lock pin (work mode).<br />
Open lift ram tap - slew machine to the side of<br />
tractor in work position.<br />
B<br />
A<br />
With machine in work position adjust the top link<br />
to bring machine frame into the vertical position.<br />
Slew machine into transport position and replace<br />
the slew lock pin (transport mode) Close lift ram<br />
tap.<br />
NOTE: VFR Models with security lock tap Where fitted this lock tap must be opened<br />
before attempting to operate the machine – refer to page 21 for further details.<br />
Attachment is now complete and the machine is ready for transportation to the work site.<br />
NOTE: On initial installation refer to running up procedure.<br />
19
PTO DRIVESHAFT INSTALLATION<br />
The PTO driveshaft attaches between the tractor and the machine gearbox to transfer the<br />
power required to the run and operate the machine – it is important to achieve the correct<br />
shaft length to avoid risk of it ‘bottoming out’ when raising or lowering the machine.<br />
The procedure for measuring and<br />
cutting the shaft is as follows:<br />
Measuring the PTO Shaft<br />
With the machine attached to the tractor<br />
in the working position measure the<br />
horizontal distance ‘A’ from the tractor’s<br />
PTO to the input shaft on the machines<br />
gearbox and subtract 75mm (3”) – this<br />
figure is the required shaft length.<br />
Place the fully closed PTO shaft on the<br />
ground and measure its overall length, if<br />
the shaft is shorter than the required<br />
length you can use it without the need<br />
to shorten - providing it allows for a<br />
minimum 150mm (6”) overlap when<br />
fitted.<br />
If the shaft is longer subtract the<br />
required shaft length plus an additional<br />
75mm (3”) - the resulting figure is the<br />
excess length that will need to be<br />
removed from each half of the shaft.<br />
Cutting the PTO Shaft<br />
Separate the two halves and using the<br />
measurement obtained above shorten<br />
both the plastic guarding and the inner<br />
steel profile tubes of each shaft by this<br />
same amount. De-burr the cut tubes<br />
with a file to remove rough or sharp<br />
edges and thoroughly clean to remove<br />
swarf before greasing, assembling and<br />
fitting the shaft.<br />
NOTE: For subsequent use with different tractors the shaft should be measured again to<br />
check suitability – there must be a minimum shaft overlap of 150mm (6”).<br />
Maintenance<br />
To increase the working life of the PTO shaft it should be periodically checked, cleaned and<br />
lubricated – refer to the PTO maintenance section for further details on this subject.<br />
20
FITTING OPERATOR CONTROL UNITS<br />
Fitment of the operator controls in the tractor cab will vary depending on the particular model<br />
or specification of machine – the information below lists the differing methods of fitment for<br />
the various types of controls available.<br />
NOTE: Electric control units work within the range of 12v-16v DC and will require a minimum<br />
power supply of 12v DC.<br />
Electric Controls<br />
Depending on the particular type of control, electric units are supplied either with a mounting<br />
bracket or a mounting pillar which should be bolted to the internal mud wing or cab cladding<br />
in a suitable convenient location that offers ease of use without interfering with normal tractor<br />
operation. Mounting pillars can be bent or twisted to achieve a comfortable working position.<br />
Ensure during fitting that no structural member of the tractor cab or roll bar is drilled or<br />
damaged.<br />
The power supply cable should be connected directly to the tractors battery - do not use<br />
cigarette lighter type connections as these prove to be sporadic and unreliable for control<br />
applications. Control units are 12 volt DC operated; the brown lead is positive (+) and the<br />
blue lead is negative (-).<br />
V4 & Revolution Proportional Controls<br />
V4 & Revolution proportional controls comprise of 2 units; the main control box or control<br />
screen (respectively), and the armrest control unit. The control box/screen is supplied with a<br />
mounting bracket and suction cup assembly that allows the unit to be mounted on the<br />
window of the tractor cab – ensure the surface used is clean and dry and that the unit is<br />
mounted in a position where it does not obstruct operator vision. The armrest unit is<br />
designed to slide over the armrest of the tractor seat and is held in place with the fixing<br />
straps provided. Alternately, a mounting bar is supplied with Revolution controls that can be<br />
used should a more permanent installation be required; when fitting the latter ensure that<br />
any holes drilled in the tractor cab is are clear of important component and electrical wiring<br />
and should not be located in any area where it could affect the safety structure of the cab.<br />
The power supply cable should be connected directly to the tractors battery - do not use<br />
cigarette lighter type connections as these prove to be sporadic and unreliable for control<br />
applications. Control units are 12 volt DC operated; the red lead is positive (+) and the black<br />
lead is negative (-).<br />
VFR Lock Tap - Pre-Operational Check<br />
VFR machines produced after late 2012<br />
are fitted with a security lock tap located on<br />
the control valve’s reach gland port; this is<br />
to prevent the risk of arm movement during<br />
shipping of the machine.<br />
Ensure the lock tap is fully opened before<br />
attempting to operate the machine.<br />
The tap should be kept open and only<br />
closed for any future shipping or as an<br />
added safety precaution when storing the<br />
machine detached from the tractor.<br />
21
HYDRAULIC OIL<br />
Hydraulic Oil Reservoir<br />
Fill the tank with oil selected from the chart<br />
below or a good quality equivalent to a point<br />
where the level is between the minimum and<br />
maximum marks on the t ank gauge. When the<br />
machine is initially run the level will drop as the<br />
oil is drawn into the circuit - top back up as<br />
required to the correct level on the gauge.<br />
Always us e clean receptacles when handling<br />
and transferring oil to avoid moisture or dirt<br />
contamination that can damage components<br />
and/or reduce machine performance.<br />
NOTE: Refer to the maintenance section for further information on the subject of hydraulic oil<br />
and system filtration.<br />
Reservoir Capacity<br />
The oil tank capacity of the machine is approximately 225 Litres.<br />
Recommended Hydraulic Oils<br />
For initial filling of the oil reservoir, periodic oil changes and r eplenishment purposes the<br />
following hydraulic oils, or a good quality equivalent are recommended.<br />
NOTE: Only use oils that are ISO 18/16/13, NAS7, or cleaner.<br />
Manufacturer Cold or Temperate Climate Hot Climate<br />
BP Bartran 46<br />
Energol HLP-HM 46<br />
Bartran 68<br />
Energol HLP-HM 68<br />
CASTROL Hyspin AWH-M 46 Hyspin AWH-M 68<br />
COMMA Hydraulic Oil LIC 15 Hydraulic Oil LIC 20<br />
ELF Hydrelf HV 46<br />
Hydrelf HV 68<br />
Hydrelf XV 46<br />
ESSO Univis N 46 Univis N 68<br />
FUCHS<br />
(UK/Non UK markets*)<br />
Renolin 46<br />
Renolin HVZ 46<br />
Renolin CL46/B15*<br />
Renolin AF46/ZAF46B*<br />
Renolin 68<br />
Renolin HVZ 68<br />
Renolin CL68/B20*<br />
Renolin AF68/ZAF68B*<br />
GREENWAY Excelpower HY 68 Excelpower HY 68<br />
MILLERS Millmax 46<br />
Millmax HV 46<br />
Millmax 68<br />
Millmax HV 68<br />
MORRIS Liquimatic 5<br />
Liquimatic HV 46<br />
Triad 46<br />
Liquimatic 6<br />
Liquimatic HV 68<br />
Triad 68<br />
SHELL Tellus 46<br />
Tellus T46<br />
Tellus 68<br />
Tellus T68<br />
TEXACO Rando HD 46<br />
Rando HDZ 46<br />
Rando HD 68<br />
Rando HDZ 68<br />
TOTAL Equivis ZS 46 Equivis ZS 68<br />
22
DETACHMENT - Axle Mounted Machines<br />
Removal of the machine must always be performed<br />
on a firm level site. Keep all bystanders at a safe<br />
distance from the machine.<br />
Never stand between tractor and<br />
machine with the tractor running or<br />
when operating the tractor’s draft links.<br />
Ensure hydraulics are set to position<br />
control.<br />
• Fit and secure the machine’s parking legs.<br />
• Position the arms at approximately half reach<br />
directly to the rear of the machine with the flail<br />
head approximately 600mm (24”) off the ground.<br />
• Remove axle latch security pins.<br />
• Take machine’s weight on draft links sufficient to<br />
allow the top link to be disconnected, then<br />
remove the top link.<br />
• From the tractor cab; release the latch catches<br />
by pulling their cords.<br />
• Operate the draft links to lower the machine to<br />
the ground. Check PTO is still fully engaged.<br />
• Level the machine by gently pushing the<br />
flailhead downwards against the ground using<br />
the machine’s controls.<br />
• Disconnect draft links, PTO shaft and remove<br />
the control unit from the tractor cab. Store<br />
electric control units in a warm, dry and clean<br />
environment.<br />
• Carefully drive tractor clear of the machine.<br />
Hitch Types & Removal<br />
Illustrations show the 3 different types of hitches used on<br />
axle mounted machines and the removal method for ‘nonfixed’<br />
versions.<br />
23
DETACHMENT – Linkage Mounted Machines<br />
DANGER!<br />
Read carefully before attempting to detach the machine from the tractor.<br />
WARNING!<br />
Do not operate quadrant lever or machine controls through the rear cab window<br />
whilst standing on or amongst linkage components – Always seek assistance.<br />
Detachment Procedure<br />
Select a firm level site on which to park the machine.<br />
• Remove stand legs from their stowage location and fit in their parking position – secure in<br />
position with pins and ‘R’ clips.<br />
• Lower machine to rest on the stand legs.<br />
Ensure lift float is turned off (where applicable).<br />
• Raise machine on tractor linkage enough only to take the weight off the stabiliser.<br />
• Open lift ram taps.<br />
• Ensure arm is in the rear position, place flailhead on the ground at half reach – push<br />
down slightly to relieve the load on the top link.<br />
• Stop tractor engine.<br />
• Close lift ram taps.<br />
• Disengage PTO and remove from tractor.<br />
• Slacken stabiliser bars/check chains as applicable.<br />
• Disconnect controls and/or control lines from the tractor cab and stow neatly on the<br />
machine clear of the ground.<br />
• Disconnect stabiliser from tractors top hitch point.<br />
• Remove draft link pins.<br />
• Slowly and carefully drive the tractor away from the machine.<br />
Storage<br />
If the machine is to be left standing for an extended period of time, lightly coat the exposed<br />
portions of the ram rods with grease. Subsequently, this grease should be wiped off before<br />
the rams are next moved.<br />
Wherever possible storage of the machine should ideally be in a clean dry location, if the<br />
machine has to be stored outside tie a piece of tarpaulin or canvas over the control<br />
assembly, do not use plastic bags as these can lead to rapid corrosion of the unit.<br />
24
ELECTRIC MONOLEVER CONTROLS<br />
Machines with Electric Monolever Controls will be supplied with one of the control units<br />
shown below, the particular version will be dependent on the specification of the machine;<br />
machines fitted with cable rotor control will use the unit shown left whilst machines with<br />
electric rotor control will use the unit shown right – the only differences between the units is<br />
that the latter has 2 addition switches fitted for operation of the electric rotor control.<br />
Cable Rotor Control Version<br />
▼<br />
Electric Rotor Control Version<br />
▼<br />
LOCATION & FUNCTION OF CONTROLS<br />
1. Arm Lift Control<br />
2. Arm Reach Control<br />
3. Flailhead Angle Control<br />
4. Arm Slew Control<br />
5. Tele/Midcut/VFR Control (Applicable models only)<br />
A. Power On/Off (Emergency Stop)<br />
B. Auto Reset<br />
C. Head Float - Angle/Lift (Option)<br />
D. Rotor On/Off (Electric RCV models)<br />
E. Rotor Direction (Electric RCV models)<br />
Powering the Controls<br />
Activation of power to the control unit is by operation of switch ‘A’ as shown below:<br />
Rotate the switch clockwise to Power ON (LED light on)<br />
Press the switch to Power OFF or Emergency Stop (LED light off)<br />
Power<br />
ON<br />
Power<br />
OFF<br />
25
ARM OPERATION<br />
Auto<br />
Reset<br />
Tele or Midcut/VFR Models only<br />
26
HEAD FLOAT OPERATION (Angle Float standard / Lift Float optional)<br />
Angle Float OFF<br />
Lift Float OFF<br />
Angle Float OFF<br />
Lift Float ON<br />
Angle Float ON<br />
Lift Float ON<br />
ROTOR OPERATION (Electric Rotor Control)<br />
Selection of Rotor Cutting Direction<br />
Uphill Cutting<br />
Downhill Cutting<br />
27
Switching the Rotor On<br />
For safety reasons, to prevent accidental starting of the rotor, the ‘Rotor On’ switch cannot<br />
be activated in a single operation or without first selecting the direction of cut – the procedure<br />
for starting the rotor is as follows:<br />
Select the required cutting direction - the Rotor On/Off Switch (D) must then be switched<br />
upwards and held in position for a minimum of 8 seconds before switching it into the fully<br />
down ‘on’ position where it will remain until it is switched off. When the switch is moved to<br />
the down position the red LED light above the switch will be lit to signify the rotor is on – if<br />
the LED does not light the switch was not held in its up position for long enough and the rotor<br />
will not have started, repeat the process again holding the switch upwards for a longer<br />
period.<br />
Rotor Start<br />
Switching the Rotor Off<br />
Stopping the rotor is performed by switching either the Rotor Power Switch (D) or the Rotor<br />
Direction Switch (E) to the central (off) position – the red LED light will go out to signify the<br />
rotor has been switched off.<br />
Rotor Stop<br />
CAUTION: When the rotor is switched off it will continue to ‘freewheel’ under its own<br />
momentum for up to 40 seconds before finally coming to a standstill – do not leave the<br />
tractor cab or attempt to approach the flailhead until the rotor has stopped turning<br />
completely.<br />
Alternative Rotor Stop<br />
28
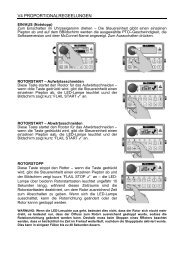
XTC (Mk2) PROPORTIONAL SWITCHBOX CONTROLS (5 Service Models)<br />
Machines with XTC Mk2 Proportional Controls (5 service models) will be supplied with the<br />
control unit shown below. The units for both electric and cable controlled rotor machines are<br />
identical except that for cable versions the rotor control switches B, C & D (shown below) will<br />
not provide a function as rotor operation will be controlled by a separate cable lever unit<br />
(refer to specific cable rotor control page for operation details of that unit).<br />
LOCATION & FUNCTION OF CONTROLS<br />
1. Arm Lift Control<br />
2. Arm Reach Control<br />
3. Head Angle Control<br />
4. Arm Slew Control (Default Mode)<br />
5. Tele*/Midcut*/VFR* Control (Default Mode)<br />
* Applies to the specific model only<br />
A. Power On/Off (LED ‘a’ indicates status)<br />
B. Rotor Start (Uphill Cutting Direction)<br />
C. Rotor Start (Downhill Cutting Direction)<br />
D. Rotor Stop<br />
E. Auto Reset<br />
F. Head Angle Float On/Off<br />
G. Lift Float On/Off (Option)<br />
Note: 2 sets of control buttons are installed on each side of the unit for operation of Angle Float & Lift<br />
Float, both sets of buttons and their LED’s are linked and therefore perform exactly the same<br />
function; they are installed to allow for operator preference.<br />
LED Lights<br />
An LED light adjacent to each control button reports the status of that particular function –<br />
when the function is selected the LED light will illuminate to confirm the function is active; the<br />
light will switch off on de-selection of that function.<br />
Powering the Controls<br />
Activation of power to the control unit is by operation of the red button switch ‘A’ as shown<br />
below:<br />
Rotate clockwise for Power ON (LED light on)<br />
Press for Power OFF / Emergency Stop (LED light off)<br />
29
ARM OPERATION<br />
Tele or Midcut/VFR Models only<br />
30
HEAD FLOAT OPERATION<br />
Angle Float (Standard Feature)<br />
Lift Float (Optional Feature)<br />
ROTOR OPERATION (Electric Rotor Control)<br />
Rotor Start (Selection of Rotor Cutting Direction)<br />
Select rotor start for required direction (LED will light to indicate the active direction).<br />
Uphill Cutting<br />
Downhill Cutting<br />
31
Switching Rotor Direction<br />
With the rotor running, changing the rotor cutting direction can only be achieved after first<br />
operating ‘rotor stop’, when stop has been selected the specific direction button can then be<br />
operated to command the rotor to switch to the desired direction. NOTE: This function has a<br />
built in time delay of approximately 8 seconds - this is a machine protection feature that<br />
allows the rotor sufficient time to de-accelerate before restarting in the opposite direction.<br />
The LED light of the active cutting direction will flash on and off during the slowing down<br />
period, when the direction has changed the LED for the new direction will be illuminated.<br />
Switching the Rotor Off<br />
Stopping the rotor is performed by operation of the rotor stop button as illustrated below.<br />
When rotor off has been selected the LED light above the button of the active cutting<br />
direction will flash on and off for approximately 8 seconds to signify that the rotor has been<br />
switched off, after this 8 second period the light will go off completely. NOTE: The rotor will<br />
continue to rotate under its own power until it finally comes to a standstill.<br />
CAUTION: When the rotor is switched off it will continue to ‘freewheel’ under its own<br />
momentum for up to 40 seconds before finally coming to a standstill – do not leave the<br />
tractor cab or attempt to approach the flailhead until the rotor has stopped turning<br />
completely.<br />
32
V4 PROPORTIONAL CONTROLS<br />
Power On / Off (Emergency Stop)<br />
Rotate Clockwise to Power On – control unit will emit a single beep and screen will display<br />
the selected PTO speed, software version and the <strong>McConnel</strong> name. Press to Power Off.<br />
Rotor Start – Uphill Cutting<br />
This button starts the rotor for ‘uphill’ cutting – when the<br />
button is pressed the control unit will emit a single beep,<br />
the LED light will illuminate and the screen will<br />
momentarily display ‘FLAIL START ’.<br />
Rotor Start – Downhill Cutting<br />
This button starts the rotor for ‘downhill’ cutting – when the<br />
button is pressed the control unit will emit a single beep,<br />
the LED light will illuminate and the screen will<br />
momentarily display ‘FLAIL START ’.<br />
Rotor Stop<br />
This button stops the rotor – when the button is pressed<br />
the control unit will emit a single beep and the screen will<br />
momentarily display ‘FLAIL STOP ’ – the LED lights<br />
above both rotor start buttons will be illuminated for<br />
approximately 10 seconds, during this period the rotor start<br />
buttons will be disabled to allow sufficient time for the rotor<br />
to power down. When the LED lights go out the rotor<br />
direction can be changed or the rotor allowed to stop.<br />
WARNING: The LED lights going out do not indicate that the rotor has stopped rotating, it<br />
signifies only that the oil flow to the rotor has ceased sufficient for the direction of rotation to<br />
be changed - therefore when stopping a rotor it must be noted that it will continue to<br />
freewheel for a considerable length of time after the stop button has been activated, in some<br />
case this can be up to 40 seconds.<br />
33
Head Angle Float<br />
There are 2 methods available for selection and de-selection of this function; activation via<br />
the control unit - refer to #1 below, or activation via the joystick controls - refer to #2 below.<br />
1. Pressing the Head Angle Float button – when activated the control unit will emit a single<br />
beep, the LED light will illuminate and the screen will momentarily display ‘ANGLE<br />
FLOAT ’ pressing the button again will deselect the function – the control unit will emit a<br />
single beep, the LED light will go out and the screen will momentarily display ‘ANGLE<br />
FLOAT X’.<br />
2. Press and hold in the lower frontal button<br />
(B1) on the joystick control and roll the left<br />
hand thumbwheel (T1) forwards – the control<br />
unit will emit a single beep, the LED light will<br />
illuminate and the screen will momentarily<br />
display ‘ANGLE FLOAT ’.<br />
To deselect press and hold in the lower<br />
frontal button (B1) on the joystick control and<br />
roll the left hand thumbwheel (T1)<br />
backwards – the control unit will emit a<br />
single beep, the LED light will go out and the<br />
screen will momentarily display ‘ANGLE<br />
FLOAT X’.<br />
NOTE: When selecting or deselecting the<br />
function, the thumbwheel (T1) should be allowed<br />
to return to its centre position before releasing<br />
the lower frontal button (B1).<br />
NOTE: By default operation of thumbwheels T1 and T2 in conjunction with button B1 activates Head<br />
Angle Float and EDS/Lift Float respectively. These controls can, if required, be swapped over so<br />
that the thumbwheels operate the opposing functions – this procedure is performed by accessing<br />
the settings menu on the control unit via the screen and menu buttons.<br />
34
EDS Function (EDS Models) / Lift Float (Non EDS Models)<br />
There are 2 methods available for selection and de-selection of this function; activation via<br />
the control unit - refer to #1 below, or activation via the joystick controls - refer to #2 below.<br />
1. Pressing the EDS / Lift Float button will activate the relevant function – when activated<br />
the control unit will emit a single beep, the LED light will illuminate and the screen will<br />
momentarily display ‘LIFT FLOAT’. Pressing the button again will deselect the function<br />
– the control unit will emit a single beep, the LED light will go out and the screen will<br />
momentarily display ‘LIFT FLOAT X’.<br />
Press and hold in the lower frontal<br />
button (B1) on the joystick control<br />
and roll the right hand thumbwheel<br />
(T2) forwards – the control unit will<br />
emit a single beep, the LED light will<br />
illuminate and the screen will<br />
momentarily display ‘LIFT FLOAT<br />
’. To deselect press and hold in<br />
the lower frontal button (B1) on the<br />
joystick control and roll the right<br />
hand thumbwheel (T2) backwards –<br />
the control unit will emit a single<br />
beep, the LED light will go out and<br />
the screen will momentarily display<br />
‘LIFT FLOAT X’.<br />
NOTE: When selecting or deselecting<br />
the function, the thumbwheel (T2)<br />
should be allowed to return to its centre<br />
position before releasing the lower<br />
frontal button (B1).<br />
All models with v4.08 software onwards: With the function engaged subsequent operation<br />
of button B1 on the joystick or the [] button on the control unit will alternately disable and<br />
enable all active floats.<br />
EDS models with pre v4.08 software: With the function engaged and the rotor running<br />
EDS settings (SOFT – MED – HARD) will automatically be displayed on the control unit<br />
screen and can be scrolled through using button B1 on the joystick or the tick [] button on<br />
the control unit, if the rotor is not running the EDS settings can manually be viewed on the<br />
screen by pressing either [◄] [►] buttons on the control unit and scrolling to the EDS work<br />
screen.<br />
35
AUXILIARY FUNCTION CONTROL<br />
There are 3 possible types of auxiliary service control as described in A, B & C below – the<br />
particular type used will be dependant on the build specification of the machine. Control<br />
operation of the function for all types remains the same (see below).<br />
A) Diverter Valve System Utilising an Existing Service (Physical Diverter Valve)<br />
The control selects either of the two diverter valves for the operation of additional equipment<br />
that may be fitted to the machine such as: Directional Ram, Orbiter Head Kit, Hydraulic<br />
Roller etc.<br />
B) 6/7 Service Manifold Systems (Electronic Diverter Valve)<br />
Only available on stackable manifold systems either as a factory fitted option or as an<br />
aftermarket kit, in the case of the latter ‘D1 and/or D2 PROP’ will need to be changed from<br />
‘N’ to ‘Y’ within ‘options’ of the setup menu on initial installation of the kit.<br />
C) Integrated Debris Blower<br />
Operated by D1 on machines with standard arm or D2 on machines with Tele, Midcut or<br />
VFR arms.<br />
There are 2 methods of control available for selection and de-selection of the functions;<br />
activation via the control unit - refer to #1 below, or activation via the joystick controls - refer<br />
to #2 below.<br />
1. Pressing the button momentarily will select Diverter Valve #1 – when activated the control<br />
unit will emit a single beep, the LED light will illuminate and the screen will momentarily<br />
display ‘DIVERTER VALVE 1 ’. Pressing the button again momentarily will deactivate<br />
diverter #1, the screen will display ‘DIVERTER VALVE 1 X’<br />
Holding the button in for 2 seconds will select Diverter Valve #2 – when selected it<br />
remains active until it is subsequently deselected by holding the button in again for 2<br />
seconds.<br />
2. Pressing the upper frontal button (B2) on<br />
the joystick momentarily will select Diverter<br />
Valve #1 – when activated the control unit<br />
will emit a single beep, the LED light will<br />
illuminate and the screen will momentarily<br />
display ‘DIVERTER VALVE 1 ’. Pressing<br />
the button again momentarily will<br />
deactivate diverter #1, the screen will<br />
display ‘DIVERTER VALVE 1 X’<br />
Holding button (B2) in for 2 seconds will<br />
select Diverter Valve #2 – when selected it<br />
remains active until it is subsequently<br />
deselected by holding the button in again<br />
for 2 seconds.<br />
36
Slew – Tele/Midcut/VFR Swap<br />
This function swaps over the controls used to operate Slew and Tele/Midcut/VFR. By default,<br />
Slew operation is performed with the right hand thumbwheel (T2) and Tele/Midcut/VFR<br />
operation with the [◄] [►] buttons on the control unit - in the swapped mode these will be<br />
the opposite way around and the LED on the control unit will be lit to indicate that the<br />
swapped mode is selected.<br />
Swapping these controls is performed via the control unit - refer to #1 below. On machines<br />
installed with pre v4.08 software the same function could also be performed via the joystick<br />
controls – for these models only refer also to #2 below.<br />
1. Press the swap button once to select swap mode – when activated the control unit will<br />
emit a single beep, the LED light will illuminate and the screen will momentarily display<br />
‘SLEW/TELE SWAP ’. Pressing the button again will deselect the function – the control<br />
unit will emit a single beep, the LED light will go out and the screen will momentarily<br />
display ‘SLEW/TELE SWAP X’.<br />
Models with pre v4.08 software only<br />
2. Press the joysticks lower frontal button (B1)<br />
once to select swap mode – when activated<br />
the control unit will emit a single beep, the<br />
LED light will illuminate and the screen will<br />
momentarily display ‘SLEW/TELE SWAP’.<br />
De-selection is with subsequent use of the<br />
same button - the control unit will emit a<br />
single beep, the LED light will go out and the<br />
screen will momentarily display ‘SLEW/TELE<br />
SWAP X’.<br />
37
Auto Reset<br />
This button is for the selection and de-selection of the Auto Reset function – pressing the<br />
button once will activate Auto Reset, the control unit will emit a single beep, the LED light will<br />
illuminate and the screen will momentarily display ‘AUTO RESET ’. Pressing the button<br />
again will deselect the function – the control unit will emit a single beep, the LED light will go<br />
out and the screen will momentarily display ‘AUTO RESET X’.<br />
38
V4 Joystick Controls - Buttons & Thumbwheels Operation<br />
NOTE: By default operation of thumbwheels T1 and T2 in<br />
conjunction with button B1 activates Head Angle Float<br />
and EDS/Lift Float respectively. These controls can, if<br />
required, be swapped over so that the thumbwheels<br />
operate the opposing functions – this procedure is<br />
performed by accessing the settings menu on the control<br />
unit via the screen and menu buttons.<br />
LH/RH Swap Shortcut; Press and hold & X on Control Unit for 3 seconds (unit will ‘bleep’ to confirm).<br />
Float Selection & De-Selection<br />
Operate thumbwheels to their furthest points (+ or -) to select or deselect float functions.<br />
Angle & Slew Operation<br />
Rotate thumbwheels in required direction.<br />
Diverter Valve Selection<br />
Diverter selection is via button B2<br />
39
ARMHEAD OPERATION – JOYSTICK CONTROLS<br />
40
TELE / MIDCUT / VFR OPERATION – JOYSTICK CONTROLS (Diverted Mode)<br />
41
V4 CONTROL UNIT – Screen Access & Menu Buttons<br />
Power on/off switch (E/Stop)<br />
Speaker (audible confirmation)<br />
Control unit emits an audible confirmation ‘beep’ when the buttons are pressed.<br />
Command Button []<br />
Command Button [X]<br />
Navigate Forward Button [>] Navigate Back Button [
V4 CONTROL UNIT – LED Screen Display & Functions<br />
IMPORTANT: Under no circumstances should a V4 Control Unit be connected to a V3 ACB (Auxiliary<br />
Control Box). Dedicated V3.5 & V4 Upgrade Kits are available from <strong>McConnel</strong> Limited – contact your<br />
local dealer or <strong>McConnel</strong> direct for available options and specific advice on this subject.<br />
Rotate the ON/OFF switch on the control unit clockwise to power up controls - unit will emit a<br />
single beep and the LED screen will light up. Note: 12 Volts at the battery is required for the<br />
unit to function correctly.<br />
1. Screen will initially display the ‘McCONNEL’ name along<br />
with the selected PTO speed and the software versions<br />
installed on the Armrest and the Control Box respectively.<br />
2. Pressing the scroll forward [►] button once will display<br />
the rotor running times screen. ‘TOT’ displays the overall<br />
total running time of the rotor which is a cumulative total<br />
and cannot be reset. ‘JOB’ is a ‘trip’ total for the current<br />
rotor running time and can be reset to zero by pressing<br />
and holding the [X] button for 3 seconds.<br />
3. Pressing either of the ‘Rotor On’ buttons will activate the<br />
‘egg timer’ icon and display the rotor on image.<br />
4. Pressing the EDS Lift float button will turn on the EDS<br />
(EDS Lift Float machines only). Then SOFT, MED or<br />
HARD will be added to the running screen.<br />
5. Pressing the tick [] button when EDS is turned on will<br />
scroll through the EDS work settings of SOFT, MED or<br />
HARD. This may also be operated via button B1 on the<br />
joystick.<br />
6. Pressing scroll forward [►] button will now display the<br />
actual Tractor PTO running speed.<br />
7. Scrolling forward [►] again displays the Power Monitor<br />
screen.<br />
Scrolling backwards [◄] will display the screens in the<br />
opposite order.<br />
43
Power Monitor<br />
When displayed the power screen will indicate to the operator the level of power being<br />
demanded by the cutting head – an ascending graphic indicates the power demand status<br />
from minimum on the left of the screen to maximum on the right.<br />
Power Status – Low Demand<br />
Power Status – High Demand<br />
When the power demand approaches the maximum limit an audible warning will alert the<br />
operator to indicate that the rotor is under excess load and at risk of ‘stalling’ – when this<br />
audible warning sounds the operator should reduce the forward tractor speed to protect the<br />
machine and regain efficient cutting power – the audible warning will cease when the power<br />
demand returns to an acceptable level.<br />
In certain cases, cutting materials of extreme density may cause an increase in the power<br />
usage to the ‘warning level’ – in these types of conditions raising the cutting head into a less<br />
dense area of the material will regain an acceptable power demand. It is advisable that work<br />
in problematic high density materials be performed in several passes, lowering the cutting<br />
head slightly on each pass until the required cut height is achieved.<br />
ADDITIONAL CONTROL & SCREEN SETTINGS<br />
Additional settings available to the operator can be found within the settings menu of the<br />
control unit and accessible via the screen and menu buttons on the control panel.<br />
Access is gained by simultaneously pressing the scroll [◄] [►] buttons on the control panel<br />
until the unit emits a ‘beep’ and the setup screen appears on the LCD - the features can then<br />
be ‘scrolled’ to (forwards or backwards) by subsequent operation of either of the scroll [◄]<br />
[►]buttons. When the required screen is reached the tick [] button should be pressed to<br />
enter the settings menu for that feature.<br />
Thumb (Thumbwheel Switching) – this allows the operator to ‘swap over’ the left and right<br />
thumbwheel functions so that they control the opposing features. In most cases this setting<br />
will be dictated by the operators’ personal preference and once chosen the operator will<br />
keep it in the selected mode.<br />
Options are ‘Normal’ or ‘Swap’ – selection is by ‘highlighting’ the required option using either<br />
of the scroll [◄] [►] buttons – the feature is then activated using the tick [] button.<br />
Pressing the [X] button exits the screen settings and returns to the normal work screen.<br />
LED (Screen Contrast) - this setting allows the operator to adjust the contrast level of the<br />
LED display – the feature affords the option to increase or decrease the contrast level to suit<br />
differing lighting conditions; this is particularly useful on dull or sunny days where reduced or<br />
increased natural light can affect screen clarity.<br />
Options are ‘Increase Contrast’ or ‘Decrease Contrast’ – selection is by ‘highlighting’ the<br />
required option using either of the scroll [◄] [►] buttons – once selected that particular<br />
option can then be adjusted in incremental steps by pressing the tick [] button the required<br />
number of times to achieve the desired contrast. Pressing the [X] button exits the screen<br />
settings and returns to the normal work screen.<br />
CAUTION: Avoid adjusting the contrast level to a state where the screen cannot be viewed as exiting<br />
the settings menu in this condition may render the LCD unusable as the ‘on screen’ prompts may no<br />
longer be visible to the user.<br />
NOTE: Some screen menus are inaccessible to the operator – these are for factory or dealer use only<br />
and are password protected to avoid inadvertent changes to specific control settings.<br />
44
TEST & FAULT FINDING SCREENS<br />
The following screens are available for testing and fault finding purposes, these are:<br />
Joystick Test Screen<br />
This screen reports the status of the CAN (Controller Area<br />
Network) signal from the joystick during its various<br />
functions.<br />
X and Y Display<br />
These report the joystick signal as it travels through its range of movements in its 2 axis –<br />
the ‘X’ axis being the ‘Lift’ up and down function and the ‘Y’ axis the ‘Reach’ in and out<br />
function.<br />
With the joystick in the central (neutral) position both ‘X’ and ‘Y’ on the screen should read 0<br />
(zero). When the joystick is moved through a specific axis the relevant readout will increase<br />
or decrease depending on the direction and distance of movement up to a maximum of<br />
+1000 in the fully forward or fully right position and -1000 in the fully back or fully left<br />
position. If the display reports a reading above the + or – 1000 figure at any point of full<br />
travel the joystick has developed a fault and should be repaired or replaced.<br />
R1 and R2 Display<br />
These report the signals from the 2 thumbwheels on the top of the joystick and are calibrated<br />
to read +1000 in the fully back position and -1000 in the fully forward position. If either of the<br />
‘R’ readings are above the + or – 1000 figure at the point of full travel the thumbwheel has<br />
developed a fault and should be repaired or replaced.<br />
B1 and B2 Display<br />
These report the status of the 2 joystick buttons and will display ‘ON’ when the button is<br />
activated or ‘OFF’ when deactivated. The readings below B1 and B2 on the screen record<br />
usage of the buttons.<br />
EDS Status Screen<br />
Although this screen is present on all v4 controls, with the<br />
exception of the voltage reading, the information it reports<br />
is only actually relevant to machines fitted with EDS.<br />
In addition to the aforementioned voltage reading the<br />
screen will report Lift Ram Pressure and Reach Position<br />
status – in each case these will display ‘OK’ when the<br />
system is working correctly. If ‘FAULT’ is displayed next to<br />
one or other feature it means a problem has been detected<br />
with that component and it should be investigated further to<br />
locate and correct the problem.<br />
NOTE: As the pressure and position features are not present on Non EDS machines by default the<br />
screen will display ‘FAULT’ next to the features on these models – this is normal and should be<br />
ignored. The voltage reading will be relevant on all models.<br />
Reach Function Screen<br />
This screen displays the status of the joystick reach function and indicates to the operator if<br />
the controls are set for correct operation of the machine to the left hand side of the tractor or<br />
to the right hand side of the tractor. The hand symbol with a displayed on it indicates the<br />
operating side that is currently active.<br />
L/H Machine Operation<br />
R/H Machine Operation<br />
45
FLAILHEAD ATTACHMENT<br />
For ease of attachment and safety this procedure is best performed on a firm level site.<br />
With the tractor parked alongside the flailhead operate the controls of the machine to<br />
position the pivot bracket of the machines head angling mechanism directly behind flailhead<br />
with the base of the hose tray (or junction bracket) parallel to the ground. Manoeuvre the<br />
flailhead backwards on its roller until the heads attachment bracket is adjacent to the<br />
machines pivot bracket. Fit the 4 attachment bolts through the brackets from the arm side - if<br />
the holes are mis-aligned carefully operate the angling ram until the holes correspond.<br />
WARNING: Ensure all persons remain at a safe distance whilst operating the angling function as the<br />
geometry of the head angling mechanism produces several pinch risk areas.<br />
With the attachment bolts correctly located through the brackets fit the self-locking nuts and<br />
tighten alternately until the brackets are drawn flush before finally tightening them to a torque<br />
setting of 203Nm (150ft.lbs).<br />
Flailhead Hose Attachment<br />
With the flailhead attached to the<br />
machine the hydraulic hoses can<br />
now be connected – refer to<br />
diagrams opposite. Upper port ‘A’ on<br />
the motor connects to junction<br />
bracket point ‘A’ on the arm and<br />
lower port ‘B’ on the motor connects<br />
to junction bracket point ‘B’ on the<br />
arm.<br />
Note: If a hose tray is already fitted to the<br />
arm it will need to be removed to allow<br />
the hoses to be connected to the junction<br />
bracket – ensure the hose tray is<br />
replaced once the hoses have been<br />
connected.<br />
46
OPERATION<br />
<strong>Operator</strong> Guard<br />
Machine Guards<br />
Before each period of work, check that all the relevant tractor and machine guards are in<br />
place and in good working condition.<br />
Small splits and abrasions on the lower edges of the flail head rubber flaps are permissible,<br />
but should one or more of these cuts or splits become fifty per cent or more of the flap height<br />
they should be replaced immediately as they will have become ineffective for debris<br />
containment.<br />
<strong>Operator</strong> Safety<br />
During operation all the tractor windows should be kept firmly closed with the exception of<br />
the rear window which may be opened only to the extent that is sufficient to allow entry of<br />
electrical or operating cables for the machine into the cab.<br />
Should the tractor not be fitted with a 'quiet' cab ear defenders must be worn at all times,<br />
failure to heed this warning may result in permanent damage to hearing.<br />
Although in normal circumstances a working machine or rotating parts should never be<br />
approached it is an additional wise precaution to avoid wearing loose or flapping clothes<br />
especially scarves and neckties whilst in close proximity to a machine.<br />
The operator should continually guard himself and others from complacency that can arise<br />
from familiarity. Never attempt to take 'short cuts', always follow the correct procedures<br />
diligently and abide by the restrictions imposed by safety considerations.<br />
REMEMBER: there is only one right way - the safe way!<br />
47
SLEW & LIFT LOCKS<br />
Slew Lock (Pin Type)<br />
The machine is fitted with a ‘pin type’ slew lock – the pin locates through the pillar into the<br />
top of the mainframe to lock the position of the arms for transport or storage.<br />
The slew function must be ‘locked’ at all times during transportation and storage of the<br />
machine and only unlocked for work.<br />
Slew Locked – always for transport & storage<br />
Slew Unlocked – only for working<br />
There are 2 holes positions available on the top of the mainframe for locking the slew; one<br />
for standard and tele arms and one for midcut arms, ensure the correct hole is selected for<br />
your particular machine – refer to illustrations below (left-hand machine shown).<br />
Midcut Arms Slew Lock Position<br />
Standard & Tele Arms Slew Lock Position<br />
Lift Ram Lock<br />
The machine is fitted with two lift ram lock<br />
taps which must always be closed during<br />
transportation and storage of the machine to<br />
prevent movement of the arms.<br />
CAUTION!<br />
▲<br />
LIFT RAM LOCK TAP<br />
Open – only for working<br />
Closed – always for transport & storage<br />
Slew and Lift Locks must be in the closed / locked position at all times during<br />
machine transportation and storage – open / unlock only for work.<br />
48
MOVING INTO TRANSPORT POSITION<br />
• Select ‘Rotor Off’ and wait for the rotor to stop<br />
turning completely.<br />
• Ensure that both ‘lift’ and ‘angle float’ functions<br />
are switched off.<br />
• Select ‘slew’ mode on the controls.<br />
• Operate ‘slew in’ function to bring the arms<br />
into position directly behind the tractor.<br />
• Operate ‘lift’ and ‘reach’ to position the as<br />
shown in the diagram opposite.<br />
• Place transport prop into the transport position<br />
Work Position<br />
Transport Position<br />
• Operate ‘reach in’ until the dipper arm contacts the<br />
transport prop.<br />
• Select ‘lift up’ and raise the arms until the tension link is<br />
300mm (12”) from the tractor cab.<br />
• Operate ‘angle’ to move the flailhead into a position<br />
where it is as compact as possible.<br />
• Close lift ram taps.<br />
• Fit slew lock pin.<br />
• Disengage the PTO shaft.<br />
• Ensure power to the control unit is switched off.<br />
See following page for additional information regarding<br />
transport positions.<br />
49
TRANSPORT POSITION FOR REAR MOUNTED MACHINES<br />
The machine is transported inline to the rear of the tractor with a minimum of 300mm (12”)<br />
clearance between the tension link and the rear cross member of the tractor cab.<br />
Transport Position with Flailhead Attached<br />
Transport Position with Flailhead Removed<br />
For transportation without a flailhead attached, the machines arms must be fully folded and<br />
the lift ram fully retracted so the mass of the arms is behind the centre line – If the lift ram<br />
was extended the weight of the arms would be in front of the centre line which would result in<br />
the balance of the machine going ‘over centre’ causing the tension link to crash into the rear<br />
cross member of the tractor’s cab.<br />
WARNING: During transport the 'SLEW’ mode must ALWAYS be selected on the controls.<br />
50
TRANSPORTING THE MACHINE<br />
Transport Height<br />
There is no fixed dimension for the transport<br />
height as this will vary for differing applications<br />
i.e. tractor size, carrying height, and degree of<br />
arm fold the particular tractor cab will permit.<br />
For the majority of installations the transport<br />
height is within the region of approximately 4.1m<br />
to 4.4m.<br />
It is advisable that once your machine has been<br />
installed on the tractor that it is folded into the<br />
transport position and your own measurement<br />
taken to ensure you have an accurate figure for<br />
the transport height.<br />
4.1m<br />
to<br />
4.4m<br />
CAUTION: Always be aware of the transport height of<br />
your machine and proceed with care when<br />
manoeuvring near building, bridges and all other<br />
overhead obstructions.<br />
Approximate transport height<br />
Transport Speed<br />
The acceptable speed of transport will vary greatly depending upon the ground conditions. In<br />
any conditions avoid driving at a speed which causes exaggerated bouncing as this will put<br />
unnecessary strain on the tractors top hitch position and increase the likelihood of the<br />
tension link coming into contact with the cab rear cross member.<br />
WARNING: During transportation of the machine the PTO must be disengaged and power to the<br />
controls switched off.<br />
MOVING FROM TRANSPORT TO WORK<br />
Reverting to the work position is basically a reversal of the previous work to transport<br />
procedure.<br />
NOTE: Always remember to release the slew and lift locking devices before attempting to move the<br />
machine from the transport position.<br />
Engaging Drive<br />
Ensure the rotor control lever/switch is in the ‘stop’ position before engaging the PTO shaft.<br />
Allow the oil to circulate for a minute or so before operating the armhead levers. Position the<br />
flailhead in a safe position, increase the engine speed to a high idle and move the rotor<br />
control lever/switch to ‘start’ – after initial ‘surging’ the rotor will run at an even speed.<br />
51
CAB PROTECTION SYSTEM<br />
The machine features an inbuilt cab<br />
protection system to safeguard the rear<br />
crossmember of the tractor cab from<br />
possible damage caused by the arms<br />
coming into contact with it during<br />
transportation or when the arms are being<br />
manoeuvred directly behind the tractor.<br />
The system consists of a shoe stop<br />
attached to the machine’s pillar and<br />
connected to the main frame by an<br />
adjustable link; the geometry of the<br />
system causes the stop to progressively<br />
rise into position behind the rocker as the<br />
arms are slewed rearwards.<br />
On initial installation of the machine the<br />
link must be adjusted to set the stop at the<br />
correct height for the particular application<br />
– once set it will not require any further<br />
adjustment unless the machine is<br />
removed and used on another tractor.<br />
In transport position the rocker must<br />
be clear of the cab protection stop by<br />
5mm minimum - NOT IN CONTACT.<br />
Minimum<br />
300mm<br />
Minimum clearance<br />
must be 5mm in the<br />
transport position.<br />
Clearance Warning Decal ►<br />
CAUTION: When operating the slew<br />
function with the machine positioned to<br />
the rear of the tractor ensure the rocker<br />
remain sufficiently clear of the stop at all<br />
times. When placing the machine into the<br />
transport position the arms should be<br />
directly in line with the tractor before<br />
finally operating ‘lift up’ and/or ‘reach in’ to<br />
position the rocker just clear of the stop -<br />
the gap should be a minimum of 5mm.<br />
In the same manner when moving out of<br />
transport ‘lift down’ and/or ‘reach out’<br />
should be the initial operation to move the<br />
rocker clear of the stop before operation<br />
of slew.<br />
Ensure rocker is moved clear of cab<br />
protection stop before slewing the arms ►<br />
52
BREAKAWAY<br />
The machine is fitted with a hydraulic breakaway device which protects the structure of the<br />
machine should an unforeseen obstacle be encountered.<br />
NOTE<br />
The breakaway function does not relieve the operator of his responsibility to drive<br />
carefully – always be alert and avoid obvious hazards before contact occurs.<br />
Breakaway may occur momentarily during normal work should an extra thick or dense patch<br />
of vegetation be encountered. In these instances tractor forward motion may be maintained<br />
with care.<br />
Where breakaway has occurred as a result of contacting a post or tree etc. the tractor must<br />
be halted and the controls of the machine utilised to manoeuvre the head away from the<br />
obstacle. Never continue forward motion to drag the head around the obstacle in<br />
breakback position.<br />
NOTE<br />
The force required to activate the breakaway system will vary dependent upon the<br />
gradient of work – It will require less force when working uphill and vice versa.<br />
On mid-cut machines the geometry of the breakaway will cause the head to initially move<br />
outwards in addition to rearwards. Therefore be aware that the breakaway action will be<br />
impeded if the outer end of the head is working against a steep bank. In this circumstance<br />
extra care must be taken during operation to avoid this occurrence.<br />
Breakaway occurs at the slew column pivot. When an obstacle is encountered continued<br />
forward motion causes the pressure in the slew ram base to rise until the relief valve setting<br />
is exceeded.<br />
With 'Auto Reset' selected:<br />
When the slew relief valve setting is exceeded oil<br />
is displaced from the slew ram into the base of the<br />
lift ram which causes the head to rise as the arm<br />
pivots backwards to clear the obstruction.<br />
Resetting of the head into the work position occurs<br />
automatically.<br />
With 'Slew' selected:<br />
When the slew relief valve setting is exceeded oil<br />
is displaced from the slew ram allowing the arm to<br />
pivot backwards horizontally and the obstacle to be<br />
cleared.<br />
Re-setting the head into the work position is<br />
carried out manually by selecting 'slew out' on the<br />
control assembly<br />
53
POWERED SLEW<br />
The slew feature allows a 100° arc of powered arm movement on the working side of the<br />
tractor; from the position at right angles to the tractor rearwards to 10° beyond the direct line<br />
astern - this feature is required to place the machine in the transport position but can also be<br />
used to sweep the arm ‘to and fro’ whilst cutting awkward areas and corners thus avoiding<br />
the need to constantly re-position the tractor. To operate in this way 'slew' must be selected<br />
on the control assembly.<br />
If breakaway occurs, the slew motion must be reversed to allow the slew breakaway<br />
relief valve to re-seat and the ram to become operable again.<br />
CAUTION:<br />
Extra care must be taken when working in 'SLEW’ mode with the reach<br />
fully in as it is possible for the flail head to hit the tractor or machine frame<br />
PARALLEL ARM GEOMETRY<br />
This feature enables the operator to adjust the 'in and out' reach of the machines arms,<br />
without the need to continuously adjust the 'lift' service in order to compensate for the<br />
change in head pivot height - as would be the case with conventional arm geometry.<br />
NOTE:<br />
The performance of this<br />
feature is at its most accurate<br />
during the mid-range of the<br />
reach travel, with some<br />
deterioration in performance<br />
being experienced when the<br />
outer extremities of reach<br />
adjustment are approached.<br />
54
EASY DRIVE SYSTEM (EDS)<br />
The Easy Drive System (EDS) is an optional extra on larger proportional machines with V4<br />
digital controls – where fitted it provides ‘hands free’ cruise control operation with automatic<br />
head and lift float at greater working speed that increase both safety and efficiency.<br />
The system comprises of sensors that measure rotational movement of the rocker pin and<br />
pressure variations in the lift ram circuit these are processed and forwarded to the hydraulic<br />
system which then regulates the optimum lift ram pressure to allow the arm and head to<br />
‘float’ over changing ground contours. With readings taken and processed every 30<br />
milliseconds the lift ram pressure is constantly and rapidly re-evaluated and adjusted.<br />
Any movement of the joystick in the lift plane will automatically de-activate EDS, on release<br />
of the joystick the system will immediately be reverted back to EDS mode - this is particularly<br />
useful feature for manoeuvring the machine around obstructions.<br />
The EDS system has 3 user settings available for differing operating conditions – these are<br />
soft, medium and hard. For machines where EDS is installed refer to the specific control<br />
section for details of operation.<br />
ANGLE FLOAT KIT (Standard Feature)<br />
Machines are fitted with Angle Float as standard – when activated the feature connects the<br />
base and gland circuits of the angle ram to allow free movement of oil in both directions thus<br />
allowing the head to automatically angle itself to match the contours of the ground.<br />
Refer to specific controls section for details of operation.<br />
NOTE: On machines with V4 proportional controls any operation of the angle float<br />
thumbwheel will override and de-activate the automatic angle float function, on release of the<br />
thumbwheel it will revert back to automatic angle float.<br />
Angle Float Off – Requires operator input to adjust flail head angle<br />
Angle Float On – Flail head automatically angles itself to match the ground contours.<br />
55
LIFT FLOAT (Optional Extra for Ground Work)<br />
Work without lift float requires far more concentration and input from the operator to quickly<br />
react and re-adjust to the ground contours often resulting in patches of higher cut material<br />
where the head is cutting too high and ‘scalping’ of the ground where it is cutting too low – in<br />
the case of the latter this can lead to increased flail wear, damage or even loss of flails.<br />
The Lift float feature is an optional extra for use during mowing work. When the function is<br />
activated the pressurised accumulator(s) work in conjunction with the valve and lift ram to<br />
take a proportion of the flailheads weight off the flail roller allowing the head to automatically<br />
follow the natural contours of the ground; this produces a cleaner more uniform cut without<br />
the need for constant operator re-adjustment. On EDS models the function has 3 user<br />
settings for differing working conditions – these are soft, medium and hard. Refer to the<br />
relevant control section for details of selecting the required setting.<br />
Operation of the lift float function is as follows: with lift float switched off, position the flailhead<br />
approximately 1m clear of the ground before switching the float function on to charge the<br />
accumulator(s) – the arms may drop at this point depending on the current level of retained<br />
pressure. Lower the flailhead into the work position, release the lift control and proceed to<br />
work. NOTE: with the exception of EDS models, occasional operation of the lift function will<br />
be required when working on downhill or uphill slopes and when reaching in or out in order to<br />
replenish the oil level within the accumulator(s) to retain optimum float capability.<br />
Without Lift Float<br />
With Lift Float<br />
- Will require constant operator input. - Automatically follows ground contours.<br />
Lift float operation when supplied as a factory fitted option is controlled from the controls unit<br />
that accompanied the machine (refer to controls section for details), but the feature is also<br />
available for a range of models as an after market kit, in which case operation will either be<br />
via an auxiliary switch on cable controlled machines, or by utilisation of the auxiliary threeposition<br />
type switch on the control unit of electric controlled machines - this will allow for<br />
selection of ‘lift float alone’ or ‘lift and angle float in unison’ if both features are fitted.<br />
Operation of the lift float control for these models will then be as specified in the main<br />
controls section.<br />
Power Connection on Cable Machines<br />
On cable controlled machines the switch supplied will need to be mounted in a convenient<br />
location in the cab. The supply cable from the poppet valve solenoid must be connected into<br />
the tractors ignition system - the brown lead is positive and the blue lead is negative.<br />
Power Connection on Electric Machines<br />
On electric controlled machines power to the unit is via the following connections:<br />
Machines with 14 core looms use connection 10 and common connection 11.<br />
Machines with 19 core looms use connection 15 and common connection 16.<br />
V4 Non-EDS proportional machines use connections LF and C.<br />
An after market Lift Float Kit (Part No. 8126351) is available for non EDS machines – refer to<br />
the following page for details of mounting location and connections.<br />
56
LIFT FLOAT KIT for non EDS machines (Part No. 8126351)<br />
The after market lift float kit is mounted to the inner side of the tank as shown in the<br />
illustration below left, a mounting plate with threaded holes is provided on the tank for this<br />
purpose. Hose and electrical connections are indicated in the illustration below right.<br />
TELESCOPIC MACHINES (Tele)<br />
Models PA6585T, PA7085T & PA8085T are equipped with telescopic dipper arms giving<br />
them additional reach capabilities. In normal working conditions the operator will pre-set tele<br />
to the desired position and the machine operated using the controls in the normal manner.<br />
Tele function mode can be used as an alternative to reach but a slower response to the<br />
commands must be expected.<br />
It should be noted that the tele position will alter the parallel motion geometry of the machine,<br />
on these models parallel motion geometry will work best at ground level when the tele arm is<br />
fully extended, and at a height of approximately 4 - 5 feet high (1.2m - 1.5m) when the tele<br />
arm is fully retracted.<br />
57
PRE-WORK PREPARATION & PRECAUTIONS<br />
IMPORTANT: Always read the book first before attempting to operate the machine –<br />
practise operating the machine, without the rotor running, in a safe open space until you are<br />
fully familiar with all controls and functions of the machine. Only begin using the machine for<br />
work when you are confident that you have mastered the controls and operation sufficient for<br />
safe use of the machine.<br />
CAUTION: Care must always be taken when working with the flailhead close in to avoid contact with the<br />
tractor.<br />
Pre-work Machine Checks<br />
Prior to use of the machine always check all bolts are tight and that the torque figures are<br />
correct for the specific locations indicated below:<br />
52 Nm<br />
Motor Bolts<br />
Roller End Capscrews<br />
203 Nm<br />
Rotor Bolts<br />
Flail Bolts<br />
Roller Bracket Bolts<br />
General Work Precautions<br />
Inspect the work area prior to operation, remove any hazardous materials and note any<br />
immovable objects - it may also be a wise precaution to mark these hazards with a visible<br />
marker than can be easily seen from the operating position in the tractor.<br />
If the type of work being undertaken makes this important precaution impractical, always<br />
maintain a high degree of alertness and restrict the tractors forward motion to a speed that<br />
allows sufficient time to stop the tractor or avoid the hazard before contact is made.<br />
General Working Practice<br />
It is the operator’s responsibility to develop safe working procedures;<br />
Always:<br />
▲ Be aware of potential hazards in the vicinity of the work area.<br />
▲ Ensure all guards are fitted correctly and in good condition.<br />
▲ Disengage PTO before stopping the engine.<br />
▲ Wait until the flail has stopped running before leaving the tractor seat.<br />
▲ Disengage the PTO, stop the engine, remove and pocket the key before making any<br />
adjustments to the machine.<br />
▲ Check frequently that all nuts and bolts are tight.<br />
▲ Keep bystanders at a safe distance.<br />
58
RUNNING UP PROCEDURE<br />
CAUTION! Before initial use of a new machine, all lubrication points must be<br />
greased and the gearbox and oil tank levels checked and where required topped up<br />
before attempting to use the machine. Refer to maintenance section for details.<br />
The procedure for starting the machine is as follows:<br />
<br />
Ensure that the rotor control valve is in ‘Stop’ position.<br />
Start tractor and engage PTO - allow the oil to circulate through the return line filter for<br />
about 5 minutes without operation of the armhead control lever.<br />
Carefully operate the armhead controls through their complete range ensuring that all<br />
movements are functioning correctly.<br />
Place the flail head at a safe attitude and move the rotor control to ‘Start’ position, after<br />
initial fluctuation, the rotor should settle to a steady speed.<br />
Increase PTO speed to approximately 650RPM and run for a further five minutes before<br />
disengaging and stopping tractor.<br />
Check the hose runs and ensure that they are free from any pinching, chaffing, straining<br />
or kinks.<br />
<br />
Check the oil level in the tank and top up as necessary.<br />
EMERGENCY STOPPING<br />
In all emergency situations machine operation and functions must be stopped immediately;<br />
Stop PTO operation using the tractor controls then immediately kill electrical power to the<br />
machine using the Off (Emergency Stop) switch on the machine’s control unit.<br />
WARNING: Auto-Reset Machines<br />
When the Auto-Reset feature is active the machines arm set is capable of<br />
unintentional movement even when the PTO is switched off and stationary.<br />
Always ensure that electrical power to the machine is switched off using the Off<br />
(Emergency Stop) switch on the machine’s control unit in emergency<br />
situations and/or when the machine is not being operated.<br />
WARNING: Cable Operated Machines<br />
In certain conditions, and/or if the Auto-Reset feature is active, the arm sets on<br />
cable operated machines possess the potential to move unintentionally, even<br />
when the PTO is switched off and stationary, if the levers were to be<br />
accidentally operated. Care must be adopted to avoid any movement of the<br />
levers when the machine is not being operated. Ensure arm sets are lowered<br />
fully to the ground when the machine is parked up or not in use.<br />
59
OPERATING SPEEDS<br />
PTO Operating Speed<br />
The correct PTO speeds for operation of machines are as follows:<br />
Gear Machines: 500 - 540 rpm (Max)<br />
Piston Machines: 800 - 830 rpm (Max)<br />
WARNING: Damage to the machine may occur if the maximum PTO speed is exceeded.<br />
Engaging Drive<br />
• Ensure the rotor control lever/switch is in the ‘stop’ position before engaging the PTO.<br />
• Allow the oil to circulate for a minute or so before operating the armhead controls.<br />
• Move the flail head into a safe working position just clear of the material to be cut.<br />
• Increase engine speed to a high idle and start the rotor – after initial ‘surging’ the rotor will<br />
run at an even speed.<br />
• Carefully lower the flail head into the work area and begin work.<br />
Tractor Forward Speed<br />
The material being cut will determine the tractor<br />
forward speed. Forward speed can be as fast as that<br />
which allows the flail head sufficient time to cut the<br />
vegetation both efficiently and neatly.<br />
If forward speed is too fast this be indicated by over<br />
frequent operation of the breakaway system, a fall off<br />
in tractor revs and a poor untidy finish to the work<br />
leaving ragged uncut tufts and poorly mulched<br />
cuttings.<br />
‘Running In’ - New Machines<br />
For the first days work with a new machine it is<br />
recommended that tractor forward speed is restricted<br />
to 3 km/hr (2 mph) maximum. This will allow machine<br />
components ‘bed in’ and allow the operator to<br />
become familiar with the controls and their response<br />
under working conditions whilst operating at a<br />
relatively slow speed. If possible, select a first days<br />
work that affords mainly light to average cutting with<br />
occasional heavy duty work – during this period<br />
check the tightness of nuts and bolts every hour,<br />
retightening as and when required.<br />
First day use - check tightness of nuts & bolts hourly ►<br />
60
HAZARDS & DANGERS<br />
Adverse Slopes<br />
When working with the flailhead high and reach<br />
fully in it is possible for the main arm balance to go<br />
over centre and take the weight off the lift ram. A<br />
restrictor in the gland circuit of the lift ram will<br />
prevent sudden unpredictable movements if this<br />
should occur - for reasons of safety this restrictor<br />
should not be removed.<br />
DANGER!<br />
NEVER REMOVE THE RESTRICTOR<br />
FROM THE LIFT RAM GLAND CIRCUIT.<br />
Never work the machine on adverse slopes with the<br />
arms positioned such that the tractor is unbalanced ►<br />
DANGER!<br />
NEVER CUT TO THE BLIND SIDE OF A HEDGE<br />
- it is impossible to see any potential hazards or dangers<br />
and the position of the flail head would allow debris to<br />
be propelled through the hedge towards the tractor and<br />
operator.<br />
DANGER!<br />
NEVER OPERATE THE MACHINE WITH<br />
THE FLAIL HEAD ROLLER REMOVED<br />
DANGER!<br />
WHEN GRASS MOWING THE ROTOR MUST ALWAYS<br />
CUT IN THE UPHILL DIRECTION WITH FRONT HOOD<br />
FITTED AND THE ROLLER POSITIONED BELOW THE<br />
CUTTING HEIGHT OF THE FLAILS<br />
61
OVERHEAD POWER LINES (OHPLs)<br />
It cannot be stressed enough the dangers involved when working in the vicinity of Overhead<br />
Power Lines (OHPLs). Some of our machines are capable of reach in excess of 8 metres<br />
(26’); they have the potential to well exceed, by possibly 3 metres (9’ 9”), the lowest legal<br />
minimum height of 5.2 metres from the ground for 11,000 and 33,000 volt power lines.<br />
Remember electrocution can occur without actually coming into contact with a power line as<br />
electricity can ‘flashover’ when machinery gets close to it.<br />
WARNING: All operators must read the following information and be aware<br />
of the risks and dangers involved when working in the vicinity of Overhead<br />
Power Lines (OHPLs).<br />
Wherever possible the safest option is always to avoid working in areas close to OHPLs.<br />
Where unavoidable, all operators must perform a risk assessment and implement a safe<br />
procedure and system of work – see following page for details.<br />
All operators should perform a risk assessment before operating the machine within 10m<br />
horizontal distance of any OHPLs.<br />
Minimum Heights for Overhead Power Lines<br />
Absolute Minimum Exclusion Zones for Specific Overhead Power Lines<br />
62
Definitions of Exclusion Zones<br />
Risk Assessment<br />
Before starting to work near OHPLs you should always assess the risks. The following points<br />
should be observed;<br />
Know the risks of contacting OHPLs and the risk of flashover.<br />
Find out the maximum height and maximum vertical reach of your machine.<br />
Find out the location and route of all Power Lines within the work area.<br />
Find out the operating voltage of all Power Lines within the work area.<br />
Contact the local Distribution Network <strong>Operator</strong> (DNO) who will be able to advise you<br />
on the operating voltage, safe minimum clearance distance for working, and<br />
additional precautions required.<br />
Never attempt to operate the machine in exclusion zones.<br />
Always work with extreme caution and plan your work ahead to avoid high risk areas.<br />
If doubt exists do not work in the area – never risk the safety of yourself or others.<br />
Emergency Action for Accidents Involving Electricity<br />
Never touch an overhead line - even if it has been brought down by machinery, or has<br />
fallen. Never assume lines are dead.<br />
When a machine is in contact with an overhead line, electrocution is possible if anyone<br />
touches both the machine and the ground. Stay in the machine and lower any raised<br />
parts in contact or drive the machine out of the lines if you can.<br />
If you need to get out to summon help or because of fire, jump out as far as you can<br />
without touching any wires or the machine - keep upright and away.<br />
Get the electricity company to disconnect the supply. Even if the line appears dead, do<br />
not touch it - automatic switching may reconnect the power.<br />
Further information and leaflets on this and other agricultural safety subjects are available on the ‘Health<br />
& Safety Executive’ website at the following address: www.hse.gov.uk/pubns/agindex.htm<br />
63
HEDGECUTTING PROCEDURE<br />
Cut the side and bottom of the field side first.<br />
This leaves the maximum thickness of hedge<br />
on the road side to prevent the possibility of<br />
any debris being thrown through the hedge into<br />
the path of oncoming vehicles.<br />
Cut the side and bottom of the road side.<br />
Top cut the hedge to the height required.<br />
64
FLAIL TYPES<br />
Grass Flails<br />
Designed specifically for general mowing activities – low power usage, ideal for cutting<br />
materials of low density.<br />
Universal Boot Flails<br />
Designed for general purpose work - suitable for mowing duties and the cutting of hedges<br />
with up to 2 years growth.<br />
Hedge Flails<br />
Double edged flail designed specifically for heavy duty hedge cutting - capable of cutting<br />
materials up to 75/80mm diameter. Can be used for mowing work where they produce a<br />
good finish but will require considerably more power and reduced forward speed when used<br />
for this purpose.<br />
NOTE: Cast flails are more suitable where the work is predominantly hedge cutting as they maintain a<br />
sharper cutting edge – forged versions possess a higher degree of durability and are therefore more<br />
suitable where the primary function is mowing work and there is increased risk of hitting foreign<br />
objects.<br />
65
Hedge Flails<br />
Double edged flail designed specifically for heavy duty hedge cutting, capable of cutting<br />
materials up to 75/80mm diameter. Can be used for mowing work where they produce a<br />
good finish but will require considerably more power when used for this purpose. The flails<br />
are fitted with rubber stops for both shaft protection and noise reduction purposes.<br />
Competition Flails<br />
Single edged flail designed specifically for heavy duty hedge and grass cutting, capable of<br />
dealing with materials up to 75/80mm diameter. When used for mowing work they produce a<br />
better finish and performance than double edged flails requiring less power and increased<br />
forward speed.<br />
Omega Flails<br />
Double edged flail for use on ‘Omega’ rotors only - designed specifically for heavy duty<br />
hedge cutting where they are capable of cutting materials up to 75/80mm diameter. Unique<br />
rotor design allows the flail to rotate 360° on its pivot protecting the flail on impact with<br />
immovable objects. Not suitable for mowing work.<br />
66
GENERAL MAINTENANCE<br />
General Lubrication<br />
The illustration below indicates the general locations of lubrication points - all points should<br />
be greased on a daily basis and always prior storage of the machine. New machines must<br />
be greased before being used.<br />
IMPORTANT: Grease new<br />
machines before first use.<br />
Grease<br />
Daily<br />
Gearbox Lubrication<br />
Check gearbox oil level on new machines prior to first use, top up if required before using the<br />
machine. Refill the gearbox after an initial 50 hours of use and thereafter at annual or 500<br />
hour intervals, whichever occurs earliest.<br />
Gearbox Capacity:<br />
0.7 Litre SAE75W90 Fully Synthetic which<br />
meets the following minimum requirements;<br />
Viscosity at 40°C, cSt, 100.0 min.<br />
Viscosity at 100°C, cSt, 17.2 min.<br />
Drainage of the gearbox for changes of<br />
oil is via the drain plug located on the<br />
base of the gearbox.<br />
For refilling or for ‘topping up’ the oil<br />
remove both plugs indicated opposite<br />
and fill gearbox via the filler plug to a<br />
point where the oil starts to run from the<br />
level plug orifice – replace plugs and<br />
tighten securely.<br />
67
SERVICE SCHEDULE<br />
Every Day<br />
<br />
Grease machine fully prior to work (and prior to storage).<br />
NOTE: New machines must be greased before initial use.<br />
Check for broken or damaged flails.<br />
Check tightness of flail nuts and bolts.<br />
Visually check for oil leaks and damaged hoses.<br />
Check all guards and safety shields are correctly fitted and undamaged.<br />
Ensure all lights are working and clean.<br />
Check oil level.<br />
Clean the cooler matrix, in dusty conditions more frequent cleaning is required.<br />
After initial 12 Hours<br />
Change return line filter element. Failure to do so will invalidate the warranty.<br />
Note; factory fitted filter elements are identified differently to replacement elements.<br />
After initial 50 Hours<br />
Change gearbox oil.<br />
Every 25 Hours<br />
Grease PTO Shaft universal joints and tubes.<br />
Every Week<br />
Check tightness of all nuts and bolts.<br />
Check gearbox oil level.<br />
Check for wear on telescopic arm pads – where applicable.<br />
Every 100 Hours<br />
Grease PTO shaft shield lubrication points.<br />
Every 500 Hours<br />
Change return line filter element.<br />
Change gearbox oil.<br />
Check condition of hydraulic oil and change if required; when changing oil new return<br />
line filter and suction strainer elements should be fitted and return line filter changed<br />
again after 12 hours of work.<br />
Annually<br />
Change tank breather.<br />
PTO Shaft Lubrication<br />
68
HYDRAULIC SYSTEM<br />
Oil Supply<br />
Check the oil level in the reservoir daily.<br />
Oil Condition & Replacement<br />
No fixed time period can be quoted for oil changes as operating conditions can vary widely<br />
but a visually inspection of the oil will often indicate its current overall state. Signs of a<br />
reduction in its condition will be apparent by changes in colour and appearance when<br />
compared to new oil. Oil in poor condition can be dark, smell rancid or burnt, or in some<br />
cases be yellow, unclear or milky in appearance indicating the presence of air or emulsified<br />
water. Moisture resulting from condensation can become entrapped in the oil causing<br />
emulsification that can block the return line filter, consequentially the filter system will be bypassed<br />
and the oil and any possible contaminants present will continue to circulate without<br />
filtration risking damage to hydraulic components. All are indications or conditions that will<br />
require replacement of the oil.<br />
Hydraulic oil is a vital component of the machine; contaminated oil is the root cause of 70%<br />
of all hydraulic system failures. Contamination can be reduced by the following;<br />
<br />
<br />
<br />
Cleaning around the reservoir cap before removal, and keeping the tank area clean.<br />
Use of clean containers when replenishing the system.<br />
Regular servicing of the filtration system.<br />
Filtration System<br />
Machines are protected by both replaceable 125 micron suction strainers and low pressure<br />
10 micron full flow return line filters – the diagram below is a ‘scaled up’ view illustrating the<br />
filtering capability built into the hydraulic system of the machine:<br />
Suction strainers<br />
The replaceable 125 micron suction strainers (Part No. 8401097) are fitted within the<br />
hydraulic tank and are ‘screw’ fitted with easy access for removal and replacement.<br />
Return Line Filter<br />
The 10 micron absolute filter elements (Part No. 8401106) should be changed after the first<br />
12 hours and thereafter at 500-hour intervals. It is important to note hours worked as if the<br />
filter becomes blocked an internal by-pass within the canister will operate and no symptoms<br />
of filter malfunction will occur to jog your memory.<br />
Tank Breather<br />
To reduce the risk of pump cavitation it is advisable to replace the 25 micron absolute tank<br />
breather (Part No. 8401050) on an annual basis under normal working conditions – for<br />
machines operating in dry dusty environments it is recommended that replacement be<br />
increased to 6 monthly.<br />
69
HYDRAULIC HOSES<br />
The condition of all hoses should be carefully checked during routine service of the machine.<br />
Hoses that have been chaffed or damaged on their outer casing should be securely wrapped<br />
with waterproof adhesive tape to stop the metal braid from rusting. Hoses that have suffered<br />
damage to the metal braid should be changed at the earliest opportunity.<br />
Hose Replacement<br />
Before changing any hoses take the time to study the existing installation as the routing has<br />
been carefully calculated to prevent hose damage during operation - always replace hoses in<br />
exactly the same location and manner. This is especially important for the flail hoses where<br />
they must be crossed, upper to lower, at the dipper and head pivots.<br />
<br />
<br />
<br />
<br />
Always replace one hose at a time to avoid the risk of wrong connections.<br />
When the hose is screwed to an additional fitting or union, use a second spanner on the<br />
union to avoid breaking both seals.<br />
Do not use jointing compound on the threads.<br />
Avoid twisting the hose. Adjust the hose line to ensure freedom from rubbing or trapping<br />
before tightening hose end connections.<br />
All Hydraulic Hoses (BSP) now fitted to <strong>McConnel</strong> Power Arm Hedge/Grass Cutters have<br />
‘soft seal’ connections on both flail and ram circuit hoses.<br />
Recommended torque settings for nut security are as follows:<br />
SIZE TORQUE SETTING O Ring Ref.<br />
1/4” BSP = 24 Nm or 18 lb.ft. 10 000 01<br />
3/8” BSP = 33 Nm or 24 lb.ft. 10 000 02<br />
1/2” BSP = 44 Nm or 35 lb.ft. 10 000 03<br />
5/8“ BSP = 58 Nm or 43 lb.ft. 10 000 04<br />
3/4“ BSP = 84 Nm or 62 lb.ft. 10 000 05<br />
1” BSP = 115 Nm or 85 lb.ft. 10 000 06<br />
For hose unions (BSP) fitted in conjunction with bonded seals the recommended torque<br />
settings are as follows:<br />
SIZE<br />
TORQUE SETTING<br />
1/4” BSP = 34 Nm or 25 lb.ft.<br />
3/8” BSP = 75 Nm or 55 lb.ft.<br />
1/2” BSP = 102 Nm or 75 lb.ft.<br />
5/8“ BSP = 122 Nm or 90 lb.ft.<br />
3/4“ BSP = 183 Nm or 135 lb.ft.<br />
1” BSP = 203 Nm or 150 lb.ft.<br />
Safety Note:<br />
Soft seal hose connections are capable of holding pressure when the nut is only ‘finger tight’.<br />
It is therefore recommended during dismantling that the hose be manually flexed to relieve<br />
any residual pressure with the retaining nut slackened prior to complete disassembly.<br />
70
TOP LINK DAMPER<br />
Machines are equipped with a rubber top link damper -<br />
this protects the tractor’s top link attachment point by<br />
absorbing the effects of sudden weight transfer when<br />
transporting the machine over rough terrain.<br />
The rubber damper should be compressed between the<br />
reaction plates to a width of approx 110mm (4¼”) and<br />
secured in place with locking nuts – check the damper<br />
width and tightness of the locking nuts on a regular basis<br />
and, re-tighten as and when required.<br />
Lubrication points are located on both sides of the front<br />
reaction plate – these should be greased regularly to<br />
reduce wear on the damper compression bolts.<br />
COVERS REMOVAL<br />
71
ELECTRICAL CONNECTIONS – Proportional Models<br />
Proportional Control Valve - Loom Installation<br />
72
AUXILIARY BOX WIRING – Proportional Models<br />
73
PTO SHAFT MAINTENANCE<br />
PTO Shaft Lubrication<br />
The PTO shaft should be lubricated on a regular basis using lithium based grease – each<br />
end of the shaft has 2 greasing points; one for lubrication of the universal joint and one for<br />
lubricating the rotating fixing ring of the shaft shield – access to the lubrication points is<br />
gained by releasing the shaft shield from its fixing ring and sliding it back along the body of<br />
the driveshaft – the procedure and lubrication frequency is illustrated below.<br />
Shaft shield fixing clasps<br />
Insert screwdrivers into the clasps<br />
Prise clasps open to release the shield<br />
Slide shield back to reveal universal joint<br />
PTO Shaft Shield<br />
Lubrication Point<br />
Universal Joint<br />
Lubrication Point<br />
Location of lubrication points<br />
Recommended lubricating frequency<br />
Slide the shaft shield back into place after lubrication ensuring the clasps relocate correctly<br />
in the fixing ring – always fit torque chains to the shields to stop them from rotating with the<br />
shaft during operation.<br />
74
TORQUE SETTINGS FOR FASTENERS<br />
The chart below lists the correct tightening torque for fasteners. This chart should be referred<br />
to when tightening or replacing bolts in order to determine the grade of bolt and the correct<br />
torque unless specific torque values are assigned in the text of the manual.<br />
Recommended torque is quoted in Foot-Pounds and Newton-Metres within this manual. The<br />
equation for conversion is 1 Nm. = 1.356 ft. lbs.<br />
TORQUE VALUES FOR IMPERIAL BOLTS<br />
Head Marking Head Marking Head Marking<br />
No Marks Three Lines Six Lines<br />
Grade Two Grade Five Grade Eight<br />
Bolt<br />
Value (Dry) Value (Dry) Value (Dry)<br />
Dia. ft.lb. Nm. ft.lb. Nm. ft.lb. Nm.<br />
1/4" 5.5 7.5 9 12.2 12.5 17.0<br />
5/16" 11 15.0 18 25.0 26 35.2<br />
3/8" 20 27.0 33 45.0 46 63.0<br />
7/16" 32 43.0 52 70.0 75 100.0<br />
1/2" 50 68.0 80 110.0 115 155.0<br />
9/16" 70 95.0 115 155.0 160 220.0<br />
5/8" 100 135.0 160 220.0 225 305.0<br />
3/4" 175 240.0 280 380.0 400 540.0<br />
7/8" 175 240.0 450 610.0 650 880.0<br />
1" 270 360.0 675 915.0 975 1325.0<br />
1-1/8" 375 510.0 850 115.0 1350 1830.0<br />
1-1/4" 530 720.0 1200 1626.0 1950 2650.0<br />
1-3/8" 700 950.0 1550 2100.0 2550 3460.0<br />
1-1/2" 930 1250.0 2100 2850.0 3350 4550.0<br />
NOTE:<br />
The values in<br />
the chart apply<br />
to fasteners as<br />
received from<br />
the supplier,<br />
dry or when<br />
lubricated with<br />
normal engine<br />
oil. They DO<br />
NOT apply if<br />
special<br />
graphited,<br />
molydisulphide<br />
greases, or<br />
other extreme<br />
pressure<br />
lubricants are<br />
used. This<br />
applies to both<br />
UNF and UNC<br />
coarse threads .<br />
TORQUE VALUES FOR METRIC BOLTS.<br />
4.8 8.8 10.9<br />
12.9<br />
Head Marking<br />
4.8<br />
Head Marking Head Marking<br />
8.8 10.9<br />
Head Marking<br />
12.9<br />
Bolt<br />
Value (Dry)<br />
Value (Dry)<br />
Value (Dry)<br />
Value (Dry)<br />
Dia. ft.lb. Nm. ft.lb. Nm. ft.lb. Nm. ft.lb. Nm.<br />
6mm 4.5 6.1 8.5 11.5 12 16.3 14.5 20.0<br />
8mm 11 14.9 20 27.1 30 40.1 35 47.5<br />
10mm 21 28.5 40 54.2 60 81.4 70 95.0<br />
12mm 37 50.2 70 95.0 105 140.0 120 160.0<br />
14mm 60 81.4 110 150.0 165 225.0 190 260.0<br />
16mm 92 125.0 175 240.0 255 350.0 300 400.0<br />
18mm 125 170.0 250 340.0 350 475.0 410 550.0<br />
20mm 180 245.0 350 475.0 500 675.0 580 790.0<br />
22mm 250 340.0 475 645.0 675 915.0 800 1090.0<br />
24mm 310 420.0 600 810.0 850 1150.0 1000 1350.0<br />
27mm 450 610.0 875 1180.0 1250 1700.0 1500 2000.0<br />
30mm 625 850.0 1200 1626.0 1700 2300.0 2000 2700.0<br />
75
<strong>McConnel</strong> Limited, Temeside Works, Ludlow, Shropshire SY8 1JL. England.<br />
Telephone: 01584 873131. Facsimile: 01584 876463. www.mcconnel.com