v4 Proportional Controls - ECON VERSION - McConnel
v4 Proportional Controls - ECON VERSION - McConnel
v4 Proportional Controls - ECON VERSION - McConnel
- No tags were found...

Create successful ePaper yourself
Turn your PDF publications into a flip-book with our unique Google optimized e-Paper software.
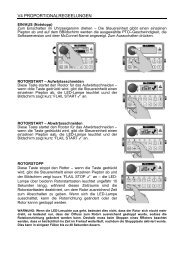
V4 JOYSTICK CONTROLS - Buttons & Thumbwheels OperationNOTE: By default operation of thumbwheels T1 and T2in conjunction with button B1 activates Head AngleFloat and EDS/Lift Float respectively. These controlscan, if required, be swapped over so that thethumbwheels operate the opposing functions – thisprocedure is performed by accessing the settingsmenu on the control unit via the screen and menubuttons.LH/RH Swap Shortcut; Press and hold & X on Control Unit for 3 seconds (unit will ‘bleep’ to confirm).FLOAT SELECTION & DE-SELECTIONOperate thumbwheels to their furthest points (+ or -) to select or deselect float functions.ANGLE & BREAKAWAY OPERATIONRotate thumbwheels in required direction.DIVERTER VALVE SELECTIONDiverter selection is via button B27
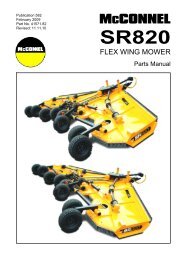
ARMHEAD OPERATION – JOYSTICK CONTROLS1 st RAM (Lift #1)Press once to activateRe-press to de-activate2 nd RAM (Lift #2)3 rd RAM (Reach)8
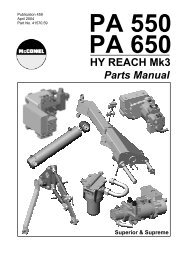
ARMHEAD OPERATION – JOYSTICK CONTROLS4 th RAM (Head Angle)5 th RAM (Breakaway)9
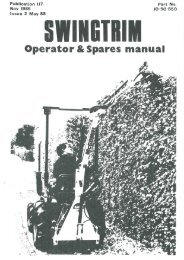
V4 CONTROL UNIT – Screen Access & Menu ButtonsPower on/off switch (E/Stop)Speaker (audible confirmation)Control unit emits an audible confirmation ‘beep’ when the buttons are pressed.Command Button []Command Button [X]Navigate Forward Button [>] Navigate Back Button [
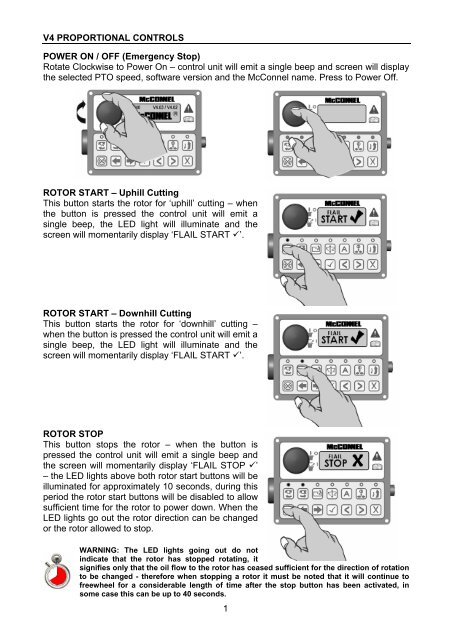
V4 CONTROL UNIT – LED Screen Display & FunctionsIMPORTANT: Under no circumstances should a V4 Control Unit be connected to a V3 ACB (AuxiliaryControl Box). Dedicated V3.5 & V4 Upgrade Kits are available from <strong>McConnel</strong> Limited – contact yourlocal dealer or <strong>McConnel</strong> direct for available options and specific advice on this subject.Rotate the ON/OFF switch on the control unit clockwise to power up controls - unit will emita single beep and the LED screen will light up. Note: 12 Volts at the battery is required forthe unit to function correctly.1. Screen will initially display the ‘<strong>McConnel</strong>’ name alongwith the selected PTO speed and the software versionsinstalled on the Armrest and the Control Boxrespectively.2. Pressing the scroll forward [►] button once will displaythe rotor running times screen. ‘TOT’ displays theoverall total running time of the rotor which is acumulative total and cannot be reset. ‘JOB’ is a ‘trip’total for the current rotor running time and can be resetto zero by pressing and holding the [X] button for 3seconds.3. Pressing either of the ‘Rotor On’ buttons will activatethe ‘egg timer’ icon and display the rotor on image.4. Pressing the EDS Lift float button will turn on the EDS(EDS Lift Float machines only). Then SOFT, MED orHARD will be added to the running screen.5. Pressing the tick [] button when EDS is turned on willscroll through the EDS work settings of SOFT, MED orHARD. This may also be operated via button B1 on thejoystick.6. Pressing scroll forward [►] button will now display theactual Tractor PTO running speed.7. Scrolling forward [►] again displays the Power Monitorscreen.Scrolling backwards [◄] will display the screens in theopposite order.11
TEST & FAULT FINDING SCREENSThe following screens are available for testing and fault finding purposes, these are:JOYSTICK TEST SCREENThis screen reports the status of the CAN (ControllerArea Network) signal from the joystick during its variousfunctions.X and Y DisplayThese report the joystick signal as it travels through its range of movements in its 2 axis –the ‘X’ axis being the ‘Lift’ up and down function and the ‘Y’ axis the ‘Reach’ in and outfunction.With the joystick in the central (neutral) position both ‘X’ and ‘Y’ on the screen should read0 (zero). When the joystick is moved through a specific axis the relevant readout willincrease or decrease depending on the direction and distance of movement up to amaximum of +1000 in the fully forward or fully right position and -1000 in the fully back orfully left position. If the display reports a reading above the + or – 1000 figure at any pointof full travel the joystick has developed a fault and should be repaired or replaced.R1 and R2 DisplayThese report the signals from the 2 thumbwheels on the top of the joystick and arecalibrated to read +1000 in the fully back position and -1000 in the fully forward position. Ifeither of the ‘R’ readings are above the + or – 1000 figure at the point of full travel thethumbwheel has developed a fault and should be repaired or replaced.B1 and B2 DisplayThese report the status of the 2 joystick buttons and will display ‘ON’ when the button isactivated or ‘OFF’ when deactivated. The readings below B1 and B2 on the screen recordusage of the buttons.EDS STATUS SCREENAlthough this screen is present on all <strong>v4</strong> controls, with theexception of the voltage reading, the information it reportsis only actually relevant to machines fitted with EDS.In addition to the aforementioned voltage reading thescreen will report Lift Ram Pressure and Reach Positionstatus – in each case these will display ‘OK’ when thesystem is working correctly. If ‘FAULT’ is displayed next toone or other feature it means a problem has beendetected with that component and it should beinvestigated further to locate and correct the problem.NOTE: As the pressure and position features are not present on Non EDS machines by default thescreen will display ‘FAULT’ next to the features on these models – this is normal and should beignored. The voltage reading will be relevant on all models.REACH FUNCTION SCREENThis screen displays the status of the joystick reach function and indicates to the operatorif the controls are set for correct operation of the machine to the left hand side of thetractor or to the right hand side of the tractor. The hand symbol with a displayed on itindicates the operating side that is currently active.L/H Machine Operation13R/H Machine Operation