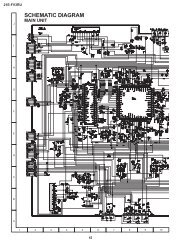
SA-VK61DGS
SA-VK61DGS
SA-VK61DGS

You also want an ePaper? Increase the reach of your titles
YUMPU automatically turns print PDFs into web optimized ePapers that Google loves.
<strong>SA</strong>-<strong>VK61DGS</strong><br />
17.2. Disassembly of Top Cabinet<br />
Step 1 Remove 3 screws each side and 5 screws at rear panel.<br />
Step 2 Lift up both sides of cabinet ass’y, push the cabinet<br />
ass’y toward the rear and remove the top cabinet.<br />
17.3. Disassembly of DVD Module (2) P.C.B.<br />
· Follow the (Step 1) - (Step 2) of Item 17.2.<br />
Step 1 Remove 4 screws.<br />
Step 2 Detach FFC boards (FP5201, FP3202, FP3203 &<br />
FP4202).<br />
Step 3 Lift up DVD Module (2) P.C.B. as shown to remove it.<br />
17.4. Disassembly for the Top Ornament Unit<br />
(The DVD changer unit can be removed after the Top<br />
Ornament Unit is removed)<br />
· Follow the (Step 1) - (Step 2) of Item 17.2.<br />
When opening the disc tray automatically (Using Power<br />
Supply)<br />
Step 1 Connect the AC power cord.<br />
Step 2 Press the power button to power up the main unit.<br />
Step 3 Press the OPEN/CLOSE button, the disc tray will be<br />
open automatically.<br />
32