SA-VK61DGS
SA-VK61DGS
SA-VK61DGS

Create successful ePaper yourself
Turn your PDF publications into a flip-book with our unique Google optimized e-Paper software.
<strong>SA</strong>-<strong>VK61DGS</strong><br />
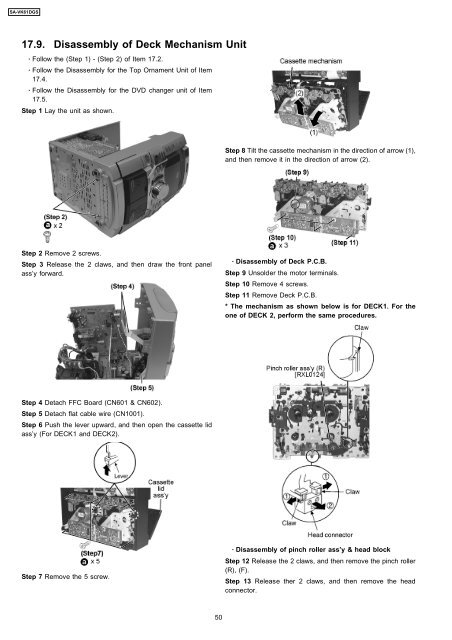
17.9. Disassembly of Deck Mechanism Unit<br />
· Follow the (Step 1) - (Step 2) of Item 17.2.<br />
· Follow the Disassembly for the Top Ornament Unit of Item<br />
17.4.<br />
· Follow the Disassembly for the DVD changer unit of Item<br />
17.5.<br />
Step 1 Lay the unit as shown.<br />
Step 8 Tilt the cassette mechanism in the direction of arrow (1),<br />
and then remove it in the direction of arrow (2).<br />
Step 2 Remove 2 screws.<br />
Step 3 Release the 2 claws, and then draw the front panel<br />
ass’y forward.<br />
· Disassembly of Deck P.C.B.<br />
Step 9 Unsolder the motor terminals.<br />
Step 10 Remove 4 screws.<br />
Step 11 Remove Deck P.C.B.<br />
* The mechanism as shown below is for DECK1. For the<br />
one of DECK 2, perform the same procedures.<br />
Step 4 Detach FFC Board (CN601 & CN602).<br />
Step 5 Detach flat cable wire (CN1001).<br />
Step 6 Push the lever upward, and then open the cassette lid<br />
ass’y (For DECK1 and DECK2).<br />
Step 7 Remove the 5 screw.<br />
· Disassembly of pinch roller ass’y & head block<br />
Step 12 Release the 2 claws, and then remove the pinch roller<br />
(R), (F).<br />
Step 13 Release ther 2 claws, and then remove the head<br />
connector.<br />
50