4.7 fuel tank (carbu - harley-davidson-sweden.se
4.7 fuel tank (carbu - harley-davidson-sweden.se
4.7 fuel tank (carbu - harley-davidson-sweden.se

Create successful ePaper yourself
Turn your PDF publications into a flip-book with our unique Google optimized e-Paper software.
HOME<br />
5. Fit free end of spring over boss on inboard side of <strong>carbu</strong>retor<br />
top, and keeping spring straight, align holes in top<br />
with tho<strong>se</strong> in flange.<br />
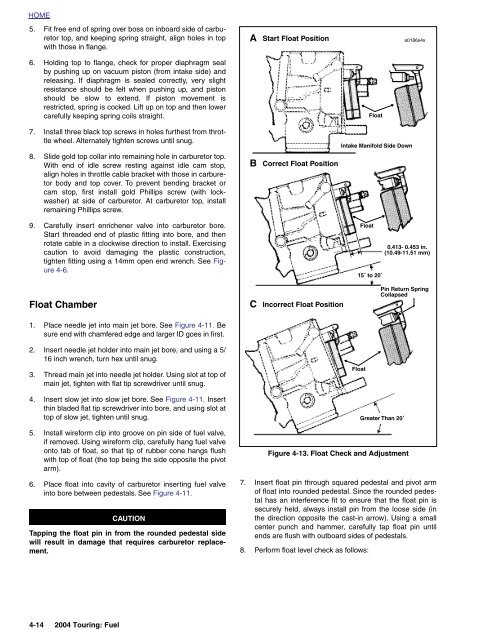
A<br />
Start Float Position<br />
a0186x4x<br />
6. Holding top to flange, check for proper diaphragm <strong>se</strong>al<br />
by pushing up on vacuum piston (from intake side) and<br />
releasing. If diaphragm is <strong>se</strong>aled correctly, very slight<br />
resistance should be felt when pushing up, and piston<br />
should be slow to extend. If piston movement is<br />
restricted, spring is cocked. Lift up on top and then lower<br />
carefully keeping spring coils straight.<br />
7. Install three black top screws in holes furthest from throttle<br />
wheel. Alternately tighten screws until snug.<br />
8. Slide gold top collar into remaining hole in <strong>carbu</strong>retor top.<br />
With end of idle screw resting against idle cam stop,<br />
align holes in throttle cable bracket with tho<strong>se</strong> in <strong>carbu</strong>retor<br />
body and top cover. To prevent bending bracket or<br />
cam stop, first install gold Phillips screw (with lockwasher)<br />
at side of <strong>carbu</strong>retor. At <strong>carbu</strong>retor top, install<br />
remaining Phillips screw.<br />
9. Carefully in<strong>se</strong>rt enrichener valve into <strong>carbu</strong>retor bore.<br />
Start threaded end of plastic fitting into bore, and then<br />
rotate cable in a clockwi<strong>se</strong> direction to install. Exercising<br />
caution to avoid damaging the plastic construction,<br />
tighten fitting using a 14mm open end wrench. See Figure<br />
4-6.<br />
B<br />
Correct Float Position<br />
Intake Manifold Side Down<br />
Float<br />
Float<br />
15˚ to 20˚<br />
0.413- 0.453 in.<br />
(10.49-11.51 mm)<br />
Float Chamber<br />
C<br />
Incorrect Float Position<br />
Pin Return Spring<br />
Collap<strong>se</strong>d<br />
1. Place needle jet into main jet bore. See Figure 4-11. Be<br />
sure end with chamfered edge and larger ID goes in first.<br />
2. In<strong>se</strong>rt needle jet holder into main jet bore, and using a 5/<br />
16 inch wrench, turn hex until snug.<br />
3. Thread main jet into needle jet holder. Using slot at top of<br />
main jet, tighten with flat tip screwdriver until snug.<br />
4. In<strong>se</strong>rt slow jet into slow jet bore. See Figure 4-11. In<strong>se</strong>rt<br />
thin bladed flat tip screwdriver into bore, and using slot at<br />
top of slow jet, tighten until snug.<br />
5. Install wireform clip into groove on pin side of <strong>fuel</strong> valve,<br />
if removed. Using wireform clip, carefully hang <strong>fuel</strong> valve<br />
onto tab of float, so that tip of rubber cone hangs flush<br />
with top of float (the top being the side opposite the pivot<br />
arm).<br />
6. Place float into cavity of <strong>carbu</strong>retor in<strong>se</strong>rting <strong>fuel</strong> valve<br />
into bore between pedestals. See Figure 4-11.<br />
CAUTION<br />
Tapping the float pin in from the rounded pedestal side<br />
will result in damage that requires <strong>carbu</strong>retor replacement.<br />
Float<br />
Figure 4-13. Float Check and Adjustment<br />
7. In<strong>se</strong>rt float pin through squared pedestal and pivot arm<br />
of float into rounded pedestal. Since the rounded pedestal<br />
has an interference fit to ensure that the float pin is<br />
<strong>se</strong>curely held, always install pin from the loo<strong>se</strong> side (in<br />
the direction opposite the cast-in arrow). Using a small<br />
center punch and hammer, carefully tap float pin until<br />
ends are flush with outboard sides of pedestals.<br />
8. Perform float level check as follows:<br />
Greater Than 20˚<br />
4-14 2004 Touring: Fuel