X50 Operation Guide - Korg
X50 Operation Guide - Korg
X50 Operation Guide - Korg
You also want an ePaper? Increase the reach of your titles
YUMPU automatically turns print PDFs into web optimized ePapers that Google loves.
7. The “Easy Installation” dialog box will appear.<br />
Click [Install].<br />
8. Depending on the version of your operating<br />
system, a confirmation dialog box may appear<br />
at this point. If so, enter your password and<br />
click [OK].<br />
9. When the installation has been successfully<br />
completed, click [Close] to exit the installer.<br />
About the <strong>X50</strong> and driver ports<br />
KEYBOARD port<br />
Applications on your computer use this port to<br />
receive MIDI messages from the <strong>X50</strong> (data from<br />
the keyboard and controllers).<br />
SOUND port<br />
Applications on your computer use this port to<br />
send MIDI messages to the <strong>X50</strong>’s internal sound<br />
generator, making it produce sound.<br />
Installing the <strong>X50</strong> Editor/Plug-In Editor<br />
To install the software in Mac OS X, proceed as follows.<br />
1. Insert the included CD-ROM into your CD-<br />
ROM drive.<br />
2. In the CD-ROM, navigate to the “<strong>X50</strong> Editor”<br />
folder, and double-click “<strong>X50</strong> Editor<br />
Installer.pkg” to start up the installer.<br />
3. Follow the on-screen instructions to install<br />
application.<br />
See “Installing the KORG USB-MIDI Driver”<br />
(☞p.30).<br />
4. When the installation has been successfully<br />
completed, click [Restart].<br />
Note: If you’re using Mac OS X, the plug-in version<br />
will also be installed in the appropriate folder.<br />
Setting up the <strong>X50</strong> Editor/Plug-In Editor<br />
For details on setting up and using the <strong>X50</strong> Editor/Plug-In<br />
Editor, see “Editor/Plug-In Editor<br />
Manual” (PDF).<br />
Connecting a computer<br />
Connecting via the <strong>X50</strong>’s USB connector,<br />
and setting-up<br />
USB connector (for connecting to computer)<br />
If you connect the <strong>X50</strong>’s USB connector to your<br />
computer, you’ll be able to send and receive note<br />
data and other performance information and<br />
sound settings between your computer and the<br />
<strong>X50</strong> as MIDI messages.<br />
Note: The USB connector of the <strong>X50</strong> is only able to<br />
transmit and receive MIDI data.<br />
Note: Use the KORG USB-MIDI Driver if you’re<br />
connecting the <strong>X50</strong> via USB to a computer that<br />
meets the requirements described in “KORG USB-<br />
MIDI Driver operating requirements.”<br />
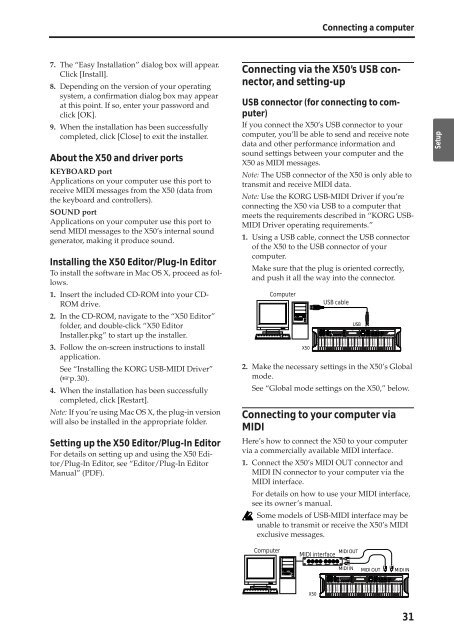
1. Using a USB cable, connect the USB connector<br />
of the <strong>X50</strong> to the USB connector of your<br />
computer.<br />
Make sure that the plug is oriented correctly,<br />
and push it all the way into the connector.<br />
2. Make the necessary settings in the <strong>X50</strong>’s Global<br />
mode.<br />
See “Global mode settings on the <strong>X50</strong>,” below.<br />
Connecting to your computer via<br />
MIDI<br />
Here’s how to connect the <strong>X50</strong> to your computer<br />
via a commercially available MIDI interface.<br />
1. Connect the <strong>X50</strong>’s MIDI OUT connector and<br />
MIDI IN connector to your computer via the<br />
MIDI interface.<br />
For details on how to use your MIDI interface,<br />
see its owner’s manual.<br />
Some models of USB-MIDI interface may be<br />
unable to transmit or receive the <strong>X50</strong>’s MIDI<br />
exclusive messages.<br />
Computer<br />
Computer<br />
<strong>X50</strong><br />
USB cable<br />
USB<br />
MIDI OUT<br />
MIDI interface<br />
<strong>X50</strong><br />
MIDI IN MIDI OUT MIDI IN<br />
31<br />
Quick Start<br />
Introduction<br />
Setup<br />
Program<br />
Combination<br />
Multi<br />
Effect<br />
Global<br />
Arpeggiator<br />
Drum Kit<br />
External control<br />
Other functions<br />
Appendices


