
Create successful ePaper yourself
Turn your PDF publications into a flip-book with our unique Google optimized e-Paper software.
Ultimate Lab Preparation Workbook<br />
For the Cisco ® CCIE Security Laboratory Exam (Version 4.1)
IPexpert’s Ultimate Preparation Workbook for the CCIE Security Lab Exam – Version 4.1<br />
Introduction<br />
IPexpert’s Preparation Workbook for the Cisco® CCIE TM Security<br />
Laboratory Exam (Version 4.1)<br />
Before We Begin<br />
Congratulations! You now possess the ULTIMATE CCIE TM Security Lab preparation resource<br />
available today! This resource was produced by senior engineers, technical instructors, and authors<br />
boasting decades of internetworking experience. Although there is no way to guarantee a 100%<br />
success rate on the CCIE TM Security Lab exam, we feel VERY confident that your chances of passing<br />
the Lab will improve dramatically after completing this industry-recognized Workbook!<br />
At the beginning of each section, you will be referred to a diagram of the network topology, as<br />
illustrated in Diagram A (located on page 4). All sections utilize the same physical topology, which can<br />
be rented at www.ProctorLabs.com.<br />
Each section has been carefully laid-out and will challenge you with a specific technology or protocol.<br />
Within each section, there is a baseline overview of the technologies covered in that particular lab<br />
scenario, as well as an “Estimated Time to Complete” each scenario. Each lab starts out with a<br />
“Configuration Tasks” section that will give you specific tasks or requirements that must be met to<br />
complete each lab scenario successfully. If you are unsure of the command or unsure how to<br />
complete a required task, a “Technical Tips and Comments” section provides a portion of the IOS<br />
commands that you will need to use to complete the task successfully. In this section, you will also find<br />
helpful technical pointers from our Instructors.<br />
In addition, for your convenience, ALL technical configurations, diagrams, and documentation are now<br />
immediately available via download in your IPexpert Member’s Area. Please visit the following web<br />
site for instructions: http://www.ipexpert.com/configs<br />
Copyright<br />
IPEXPERT’S ULTIMATE PREPARATION WORKBOOK FOR THE CISCO ® CCIE TM SECURITY<br />
LABORATORY EXAM (VERSION 4.1). Copyright © 2007 by IPexpert, Inc. All rights reserved. Printed<br />
in the United States of America. No part of this book may be used or reproduced in any manner<br />
whatsoever without written permission. Protected by End-User License Agreement on Pages 6 and 7.<br />
ISBN 978-1-934344-06-4<br />
Copyright IPexpert, Inc. (http://www.ipexpert.com) 2007. All Rights Reserved. 1
Introduction IPexpert’s Ultimate Preparation Workbook for the CCIE Security Lab Exam – Version 4.1<br />
About IPexpert’s Authors<br />
IPexpert employs only the best and brightest CCIE developers and instructors in the industry. Our<br />
celebrated team of diverse experts holds multiple CCIE certifications gained from substantial and<br />
highly relevant real-world experience. These key attributes give IPexpert the leading edge for<br />
delivering the most effective training possible.<br />
Wayne A. Lawson II<br />
CCIE #5244 (R&S), CCNA, CCDA, Nortel NCSE, MCP, MCSE (NT 4.0), MCSE +I, CNA, CNE (4.0),<br />
CNX Ethernet, Cisco Wireless LAN Design Specialist, Cisco IP Telephony Design Specialist<br />
Founder & President – IPexpert, Inc.<br />
With 15 years of networking, sales and marketing experience, Mr. Lawson possesses the technical<br />
competency, leadership and visionary talent possessed only by the most successful entrepreneurs<br />
around the globe. Wayne has served as a highly effective contributing member of five major<br />
organizations, including the United States Marine Corps (USMC), International Network Services<br />
(INS), Cisco Systems, Vertical Networks and IPexpert, Inc. He has been published on the topics of<br />
"Building Cisco Remote Access Networks" (ISBN: 1-928993-13-X) and "Configuring Cisco AVVID"<br />
(ISBN: 1-928994-14-8), and has written for various technical and entrepreneurial magazines. Mr.<br />
Lawson founded IPexpert in 2001 and continues to revolutionize the way engineers prepare for the<br />
coveted CCIE Lab certification. Wayne’s unique visionary approach to cutting-edge technologies and<br />
enterprise network solutions, coupled with a fanatical dedication to customer satisfaction, propel the<br />
engine of success at IPexpert. With a talent for revolutionizing products, services and solutions, and a<br />
drive to achieve perfection, his leadership and business ethics have molded IPexpert into the clear<br />
leader in CCIE Lab training. In addition to acting as the President and Senior Director of IPexpert, Inc.,<br />
Wayne is also preparing for his CCIE Voice Lab exam.<br />
Scott Morris<br />
Quad CCIE #4713 (R&S, ISP-Dial, Security and Service Provider), CCDP, CCSP, Cisco Cable<br />
Communications Specialist, Cisco IP Telephony Support Specialist, Cisco IP Telephony Design<br />
Specialist, CCNA (WAN Switching), MCSE (NT 4.0), Juniper Networks JNCIE (#153), RiverStone<br />
Networks RCNP, NSA/CNSS INFOSEC Professional, TIA Convergence Technology Professional<br />
(CTP), and CISSP #37445.<br />
Senior Technical Instructor and Developer – IPexpert, Inc.<br />
Boasting more than 19 years of technical training and consulting experience and a wealth of technical<br />
certifications, Scott Morris has proven himself among the elite in the technical training industry. Scott is<br />
one of the few people in the world currently holding four separate CCIE certifications, and he is<br />
actively preparing for his fifth – the CCIE Voice. Scott has an outstanding track record of success in<br />
editing, writing and reviewing training books for Cisco Press, Wylie, Sybex, Que Publishing and<br />
McGraw-Hill, and teaching CCIE lab preparation materials. He has served as a contributing author for<br />
works including Cisco Press’ Managing Cisco Network Security book (ISBN: 1578701031) - Chapters<br />
on the PIX Firewall; and Cisco Press’ CCIE Practical Studies, Vol. 2 (ISBN: 1587050722) - Chapter on<br />
Multicast. Scott has also written various articles for Packet Magazine and TCP Mag.<br />
Marvin Greenlee<br />
CCIE #12237 (Security, Service Provider, Routing and Switching), Cisco IP Communications Express<br />
Specialist, Cisco IP Telephony Express Specialist, Cisco VPN/Security Sales Specialist, CCDP,<br />
CCNP, MCSE (NT4.0,2000), Juniper Networks JNCIA-M.<br />
Sr. Technical Instructor and Developer – IPexpert, Inc.<br />
Joining IPexpert in 2007, Marvin Greenlee brings years of valuable experience in technical consulting<br />
and training. In addition to his on-the-job experience employed at Cisco, he has written, edited, and<br />
reviewed several books and training materials focused on CCIE certification topics. Mr. Greenlee has<br />
earned a favorable reputation in the CCIE Lab training community as an active participant on various<br />
message boards and email lists. Marvin is responsible for instructor-led training, self-study product<br />
development and support, with a focus on the CCIE Security track.<br />
2 Copyright IPexpert, Inc. (http://www.ipexpert.com) 2007. All Rights Reserved.
IPexpert’s Ultimate Preparation Workbook for the CCIE Security Lab Exam – Version 4.1<br />
Introduction<br />
Mark Snow<br />
CCIE #14073 (Voice, Security), CCVP, CCNP, CCDP, CSE, CQS-CIPCCES, CQS-CIPTDS, CQS-<br />
CIPTOS, CQS-CIPTSS, MCSE.<br />
Sr. Voice Technical Instructor and Developer – IPexpert, Inc.<br />
From an early age when his father, a patented inventor with Bell Labs®, first started him on Unix<br />
System V, Mark Snow’s passion for technology has not yet stopped growing. With over 12 years<br />
working professionally in the IT industry and over 7 years spent consulting internationally with a focus<br />
on Cisco IP Telephony and Security, Mark brings a wealth of knowledge to the training arena. Mark<br />
plans to begin working on his next CCIE in Storage. With IPexpert for 2 years, Mark is responsible for<br />
instructor-led training, self-study product development and support, with a focus on the CCIE Voice<br />
and Security tracks.<br />
Vik Malhi<br />
CCIE #13890 Voice, CCVP, Cisco IP Telephony Support Specialist, Cisco IP Telephony Operations<br />
Specialist, Cisco IP Telephony Design Specialist and Cisco Wireless LAN Design Specialist.<br />
Sr. Voice Technical Instructor and Developer – IPexpert, Inc.<br />
With nearly 10 years of IP Telephony training and consulting experience and a wealth of technical<br />
certifications, Vik Malhi has proven that he? one of the top Cisco voice instructors and consultants in<br />
the world! Vik was the first engineer to install CM 3.0 in Europe, Has over 6 years of AVVID consulting<br />
and implementation experience and has taught CCIE Voice Lab classes for the past several months.<br />
Vik has joined IPexpert's accredited team of experts and will be in charge of updating, supporting and<br />
teaching IPexpert's CCIE Voice-related products, services and classes.<br />
Technical Support<br />
(http://www.CertificationTalk.com)<br />
(http://www.OnlineStudyList.com)<br />
IPexpert is proud to lead the industry with multiple support options at your disposal free of charge. Our<br />
online forums (www.CertificationTalk.com) have attracted a membership of nearly 20,000 of your<br />
peers from around the world! At www.OnlineStudyList.com, you may subscribe to multiple “SPAMfree”<br />
email lists. Also, if you are an IPexpert Elite Member and need support for your IPexpert<br />
products, simply open a support ticket at www.IPexpert.com and it will be addressed promptly.<br />
Feedback<br />
Do you have a suggestion or other feedback regarding this book or other IPexpert products? At<br />
IPexpert, we look to you – our valued clients – for the real world, frontline evaluation that we believe is<br />
necessary to improve continually. Please send an email with your thoughts to feedback@ipexpert.com<br />
or call 1.866.225.8064 (international callers dial +1.810.326.1444).<br />
In addition, when you pass the CCIE TM Lab exam, we want to hear about it! Email your CCIE TM<br />
number to success@ipexpert.com and let us know how IPexpert helped you succeed. We would like<br />
to send you a gift of thanks and congratulations.<br />
Copyright IPexpert, Inc. (http://www.ipexpert.com) 2007. All Rights Reserved. 3
Introduction IPexpert’s Ultimate Preparation Workbook for the CCIE Security Lab Exam – Version 4.1<br />
Additional CCIE TM Preparation Material<br />
IPexpert, Inc. is committed to developing the most effective Cisco CCIE TM R&S, Security, Service<br />
Provider, and Voice Lab certification preparation tools available. Our team of certified networking<br />
professionals develops the most up-to-date and comprehensive materials for networking certification,<br />
including self-paced workbooks, online Cisco hardware rental, classroom training, online (distance<br />
learning) instructor-led training, audio products, and video training materials. Unlike other certificationtraining<br />
providers, we employ the most experienced and accomplished team of experts to create,<br />
maintain, and constantly update our products. At IPexpert, we are focused on making your CCIE TM<br />
Lab preparation more effective.<br />
IPexpert features a variety of CCIE TM training materials to suit your needs and learning preferences.<br />
Please review the IPexpert catalog which can be downloaded from our website at www.ipexpert.com.<br />
Diagram A | Standard Topology<br />
NOTE<br />
When you download the configurations from your IPexpert Member’s Area, please<br />
note that base configurations, backbone configurations and ALL diagrams seen in<br />
this workbook are included in the download (.zip) file. Please visit the following<br />
web site for instructions: http://www.ipexpert.com/configs.<br />
4 Copyright IPexpert, Inc. (http://www.ipexpert.com) 2007. All Rights Reserved.
IPexpert’s Ultimate Preparation Workbook for the CCIE Security Lab Exam – Version 4.1<br />
EULA<br />
IPEXPERT END-USER LICENSE AGREEMENT<br />
END USER LICENSE FOR ONE (1) PERSON ONLY<br />
IF YOU DO NOT AGREE WITH THESE TERMS AND CONDITIONS,<br />
DO NOT OPEN OR USE THE TRAINING MATERIALS.<br />
This is a legally binding agreement between you and IPEXPERT, the “Licensor,” from whom you have licensed the IPEXPERT<br />
training materials (the “Training Materials”). By using the Training Materials, you agree to be bound by the terms of this License,<br />
except to the extent these terms have been modified by a written agreement (the “Governing Agreement”) signed by you (or the<br />
party that has licensed the Training Materials for your use) and an executive officer of Licensor. If you do not agree to the<br />
License terms, the Licensor is unwilling to license the Training Materials to you. In this event, you may not use the Training<br />
Materials, and you should promptly contact the Licensor for return instructions.<br />
The Training Materials shall be used by only ONE (1) INDIVIDUAL who shall be the sole individual authorized to use the<br />
Training Materials throughout the term of this License.<br />
Copyright and Proprietary Rights<br />
The Training Materials are the property of IPEXPERT, Inc. ("IPEXPERT") and are protected by United States and International<br />
copyright laws. All copyright, trademark, and other proprietary rights in the Training Materials and in the Training Materials, text,<br />
graphics, design elements, audio, and all other materials originated by IPEXPERT at its site, in its workbooks, scenarios and<br />
courses (the "IPEXPERT Information") are reserved to IPEXPERT.<br />
The Training Materials cannot be used by or transferred to any other person. You may not rent, lease, loan, barter, sell or timeshare<br />
the Training Materials or accompanying documentation. You may not reverse engineer, decompile, or disassemble the<br />
Training Materials. You may not modify, or create derivative works based upon the Training Materials in whole or in part. You<br />
may not reproduce, store, upload, post, transmit, download or distribute in any form or by any means, electronic, mechanical,<br />
recording or otherwise any part of the Training Materials and IPEXPERT Information other than printing out or downloading<br />
portions of the text and images for your own personal, non-commercial use without the prior written permission of IPEXPERT.<br />
You shall observe copyright and other restrictions imposed by IPEXPERT. You may not use the Training Materials or<br />
IPEXPERT Information in any manner that infringes the rights of any person or entity.<br />
Exclusions of Warranties<br />
THE TRAINING MATERIALS AND DOCUMENTATION ARE PROVIDED “AS IS.” LICENSOR HEREBY DISCLAIMS ALL<br />
OTHER WARRANTIES, EXPRESS, IMPLIED, OR STATUTORY, INCLUDING WITHOUT LIMITATION, THE IMPLIED<br />
WARRANTIES OF MERCHANTABILITY AND FITNESS FOR A PARTICULAR PURPOSE. SOME STATES DO NOT ALLOW<br />
THE LIMITATION OF INCIDENTAL DAMAGES OR LIMITATIONS ON HOW LONG AN IMPLIED WARRANTY LASTS, SO THE<br />
ABOVE LIMITATIONS OR EXCLUSIONS MAY NOT APPLY TO YOU. This agreement gives you specific legal rights, and you<br />
may have other rights that vary from state to state.<br />
Choice of Law and Jurisdiction<br />
This Agreement shall be governed by and construed in accordance with the laws of the State of Michigan, without reference to<br />
any conflict of law principles. You agree that any litigation or other proceeding between you and Licensor in connection with the<br />
Training Materials shall be brought in the Michigan state or courts located in Port Huron, Michigan, and you consent to the<br />
jurisdiction of such courts to decide the matter. The parties agree that the United Nations Convention on Contracts for the<br />
International Sale of Goods shall not apply to this License. If any provision of this Agreement is held invalid, the remainder of<br />
this License shall continue in full force and effect.<br />
Limitation of Claims and Liability<br />
ANY ACTION ON ANY CLAIM AGAINST IPEXPERT MUST BE BROUGHT BY THE USER WITHIN ONE (1) YEAR<br />
FOLLOWING THE DATE THE CLAIM FIRST ACCRUED, OR SHALL BE DEEMED WAIVED. IN NO EVENT WILL THE<br />
LICENSOR’S LIABILITY UNDER, ARISING OUT OF, OR RELATING TO THIS AGREEMENT EXCEED THE AMOUNT PAID<br />
TO LICENSOR FOR THE TRAINING MATERIALS. LICENSOR SHALL NOT BE LIABLE FOR ANY SPECIAL, INCIDENTAL,<br />
INDIRECT, OR CONSEQUENTIAL DAMAGES, HOWEVER CAUSED AND ON ANY THEORY OF LIABILITY, REGARDLESS<br />
OF WHETHER LICENSOR HAS BEEN ADVISED OF THE POSSIBILITY OF SUCH DAMAGES. WITHOUT LIMITING THE<br />
FOREGOING, LICENSOR WILL NOT BE LIABLE FOR LOST PROFITS, LOSS OF DATA, OR COSTS OF COVER.<br />
Copyright IPexpert, Inc. (http://www.ipexpert.com) 2007. All Rights Reserved. 5
EULA IPexpert’s Ultimate Preparation Workbook for the CCIE Security Lab Exam – Version 4.1<br />
Entire Agreement<br />
This is the entire agreement between the parties and may not be modified except in writing signed by both parties.<br />
U.S. Government - Restricted Rights<br />
The Training Materials and accompanying documentation are “commercial computer Training Materials” and “commercial<br />
computer Training Materials documentation,” respectively, pursuant to DFAR Section 227.7202 and FAR Section 12.212, as<br />
applicable. Any use, modification, reproduction release, performance, display, or disclosure of the Training Materials and<br />
accompanying documentation by the U.S. Government shall be governed solely by the terms of this Agreement and shall be<br />
prohibited except to the extent expressly permitted by the terms of this Agreement.<br />
IF YOU DO NOT AGREE WITH THE ABOVE TERMS AND CONDITIONS, DO NOT OPEN OR USE THE TRAINING<br />
MATERIALS AND CONTACT LICENSOR FOR INSTRUCTIONS ON RETURN OF THE TRAINING MATERIALS.<br />
6 Copyright IPexpert, Inc. (http://www.ipexpert.com) 2007. All Rights Reserved.
IPexpert’s Ultimate Preparation Workbook for the CCIE Security Lab Exam – Version 4.1<br />
Table of Contents<br />
IPexpert’s Preparation Workbook for the Cisco® CCIE TM Security<br />
Laboratory Exam (4.1)<br />
Table of Contents<br />
NOTE<br />
You are encouraged to take advantage of the knowledge and support from your<br />
peers around the globe. Join www.CertificationTalk.com to participate in online<br />
forums along with nearly 20,000 other members! Subscribe to one or more email<br />
lists at www.OnlineStudyList.com to stay informed and involved with others who<br />
are working to achieve the same goals. CertificationTalk and OnlineStudyList<br />
memberships are available to you at no charge!<br />
Section 1: Access Control Lists (ACLs) and Filters for IP ............................................. Page 11<br />
o<br />
o<br />
o<br />
o<br />
o<br />
o<br />
o<br />
Named Access Lists<br />
Time-Based Access Lists<br />
Dynamic Access Lists<br />
Reflexive Access Lists<br />
Context Based Access Lists (CBAC)<br />
RFC 1918 Filtering<br />
IP Spoofing Filtering<br />
Section 2: Network Attacks and Advanced Filtering ...................................................... Page 19<br />
o<br />
o<br />
o<br />
o<br />
o<br />
Using Route Maps to Prevent Attacks<br />
Using Access-List to Filter ICMP Smurf Attacks<br />
Using Mac Address List to Filter Packets<br />
Using IP TCP Intercept Feature to Prevent Attacks<br />
Using NBAR to Block Attacks<br />
Section 3: GRE and NAT....................................................................................................Page 25<br />
o<br />
o<br />
o<br />
o<br />
o<br />
o<br />
GRE Tunneling<br />
Static Routes over GRE Tunnels<br />
Running Routing Protocols over GRE Tunnels<br />
NAT<br />
PAT<br />
Static NAT<br />
Section 4: Authentication, Authorization and Accounting (AAA) on a Router ............ Page 31<br />
o<br />
o<br />
o<br />
o<br />
o<br />
Configuring TACACS+ for AAA on a Router<br />
Configuring RADIUS for AAA on a Router<br />
Configuring Login Authentication on a Router using TACACS+ and RADIUS<br />
Configuring Local Authorization on a Router<br />
Configuring Accounting using TACACS+ and RADIUS<br />
Copyright IPexpert, Inc. (http://www.ipexpert.com) 2007. All Rights Reserved. 7
Table of Contents IPexpert’s Ultimate Preparation Workbook for the CCIE Security Lab Exam – Version 4.1<br />
Section 5: PIX Firewall ....................................................................................................... Page 37<br />
o<br />
o<br />
o<br />
o<br />
o<br />
o<br />
o<br />
o<br />
o<br />
o<br />
Basic PIX Configuration (Global, NAT, NAT 0, Static)<br />
Configuring VLAN interfaces on the PIX<br />
Translations and Connections<br />
Access Lists and Object Groups on a PIX<br />
Authentication Proxy for Standard and Non-Standard Protocols through the PIX<br />
Advanced Filtering on the PIX<br />
Routing RIP and OSPF on the PIX<br />
Running Routing Protocols through the PIX Firewalls (IGP and BGP)<br />
Remote Management of the PIX<br />
DHCP Server on the PIX<br />
Section 6: PIX Firewall / ASA ............................................................................................ Page 47<br />
o<br />
o<br />
o<br />
o<br />
o<br />
o<br />
Basic ASA Configuration<br />
Configuring interfaces on the ASA<br />
Security Contexts<br />
Transparent Firewall<br />
Failover<br />
Modular Policy Framework<br />
Section 7: IPSec.................................................................................................................. Page 51<br />
o<br />
o<br />
o<br />
Configuring a Router-to-Router IPSec Tunnel using Pre-Shared Keys<br />
Configuring a Router-to-Router IPSec Tunnel using a GRE Tunnel through the PIX<br />
Configuring a Router-to-PIX Tunnel<br />
Section 7B: DMVPN............................................................................................................ Page 57<br />
o<br />
o<br />
Configuring DMVPN<br />
Configuring EzVPN Server<br />
Section 8: VPN Concentrator ............................................................................................Page 61<br />
o<br />
o<br />
o<br />
o<br />
o<br />
o<br />
Configuring the VPN Concentrator from the CLI<br />
Enabling Routing Protocols on the Concentrator<br />
Configuring a LAN-to-LAN Tunnel from a Router to a Concentrator<br />
Configuring a Remote Access VPN using PPTP and IPSec<br />
Configuring Web VPN<br />
Configuring EZVPN between a Router and a Concentrator<br />
Section 9: Switching .......................................................................................................... Page 67<br />
o<br />
o<br />
o<br />
o<br />
o<br />
o<br />
o<br />
o<br />
Creating VTP Domains with Authentication<br />
Trunking<br />
VLANs and Port Assignment<br />
Port Security<br />
Configuring the Switch to Communicate to a VMPS Server<br />
Dot1x Authentication<br />
Filtering<br />
L3<br />
8 Copyright IPexpert, Inc. (http://www.ipexpert.com) 2007. All Rights Reserved.
IPexpert’s Ultimate Preparation Workbook for the CCIE Security Lab Exam – Version 4.1<br />
Table of Contents<br />
Section 10: IDS ................................................................................................................... Page 73<br />
o<br />
o<br />
o<br />
o<br />
o<br />
o<br />
o<br />
o<br />
Configuring IDS on a Router<br />
Configuring IDS on the PIX<br />
Configuring the IDS Sensor Appliance from the CLI<br />
Configuring the IDS Sensor Appliance from IDM<br />
Configuring IEV to Receive Alarms from the Sensor<br />
Fine Tuning Signatures on the Sensor<br />
Creating Custom Signature on the Sensor<br />
Configuring Shun on a PIX<br />
Section 10B: IPS ................................................................................................................. Page 79<br />
o<br />
o<br />
o<br />
o<br />
Configuring the IDS Sensor Appliance from the CLI<br />
Configuring the IDS Sensor Appliance from IDM<br />
Fine Tuning Signatures on the Sensor<br />
Creating Custom Signature on the Sensor<br />
Section 10C: IDS................................................................................................................. Page 83<br />
o<br />
o<br />
o<br />
o<br />
Configuring the IDS Sensor Appliance from the CLI<br />
Configuring the IDS Sensor Appliance from IDM<br />
Fine Tuning Signatures on the Sensor<br />
Creating Custom Signature on the Sensor<br />
Section 11: Router Management | IOS Services ............................................................. Page 87<br />
o<br />
o<br />
o<br />
o<br />
o<br />
Configuring Telnet Parameters<br />
Configuring DHCP Server Parameters<br />
Configuring NTP<br />
Configuring IP Accounting<br />
Configuring Core Dumps<br />
Section 12: NAC..................................................................................................................Page 93<br />
o<br />
o<br />
o<br />
o<br />
Configuring VPN Concentrator to support L3 NAC<br />
Configuring MS CA Server to hand out certificates<br />
Configuring ACS Server to Authenticate and do a Posture Assessment of Workstation Node<br />
Configuring XP Workstation with CTA to receive PA<br />
Section 13: Multiprotocol Challenge A (One Day Lab Experience)............................... Page 99<br />
Section 14: Multiprotocol Challenge B (One Day Lab Experience)............................. Page 109<br />
Section 15: Multiprotocol Challenge C (One Day Lab Experience)............................. Page 121<br />
Section 16: Multiprotocol Challenge D (One Day Lab Experience)............................. Page 131<br />
Section 17: Multiprotocol Challenge E (One Day Lab Experience)............................. Page 141<br />
Section 18: Multiprotocol Challenge F (One Day Lab Experience) ............................. Page 151<br />
Section 19: Multiprotocol Challenge G (One Day Lab Experience) ............................ Page 165<br />
Copyright IPexpert, Inc. (http://www.ipexpert.com) 2007. All Rights Reserved. 9
Table of Contents IPexpert’s Ultimate Preparation Workbook for the CCIE Security Lab Exam – Version 4.1<br />
Appendices<br />
Appendix A: Cisco® CCIE TM Lab Preparation Tips, Tricks and Hints......................... Page 179<br />
Appendix B: IPexpert’s IPv6 e-Book and Advanced IPv6 Lab Scenario .................... Page 183<br />
Appendix C: Bonus Lab | Sample V3 IPexpert eScenario............................................Page 221<br />
Technical Verification and Support<br />
To verify your router configurations please ensure that you have downloaded the<br />
latest configurations at www.IPexpert.com. Please visit the following web site for<br />
instructions: http://www.ipexpert.com/configs<br />
Support is also available in the following ways:<br />
• Email: support@ipexpert.com<br />
• Telephone (US and Canada): +1.866.225.8064<br />
• Telephone (Outside U.S. & Canada): +1.810.326.1444<br />
• Support Ticket System (Elite Members): http://www.ipexpert.com<br />
• Mailing List: http://www.OnlineStudyList.com<br />
• Online Forum: http://www.CertificationTalk.com<br />
10 Copyright IPexpert, Inc. (http://www.ipexpert.com) 2007. All Rights Reserved.
IPexpert’s Ultimate Preparation Workbook for the CCIE Security Lab Exam – Version 4.1 Section 6<br />
Section 6: PIX Firewall / ASA<br />
• Basic ASA Configuration<br />
• Configuring interfaces on the ASA<br />
• Security Contexts<br />
• Transparent Firewall<br />
• Failover<br />
• Modular Policy Framework<br />
PIX / ASA Firewall Overview<br />
This section will test your understanding and knowledge of PIX and<br />
ASA. You will configure the PIX and ASA for communication with<br />
other devices.<br />
This lab will use Routers R1, R2, R4, R5, R6, R7, the ASAs, the<br />
appropriate Catalyst switches and the PIX.<br />
Estimated Time to Complete: 2 Hours<br />
Copyright IPexpert, Inc. (http://www.ipexpert.com) 2007. All Rights Reserved. 47
Section 6 IPexpert’s Ultimate Preparation Workbook for the CCIE Security Lab Exam – Version 4.1<br />
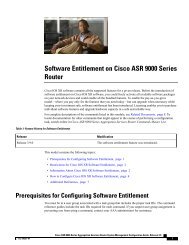
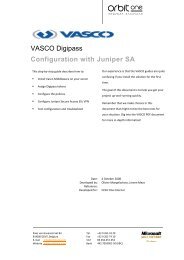
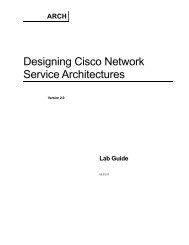
Diagram 6-A<br />
Section 6A Pre-Lab Setup<br />
• Physically connect and configure your network according to Diagram 6-A.<br />
• This lab will focus strictly on PIX you will need to pre-configure the network with the base IP<br />
Addressing and VLAN configuration. The pre-configuration files will be used to initially<br />
configure the routers. You will find these configurations in the “Initial Configurations” subfolder<br />
within each section (i.e. IPexpert CCIE Security 4.1 WB Configs Section 6 Initial<br />
Configurations Router X.txt.). To ensure you are using the most up-to-date and accurate<br />
configurations, please be sure to check the “MY CONFIGS” area of your www.IPexpert.com<br />
Member’s Area.<br />
48 Copyright IPexpert, Inc. (http://www.ipexpert.com) 2007. All Rights Reserved.
IPexpert’s Ultimate Preparation Workbook for the CCIE Security Lab Exam – Version 4.1 Section 6<br />
Section 6 Configuration Tasks<br />
NOTE<br />
As a general rule of thumb, we recommend that you read the ENTIRE lab prior to<br />
beginning.<br />
Transparent Firewall Configuration<br />
1) Configure the PIX for transparent firewall mode. Use the management IP address of<br />
56.56.56.55/24. Configure the firewall to allow telnet and SSH for management from R5’s<br />
interface connected to VLAN 5.<br />
2) R6 and R5 are preconfigured for OSPF and EIGRP adjacencies. Configure the PIX to allow<br />
these adjacencies to form. Permit only ICMP and the necessary routing protocol traffic to pass<br />
through the firewall.<br />
3) Configure an ethertype access list on both interfaces to block BPDUs. All other Ethertypes<br />
should be explicitly permitted.<br />
ASA Contexts<br />
4) Configure ASA1 for context “left”. Assign IP addresses and security levels to the interfaces as<br />
shown in the diagram. Configure the switch to allow traffic to pass on the VLANs shown, for<br />
the interface connecting to the ASA. Verify that R1 can ping R7. Do not configure any NAT or<br />
STATIC statements for context “left”.<br />
5) Configure context “left” for TCP normalization to verify TCP checksums. Do not apply the<br />
policy globally.<br />
6) Configure ASA2 for context “right”. Assign IP addresses to the interfaces as shown in the<br />
diagram. Configure the switch to allow traffic to pass on the VLANs shown, for the interface<br />
connecting to the ASA. Verify that R2 can ping R4.<br />
7) R2 and R4 are preconfigured for a BGP peering. Make sure that this peering is allowed to<br />
form without adjusting the configuration of R2 or R4.<br />
Failover<br />
8) If ASA1 fails, ASA2 should take over for context ‘left’. If ASA2 fails, ASA1 should take over for<br />
context ‘right’. Configure the failover as LAN-based, using interface Eth0/2 on both devices.<br />
Verify by shutting down the port on the switch, connected to each ASA. Failover should also<br />
be stateful. Configure the standby addresses to be .56 on the respective subnets. The inside<br />
and outside interfaces should NOT show us as “Not-Monitored” or “waiting” in the output of<br />
‘show failover’, they should show up as “Normal”.<br />
Copyright IPexpert, Inc. (http://www.ipexpert.com) 2007. All Rights Reserved. 49
Section 6 IPexpert’s Ultimate Preparation Workbook for the CCIE Security Lab Exam – Version 4.1<br />
Section 6 Technical Tips and Comments<br />
Transparent Firewall<br />
• Start by changing the firewall mode<br />
• Use an extended access list to match protocols<br />
• Use an ethertype access list to match ethertype values<br />
Contexts<br />
• Start by changing the mode<br />
• Allocate interfaces from system, use changeto to switch between contexts<br />
• QoS policy on the ASA is similar to a router. Create a class, apply properties in a policy map,<br />
and apply to the device using the service policy command.<br />
Failover<br />
• Use the failover commands to configure failover<br />
• Verify with show failover<br />
Technical Verification and Support<br />
To verify your router configurations please ensure that you have downloaded the<br />
latest configurations at www.IPexpert.com. Please visit the following web site for<br />
instructions: http://www.ipexpert.com/configs<br />
Support is also available in the following ways:<br />
• Email: support@ipexpert.com<br />
• Telephone (US and Canada): +1.866.225.8064<br />
• Telephone (Outside U.S. & Canada): +1.810.326.1444<br />
• Support Ticket System (Elite Members): http://www.ipexpert.com<br />
• Mailing List: http://www.OnlineStudyList.com<br />
• Online Forum: http://www.CertificationTalk.com<br />
50 Copyright IPexpert, Inc. (http://www.ipexpert.com) 2007. All Rights Reserved.
IPexpert’s Ultimate Preparation Workbook for the CCIE Security Lab Exam – Version 4.1 Section 13<br />
Section 13: Multiprotocol Challenge A<br />
(One Day Lab Experience)<br />
This Lab is intended to assess your readiness to attempt the actual<br />
CCIE Security lab exam. During this section you will be utilizing the<br />
entire topology and all topics listed on the CCIE Security Lab<br />
Blueprint are fair game.<br />
Estimated Time to Complete: 8 Hours<br />
MUST DO:<br />
Read the ENTIRE lab prior to beginning.<br />
Copyright IPexpert, Inc. (http://www.ipexpert.com) 2007. All Rights Reserved. 99
Section 13 IPexpert’s Ultimate Preparation Workbook for the CCIE Security Lab Exam – Version 4.1<br />
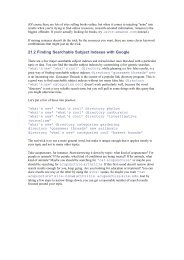
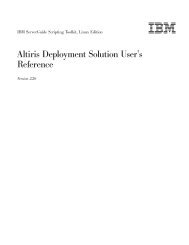
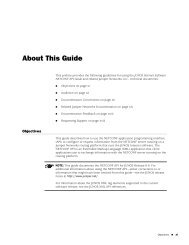
Diagram 13-A<br />
100 Copyright IPexpert, Inc. (http://www.ipexpert.com) 2007. All Rights Reserved.
IPexpert’s Ultimate Preparation Workbook for the CCIE Security Lab Exam – Version 4.1 Section 13<br />
Section 13 IP Addressing<br />
Device Port IP Address<br />
R1 F 0/0 10.2.2.1/24<br />
F 0/1 10.1.1.1/24<br />
Loopback 0 1.1.1.1 / 8<br />
R2 F 1/0 192.1.12.2/24<br />
S 0/1/0.4 192.1.24.2/24<br />
S 0/1/0.5 192.1.25.2/24<br />
S 0/1/0.6 192.1.26.2/24<br />
Loopback 0 2.2.2.2 / 8<br />
R4 F 0/0 192.1.49.4/24<br />
S 0/0/0 192.1.24.4/24<br />
Loopback 0 4.4.4.4/8<br />
R5 F 0/0 10.5.5.5/24<br />
S 0/1/0 192.1.25.5/24<br />
Loopback 0 5.5.5.5 / 8<br />
R6 F 0/0 192.1.6.6/24<br />
S 0/1/0 192.1.26.6/24<br />
Loopback 0 6.6.6.6/8<br />
R9 F 0/0 192.1.49.9/24<br />
Loopback 0 9.9.9.9/8<br />
PIX E 0 (outside) 192.1.12.10/24<br />
E 1 (inside) 10.2.2.10/24<br />
Concentrator Private 10.2.2.5/24<br />
Public 192.1.12.5/24<br />
IDS Sensor Command & Control 10.1.1.15/24<br />
BB1 Ethernet 10.1.1.200 /24<br />
BB2 Ethernet 10.5.5.100 /24<br />
BB2 Ethernet 192.1.6.25 /24<br />
Copyright IPexpert, Inc. (http://www.ipexpert.com) 2007. All Rights Reserved. 101
Section 13 IPexpert’s Ultimate Preparation Workbook for the CCIE Security Lab Exam – Version 4.1<br />
Section 13 Pre-Lab Setup<br />
• Pre-load the Initial Configurations for all the devices. You will find these configurations in<br />
the “Initial Configurations” subfolder within each section (i.e. IPexpert CCIE Security 4.1 WB<br />
Configs Section 13 Initial Configurations Router X.txt.). To ensure you are using the<br />
most up-to-date and accurate configurations, please be sure to check the “MY CONFIGS”<br />
area of your www.IPexpert.com Member’s Area.<br />
1 - Layer 2 Configuration (8 Points)<br />
1.1 - Switch Management and Traffic control (4 Points)<br />
a) Create a Management interface on the Switch1 belonging to VLAN 6. Set the IP Address as<br />
.20 on that network.<br />
b) Allow Management access to this switch from VLAN 6 only.<br />
c) Port F 0/15 on the Switch1 is experiencing Broadcast and Multicast problems. Configure it so<br />
that broadcasts do not take more than 30% of the bandwidth and Multicast does not take more<br />
than 20% of the bandwidth. For broadcast traffic, the port should forward again when it falls<br />
below 25%. For Multicast traffic, the port should forward again when it falls below 15%.<br />
d) Set the Port to Access Mode so that it does not negotiate the Port mode.<br />
e) Configure port F0/15 on Switch1 to block inbound traffic with an ethertype value of 0x1234.<br />
1.2 - Catalyst Security (4 Points)<br />
a) Add VLAN 123 to Cat1. Configure MAC address filtering and only permit MAC address from<br />
0000.1234.4321 to 0000.4321.1234 for Vlan 123 on Cat2.<br />
2 - PIX Firewall / ASA Configuration (17 Points)<br />
2.1 - PIX IP Address (3 Points)<br />
a) Assign IP Addresses to the PIX Firewall interfaces as shown in the diagram. Eth0 is the<br />
outside interface, and should have a security level of 0. Eth1 is the inside interface and should<br />
have a security level of 100.<br />
2.2 - Routing (3 Points)<br />
a) Run RIP as the routing protocol on the PIX Firewall. Configure RIP such that it only receives<br />
routes from the outside interface.<br />
b) Configure RIP such that it receives routes from the inside interface and also injects a default<br />
route from the inside interface.<br />
102 Copyright IPexpert, Inc. (http://www.ipexpert.com) 2007. All Rights Reserved.
IPexpert’s Ultimate Preparation Workbook for the CCIE Security Lab Exam – Version 4.1 Section 13<br />
2.3 - Address Translation (4 Points)<br />
a) There is a Web/SMTP/DNS Server at 10.1.1.55. Create a Static Mapping to 192.1.12.55.<br />
Allow the appropriate entries in the access-list.<br />
b) Also create a static mapping to R1. Create a Static Mapping to 192.1.12.15. Allow Telnet<br />
access to R1 from R2 only in the access-list.<br />
c) Create a Static entry for the AAA server at 10.1.1.100. Translate it to 192.1.12.100. Allow the<br />
appropriate entries in the access-list for TACACS+. Only allow R2 to communicate to the<br />
TACACS+ server. R2 should communicate to the TACACS+ server using its loopback0<br />
interface.<br />
d) Enable Nat-control on the PIX.<br />
2.4 – Transparent Firewall (2 points)<br />
a) Configure ASA1 in transparent firewall mode for the VLANs connecting R4 and R9. Make sure<br />
that the routing protocol adjacencies between R4 and R9 work after completing this step. Do<br />
not configure contexts for this step.<br />
2.5 – Contexts (2 points)<br />
a) Configure ASA2 in transparent firewall mode for the VLANs connecting R5 and BB2, using<br />
contexts. Use the context name r5tobb2. Configure interfaces eth0/0 and eth0/1 for a security<br />
level of 100.<br />
2.6 – Management / Filtering (3 points)<br />
a) Configure ASA1 to allow management access via SSH on the interface connecting to R4.<br />
b) Configure ASA1 to block ICMP type 0 traffic with a source of R9’s Ethernet interface, and a<br />
destination of R4’s Ethernet interface. ICMP type 8 traffic should not be affected.<br />
3 - IDS Configuration (16 Points)<br />
3.1 - Basic Configuration of IDS (4 Points)<br />
a) Configure the IDS Sensor’s Command and Control Interface through the CLI to allow access<br />
to the Sensor from the AAA server based on the Network Diagram.<br />
b) You would like to monitor all traffic received in the outside VLAN of the PIX.<br />
c) Configure the Switch to copy all relevant traffic to the monitoring port.<br />
3.2 - Enabling and Fine tuning the ICMP Echo Request Signature (4 Points)<br />
a) Enable the ICMP Echo Request Signature.<br />
b) Set the Alarm Severity to High.<br />
c) Verify the Alarm by pinging the outside Interface of the PIX from R2.<br />
3.3 - Creating a Custom Signature (4 Points)<br />
a) Create a custom string signature<br />
Copyright IPexpert, Inc. (http://www.ipexpert.com) 2007. All Rights Reserved. 103
Section 13 IPexpert’s Ultimate Preparation Workbook for the CCIE Security Lab Exam – Version 4.1<br />
b) Set the Alarm Severity to High.<br />
c) If sensor detects telnet traffic with a string of “admin”, it should fire this alarm.<br />
d) Enable telnet on R1 by assigning it a password of telnet. Configure a static route on R1 for the<br />
192.1.12.0 network via the PIX. It is learning this route through the concentrator.<br />
e) Verify the Alarm by connecting into R1 for Telnet and typing the work “admin” after you are<br />
connected.<br />
3.4 - IOS IDS (4 Points)<br />
a) Configure IDS on R6 for attacks from the Frame Relay clouds.<br />
b) Configure the IOS IDS with the following parameters:<br />
Send the alarm to a syslog server.<br />
Configure the Router with the Syslog Server’s Address at 192.1.12.65.<br />
c) Configure Static mappings and access-list entries on the PIX to allow this type of traffic. The<br />
syslog is at 10.1.1.65.<br />
4 - BGP Routing Configuration (4 Points)<br />
4.1 – BGP Traffic Policy (4 Points)<br />
a) Configure R2 to dynamically propagate information for static routes added to R2 with the<br />
following parameters:<br />
If a static route is added with tag 12345, the network should be advertised into BGP.<br />
The routes should be seen on R4 and R5 with a next-hop address of 192.0.0.1.<br />
Traffic destined to these networks should be dropped locally by R4 and R5, and not<br />
forwarded to R2.<br />
Routing information for these networks should not be propagated beyond AS 245. Do not<br />
use any distribute-lists or route-maps to filter outbound to BB2 or R9.<br />
5 - Access Management Configuration (9 Points)<br />
5.1 - Management of R2 using Telnet (5 Points)<br />
a) Setup R2 with AAA access.<br />
b) No Authentication or authorization should be done on the Console or AUX lines.<br />
c) Setup Authentication based on TACACS+ for the VTY lines.<br />
d) Create 2 users created on the AAA server, User 1 and User2. Both the users should have<br />
cisco as their password.<br />
e) Setup Authorization based on Local Privilege Levels defined as follows:<br />
<br />
Setup authorization for User1 such that the user can type all commands. User1 should be<br />
in Privilege Exec mode when logged in.<br />
104 Copyright IPexpert, Inc. (http://www.ipexpert.com) 2007. All Rights Reserved.
IPexpert’s Ultimate Preparation Workbook for the CCIE Security Lab Exam – Version 4.1 Section 13<br />
<br />
Setup authorization for User2 such that the user can type all commands specified in<br />
Privilege Level 7. Privilege Level 7 should allow the user to type all commands for snmpserver<br />
in global configuration mode. This privilege level should also allow the user to<br />
change the hostname of the Router.<br />
f) Configure Accounting for all commands typed by users from Telnet. You should be able to<br />
charge the users based on usage times.<br />
g) Only allow VLAN 6 to be able to telnet into R2.<br />
5.2 - HTTP Management (2 Points)<br />
a) Configure HTTP Management on R2.<br />
b) Only Users from the VLAN 49 should be able to manage this router through HTTP.<br />
c) HTTP should authenticate to the already configured AAA.<br />
5.3 – ASA Management (2 points)<br />
1. ASA1 is configured to allow SSH management. Configure ASA1 to authenticate SSH sessions<br />
via TACACS+. Create a user asamgr with password !p3xp3rt on the ACS server. Verify that<br />
you can connect to ASA1 via SSH from R2.<br />
6 - IP Services Configuration (8 Points)<br />
6.1 - Creating Core Dumps (2 Points)<br />
a) Configure R5 to send a Core Dump to a TFTP Server located at 192.1.12.100.<br />
b) Set the Dump size to 32768.<br />
c) The router should use the source address of 5.5.5.5, the Loopback address on R5.<br />
6.2 - DHCP Server (4 Points)<br />
a) Enable R4 as a DHCP Server with the following information:<br />
IP ADDRESS : 192.1.49.0/24<br />
WINS ADDRESS : 192.1.49.135<br />
DNS ADDRESS : 192.1.49.53<br />
DEFAULT GATEWAY : 192.1.49.4<br />
LEASE TIME : 6 Days<br />
b) Enable conflict logging on R4.<br />
c) Configure option 19 to tell the client should configure its IP layer for packet forwarding.<br />
d) Specifies four ping attempts by the DHCP server before ceasing any further ping attempts.<br />
e) Configure switch1 for DHCP snooping for this VLAN.<br />
Copyright IPexpert, Inc. (http://www.ipexpert.com) 2007. All Rights Reserved. 105
Section 13 IPexpert’s Ultimate Preparation Workbook for the CCIE Security Lab Exam – Version 4.1<br />
6.3 - NTP (2 Points)<br />
a) Configure R2 as the NTP clock master.<br />
b) Configure R6 to use NTP clock from R2 in a secured way. R2 should not have any NTP<br />
authentication keys configured to achieve this task.<br />
7 - Virtual Private Networks Configuration (18 Points)<br />
7.1 - Basic Concentrator Configuration (3 Points)<br />
a) Configure the IP Address of the Private Interface through the CLI.<br />
b) The Public interface should be configured from the Graphical interface.<br />
c) Make sure the PC can access the Concentrator. You are allowed a static route on the<br />
Concentrator to accomplish this.<br />
d) Configure the concentrator to send routes using RIP on the private interface.<br />
e) Configure a Default Route on the Public Interface pointing towards R2.<br />
7.2 - Setup a Site-to-Site IPSec VPN between the Concentrator and R5 (4 Points)<br />
a) Encrypt traffic between the 10.2.2.0/24 and 10.5.5.0/24 networks using the following<br />
parameters:<br />
<br />
<br />
<br />
Authentication is based on Pre-shared key of ccie.<br />
Use MD5 for the Hashing algorithm. Use defaults for the rest of the ISAKMP parameters.<br />
For IPSec, use ESP-DES for encryption and ESP-SHA-HMAC for Data Authentication in<br />
Tunnel Mode.<br />
b) You can use static routes on R5 and R1 to accomplish this.<br />
7.3 - Setup a Remote Access VPN from the Cisco Secure Client and the Concentrator (4 points)<br />
a) Use the following parameters to setup Concentrator with the following options:<br />
<br />
<br />
<br />
Assign IP Address in the range of 10.3.3.1 – 10.3.3.254. The pool should be created on<br />
the Concentrator.<br />
Set the username as VPNUser with a password of ccie1234.<br />
Create a group called Remote with a password of ccie.<br />
b) The network 10.3.3.0 should be propagated to R1 through RIP.<br />
7.4 - Setup a Site-to-Site IPSec VPN between the R2 and R6 (4 Points)<br />
a) Create the following loopbacks on R2 and R6:<br />
R2 - Int loo 10 : 192.168.102.2/24<br />
R6 - Int loo 10 : 192.168.106.6/24<br />
b) Create a GRE tunnel from R2 S 0/1/0.6 to R6 S 4/0. Route the newly created loopbacks over<br />
the tunnel using EIGRP in AS 26.<br />
106 Copyright IPexpert, Inc. (http://www.ipexpert.com) 2007. All Rights Reserved.
IPexpert’s Ultimate Preparation Workbook for the CCIE Security Lab Exam – Version 4.1 Section 13<br />
c) Encrypt traffic going on the GRE tunnel including the EIGRP traffic using the following<br />
parameters:<br />
<br />
<br />
<br />
Authentication is based on Pre-shared key of ccie.<br />
Use MD5 for the Hashing algorithm and Group 2 for the Diffie-Hellman key exchange. Use<br />
defaults for the rest of the parameters.<br />
For IPSec, use ESP-DES for encryption and ESP-MD5-HMAC for Authentication in<br />
Transport Mode.<br />
8 - IOS Firewall Configuration (8 Points)<br />
8.1 - Cisco IOS Firewall (4 Points)<br />
a) On R4, inspect all tcp, udp and icmp traffic from the Ethernet segment going towards the<br />
Frame networks.<br />
b) Only allow relevant traffic coming in.<br />
c) ACL should be set to inbound on the Serial interface.<br />
8.2 - Cisco IOS Firewall tuning (2 Points)<br />
a) Set the IOS Firewall such that it blocks half-open connections if they exceed 1000 and stop<br />
deleting the connections if the reach 800.<br />
b) Also set it for a one-minute high.<br />
c) Set the TCP idle time to 30 Minutes.<br />
8.3 - Cisco IOS Firewall on R4 (2 points)<br />
a) Set the global UDP idle timeout to 110 seconds.<br />
b) Changes the max-incomplete host number to 32 half-open sessions, and changes the blocktime<br />
timeout to 1 minute.<br />
c) Turn on an audit trail messages which will be displayed on the console after each CBAC<br />
session closes.<br />
d) Globally specify the TCP session will still be managed after the firewall detects a FINexchange<br />
to be 15 seconds for all TCP sessions.<br />
9 - Advanced Security and Attacks Configuration (12 Points)<br />
9.1 - Filtering Java and ActiveX applets (2 Points)<br />
a) Setup the PIX to block the downloading of Java and ActiveX applets from anywhere.<br />
9.2 - Allow Remote Management of the PIX (2 Points)<br />
a) Setup the PIX firewall so that the PC at 10.1.1.100 can telnet into the PIX for remote<br />
management. Change the default Telnet password to ccie.<br />
Copyright IPexpert, Inc. (http://www.ipexpert.com) 2007. All Rights Reserved. 107
Section 13 IPexpert’s Ultimate Preparation Workbook for the CCIE Security Lab Exam – Version 4.1<br />
9.3 - Time-Based Access List (2 Points)<br />
a) You do not want users on R6 Ethernet Network access a special application that uses TCP<br />
port 25000, during the Weekdays between 9:00 AM to 4:00 PM.<br />
b) It is OK for them to use the application at other times.<br />
9.4 - Time-Based Access List (2 Points)<br />
a) You do not want users on R6 Ethernet Network to use a customized application that uses<br />
UDP port 20000, on the Weekend between 10:00 AM to 3:00 PM.<br />
b) It is OK for them to use the application at other times.<br />
9.5 - Disable Unnecessary Services (2 Points)<br />
a) Disable the DHCP Service on R6.<br />
b) Verify that it is disabled by typing Show ip socket output.<br />
9.6 - Spoofing (2 Points)<br />
a) Remove problems caused by the introduction of malformed or forged (spoofed) IP source<br />
addresses into a network by discarding IP packets that lack a verifiable IP source address in<br />
R2's F1/0. Only packets with a source address of 10.5.5.100 arriving at interface<br />
FastEthernet0/0 are verified and dropped if needed.<br />
Technical Verification and Support<br />
To verify your router configurations please ensure that you have downloaded the<br />
latest configurations at www.IPexpert.com. Please visit the following web site for<br />
instructions: http://www.ipexpert.com/configs<br />
Support is also available in the following ways:<br />
• Email: support@ipexpert.com<br />
• Telephone (US and Canada): +1.866.225.8064<br />
• Telephone (Outside U.S. & Canada): +1.810.326.1444<br />
• Support Ticket System (Elite Members): http://www.ipexpert.com<br />
• Mailing List: http://www.OnlineStudyList.com<br />
• Online Forum: http://www.CertificationTalk.com<br />
108 Copyright IPexpert, Inc. (http://www.ipexpert.com) 2007. All Rights Reserved.
CCIE ® Security Proctor Guide<br />
A companion to IPexpert’s Ultimate Lab Preparation Workbook (Version 4.1)
IPexpert’s CCIE Security Proctor Guide – Version 4.1<br />
Introduction<br />
IPexpert’s CCIE Security Proctor Guide (Version 4.1)<br />
(To be used in conjunction with IPexpert’s Ultimate Preparation Workbook for<br />
the Cisco® CCIE TM Security Laboratory Exam, Version 4.1)<br />
Before We Begin<br />
This guide was created to provide you with not only a hand-holding walk-through, but also to provide<br />
you with a “Proctor Like” experience. Used in conjunction with our CCIE Security Lab Preparation<br />
Workbook (Version 4.1), you’re guaranteed a real self-paced learning experienced like no other!<br />
Technical Support<br />
(http://www.CertificationTalk.com)<br />
(http://www.OnlineStudyList.com)<br />
IPexpert is proud to lead the industry with multiple support options at your disposal free of charge. Our<br />
online forums (www.CertificationTalk.com) have attracted a membership of nearly 20,000 of your<br />
peers from around the world! At www.OnlineStudyList.com, you may subscribe to multiple “SPAMfree”<br />
email lists. Also, if you are an IPexpert Elite Member and need support for your IPexpert<br />
products, simply open a support ticket at www.IPexpert.com and it will be addressed promptly.<br />
Copyright<br />
IPEXPERT’S CCIE TM SECURITY PROCTOR GUIDE (VERSION 4.1). Copyright © 2007 by IPexpert,<br />
Inc. All rights reserved. Printed in the United States of America. No part of this book may be used or<br />
reproduced in any manner whatsoever without written permission. Protected by End-User License<br />
Agreement on Pages 5 and 6.<br />
ISBN 978-1-934344-07-1<br />
Copyright IPexpert, Inc. (http://www.ipexpert.com) 2007. All Rights Reserved. 1
Introduction IPexpert’s CCIE Security Proctor Guide – Version 4.1<br />
About IPexpert’s Authors<br />
IPexpert employs only the best and brightest CCIE developers and instructors in the industry. Our<br />
celebrated team of diverse experts holds multiple CCIE certifications gained from substantial and<br />
highly relevant real-world experience. These key attributes give IPexpert the leading edge for<br />
delivering the most effective training possible.<br />
Wayne A. Lawson II<br />
CCIE #5244 (R&S), CCNA, CCDA, Nortel NCSE, MCP, MCSE (NT 4.0), MCSE +I, CNA, CNE (4.0),<br />
CNX Ethernet, Cisco Wireless LAN Design Specialist, Cisco IP Telephony Design Specialist<br />
Founder & President – IPexpert, Inc.<br />
With 15 years of networking, sales and marketing experience, Mr. Lawson possesses the technical<br />
competency, leadership and visionary talent possessed only by the most successful entrepreneurs<br />
around the globe. Wayne has served as a highly effective contributing member of five major<br />
organizations, including the United States Marine Corps (USMC), International Network Services<br />
(INS), Cisco Systems, Vertical Networks and IPexpert, Inc. He has been published on the topics of<br />
"Building Cisco Remote Access Networks" (ISBN: 1-928993-13-X) and "Configuring Cisco AVVID"<br />
(ISBN: 1-928994-14-8), and has written for various technical and entrepreneurial magazines. Mr.<br />
Lawson founded IPexpert in 2001 and continues to revolutionize the way engineers prepare for the<br />
coveted CCIE Lab certification. Wayne’s unique visionary approach to cutting-edge technologies and<br />
enterprise network solutions, coupled with a fanatical dedication to customer satisfaction, propel the<br />
engine of success at IPexpert. With a talent for revolutionizing products, services and solutions, and a<br />
drive to achieve perfection, his leadership and business ethics have molded IPexpert into the clear<br />
leader in CCIE Lab training. In addition to acting as the President and Senior Director of IPexpert, Inc.,<br />
Wayne is also preparing for his CCIE Voice Lab exam.<br />
Scott Morris<br />
Quad CCIE #4713 (R&S, ISP-Dial, Security and Service Provider), CCDP, CCSP, Cisco Cable<br />
Communications Specialist, Cisco IP Telephony Support Specialist, Cisco IP Telephony Design<br />
Specialist, CCNA (WAN Switching), MCSE (NT 4.0), Juniper Networks JNCIE (#153) and JCNIS,<br />
RiverStone Networks RCNP, NSA/CNSS INFOSEC Professional, TIA Convergence Technology<br />
Professional (CTP), and CISSP #37445.<br />
Senior Technical Instructor and Developer – IPexpert, Inc.<br />
Boasting more than 18 years of technical training and consulting experience and a wealth of technical<br />
certifications, Scott Morris has proven himself among the elite in the technical training industry. Scott is<br />
one of the few people in the world currently holding four separate CCIE certifications, and he is<br />
actively preparing for his fifth – the CCIE Voice. Scott has an outstanding track record of success in<br />
editing, writing and reviewing training books for Cisco Press, Wylie, Sybex, Que Publishing and<br />
McGraw-Hill, and teaching CCIE lab preparation materials. He has served as a contributing author for<br />
works including Cisco Press’ Managing Cisco Network Security book (ISBN: 1578701031) - Chapters<br />
on the PIX Firewall; and Cisco Press’ CCIE Practical Studies, Vol. 2 (ISBN: 1587050722) - Chapter on<br />
Multicast. Scott has also written various articles for Packet Magazine and TCP Mag.<br />
Marvin Greenlee<br />
CCIE #12237 (Security, Service Provider, Routing and Switching), Cisco IP Communications Express<br />
Specialist, Cisco IP Telephony Express Specialist, Cisco VPN/Security Sales Specialist, CCDP,<br />
CCNP, MCSE (NT4.0,2000), Juniper Networks JNCIA-M.<br />
Sr. Technical Instructor and Developer – IPexpert, Inc.<br />
Joining IPexpert in 2007, Marvin Greenlee brings years of valuable experience in technical consulting<br />
and training. In addition to his on-the-job experience employed at Cisco, he has written, edited, and<br />
reviewed several books and training materials focused on CCIE certification topics. Mr. Greenlee has<br />
earned a favorable reputation in the CCIE Lab training community as an active participant on various<br />
message boards and email lists. Marvin is responsible for instructor-led training, self-study product<br />
development and support, with a focus on the CCIE Security track.<br />
2 Copyright IPexpert, Inc. (http://www.ipexpert.com) 2007. All Rights Reserved.
IPexpert’s CCIE Security Proctor Guide – Version 4.1<br />
Introduction<br />
Mark Snow<br />
CCIE #14073 (Voice, Security), CCVP, CCNP, CCDP, CSE, CQS-CIPCCES, CQS-CIPTDS, CQS-<br />
CIPTOS, CQS-CIPTSS, MCSE.<br />
Sr. Voice Technical Instructor and Developer – IPexpert, Inc.<br />
From an early age when his father, a patented inventor with Bell Labs®, first started him on Unix<br />
System V, Mark Snow’s passion for technology has not yet stopped growing. With over 12 years<br />
working professionally in the IT industry and over 7 years spent consulting internationally with a focus<br />
on Cisco IP Telephony and Security, Mark brings a wealth of knowledge to the training arena. Mark<br />
plans to begin working on his next CCIE in Storage. With IPexpert for 2 years, Mark is responsible for<br />
instructor-led training, self-study product development and support, with a focus on the CCIE Voice<br />
and Security tracks.<br />
Vik Malhi<br />
CCIE #13890 Voice, CCVP, Cisco IP Telephony Support Specialist, Cisco IP Telephony Operations<br />
Specialist, Cisco IP Telephony Design Specialist and Cisco Wireless LAN Design Specialist.<br />
Sr. Voice Technical Instructor and Developer – IPexpert, Inc.<br />
With nearly 10 years of IP Telephony training and consulting experience and a wealth of technical<br />
certifications, Vik Malhi has proven that he? one of the top Cisco voice instructors and consultants in<br />
the world! Vik was the first engineer to install CM 3.0 in Europe, Has over 6 years of AVVID consulting<br />
and implementation experience and has taught CCIE Voice Lab classes for the past several months.<br />
Vik has joined IPexpert's accredited team of experts and will be in charge of updating, supporting and<br />
teaching IPexpert's CCIE Voice-related products, services and classes.<br />
Feedback<br />
Do you have a suggestion or other feedback regarding this book or other IPexpert products? At<br />
IPexpert, we look to you – our valued clients – for the real world, frontline evaluation that we believe is<br />
necessary to improve continually. Please send an email with your thoughts to feedback@ipexpert.com<br />
or call 1.866.225.8064 (international callers dial +1.810.326.1444).<br />
In addition, when you pass the CCIE TM Lab exam, we want to hear about it! Email your CCIE TM<br />
number to success@ipexpert.com and let us know how IPexpert helped you succeed. We would like<br />
to send you a gift of thanks and congratulations.<br />
Additional CCIE TM Preparation Material<br />
IPexpert, Inc. is committed to developing the most effective Cisco CCIE TM R&S, Security, Service<br />
Provider, and Voice Lab certification preparation tools available. Our team of certified networking<br />
professionals develops the most up-to-date and comprehensive materials for networking certification,<br />
including self-paced workbooks, online Cisco hardware rental, classroom training, online (distance<br />
learning) instructor-led training, audio products, and video training materials. Unlike other certificationtraining<br />
providers, we employ the most experienced and accomplished team of experts to create,<br />
maintain, and constantly update our products. At IPexpert, we are focused on making your CCIE TM<br />
Lab preparation more effective.<br />
IPexpert features a variety of CCIE TM training materials to suit your needs and learning preferences.<br />
Please review the catalog that has been incorporated into this book for additional products that are<br />
available to you!<br />
Copyright IPexpert, Inc. (http://www.ipexpert.com) 2007. All Rights Reserved. 3
Introduction IPexpert’s CCIE Security Proctor Guide – Version 4.1<br />
Command Syntax<br />
Command syntax in this book confirms to the following conventions:<br />
Technical Notes:<br />
NOTE:<br />
Please reference your R&S Workbook for all diagrams and tables.<br />
R&S Workbook Tasks:<br />
Task 1.1<br />
Technical tasks taken from the R&S Workbook will be displayed in this same font (Arial). The text will<br />
hug the left column and be normal (not bold, italicized or underlined). The task will follow a Bold<br />
heading which will display the Lab number–dot-Task number (i.e. Lab 3 Task 7 = Task 3.7)<br />
Notes from the Instructor / Proctor:<br />
<br />
Notes from the Instructor / Proctor will be displayed in the following font (Arial) and be<br />
bold. There will also be an arrow pointing to the text as displayed within this<br />
statement.<br />
Commands:<br />
R4(config)#command that you need to type will be displayed as follows<br />
or<br />
R2:<br />
int fa1/0<br />
no switchport<br />
ip address 150.50.17.2 255.255.255.0<br />
Router Output / Output Notes:<br />
Important command output will be displayed as such Notes regarding the<br />
command or router output will be displayed as such<br />
Standard Router or Switch Prompt:<br />
Cat3550-1(config)#<br />
4 Copyright IPexpert, Inc. (http://www.ipexpert.com) 2007. All Rights Reserved.
IPexpert’s CCIE Security Proctor Guide – Version 4.1<br />
EULA<br />
IPEXPERT END-USER LICENSE AGREEMENT<br />
END USER LICENSE FOR ONE (1) PERSON ONLY<br />
IF YOU DO NOT AGREE WITH THESE TERMS AND CONDITIONS,<br />
DO NOT OPEN OR USE THE TRAINING MATERIALS.<br />
This is a legally binding agreement between you and IPEXPERT, the “Licensor,” from whom you have licensed the IPEXPERT<br />
training materials (the “Training Materials”). By using the Training Materials, you agree to be bound by the terms of this License,<br />
except to the extent these terms have been modified by a written agreement (the “Governing Agreement”) signed by you (or the<br />
party that has licensed the Training Materials for your use) and an executive officer of Licensor. If you do not agree to the<br />
License terms, the Licensor is unwilling to license the Training Materials to you. In this event, you may not use the Training<br />
Materials, and you should promptly contact the Licensor for return instructions.<br />
The Training Materials shall be used by only ONE (1) INDIVIDUAL who shall be the sole individual authorized to use the<br />
Training Materials throughout the term of this License.<br />
Copyright and Proprietary Rights<br />
The Training Materials are the property of IPEXPERT, Inc. ("IPEXPERT") and are protected by United States and International<br />
copyright laws. All copyright, trademark, and other proprietary rights in the Training Materials and in the Training Materials, text,<br />
graphics, design elements, audio, and all other materials originated by IPEXPERT at its site, in its workbooks, scenarios and<br />
courses (the "IPEXPERT Information") are reserved to IPEXPERT.<br />
The Training Materials cannot be used by or transferred to any other person. You may not rent, lease, loan, barter, sell or timeshare<br />
the Training Materials or accompanying documentation. You may not reverse engineer, decompile, or disassemble the<br />
Training Materials. You may not modify, or create derivative works based upon the Training Materials in whole or in part. You<br />
may not reproduce, store, upload, post, transmit, download or distribute in any form or by any means, electronic, mechanical,<br />
recording or otherwise any part of the Training Materials and IPEXPERT Information other than printing out or downloading<br />
portions of the text and images for your own personal, non-commercial use without the prior written permission of IPEXPERT.<br />
You shall observe copyright and other restrictions imposed by IPEXPERT. You may not use the Training Materials or<br />
IPEXPERT Information in any manner that infringes the rights of any person or entity.<br />
Exclusions of Warranties<br />
THE TRAINING MATERIALS AND DOCUMENTATION ARE PROVIDED “AS IS.” LICENSOR HEREBY DISCLAIMS ALL<br />
OTHER WARRANTIES, EXPRESS, IMPLIED, OR STATUTORY, INCLUDING WITHOUT LIMITATION, THE IMPLIED<br />
WARRANTIES OF MERCHANTABILITY AND FITNESS FOR A PARTICULAR PURPOSE. SOME STATES DO NOT ALLOW<br />
THE LIMITATION OF INCIDENTAL DAMAGES OR LIMITATIONS ON HOW LONG AN IMPLIED WARRANTY LASTS, SO THE<br />
ABOVE LIMITATIONS OR EXCLUSIONS MAY NOT APPLY TO YOU. This agreement gives you specific legal rights, and you<br />
may have other rights that vary from state to state.<br />
Choice of Law and Jurisdiction<br />
This Agreement shall be governed by and construed in accordance with the laws of the State of Michigan, without reference to<br />
any conflict of law principles. You agree that any litigation or other proceeding between you and Licensor in connection with the<br />
Training Materials shall be brought in the Michigan state or courts located in Port Huron, Michigan, and you consent to the<br />
jurisdiction of such courts to decide the matter. The parties agree that the United Nations Convention on Contracts for the<br />
International Sale of Goods shall not apply to this License. If any provision of this Agreement is held invalid, the remainder of<br />
this License shall continue in full force and effect.<br />
Limitation of Claims and Liability<br />
ANY ACTION ON ANY CLAIM AGAINST IPEXPERT MUST BE BROUGHT BY THE USER WITHIN ONE (1) YEAR<br />
FOLLOWING THE DATE THE CLAIM FIRST ACCRUED, OR SHALL BE DEEMED WAIVED. IN NO EVENT WILL THE<br />
LICENSOR’S LIABILITY UNDER, ARISING OUT OF, OR RELATING TO THIS AGREEMENT EXCEED THE AMOUNT PAID<br />
TO LICENSOR FOR THE TRAINING MATERIALS. LICENSOR SHALL NOT BE LIABLE FOR ANY SPECIAL, INCIDENTAL,<br />
INDIRECT, OR CONSEQUENTIAL DAMAGES, HOWEVER CAUSED AND ON ANY THEORY OF LIABILITY, REGARDLESS<br />
OF WHETHER LICENSOR HAS BEEN ADVISED OF THE POSSIBILITY OF SUCH DAMAGES. WITHOUT LIMITING THE<br />
FOREGOING, LICENSOR WILL NOT BE LIABLE FOR LOST PROFITS, LOSS OF DATA, OR COSTS OF COVER.<br />
Copyright IPexpert, Inc. (http://www.ipexpert.com) 2007. All Rights Reserved. 5
EULA IPexpert’s CCIE Security Proctor Guide – Version 4.1<br />
Entire Agreement<br />
This is the entire agreement between the parties and may not be modified except in writing signed by both parties.<br />
U.S. Government - Restricted Rights<br />
The Training Materials and accompanying documentation are “commercial computer Training Materials” and “commercial<br />
computer Training Materials documentation,” respectively, pursuant to DFAR Section 227.7202 and FAR Section 12.212, as<br />
applicable. Any use, modification, reproduction release, performance, display, or disclosure of the Training Materials and<br />
accompanying documentation by the U.S. Government shall be governed solely by the terms of this Agreement and shall be<br />
prohibited except to the extent expressly permitted by the terms of this Agreement.<br />
IF YOU DO NOT AGREE WITH THE ABOVE TERMS AND CONDITIONS, DO NOT OPEN OR USE THE TRAINING<br />
MATERIALS AND CONTACT LICENSOR FOR INSTRUCTIONS ON RETURN OF THE TRAINING MATERIALS.<br />
6 Copyright IPexpert, Inc. (http://www.ipexpert.com) 2007. All Rights Reserved.
IPexpert’s CCIE Security Proctor Guide – Version 4.1<br />
Table of Contents<br />
IPexpert’s CCIE Security Proctor Guide (Version 4.1)<br />
Table of Contents<br />
Section 1: Access Control Lists (ACLs) and Filters for IP ............................................... Page 9<br />
Section 2: Network Attacks and Advanced Filtering ...................................................... Page 25<br />
Section 3: GRE and NAT....................................................................................................Page 35<br />
Section 4: Authentication, Authorization and Accounting (AAA) on a Router ............ Page 55<br />
Section 5: PIX Firewall ....................................................................................................... Page 75<br />
Section 6: PIX Firewall / ASA .......................................................................................... Page 117<br />
Section 7: IPSec................................................................................................................ Page 131<br />
Section 7B: DMVPN.......................................................................................................... Page 147<br />
Section 8: VPN Concentrator .......................................................................................... Page 155<br />
Section 9: Switching ........................................................................................................ Page 179<br />
Section 10: IDS ................................................................................................................. Page 203<br />
Section 10B: IPS ...............................................................................................................Page 217<br />
Section 10C: IDS...............................................................................................................Page 229<br />
Section 11: Router Management | IOS Services ...........................................................Page 243<br />
Section 12: NAC................................................................................................................Page 257<br />
Section 13: Multiprotocol Challenge A (One Day Lab Experience)............................. Page 339<br />
Section 14: Multiprotocol Challenge B (One Day Lab Experience)............................. Page 367<br />
Section 15: Multiprotocol Challenge C (One Day Lab Experience)............................. Page 397<br />
Section 16: Multiprotocol Challenge D (One Day Lab Experience)............................. Page 421<br />
Section 17: Multiprotocol Challenge E (One Day Lab Experience)............................. Page 447<br />
Section 18: Multiprotocol Challenge F (One Day Lab Experience) ............................. Page 473<br />
Section 19: Multiprotocol Challenge G (One Day Lab Experience) ............................ Page 521<br />
Copyright IPexpert, Inc. (http://www.ipexpert.com) 2007. All Rights Reserved. 7
Table of Contents IPexpert’s CCIE Security Proctor Guide – Version 4.1<br />
This page left intentionally blank.<br />
8 Copyright IPexpert, Inc. (http://www.ipexpert.com) 2007. All Rights Reserved.
IPexpert’s CCIE Security Proctor Guide – Version 4.1 Section 6<br />
Section 6: PIX Firewall / ASA<br />
Estimated Time to Complete: 2 Hours<br />
NOTE:<br />
Please reference your Security Workbook for all diagrams and<br />
tables.<br />
Copyright IPexpert, Inc. (http://www.ipexpert.com) 2007. All Rights Reserved. 117
Section 6 IPexpert’s CCIE Security Proctor Guide – Version 4.1<br />
Section 6 Pre-Lab Setup<br />
• Physically connect and configure your network according to Diagram 5-A.<br />
• This lab will focus strictly on PIX you will need to pre-configure the network with the base IP<br />
Addressing and VLAN configuration. The pre-configuration files will be used to initially<br />
configure the routers. You will find these configurations in the “Initial Configurations” subfolder<br />
within each section (i.e. IPexpert CCIE Security 4.1 WB Configs Section 5 Initial<br />
Configurations Router X.txt.). To ensure you are using the most up-to-date and accurate<br />
configurations, please be sure to check the “MY CONFIGS” area of your www.IPexpert.com<br />
Member’s Area.<br />
Section 6 Configuration Tasks<br />
Transparent Firewall Configuration<br />
Task 6-1<br />
Configure the PIX for transparent firewall mode. Use the management IP address of 56.56.56.55/24.<br />
Configure the firewall to allow telnet and SSH for management from R5’s interface connected to VLAN 5.<br />
pixfirewall(config)#firewall transparent<br />
pixfirewall(config)#ip address 56.56.56.55 255.255.255.0<br />
pixfirewall(config)#interface eth0<br />
pixfirewall(config-if)#no shut<br />
pixfirewall(config-if)#nameif inside<br />
INFO: Security level for "inside" set to 100 by default.<br />
pixfirewall(config-if)#interface eth1<br />
pixfirewall(config-if)#no shut<br />
pixfirewall(config-if)#nameif outside<br />
INFO: Security level for "outside" set to 0 by default.<br />
pixfirewall(config)#telnet 56.56.56.5 255.255.255.255 inside<br />
pixfirewall(config)#ssh 56.56.56.5 255.255.255.255 inside<br />
pixfirewall(config)#username cisco password cisco<br />
pixfirewall(config)#aaa authentication ssh console LOCAL<br />
Verify by testing from R5.<br />
R5#ssh -l cisco 56.56.56.55<br />
Password:<br />
Type help or '?' for a list of available commands.<br />
pixfirewall><br />
<br />
In order to be able to ping from R5 to R6, you can permit ICMP traffic entering the<br />
outside interface.<br />
pixfirewall#conf t<br />
pixfirewall(config)#access-list OUTSIDE permit icmp any any<br />
pixfirewall(config)#access-group OUTSIDE in interface outside<br />
118 Copyright IPexpert, Inc. (http://www.ipexpert.com) 2007. All Rights Reserved.
IPexpert’s CCIE Security Proctor Guide – Version 4.1 Section 6<br />
Task 6-2<br />
R6 and R5 are preconfigured for OSPF and EIGRP adjacencies. Configure the PIX to allow these<br />
adjacencies to form. Permit only ICMP and the necessary routing protocol traffic to pass through the<br />
firewall.<br />
<br />
If you turn on the debug for OSPF hellos, you will see that they are sent out the<br />
interfaces, but not received back. If you permit the OSPF traffic to the all OSPF routers<br />
group 224.0.0.5 and the host on the other side, the adjacency can form.<br />
R6#deb ip ospf hello<br />
OSPF hello events debugging is on<br />
R6#<br />
*Jan 14 06:38:45.244: OSPF: Send hello to 224.0.0.5 area 0 on FastEthernet0/0<br />
from 56.56.56.6<br />
pixfirewall(config)#access-list OUTSIDE permit ospf host 56.56.56.6<br />
host 224.0.0.5<br />
pixfirewall(config)#access-list OUTSIDE permit ospf host 56.56.56.6<br />
host 56.56.56.5<br />
pixfirewall(config)#access-list INSIDE permit ospf host 56.56.56.5<br />
host 224.0.0.5<br />
pixfirewall(config)#access-group INSIDE in interface inside<br />
pixfirewall(config)#access-list INSIDE permit ospf host 56.56.56.5<br />
host 56.56.56.6<br />
pixfirewall(config)#access-list OUTSIDE permit eigrp host 56.56.56.6<br />
host 224.0.0.10<br />
pixfirewall(config)#access-list OUTSIDE permit eigrp host 56.56.56.6<br />
host 56.56.56.5<br />
pixfirewall(config)#access-list INSIDE permit eigrp host 56.56.56.5<br />
host 224.0.0.10<br />
pixfirewall(config)#access-list INSIDE permit eigrp host 56.56.56.5<br />
host 56.56.56.6<br />
<br />
Verify that you can ping the networks learned.<br />
R6#ping 192.168.20.5<br />
Type escape sequence to abort.<br />
Sending 5, 100-byte ICMP Echos to 192.168.20.5, timeout is 2 seconds:<br />
!!!!!<br />
Success rate is 100 percent (5/5), round-trip min/avg/max = 88/156/176 ms<br />
R6#ping 192.168.54.5<br />
Type escape sequence to abort.<br />
Sending 5, 100-byte ICMP Echos to 192.168.54.5, timeout is 2 seconds:<br />
!!!!!<br />
Success rate is 100 percent (5/5), round-trip min/avg/max = 88/157/176 ms<br />
R6#<br />
Copyright IPexpert, Inc. (http://www.ipexpert.com) 2007. All Rights Reserved. 119
Section 6 IPexpert’s CCIE Security Proctor Guide – Version 4.1<br />
Task 6-3<br />
Configure an ethertype access list on both interfaces to block BPDUs. All other Ethertypes should be<br />
explicitly permitted.<br />
<br />
Here, we are just configuring a basic ACL and applying to the interfaces.<br />
pixfirewall(config)#access-list NOBPDU ethertype deny bpdu<br />
pixfirewall(config)#access-list NOBPDU ethertype permit any<br />
pixfirewall(config)#access-group NOBPDU in interface outside<br />
pixfirewall(config)#access-group NOBPDU in interface inside<br />
ASA Contexts<br />
Task 6-4<br />
Configure ASA1 for context “left”. Assign IP addresses and security levels to the interfaces as shown<br />
in the diagram. Configure the switch to allow traffic to pass on the VLANs shown, for the interface<br />
connecting to the ASA. Verify that R1 can ping R7. Do not configure any NAT or STATIC statements<br />
for context “left”.<br />
<br />
Start by changing to multiple context mode with the command mode multi. This will<br />
require a reload and will clear the configuration.<br />
SA1(config)#mode multi<br />
WARNING: This command will change the behavior of the device<br />
WARNING: This command will initiate a Reboot<br />
Proceed with change mode? [confirm]<br />
Convert the system configuration? [confirm]<br />
!!<br />
The old running configuration file will be written to disk0<br />
The admin context configuration will be written to disk0<br />
The new running configuration file was written to disk0<br />
Security context mode: multiple<br />
***<br />
*** --- SHUTDOWN NOW ---<br />
***<br />
*** Message to all terminals:<br />
***<br />
*** change mode<br />
Rebooting....<br />
Booting system, please wait...<br />
120 Copyright IPexpert, Inc. (http://www.ipexpert.com) 2007. All Rights Reserved.
IPexpert’s CCIE Security Proctor Guide – Version 4.1 Section 6<br />
<br />
Make sure that your interfaces are enabled globally, configure the VLANs for the<br />
subinterfaces, and then create the context.<br />
ASA1(config)#interface eth0/0<br />
ASA1(config-if)#no shut<br />
ASA1(config-if)#int eth0/1<br />
ASA1(config-if)#no shut<br />
ASA1(config-if)#int eth0/2<br />
ASA1(config-if)#no shut<br />
ASA1(config)#interface eth0/1.1<br />
ASA1(config-subif)#vlan 101<br />
ASA1(config-subif)#int eth0/1.2<br />
ASA1(config-subif)#vlan 102<br />
ASA1(config-subif)#int eth0/1.7<br />
ASA1(config-subif)#vlan 107<br />
ASA1(config-subif)#int eth0/1.4<br />
ASA1(config-subif)#vlan 104<br />
ASA1(config)#context left<br />
Creating context 'left'... Done. (2)<br />
ASA1(config-ctx)#config-url disk0:/left.cfg<br />
WARNING: Could not fetch the URL disk0:/left.cfg<br />
INFO: Creating context with default config<br />
ASA1(config-ctx)#<br />
ASA1(config-ctx)#allocate-interface eth0/1.1<br />
ASA1(config-ctx)#allocate-interface eth0/1.7<br />
<br />
Change to the context, and configure the IP addresses and security levels for the<br />
interfaces.<br />
ASA1#changeto context left<br />
ASA1/left#conf t<br />
ASA1/left(config)#interface eth0/1.1<br />
ASA1/left(config-if)#nameif outside<br />
INFO: Security level for "outside" set to 0 by default.<br />
ASA1/left(config-if)#ip address 10.1.1.55 255.255.255.0<br />
ASA1/left(config-if)#interface eth0/1.3<br />
ASA1/left(config-if)#nameif inside<br />
INFO: Security level for "inside" set to 100 by default.<br />
ASA1/left(config-if)#ip address 10.7.7.55 255.255.255.0<br />
<br />
Add an access-list for the outside interface and apply. To allow the ping through,<br />
permit ICMP. To be more granular, you could explicitly specify echo and echo-reply, as<br />
well as the source/destination address, but this section is really just looking for basic<br />
connectivity.<br />
ASA1/left(config)#access-list leftoutside permit icmp any any<br />
ASA1/left(config)#access-group leftoutside in interface outside<br />
Copyright IPexpert, Inc. (http://www.ipexpert.com) 2007. All Rights Reserved. 121
Section 6 IPexpert’s CCIE Security Proctor Guide – Version 4.1<br />
R1#ping 10.7.7.7<br />
Type escape sequence to abort.<br />
Sending 5, 100-byte ICMP Echos to 10.7.7.7, timeout is 2 seconds:<br />
!!!!!<br />
Success rate is 100 percent (5/5), round-trip min/avg/max = 84/150/168 ms<br />
R1#<br />
Task 6-5<br />
Configure context “left” for TCP normalization to verify TCP checksums. Do not apply the policy<br />
globally.<br />
<br />
Configuring a service policy on the PIX is very similar to MQC on a router. Start with a<br />
class map to match traffic, configure a policy map and then apply to the interface. In<br />
order to verify the checksums, configure a TCP map and assign it to the class in the<br />
policy map.<br />
ASA1/left(config)#tcp-map MYMAP<br />
ASA1/left(config-tcp-map)#checksum-verification<br />
ASA1/left(config)#class MYCLASS<br />
ASA1/left(config-cmap)#match any<br />
ASA1/left(config-cmap)#exit<br />
ASA1/left(config)#policy-map MYPOLICY<br />
ASA1/left(config-pmap)#class MYCLASS<br />
ASA1/left(config-pmap-c)#set connection advanced-options MYMAP<br />
ASA1/left(config)#service-policy MYPOLICY interface inside<br />
ASA1/left(config)#service-policy MYPOLICY interface outside<br />
<br />
Verify with show service policy.<br />
ASA1/left#show service-policy<br />
Global policy:<br />
Service-policy: global_policy<br />
Class-map: inspection_default<br />
Inspect: dns preset_dns_map, packet 0, drop 0, reset-drop 0<br />
Inspect: ftp, packet 0, drop 0, reset-drop 0<br />
Inspect: h323 h225 _default_h323_map, packet 0, drop 0, reset-drop 0<br />
Inspect: h323 ras _default_h323_map, packet 0, drop 0, reset-drop 0<br />
Inspect: netbios, packet 0, drop 0, reset-drop 0<br />
Inspect: rsh, packet 0, drop 0, reset-drop 0<br />
Inspect: rtsp, packet 0, drop 0, reset-drop 0<br />
Inspect: skinny, packet 0, drop 0, reset-drop 0<br />
Inspect: esmtp _default_esmtp_map, packet 0, drop 0, reset-drop 0<br />
Inspect: sqlnet, packet 0, drop 0, reset-drop 0<br />
Inspect: sunrpc, packet 0, drop 0, reset-drop 0<br />
Inspect: tftp, packet 0, drop 0, reset-drop 0<br />
Inspect: sip, packet 0, drop 0, reset-drop 0<br />
Inspect: xdmcp, packet 0, drop 0, reset-drop 0<br />
122 Copyright IPexpert, Inc. (http://www.ipexpert.com) 2007. All Rights Reserved.
IPexpert’s CCIE Security Proctor Guide – Version 4.1 Section 6<br />
Interface outside:<br />
Service-policy: MYPOLICY<br />
Class-map: MYCLASS<br />
Set connection policy:<br />
Set connection advanced-options: MYMAP<br />
Retransmission drops: 0 TCP checksum drops : 0<br />
Exceeded MSS drops : 0 SYN with data drops: 0<br />
Out-of-order packets: 0 No buffer drops : 0<br />
Reserved bit cleared: 0 Reserved bit drops : 0<br />
IP TTL modified : 0 Urgent flag cleared: 0<br />
Window varied resets: 0<br />
TCP-options:<br />
Selective ACK cleared: 0 Timestamp cleared : 0<br />
Window scale cleared : 0<br />
Other options cleared: 0<br />
Other options drops: 0<br />
Interface inside:<br />
Service-policy: MYPOLICY<br />
Class-map: MYCLASS<br />
Set connection policy:<br />
Set connection advanced-options: MYMAP<br />
Retransmission drops: 0 TCP checksum drops : 0<br />
Exceeded MSS drops : 0 SYN with data drops: 0<br />
Out-of-order packets: 0 No buffer drops : 0<br />
Reserved bit cleared: 0 Reserved bit drops : 0<br />
IP TTL modified : 0 Urgent flag cleared: 0<br />
Window varied resets: 0<br />
TCP-options:<br />
Selective ACK cleared: 0 Timestamp cleared : 0<br />
Window scale cleared : 0<br />
Other options cleared: 0<br />
Other options drops: 0<br />
ASA1/left#<br />
Task 6-6<br />
Configure ASA2 for context “right”. Assign IP addresses to the interfaces as shown in the diagram.<br />
Configure the switch to allow traffic to pass on the VLANs shown, for the interface connecting to the<br />
ASA. Verify that R2 can ping R4.<br />
<br />
Make sure to read the whole lab. Since we are configuring failover in the next section,<br />
it is easier to just create the context on ASA1 and then let the failover handle the<br />
configuration replication.<br />
ASA1(config)#context right<br />
Creating context 'right'... Done. (3)<br />
ASA1(config-ctx)#config-url disk0:/right.cfg<br />
WARNING: Could not fetch the URL disk0:/right.cfg<br />
INFO: Creating context with default config<br />
ASA1(config-ctx)#<br />
ASA1(config)#context right<br />
ASA1(config-ctx)#allocate eth0/1.2<br />
ASA1(config-ctx)#allocate eth0/1.4<br />
ASA1(config)#changeto context right<br />
ASA1/right(config)#interface eth0/1.2<br />
ASA1/right(config-if)#ip address 10.2.2.55 255.255.255.0<br />
Copyright IPexpert, Inc. (http://www.ipexpert.com) 2007. All Rights Reserved. 123
Section 6 IPexpert’s CCIE Security Proctor Guide – Version 4.1<br />
ASA1/right(config-if)#nameif outside<br />
INFO: Security level for "outside" set to 0 by default.<br />
ASA1/right(config-if)#interface eth0/1.4<br />
ASA1/right(config-if)#ip address 10.4.4.55 255.255.255.0<br />
ASA1/right(config-if)#nameif inside<br />
INFO: Security level for "inside" set to 100 by default.<br />
ASA1/right(config-if)#<br />
ASA1/right(config-if)#access-list rightoutside permit icmp any any<br />
ASA1/right(config)#access-group rightoutside in interface outside<br />
Task 6-7<br />
R2 and R4 are preconfigured for a BGP peering. Make sure that this peering is allowed to form<br />
without adjusting the configuration of R2 or R4.<br />
<br />
There are a few things to watch for here. By default, the pix will randomize the TCP<br />
sequence numbers for traffic. Since the MD5 hash uses the sequence number, the<br />
hash fails at the other end. In order to work around this, the ASA can be configured to<br />
leave the sequence numbers alone with the “norandomseq” option on a static<br />
translation. If the peering is established inside to outside, the ASA will pass traffic<br />
normally. If the peering is initiated by the router on the outside, it will need to be<br />
permitted in the ACL on the outside interface. The source TCP port will be greater than<br />
1024, and the destination port will be 179.<br />
ASA1/right(config)#access-list rightoutside permit tcp host 10.2.2.2<br />
gt 1024 host 10.4.4.4 eq 179<br />
ASA1/right(config)#static (inside,outside) 10.4.4.4 10.4.4.4 netmask<br />
255.255.255.255 norandom<br />
<br />
In addition, the ASA treats the TCP packet a little differently. By default, some of the<br />
TCP options that were allowed through in earlier PIX versions are now removed. This<br />
includes TCP option 19, which is the MD5 Signature option. As a result, the router on<br />
the other side of the firewall may see a message similar to the one shown below.<br />
*Jan 14 03:29:21.407: %TCP-6-BADAUTH: No MD5 digest from 10.2.2.2(18652) to<br />
10.4.4.4(179)<br />
<br />
In order to work around this, a TCP map can be configured to allow option 19. You may<br />
need to remove the default global policy before applying the new policy.<br />
ASA1/right(config)#tcp-map FIXBGP<br />
ASA1/right(config-tcp-map)#tcp-options range 19 19 allow<br />
ASA1/right(config-tcp-map)#exit<br />
ASA1/right(config)#class-map MYBGPFIX<br />
ASA1/right(config-cmap)#match port tcp eq 179<br />
ASA1/right(config-cmap)#exit<br />
ASA1/right(config)#policy-map BGPPOLICY<br />
ASA1/right(config-pmap)#class MYBGPFIX<br />
ASA1/right(config-pmap-c)#set connection advanced-options FIXBGP<br />
ASA1/right(config)#service-policy BGPPOLICY global<br />
ERROR: Policy map global_policy is already configured as a service policy<br />
ASA1/right(config)#no service-policy global_policy global<br />
ASA1/right(config)#service-policy BGPPOLICY global<br />
124 Copyright IPexpert, Inc. (http://www.ipexpert.com) 2007. All Rights Reserved.
IPexpert’s CCIE Security Proctor Guide – Version 4.1 Section 6<br />
Failover<br />
Task 6-8<br />
If ASA1 fails, ASA2 should take over for context ‘left’. If ASA2 fails, ASA1 should take over for context<br />
‘right’. Configure the failover as LAN-based, using interface Eth0/2 on both devices. Verify by shutting<br />
down the port on the switch, connected to each ASA. Failover should also be stateful. Configure the<br />
standby addresses to be .56 on the respective subnets. The inside and outside interfaces should<br />
NOT show us as “Not-Monitored” or “waiting” in the output of ‘show failover’, they should show up as<br />
“Normal”.<br />
<br />
Configure the standby addresses for the failover in the individual contexts.<br />
ASA1/left(config)#int eth0/1.1<br />
ASA1/left(config-if)#ip address 10.1.1.55 255.255.255.0 standby<br />
10.1.1.56<br />
ASA1/left(config-if)#int eth0/1.7<br />
ASA1/left(config-if)#ip address 10.7.7.55 255.255.255.0 standby<br />
10.7.7.56<br />
ASA1/left(config)#changeto cont right<br />
ASA1/right(config)#int eth0/1.2<br />
ASA1/right(config-if)#ip address 10.2.2.55 255.255.255.0 standby<br />
10.2.2.56<br />
ASA1/right(config-if)#int eth0/1.4<br />
ASA1/right(config-if)#ip address 10.4.4.55 255.255.255.0 standby<br />
10.4.4.56<br />
ASA1/right#changeto system<br />
ASA1(config)#interface eth0/2<br />
ASA1(config-if)#description LAN Failover/State link<br />
ASA1(config)#failover lan unit primary<br />
ASA1(config)#failover lan interface failoverint eth0/2<br />
INFO: Non-failover interface config is cleared on Ethernet0/2 and its subinterfaces<br />
ASA1(config)#failover link failoverint eth0/2<br />
ASA1(config)#failover interface ip failoverint 55.55.55.55<br />
255.255.255.0 standby 55.55.55.56<br />
ASA1(config)#failover group 1<br />
ASA1(config-fover-group)#primary<br />
ASA1(config-fover-group)#preempt<br />
ASA1(config-fover-group)#exit<br />
ASA1(config)#failover group 2<br />
ASA1(config-fover-group)#secondary<br />
ASA1(config-fover-group)#preempt<br />
ASA1(config)#context left<br />
ASA1(config-ctx)#join-failover-group 1<br />
ASA1(config-ctx)#context right<br />
ASA1(config-ctx)#join-failover-group 2<br />
ASA1(config)#failover<br />
Copyright IPexpert, Inc. (http://www.ipexpert.com) 2007. All Rights Reserved. 125
Section 6 IPexpert’s CCIE Security Proctor Guide – Version 4.1<br />
<br />
Check the output of “show failover”.<br />
ASA1(config)#show failover<br />
Failover On<br />
Failover unit Primary<br />
Failover LAN Interface: failoverint Ethernet0/2 (Configuration incomplete)<br />
Unit Poll frequency 1 seconds, holdtime 15 seconds<br />
Interface Poll frequency 5 seconds, holdtime 25 seconds<br />
Interface Policy 1<br />
Monitored Interfaces 0 of 250 maximum<br />
Version: Ours 7.2(2), Mate Unknown<br />
Last Failover at: 18:35:24 UTC Jan 22 2007<br />
This host: Primary - Disabled<br />
Active time: 0 (sec)<br />
slot 0: ASA5510 hw/sw rev (1.1/7.2(2)) status (Up Sys)<br />
left Interface outside (10.1.1.55): Normal (Not-Monitored)<br />
left Interface inside (10.7.7.55): Normal (Not-Monitored)<br />
right Interface outside (10.2.2.55): Normal (Not-Monitored)<br />
right Interface inside (10.4.4.55): Normal (Not-Monitored)<br />
slot 1: empty<br />
Other host: Secondary - Not Detected<br />
Active time: 0 (sec)<br />
slot 0: empty<br />
left Interface outside (10.1.1.56): Unknown (Not-Monitored)<br />
left Interface inside (10.7.7.56): Unknown (Not-Monitored)<br />
right Interface outside (10.2.2.56): Unknown (Not-<br />
Monitored)<br />
right Interface inside (10.4.4.56): Unknown (Not-Monitored)<br />
slot 1: empty<br />
Stateful Failover Logical Update Statistics<br />
Link : failoverint Ethernet0/2 (Configuration incomplete)<br />
Stateful Obj xmit xerr rcv rerr<br />
General 0 0 0 0<br />
sys cmd 0 0 0 0<br />
up time 0 0 0 0<br />
RPC services 0 0 0 0<br />
TCP conn 0 0 0 0<br />
UDP conn 0 0 0 0<br />
ARP tbl 0 0 0 0<br />
Xlate_Timeout 0 0 0 0<br />
Logical Update Queue Information<br />
Cur Max Total<br />
Recv Q: 0 0 0<br />
Xmit Q: 0 0 0<br />
ASA1(config)#<br />
<br />
By default, physical interfaces will be monitored, subinterfaces will not. In order to<br />
monitor the subinterfaces, use the command ‘monitor-interface’ under the contexts.<br />
ASA1(config)#changeto cont right<br />
ASA1/right(config)#monitor-interface ?<br />
configure mode commands/options:<br />
Current available interface(s):<br />
inside Name of interface Ethernet0/1.4<br />
outside Name of interface Ethernet0/1.2<br />
ASA1/right(config)#monitor-interface inside<br />
ASA1/right(config)#monitor-interface outside<br />
126 Copyright IPexpert, Inc. (http://www.ipexpert.com) 2007. All Rights Reserved.
IPexpert’s CCIE Security Proctor Guide – Version 4.1 Section 6<br />
ASA1(config)#changeto context left<br />
ASA1/left(config)#monitor-interface inside<br />
ASA1/left(config)#monitor-interface outside<br />
<br />
On the secondary unit, we just need to configure the failover link, configure the ASA as<br />
secondary, and enable failover.<br />
ASA2(config)#failover lan interface failoverint eth0/2<br />
INFO: Non-failover interface config is cleared on Ethernet0/2 and its subinterfaces<br />
ASA2(config)#failover interface ip failoverint 55.55.55.55<br />
255.255.255.0 standby 55.55.55.56<br />
ASA2(config)#failover lan unit secondary<br />
ASA2(config)#failover<br />
ASA2(config)#int eth0/2<br />
ASA2(config-if)#no shut<br />
<br />
You may see an error message on the console display:<br />
ASA1#Mate's operating mode (Single) is not compatible with my mode<br />
(Multi). Failover will be disabled.<br />
<br />
Configure ASA2 for multiple mode, and allow it to reload. After ASA2 comes back<br />
online, reenable failover, and ASA2 will replicate the configuration. Make sure to<br />
enable failover on ASA1 FIRST.<br />
ASA2(config)#mode multi<br />
ASA1(config)#failover<br />
ASA2(config)#failover<br />
ASA2(config)#.<br />
Detected an Active mate<br />
Beginning configuration replication from mate.<br />
Removing context 'admin' (1)... Done<br />
INFO: Admin context is required to get the interfaces<br />
Creating context 'admin'... Done. (2)<br />
WARNING: Skip fetching the URL disk0:/admin.cfg<br />
INFO: Creating context with default config<br />
INFO: Admin context will take some time to come up .... please wait.<br />
Creating context 'left'... Done. (3)<br />
WARNING: Skip fetching the URL disk0:/left.cfg<br />
INFO: Creating context with default config<br />
Creating context 'right'... Done. (4)<br />
WARNING: Skip fetching the URL disk0:/right.cfg<br />
INFO: Creating context with default config<br />
End configuration replication from mate.<br />
Group 2 No Response from Mate<br />
Group 1 Detected Active mate<br />
Copyright IPexpert, Inc. (http://www.ipexpert.com) 2007. All Rights Reserved. 127
Section 6 IPexpert’s CCIE Security Proctor Guide – Version 4.1<br />
<br />
On ASA2, the output should show the failover status.<br />
ASA1#show failover<br />
Failover On<br />
Failover unit Secondary<br />
Failover LAN Interface: failoverint Ethernet0/2 (up)<br />
Unit Poll frequency 1 seconds, holdtime 15 seconds<br />
Interface Poll frequency 5 seconds, holdtime 25 seconds<br />
Interface Policy 1<br />
Monitored Interfaces 4 of 250 maximum<br />
Version: Ours 7.2(2), Mate 7.2(2)<br />
Group 1 last failover at: 21:22:56 UTC Jan 22 2007<br />
Group 2 last failover at: 21:35:22 UTC Jan 22 2007<br />
This host: Secondary<br />
Group 1 State: Standby Ready<br />
Active time: 0 (sec)<br />
Group 2 State: Active<br />
Active time: 424 (sec)<br />
slot 0: ASA5510 hw/sw rev (1.1/7.2(2)) status (Up Sys)<br />
left Interface outside (10.1.1.56): Normal<br />
left Interface inside (10.7.7.56): Normal<br />
right Interface outside (10.2.2.55): Normal<br />
right Interface inside (10.4.4.55): Normal<br />
slot 1: empty<br />
Other host: Primary<br />
Group 1 State: Active<br />
Active time: 2080 (sec)<br />
Group 2 State: Standby Ready<br />
Active time: 1658 (sec)<br />
slot 0: ASA5510 hw/sw rev (1.1/7.2(2)) status (Up Sys)<br />
left Interface outside (10.1.1.55): Normal<br />
left Interface inside (10.7.7.55): Normal<br />
right Interface outside (10.2.2.56): Normal<br />
right Interface inside (10.4.4.56): Normal<br />
slot 1: empty<br />
Stateful Failover Logical Update Statistics<br />
Link : failoverint Ethernet0/2 (up)<br />
Stateful Obj xmit xerr rcv rerr<br />
General 114 0 133 0<br />
sys cmd 111 0 111 0<br />
up time 0 0 0 0<br />
RPC services 0 0 0 0<br />
TCP conn 2 0 14 0<br />
UDP conn 0 0 0 0<br />
ARP tbl 1 0 8 0<br />
Xlate_Timeout 0 0 0 0<br />
ASA1#<br />
Logical Update Queue Information<br />
Cur Max Total<br />
Recv Q: 0 1 133<br />
Xmit Q: 0 1 114<br />
128 Copyright IPexpert, Inc. (http://www.ipexpert.com) 2007. All Rights Reserved.
IPexpert’s CCIE Security Proctor Guide – Version 4.1 Section 6<br />
Technical Verification and Support<br />
To verify your router configurations please ensure that you have downloaded the<br />
latest configurations at www.IPexpert.com. Please visit the following web site for<br />
instructions: http://www.ipexpert.com/configs<br />
Support is also available in the following ways:<br />
• Email: support@ipexpert.com<br />
• Telephone (US and Canada): +1.866.225.8064<br />
• Telephone (Outside U.S. & Canada): +1.810.326.1444<br />
• Support Ticket System (Elite Members): http://www.ipexpert.com<br />
• Mailing List: http://www.OnlineStudyList.com<br />
• Online Forum: http://www.CertificationTalk.com<br />
Copyright IPexpert, Inc. (http://www.ipexpert.com) 2007. All Rights Reserved. 129
Section 6 IPexpert’s CCIE Security Proctor Guide – Version 4.1<br />
This page left intentionally blank.<br />
130 Copyright IPexpert, Inc. (http://www.ipexpert.com) 2007. All Rights Reserved.
IPexpert’s CCIE Security Proctor Guide – Version 4.1 Section 13<br />
Section 13: Multiprotocol Challenge A<br />
(One Day Lab Experience)<br />
Estimated Time to Complete: 8 Hours<br />
NOTE:<br />
Please reference your Security Workbook for all diagrams and<br />
tables.<br />
Copyright IPexpert, Inc. (http://www.ipexpert.com) 2007. All Rights Reserved. 339
Section 13 IPexpert’s CCIE Security Proctor Guide – Version 4.1<br />
Section 13 Pre-Lab Setup<br />
Pre-load the Initial Configurations for all the devices. You will find these configurations in the<br />
“Initial Configurations” subfolder within each section (i.e. IPexpert CCIE Security 4.1 WB Configs <br />
Section 13 Initial Configurations Router X.txt.). To ensure you are using the most up-to-date and<br />
accurate configurations, please be sure to check the “MY CONFIGS” area of your www.IPexpert.com<br />
Member’s Area.<br />
1 - Layer 2 Configuration (8 Points)<br />
1.1 - Switch Management and Traffic control (4 Points)<br />
a) Create a Management interface on the Switch1 belonging to VLAN 6. Set the IP Address as .20<br />
on that network.<br />
Sw1(config)#int vlan 6<br />
Sw1(config-if)#ip address 192.1.6.20 255.255.255.0<br />
b) Allow Management access to this switch from VLAN 6 only.<br />
Sw1(config)#access-list 23 permit 192.1.6.0 0.0.0.255<br />
Sw1(config)#line vty 0 15<br />
Sw1(config-line)#access-class 23 in<br />
c) Port F 0/15 on the Switch1 is experiencing Broadcast and Multicast problems. Configure it so that<br />
broadcasts do not take more than 30% of the bandwidth and Multicast does not take more than<br />
20% of the bandwidth. For broadcast traffic, the port should forward again when it falls below<br />
25%. For Multicast traffic, the port should forward again when it falls below 15%.<br />
<br />
Storm control allows you to set levels for traffic. Newer code versions allow the setting<br />
of rising and falling thresholds.<br />
Sw1(config)#int fa0/15<br />
Sw1(config-if)#storm-control broadcast level 30 25<br />
Sw1(config-if)#storm-control multicast level 20 15<br />
d) Set the Port to Access Mode so that it does not negotiate the Port mode.<br />
Sw1(config-if)#switchport mode access<br />
e) Configure port F0/15 on Switch1 to block inbound traffic with an ethertype value of 0x1234.<br />
<br />
A MAC access list will allow traffic filtering at layer 2, including Ethertype values.<br />
Sw1(config)#mac access-list extended NO1234<br />
Sw1(config-ext-macl)#deny any any 0x1234 0<br />
Sw1(config-ext-macl)#permit any any<br />
Sw1(config)#int fa0/15<br />
Sw1(config-if)#mac access-group NO1234 in<br />
340 Copyright IPexpert, Inc. (http://www.ipexpert.com) 2007. All Rights Reserved.
IPexpert’s CCIE Security Proctor Guide – Version 4.1 Section 13<br />
1.2 - Catalyst Security (4 Points)<br />
a) Add VLAN 123 to Cat1. Configure MAC address filtering and only permit MAC address from<br />
0000.1234.4321 to 0000.4321.1234 for Vlan 123.<br />
<br />
For more granular control, vlan maps can be used to restrict traffic. Setup is similar to<br />
a route map, where individual clauses match, and can either permit (forward) or deny<br />
(drop). Start with a mac access-list to match the traffic that you want to permit in the<br />
filter.<br />
Sw1(config)#vlan 123<br />
Sw1(config-vlan)#state active<br />
Sw2(config)#mac access-list extended from1234<br />
Sw2(config-ext-macl)#permit host 0000.1234.4321 host 0000.4321.1234<br />
Sw2(config-ext-macl)#exit<br />
Sw2(config)#vlan access-map VLAN123filter 10<br />
Sw2(config-access-map)#match mac address from1234<br />
Sw2(config-access-map)#action forward<br />
Sw2(config-access-map)#exit<br />
Sw2(config)#vlan access-map VLAN123filter 20<br />
Sw2(config-access-map)#action drop<br />
Sw2(config-access-map)#exit<br />
Sw2(config)#vlan filter VLAN123filter vlan-list 123<br />
2 - PIX Firewall / ASA Configuration (17 Points)<br />
2.1 - PIX IP Address (3 Points)<br />
a) Assign IP Addresses to the PIX Firewall interfaces as shown in the diagram. Eth0 is the outside<br />
interface, and should have a security level of 0. Eth1 is the inside interface and should have a<br />
security level of 100.<br />
<br />
Configure the interface names, and apply the addresses.<br />
pixfirewall(config)#int eth0<br />
pixfirewall(config-if)#nameif outside<br />
INFO: Security level for "outside" set to 0 by default.<br />
pixfirewall(config-if)#ip address 192.1.12.10 255.255.255.0<br />
pixfirewall(config-if)#no shut<br />
pixfirewall(config-if)#int eth1<br />
pixfirewall(config-if)#nameif inside<br />
INFO: Security level for "inside" set to 100 by default.<br />
pixfirewall(config-if)#ip address 10.2.2.10 255.255.255.0<br />
pixfirewall(config-if)#no shut<br />
2.2 - Routing (3 Points)<br />
a) Run RIP as the routing protocol on the PIX Firewall. Configure RIP such that it only receives<br />
routes from the outside interface.<br />
pixfirewall(config)#router rip<br />
pixfirewall(config-router)#version 2<br />
pixfirewall(config-router)#no auto-summary<br />
Copyright IPexpert, Inc. (http://www.ipexpert.com) 2007. All Rights Reserved. 341
Section 13 IPexpert’s CCIE Security Proctor Guide – Version 4.1<br />
pixfirewall(config-router)#network 10.0.0.0<br />
pixfirewall(config-router)#network 192.1.12.0<br />
pixfirewall(config-router)#passive outside<br />
b) Configure RIP such that it receives routes from the inside interface and also injects a default route<br />
from the inside interface.<br />
<br />
Since the network statement was already added in the previous step, we just need to<br />
configure the PIX to send a default route.<br />
pixfirewall(config)#router rip<br />
pixfirewall(config-router)#default-information originate<br />
2.3 - Address Translation (4 Points)<br />
a) There is a Web/SMTP/DNS Server at 10.1.1.55. Create a Static Mapping to 192.1.12.55. Allow<br />
the appropriate entries in the access-list.<br />
<br />
Web servers use TCP ports 80 for http and 443 for HTTPS. SMTP is TCP port 25. DNS<br />
uses UDP port 53 for lookups and TCP port 53 for zone transfers. When allowing<br />
access, remember to configure the access-list using the translated address.<br />
pixfirewall(config)#static (inside,outside) 192.1.12.55 10.1.1.55<br />
netmask 255.255.255.255<br />
pixfirewall(config)#access-list outsideint permit tcp any host<br />
192.1.12.55 eq 25<br />
pixfirewall(config)#access-list outsideint permit tcp any host<br />
192.1.12.55 eq 53<br />
pixfirewall(config)#access-list outsideint permit tcp any host<br />
192.1.12.55 eq 80<br />
pixfirewall(config)#access-list outsideint permit tcp any host<br />
192.1.12.55 eq 443<br />
pixfirewall(config)#access-list outsideint permit udp any host<br />
192.1.12.55 eq 53<br />
pixfirewall(config)#access-group outsideint in interface outside<br />
b) Also create a static mapping to R1. Create a static mapping to 192.1.12.15. Allow Telnet access to<br />
R1 from R2 only in the access-list.<br />
pixfirewall(config)#static (inside,outside) 192.1.12.15 10.2.2.1<br />
netmask 255.255.255.255<br />
pixfirewall(config)#access-list outsideint permit tcp host 192.1.12.2<br />
host 192.1.12.15 eq 23<br />
c) Create a Static entry for the AAA server at 10.1.1.100. Translate it to 192.1.12.100. Allow the<br />
appropriate entries in the access-list for TACACS+. Only allow R2 to communicate to the<br />
TACACS+ server. R2 should communicate to the TACACS+ server using its loopback0 interface.<br />
pixfirewall(config)#static (inside,outside) 192.1.12.100 10.1.1.100<br />
netmask 255.255.255.255<br />
pixfirewall(config)#access-list outsideint permit tcp host 2.2.2.2<br />
host 192.1.12.100 eq 49<br />
R2(config)#ip tacacs source-int lo0<br />
342 Copyright IPexpert, Inc. (http://www.ipexpert.com) 2007. All Rights Reserved.
IPexpert’s CCIE Security Proctor Guide – Version 4.1 Section 13<br />
d) Enable Nat-control on the PIX.<br />
pixfirewall(config)#nat-control<br />
2.4 – Transparent Firewall (2 points)<br />
a) Configure ASA1 in transparent firewall mode for the VLANs connecting R4 and R9. Make sure<br />
that the routing protocol adjacencies between R4 and R9 work after completing this step. Do not<br />
configure contexts for this step.<br />
ciscoasa(config)#firewall transparent<br />
ciscoasa(config)#hostname ASA1<br />
ASA1(config)#int eth0/0<br />
ASA1(config-if)#no shut<br />
ASA1(config-if)#int eth0/1<br />
ASA1(config-if)#no shut<br />
ASA1(config)#int eth0/0<br />
ASA1(config-if)#nameif outside<br />
IICMP: icmp_open Entry for context 0<br />
NFO: Security level for "outside" set to 0 by default.<br />
ASA1(config-if)#int eth0/1<br />
ASA1(config-if)#nameif inside<br />
IICMP: icmp_open Entry for context 0<br />
NFO: Security level for "inside" set to 100 by default.<br />
ASA1(config)#ip address 192.1.49.55 255.255.255.0<br />
<br />
At a minimum, we need to allow OSPF and BGP traffic, and possibly ICMP echo and<br />
echo-reply for ping testing. Since we are not given any restrictions on what traffic to<br />
allow, we can just allow all IP traffic.<br />
ASA1(config)#access-list ROUTING permit ip any any<br />
ASA1(config)#access-group ROUTING in interface outside<br />
ASA1(config)#access-group ROUTING in interface inside<br />
2.5 – Contexts (2points)<br />
a) Configure ASA2 in transparent firewall mode for the VLANs connecting R5 and BB2, using<br />
contexts. Use the context name r5tobb2. Configure interfaces eth0/0 and eth0/1 for a security<br />
level of 100.<br />
<br />
Configuration for ASA2 will be similar, but we will be using contexts. Start by<br />
switching to multiple context mode.<br />
ciscoasa(config)#mode multiple<br />
WARNING: This command will change the behavior of the device<br />
WARNING: This command will initiate a Reboot<br />
Proceed with change mode? [confirm]<br />
Convert the system configuration? [confirm]<br />
Copyright IPexpert, Inc. (http://www.ipexpert.com) 2007. All Rights Reserved. 343
Section 13 IPexpert’s CCIE Security Proctor Guide – Version 4.1<br />
<br />
Enable the interfaces, create the context, and allocate the interfaces. We need to also<br />
create an admin context, but we do not have to assign it any interfaces.<br />
ciscoasa(config)#firewall transparent<br />
ciscoasa(config)#int eth0/0<br />
ciscoasa(config-if)#no shut<br />
ciscoasa(config-if)#int eth0/1<br />
ciscoasa(config-if)#no shut<br />
ciscoasa(config)#admin-context MYADMIN<br />
ciscoasa(config)#context MYADMIN<br />
ciscoasa(config-ctx)#config-url disk0:MYADMIN<br />
INFO: Converting disk0:MYADMIN to disk0:/MYADMIN<br />
WARNING: Could not fetch the URL disk0:/MYADMIN<br />
INFO: Creating context with default config<br />
INFO: Admin context will take some time to come up .... please wait.<br />
ciscoasa(config-ctx)#exit<br />
ciscoasa(config)#<br />
ciscoasa(config)#context r5tobb2<br />
Creating context 'r5tobb2'... Done. (5)<br />
ciscoasa(config-ctx)#config-url disk0:r5tobb2<br />
INFO: Converting disk0:r5tobb2 to disk0:/r5tobb2<br />
WARNING: Could not fetch the URL disk0:/r5tobb2<br />
INFO: Creating context with default config<br />
ciscoasa(config-ctx)#allocate-interface eth0/0<br />
ciscoasa(config-ctx)#allocate-interface eth0/1<br />
ciscoasa(config)#hostname ASA2<br />
ASA2(config)#<br />
ASA2(config)#changeto context r5tobb2<br />
ASA2/r5tobb2(config-if)#int eth0/0<br />
ASA2/r5tobb2(config-if)#nameif outside<br />
ASA2/r5tobb2(config-if)#int eth0/1<br />
ASA2/r5tobb2(config-if)#nameif inside<br />
INFO: Security level for "inside" set to 100 by default.<br />
ASA2/r5tobb2(config-if)#exit<br />
ASA2/r5tobb2(config)#ip address 10.5.5.55 255.255.255.0<br />
ASA2/r5tobb2(config)#route outside 0 0 10.5.5.5<br />
<br />
To allow traffic to pass between interfaces with the same security level, use the samesecurity-traffic<br />
command. Again, we are not given traffic restrictions, so we can permit<br />
everything. At a minimum, EIGRP and BGP need to be allowed for the routing protocol<br />
adjacencies, and possibly ICMP for testing.<br />
ASA2/r5tobb2(config)#same-security-traffic permit inter-interface<br />
ASA2/r5tobb2(config)#access-list ROUTING permit ip any any<br />
ASA2/r5tobb2(config)#access-group ROUTING in interface outside<br />
ASA2/r5tobb2(config)#access-group ROUTING in interface inside<br />
344 Copyright IPexpert, Inc. (http://www.ipexpert.com) 2007. All Rights Reserved.
IPexpert’s CCIE Security Proctor Guide – Version 4.1 Section 13<br />
2.6 – Management / Filtering (3 points)<br />
a) Configure ASA1 to allow management access via SSH on the interface connecting to R4.<br />
<br />
Add a username and password, and add local authentication for SSH. Allow ssh on the<br />
outside interface.<br />
ASA1(config)#ssh 192.1.49.0 255.255.255.0 outside<br />
ASA1(config)#username cisco password cisco<br />
ASA1(config)#aaa authentication ssh console LOCAL<br />
Verify by connecting from R4.<br />
R4#ssh -l cisco 192.1.49.55<br />
Password:<br />
Type help or '?' for a list of available commands.<br />
ASA1><br />
b) Configure ASA1 to block ICMP type 0 traffic with a source of R9’s Ethernet interface, and a<br />
destination of R4’s Ethernet interface. ICMP type 8 traffic should not be affected.<br />
<br />
Type 8 is echo, type 0 is echo reply.<br />
ASA1(config)#access-list INSIDE deny icmp host 192.1.49.9 host<br />
192.1.49.4 ech$<br />
ASA1(config)#access-list INSIDE permit ip any any<br />
ASA1(config)#access-group INSIDE in interface inside<br />
3 - IDS Configuration (16 Points)<br />
3.1 - Basic Configuration of IDS (4 Points)<br />
a) Configure the IDS Sensor’s Command and Control Interface through the CLI to allow access to<br />
the Sensor from the AAA server based on the Network Diagram.<br />
<br />
Run Setup from the command line.<br />
Continue with configuration dialog?[yes]:<br />
Enter host name[sensor]: IDS<br />
Enter IP interface[10.1.9.201/24,10.1.9.1]: 10.1.1.15/24,10.1.1.1<br />
Enter telnet-server status[disabled]:<br />
Enter web-server port[443]:<br />
Modify current access list?[no]: yes<br />
Current access list entries:<br />
No entries<br />
Permit: 10.1.1.0/24<br />
Permit:<br />
Modify system clock settings?[no]:<br />
Modify virtual sensor "vs0" configuration?[no]:<br />
Copyright IPexpert, Inc. (http://www.ipexpert.com) 2007. All Rights Reserved. 345
Section 13 IPexpert’s CCIE Security Proctor Guide – Version 4.1<br />
<br />
Verify that you can ping the ACS server.<br />
IDS#ping 10.1.1.100<br />
PING 10.1.1.100 (10.1.1.100): 56 data bytes<br />
64 bytes from 10.1.1.100: icmp_seq=0 ttl=127 time=4.4 ms<br />
64 bytes from 10.1.1.100: icmp_seq=1 ttl=127 time=0.6 ms<br />
64 bytes from 10.1.1.100: icmp_seq=2 ttl=127 time=2.4 ms<br />
64 bytes from 10.1.1.100: icmp_seq=3 ttl=127 time=1.2 ms<br />
--- 10.1.1.100 ping statistics ---<br />
4 packets transmitted, 4 packets received, 0% packet loss<br />
round-trip min/avg/max = 0.6/2.1/4.4 ms<br />
IDS#<br />
b) You would like to monitor all traffic received in the outside VLAN of the PIX.<br />
<br />
The IDS Sensing interface is connected to port fa0/7 on Cat1. The devices connected to<br />
the outside VLAN are the PIX outside interface on port fa0/2 on cat2 and R2’s interface<br />
fa1/0 connected to fa0/2 on Cat1.<br />
Sw1(config)#monitor session 1 source vlan 12 , 555 rx<br />
Sw1(config)#monitor session 1 dest int fa0/7<br />
Sw1(config)#vlan 555<br />
Sw1(config-vlan)#remote-span<br />
Sw2(config)#monitor session 1 sourc vlan 12 rx<br />
Sw2(config)#monitor session 1 dest remote vlan 555<br />
c) Configure the Switch to copy all relevant traffic to the monitoring port.<br />
<br />
This was accomplished in the previous step.<br />
3.2 - Enabling and Fine tuning the ICMP Echo Request Signature (4 Points)<br />
a) Enable the ICMP Echo Request Signature.<br />
b) Set the Alarm Severity to High.<br />
c) Verify the Alarm by pinging the outside Interface of the PIX from R2.<br />
IDS(config)#service interface<br />
IDS(config-int)#physical-interfaces FastEthernet0/1<br />
IDS(config-int-phy)#admin-state enabled<br />
IDS(config)#service analysis-engine<br />
IDS(config-ana)#virtual-sensor vs0<br />
IDS(config-ana-vir)#physical-interface FastEthernet0/1 subinterfacenumber<br />
0<br />
346 Copyright IPexpert, Inc. (http://www.ipexpert.com) 2007. All Rights Reserved.
IPexpert’s CCIE Security Proctor Guide – Version 4.1 Section 13<br />
IDS(config)#service signature-definition sig0<br />
IDS(config-sig)#signatures 2004 0<br />
IDS(config-sig-sig)#alert-severity high<br />
IDS(config-sig-sig)#status<br />
IDS(config-sig-sig-sta)#enabled true<br />
<br />
For an example of how to configure via the GUI, see the IDS section in this Proctor<br />
Guide.<br />
3.3 - Creating a Custom Signature (4 Points)<br />
a) Create a custom string signature<br />
b) Set the Alarm Severity to High.<br />
c) If sensor detects telnet traffic with a string of “admin”, it should fire this alarm.<br />
d) Enable telnet on R1 by assigning it a password of telnet. Configure a static route on R1 for the<br />
192.1.12.0 network via the PIX. It is learning this route through the concentrator.<br />
e) Verify the Alarm by connecting into R1 for Telnet and typing the work “admin” after you are<br />
connected.<br />
IDS(config)#service signature-definition sig0<br />
IDS(config-sig)#<br />
IDS(config-sig)#no signatures 60000 0<br />
IDS(config-sig)#signatures 60000 0<br />
IDS(config-sig-sig)#alert-severity high<br />
IDS(config-sig-sig)#engine string-tcp<br />
IDS(config-sig-sig-str)#regex-string admin<br />
IDS(config-sig-sig-str)#service-ports 23<br />
R1(config)#line vty 0 15<br />
R1(config-line)#password telnet<br />
R1(config-line)#ip route 192.1.12.0 255.255.255.0 10.2.2.10<br />
<br />
<br />
Note: The static NAT and access list for the telnet connection from R2 to R1 was<br />
configured in an earlier step.<br />
Verify the signature fires and is visible on the event viewer.<br />
3.4 - IOS IDS (4 Points)<br />
a) Configure IDS on R6 for attacks from the Frame Relay clouds.<br />
b) Configure the IOS IDS with the following parameters:<br />
Send the alarm to a syslog server.<br />
Configure the Router with the Syslog Server’s Address at 192.1.12.65.<br />
Copyright IPexpert, Inc. (http://www.ipexpert.com) 2007. All Rights Reserved. 347
Section 13 IPexpert’s CCIE Security Proctor Guide – Version 4.1<br />
<br />
Pretty straightforward, configure logging, and apply the inspection to the interface.<br />
R6(config)#ip ips name MYIDS<br />
R6(config)#ip ips notify log<br />
R6(config)#logging host 192.1.12.65<br />
R6(config)#int ser0/1/0<br />
R6(config-if)#ip ips MYIDS in<br />
c) Configure Static mappings and access-list entries on the PIX to allow this type of traffic. The<br />
syslog is at 10.1.1.65.<br />
pixfirewall(config)#static (inside,outside) 192.1.12.65 10.1.1.65<br />
netmask 255.255.255.255<br />
pixfirewall(config)#access-list outsideint permit udp host 192.1.26.6<br />
host 192.1.12.65 eq 514<br />
4 - BGP Routing Configuration (4 Points)<br />
4.1 – BGP Traffic Policy (4 Points)<br />
a) Configure R2 to dynamically propagate information for static routes added to R2 with the following<br />
parameters:<br />
If a static route is added with tag 12345, the network should be advertised into BGP.<br />
The routes should be seen on R4 and R5 with a next-hop address of 192.0.0.1.<br />
Traffic destined to these networks should be dropped locally by R4 and R5, and not forwarded<br />
to R2.<br />
Routing information for these networks should not be propagated beyond AS 245. Do not use<br />
any distribute-lists or route-maps to filter outbound to BB2 or R9.<br />
<br />
In order to prevent the information from being sent further, you can use the no-export<br />
community. On R4 and R5, drop the traffic locally with a route to Null0 for 192.0.0.1. R4<br />
and R5 would still send an ICMP unreachable message (backscatter) back to the source<br />
address, unless you configured the command “no ip unreachables” on the Null0<br />
interface. This is not required for the section, however.<br />
R2(config)#route-map TRAFPOLICY<br />
R2(config-route-map)#match tag 12345<br />
R2(config-route-map)#set ip next-hop 192.0.0.1<br />
R2(config-route-map)#set community no-export<br />
R2(config)#router bgp 245<br />
R2(config-router)#redist static route-map TRAFPOLICY<br />
R2(config-router)#neighbor 4.4.4.4 send-community<br />
R2(config-router)#neighbor 5.5.5.5 send-community<br />
R2(config)#ip route 155.55.55.55 255.255.255.255 192.0.0.1 tag 12345<br />
R2(config)#ip route 192.0.0.1 255.255.255.255 null0<br />
R4(config)#ip route 192.0.0.1 255.255.255.255 null0<br />
R5(config)#ip route 192.0.0.1 255.255.255.255 null0<br />
348 Copyright IPexpert, Inc. (http://www.ipexpert.com) 2007. All Rights Reserved.
IPexpert’s CCIE Security Proctor Guide – Version 4.1 Section 13<br />
5 - Access Management Configuration (9 Points)<br />
5.1 - Management of R2 using Telnet (5 Points)<br />
a) Setup R2 with AAA access.<br />
<br />
On the ACS server, configure R2 as a AAA client under Network configuration.<br />
R2(config)#ip tacacs source-int lo0<br />
b) No Authentication or authorization should be done on the Console or AUX lines.<br />
R2(config)#aaa new-model<br />
R2(config)#aaa authentication login default none<br />
R2(config)#tacacs-server host 192.1.12.100 key cisco<br />
c) Setup Authentication based on TACACS+ for the VTY lines.<br />
R2(config)#aaa authentication login VTYMETHOD group tacacs<br />
R2(config)#line vty 0 15<br />
R2(config-line)#login authent VTYMETHOD<br />
d) Create 2 users on the AAA server, User1 and User2. Both the users should have cisco as their<br />
password.<br />
Create the users on both the ACS server, and locally on R2.<br />
R2(config)#username User1 priv 15 password cisco<br />
R2(config)#username User2 priv 7 password cisco<br />
<br />
Use the TEST AAA command to verify that the users were successfully added on the<br />
ACS server.<br />
R2#test aaa group tacacs+ User1 cisco legacy<br />
Attempting authentication test to server-group tacacs+ using tacacs+<br />
User was successfully authenticated.<br />
R2#test aaa group tacacs+ User2 cisco legacy<br />
Attempting authentication test to server-group tacacs+ using tacacs+<br />
User was successfully authenticated.<br />
R2#<br />
e) Setup Authorization based on Local Privilege Levels defined as follows:<br />
<br />
<br />
Setup authorization for User1 such that the user can type all commands. User1 should be in<br />
Privilege Exec mode when logged in.<br />
Setup authorization for User2 such that the user can type all commands specified in Privilege<br />
Level 7. Privilege Level 7 should allow the user to type all commands for snmp-server in<br />
global configuration mode. This privilege level should also allow the user to change the<br />
hostname of the Router.<br />
Copyright IPexpert, Inc. (http://www.ipexpert.com) 2007. All Rights Reserved. 349
Section 13 IPexpert’s CCIE Security Proctor Guide – Version 4.1<br />
Configure the commands for snmp, hostname, and config for privilege level 7.<br />
R2(config)#privilege configure all level 7 snmp-server<br />
R2(config)#privilege configure level 7 hostname<br />
R2(config)#privilege exec level 7 configure terminal<br />
R2(config)#privilege exec level 7 configure<br />
R2(config)#aaa authorization commands 1 NO none<br />
R2(config)#aaa authorization commands 7 NO none<br />
R2(config)#aaa authorization commands 15 NO none<br />
R2(config)#aaa authorization commands 1 YES local<br />
R2(config)#aaa authorization commands 7 YES local<br />
R2(config)#aaa authorization commands 15 YES local<br />
R2(config)#line aux 0<br />
R2(config-line)#authorization commands 1 NO<br />
R2(config-line)#authorization commands 7 NO<br />
R2(config-line)#authorization commands 15 NO<br />
R2(config-line)#line vty 0 15<br />
R2(config-line)#authorization commands 1 YES<br />
R2(config-line)#authorization commands 7 YES<br />
R2(config-line)#authorization commands 15 YES<br />
R2(config)#line aux 0<br />
R2(config-line)#authorization exec NO<br />
R2(config-line)#line vty 0 15<br />
R2(config-line)#authorization exec YES<br />
<br />
Verify by telnetting to R2 and logging in as one of the new users.<br />
R2#telnet 2.2.2.2<br />
Trying 2.2.2.2 ... Open<br />
Username: User2<br />
Password:<br />
R2#show priv<br />
Current privilege level is 7<br />
R2<br />
f) Configure Accounting for all commands typed by users from Telnet. You should be able to charge<br />
the users based on usage times.<br />
R2(config)#aaa accounting exec YES start-stop group tacacs+<br />
R2(config)#aaa accounting commands 1 YES start-stop group tac<br />
R2(config)#aaa accounting commands 7 YES start-stop group tac<br />
R2(config)#aaa accounting commands 15 YES start-stop group tac<br />
R2(config)#line vty 0 15<br />
R2(config-line)#accounting exec YES<br />
R2(config-line)#accounting commands 1 YES<br />
R2(config-line)#accounting commands 7 YES<br />
R2(config-line)#accounting commands 15 YES<br />
350 Copyright IPexpert, Inc. (http://www.ipexpert.com) 2007. All Rights Reserved.
IPexpert’s CCIE Security Proctor Guide – Version 4.1 Section 13<br />
g) Only allow VLAN 6 to be able to telnet into R2.<br />
R2(config)#access-list 23 permit 192.1.6.0 0.0.0.255<br />
R2(config)#line vty 0 15<br />
R2(config-line)#access-class 23 in<br />
5.2 - HTTP Management (2 Points)<br />
a) Configure HTTP Management on R2.<br />
R2(config)#ip http server<br />
b) Only Users from the VLAN 49 should be able to manage this router through HTTP.<br />
R2(config)#ip http authentication local<br />
R2(config)#ip http access-class 49<br />
R2(config)#access-list 49 permit 192.1.49.0 0.0.0.255<br />
c) HTTP should authenticate to the already configured AAA.<br />
R2(config)#ip http authentication local<br />
5.3 – ASA Management (2 points)<br />
a) ASA1 is configured to allow SSH management. Configure ASA1 to authenticate SSH sessions via<br />
TACACS+. Create a user asamgr with password !p3xp3rt on the ACS server. Verify that you can<br />
connect to ASA1 via SSH from R2.<br />
<br />
On the PIX, configure to allow the inbound TACACS traffic from ASA1. On the ASA,<br />
configure to permit SSH from R2. Since the ACS server is reached via the outside<br />
interface, make sure that you specify the outside interface in the server definition.<br />
pixfirewall(config)#access-list outsideint permit tcp host<br />
192.1.49.55 host 192.1.12.100 eq tacacs<br />
ASA1(config)#ssh 192.1.24.2 255.255.255.255 outside<br />
ASA1(config)#aaa-server TAC prot tacacs+<br />
ASA1(config)#aaa-server TAC (outside) host 192.1.12.100<br />
ASA1(config-aaa-server-host)#key cisco<br />
ASA1(config)#no aaa authent ssh console LOCAL<br />
ASA1(config)#aaa authent ssh console TAC<br />
Copyright IPexpert, Inc. (http://www.ipexpert.com) 2007. All Rights Reserved. 351
Section 13 IPexpert’s CCIE Security Proctor Guide – Version 4.1<br />
Verify that you can log in from R2.<br />
R2#ssh -l asamgr 192.1.49.55<br />
Password:<br />
Type help or '?' for a list of available commands.<br />
ASA1> en<br />
Password: *****<br />
Invalid password<br />
Password:<br />
ASA1#<br />
6 - IP Services Configuration (8 Points)<br />
6.1 - Creating Core Dumps (2 Points)<br />
a) Configure R5 to send a Core Dump to a TFTP Server located at 192.1.12.100.<br />
b) Set the Dump size to 32768.<br />
c) The router should use the source address of 5.5.5.5, the Loopback address on R5.<br />
<br />
Since 192.1.12.100 is the translated address of the ACS server, make sure that you also<br />
allow the traffic to pass through the PIX.<br />
R5(config)#exception dump 192.1.12.100<br />
R5(config)#exception prot tftp<br />
R5(config)#exception region-size 32768<br />
R5(config)#ip tftp source-int loop0<br />
pixfirewall(config)#access-list outsideint permit udp host 5.5.5.5<br />
host 192.1.12.100 eq 69<br />
6.2 - DHCP Server (4 Points)<br />
a) Enable R4 as a DHCP Server with the following information:<br />
IP ADDRESS : 192.1.49.0/24<br />
WINS ADDRESS : 192.1.49.135<br />
DNS ADDRESS : 192.1.49.53<br />
DEFAULT GATEWAY : 192.1.49.4<br />
LEASE TIME : 6 Days<br />
b) Enable conflict logging on R4.<br />
R4(config)#no ip dhcp conflict logging<br />
R4(config)#ip dhcp excluded-address 192.1.49.53<br />
R4(config)#ip dhcp excluded-address 192.1.49.135<br />
R4(config)#ip dhcp pool R4<br />
R4(dhcp-config)#network 192.1.49.0 255.255.255.0<br />
R4(dhcp-config)#netbios-name-server 192.1.49.135<br />
R4(dhcp-config)#dns-server 192.1.49.53<br />
R4(dhcp-config)#default-router 192.1.49.4<br />
R4(dhcp-config)#option 19 hex 01<br />
352 Copyright IPexpert, Inc. (http://www.ipexpert.com) 2007. All Rights Reserved.
IPexpert’s CCIE Security Proctor Guide – Version 4.1 Section 13<br />
c) Configure option 19 to tell the client should configure its IP layer for packet forwarding.<br />
<br />
This was configured in the previous step.<br />
d) Specifies four ping attempts by the DHCP server before ceasing any further ping attempts.<br />
R4(config)#ip dhcp ping packets 4<br />
e) Configure switch1 for DHCP snooping for this VLAN.<br />
Sw1(config)#ip dhcp snooping<br />
Sw1(config)#ip dhcp snooping vlan 49<br />
Sw1(config)#int fa0/4<br />
Sw1(config-if)#ip dhcp snooping trust<br />
<br />
Verify with show ip dhcp snooping:<br />
Sw1#show ip dhcp snooping<br />
Switch DHCP snooping is enabled<br />
DHCP snooping is configured on following VLANs:<br />
49<br />
Insertion of option 82 is enabled<br />
circuit-id format: vlan-mod-port<br />
remote-id format: MAC<br />
Option 82 on untrusted port is not allowed<br />
Verification of hwaddr field is enabled<br />
Interface Trusted Rate limit (pps)<br />
------------------------ ------- ----------------<br />
FastEthernet0/4 yes unlimited<br />
Sw1#<br />
6.3 - NTP (2 Points)<br />
a) Configure R2 as the NTP clock master.<br />
R2(config)#ntp master<br />
b) Configure R6 to use NTP clock from R2 in a secured way. R2 should not have any NTP<br />
authentication keys configured to achieve this task.<br />
R2(config)#int tunnel26<br />
R2(config-if)#ip address 192.168.26.2 255.255.255.0<br />
R2(config-if)#tun source ser0/1/0.6<br />
R2(config-if)#tun dest 192.1.26.6<br />
R6(config)#int tun26<br />
R6(config-if)#ip address 192.168.26.6 255.255.255.0<br />
R6(config-if)#tun source ser0/1/0<br />
R6(config-if)#tun dest 192.1.26.2<br />
R6(config)#ntp server 192.168.26.2<br />
Copyright IPexpert, Inc. (http://www.ipexpert.com) 2007. All Rights Reserved. 353
Section 13 IPexpert’s CCIE Security Proctor Guide – Version 4.1<br />
7 - Virtual Private Networks Configuration (18 Points)<br />
7.1 - Basic Concentrator Configuration (3 Points)<br />
a) Configure the IP Address of the Private Interface through the CLI.<br />
<br />
The basic setup through the CLI prompts you for basic setup information. After you<br />
have configured the private IP address, make sure to save changes and then you can<br />
access the GUI for the remainder of the setup.<br />
b) The Public interface should be configured from the Graphical interface.<br />
<br />
You can configure the public interface from either the GUI or from the command line.<br />
c) Make sure the PC can access the Concentrator. You are allowed a static route on the<br />
Concentrator to accomplish this.<br />
<br />
In this setup, a static route is not necessary on the concentrator. You should be<br />
familiar with how to add a static route to the concentrator, if needed, from the<br />
command line interface.<br />
354 Copyright IPexpert, Inc. (http://www.ipexpert.com) 2007. All Rights Reserved.
IPexpert’s CCIE Security Proctor Guide – Version 4.1 Section 13<br />
<br />
From the main menu on the CLI, the path to follow is:<br />
Configuration – System Management – IP Routing – Static Routes – Add Static route.<br />
d) Configure the concentrator to send routes using RIP on the private interface.<br />
<br />
By default, RIP is enabled on the private interface to receive routes. Outbound RIP is<br />
disabled by default. In order for later sections to work, you need to enable it outbound<br />
on the private interface.<br />
Configuration – Interfaces – Private – Outbound RIP.<br />
e) Configure a Default Route on the Public Interface pointing towards R2.<br />
<br />
<br />
The concentrator is learning a default route from the PIX. Configuring a static route,<br />
will allow R2 to be preferred<br />
Under Configuration-system- IP Routing – Default Gateways, add the router address or<br />
192.1.12.2 as a default gateway.<br />
7.2 - Setup a Site-to-Site IPSec VPN between the Concentrator and R5 (4 Points)<br />
a) Encrypt traffic between the 10.2.2.0/24 and 10.5.5.0/24 networks using the following parameters:<br />
<br />
<br />
<br />
Authentication is based on Pre-shared key of ccie.<br />
Use MD5 for the Hashing algorithm. Use defaults for the rest of the ISAKMP parameters.<br />
For IPSec, use ESP-DES for encryption and ESP-SHA-HMAC for Data Authentication in<br />
Tunnel Mode.<br />
b) You can use static routes on R5 and R1 to accomplish this.<br />
R5(config)#crypto isakmp key ccie address 192.1.12.5<br />
R5(config)#crypto isakmp policy 10<br />
R5(config-isakmp)#hash md5<br />
R5(config-isakmp)#authent pre-share<br />
R5(config)#crypto ipsec transform-set VPNC esp-des esp-sha-hmac<br />
R5(cfg-crypto-trans)#mode tunnel<br />
R5(config)#access-list 172 permit ip 10.5.5.0 0.0.0.255 10.2.2.0<br />
0.0.0.255<br />
R5(config)#crypto map R5MAP 10 ipsec-isakmp<br />
% NOTE: This new crypto map will remain disabled until a peer<br />
and a valid access list have been configured.<br />
R5(config-crypto-map)#match address 172<br />
R5(config-crypto-map)#set peer 192.1.12.5<br />
R5(config-crypto-map)#set transform VPNC<br />
R5(config)#int ser0/1/0<br />
R5(config-if)#crypto map R5MAP<br />
R5(config)#ip route 10.2.2.0 255.255.255.0 192.1.25.2<br />
Copyright IPexpert, Inc. (http://www.ipexpert.com) 2007. All Rights Reserved. 355
Section 13 IPexpert’s CCIE Security Proctor Guide – Version 4.1<br />
<br />
<br />
Add a static route to the VPN concentrator for the 10.5.5.0/24 network, with a<br />
destination of R2.<br />
Check the routing table on the VPN Concentrator. Depending on how you set up the<br />
routing on the PIX, you may also need to add a route to 192.1.25.0/24 via the public<br />
interface.<br />
356 Copyright IPexpert, Inc. (http://www.ipexpert.com) 2007. All Rights Reserved.
IPexpert’s CCIE Security Proctor Guide – Version 4.1 Section 13<br />
Copyright IPexpert, Inc. (http://www.ipexpert.com) 2007. All Rights Reserved. 357
Section 13 IPexpert’s CCIE Security Proctor Guide – Version 4.1<br />
<br />
Verify that you can ping R1’s address with a source of R5’s Ethernet address.<br />
R5#ping 10.2.2.1 source 10.5.5.5<br />
Type escape sequence to abort.<br />
Sending 5, 100-byte ICMP Echos to 10.2.2.1, timeout is 2 seconds:<br />
Packet sent with a source address of 10.5.5.5<br />
!!!!!<br />
Success rate is 100 percent (5/5), round-trip min/avg/max = 28/28/32 ms<br />
R5#<br />
7.3 - Setup a Remote Access VPN from the Cisco Secure Client and the Concentrator (4 points)<br />
a) Use the following parameters to setup Concentrator with the following options:<br />
<br />
<br />
<br />
Assign IP Address in the range of 10.3.3.1 – 10.3.3.254. The pool should be created on the<br />
Concentrator.<br />
Set the username as VPNUser with a password of ccie1234.<br />
Create a group called Remote with a password of ccie.<br />
b) The network 10.3.3.0 should be propagated to R1 through RIP.<br />
<br />
<br />
<br />
<br />
<br />
<br />
Add the group under User Management - Groups – Add Group.<br />
Add the address pool for the group, by selecting the group and “add address pool”<br />
Add the user under Configuration – User Management – Users.<br />
Under system – IP routing, select Generate holddown routes, and apply.<br />
Under system – address management – assignment, select use address pools.<br />
You can verify by connecting from the Test PC, however since split tunneling is not<br />
configured, you will may lose your connection to the Test PC.<br />
358 Copyright IPexpert, Inc. (http://www.ipexpert.com) 2007. All Rights Reserved.
IPexpert’s CCIE Security Proctor Guide – Version 4.1 Section 13<br />
<br />
Make sure that R1 sees the route for the 10.3.3.0/24 network. If you did not enable<br />
outbound RIP updates on the VPN concentrator’s private interface, R1 will not receive<br />
the update from the concentrator.<br />
R1#show ip route 10.3.3.0<br />
Routing entry for 10.3.3.0/24<br />
Known via "rip", distance 120, metric 1<br />
Redistributing via rip<br />
Last update from 10.2.2.5 on FastEthernet0/0, 00:00:16 ago<br />
Routing Descriptor Blocks:<br />
* 10.2.2.5, from 10.2.2.5, 00:00:16 ago, via FastEthernet0/0<br />
Route metric is 1, traffic share count is 1<br />
R1#<br />
Copyright IPexpert, Inc. (http://www.ipexpert.com) 2007. All Rights Reserved. 359
Section 13 IPexpert’s CCIE Security Proctor Guide – Version 4.1<br />
7.4 - Setup a Site-to-Site IPSec VPN between the R2 and R6 (4 Points)<br />
a) Create the following loopbacks on R2 and R6:<br />
R2 - Int loo 10 : 192.168.102.2/24<br />
R6 - Int loo 10 : 192.168.106.6/24<br />
b) Create a GRE tunnel from R2 S 0/1/0.6 to R6 S 0/1/0. Route the newly created loopbacks over the<br />
tunnel using EIGRP in AS 26.<br />
<br />
Depending on how you configured step 6.3, it is possible that you already have the<br />
tunnel created. If so, just add the networks to EIGRP.<br />
R2(config)#router eigrp 26<br />
R2(config-router)#network 192.168.26.0<br />
R2(config-router)#network 192.168.102.0<br />
R6(config)#router eigrp 26<br />
R6(config-router)#network 192.168.26.0<br />
R6(config-router)#network 192.168.106.0<br />
c) Encrypt traffic going on the GRE tunnel including the EIGRP traffic using the following parameters:<br />
<br />
<br />
<br />
<br />
Authentication is based on Pre-shared key of ccie.<br />
Use MD5 for the Hashing algorithm and Group 2 for the Diffie-Hellman key exchange. Use<br />
defaults for the rest of the parameters.<br />
For IPSec, use ESP-DES for encryption and ESP-MD5-HMAC for Authentication in Transport<br />
Mode.<br />
Start with the key on both sides:<br />
R2(config)#crypto isakmp key ccie address 192.1.26.6<br />
R6(config)#crypto isakmp key ccie address 192.1.26.2<br />
<br />
Configure the isakmp policies:<br />
R2(config)#crypto isakmp policy 10<br />
R2(config-isakmp)#hash md5<br />
R2(config-isakmp)#authent pre-share<br />
R2(config-isakmp)#group 2<br />
R6(config)#crypto isakmp policy 10<br />
R6(config-isakmp)#hash md5<br />
R6(config-isakmp)#authent pre-share<br />
R6(config-isakmp)#group 2<br />
<br />
Configure the transform sets:<br />
R2(config)#crypto ipsec transform-set R2R6 esp-des esp-md5-hmac<br />
R2(cfg-crypto-trans)#mode transport<br />
R6(config)#crypto ipsec transform-set R2R6 esp-des esp-md5-hmac<br />
R6(cfg-crypto-trans)#mode transport<br />
360 Copyright IPexpert, Inc. (http://www.ipexpert.com) 2007. All Rights Reserved.
IPexpert’s CCIE Security Proctor Guide – Version 4.1 Section 13<br />
<br />
Configure the access lists:<br />
R2(config)#access-list 151 permit gre host 192.1.26.2 host 192.1.26.6<br />
R6(config)#access-list 151 permit gre host 192.1.26.6 host 192.1.26.2<br />
<br />
Configure the crypto maps:<br />
R2(config)#crypto map secure 10 ipsec-isakmp<br />
% NOTE: This new crypto map will remain disabled until a peer<br />
and a valid access list have been configured.<br />
R2(config-crypto-map)#set peer 192.1.26.6<br />
R2(config-crypto-map)#set transform-set R2R6<br />
R2(config-crypto-map)#match address 151<br />
R6(config)#crypto map secure 10 ipsec-isakmp<br />
% NOTE: This new crypto map will remain disabled until a peer<br />
and a valid access list have been configured.<br />
R6(config-crypto-map)#set peer 192.1.26.2<br />
R6(config-crypto-map)#set transform-set R2R6<br />
R6(config-crypto-map)#match address 151<br />
<br />
Apply to the interfaces:<br />
R2(config-crypto-map)#int ser0/1/0.6<br />
R2(config-subif)#crypto map secure<br />
R6(config)#int ser0/1/0<br />
R6(config-if)#crypto map secure<br />
<br />
Verify with show crypto ipsec sa:<br />
R6#show crypto ipsec sa<br />
interface: Serial0/1/0<br />
Crypto map tag: secure, local addr 192.1.26.6<br />
protected vrf: (none)<br />
local ident (addr/mask/prot/port): (192.1.26.6/255.255.255.255/47/0)<br />
remote ident (addr/mask/prot/port): (192.1.26.2/255.255.255.255/47/0)<br />
current_peer 192.1.26.2 port 500<br />
PERMIT, flags={origin_is_acl,}<br />
#pkts encaps: 165, #pkts encrypt: 165, #pkts digest: 165<br />
#pkts decaps: 165, #pkts decrypt: 165, #pkts verify: 165<br />
#pkts compressed: 0, #pkts decompressed: 0<br />
#pkts not compressed: 0, #pkts compr. failed: 0<br />
#pkts not decompressed: 0, #pkts decompress failed: 0<br />
#send errors 1, #recv errors 0<br />
local crypto endpt.: 192.1.26.6, remote crypto endpt.: 192.1.26.2<br />
path mtu 1500, ip mtu 1500<br />
current outbound spi: 0x8AE41CB5(2330205365)<br />
Copyright IPexpert, Inc. (http://www.ipexpert.com) 2007. All Rights Reserved. 361
Section 13 IPexpert’s CCIE Security Proctor Guide – Version 4.1<br />
8 - IOS Firewall Configuration (8 Points)<br />
8.1 - Cisco IOS Firewall (4 Points)<br />
a) On R4, inspect all tcp, udp and icmp traffic from the Ethernet segment going towards the Frame<br />
networks.<br />
<br />
Start by configuring the inspection, and apply to the interface.<br />
R4(config)#ip inspect name MYFW tcp<br />
R4(config)#ip inspect name MYFW udp<br />
R4(config)#ip inspect name MYFW icmp<br />
R4(config)#int ser0/0/0<br />
R4(config-if)#ip inspect MYFW out<br />
b) Only allow relevant traffic coming in.<br />
<br />
We have BGP and OSPF sessions to permit.<br />
R4(config)#ip access-list extended 121<br />
R4(config-ext-nacl)#permit tcp host 2.2.2.2 host 4.4.4.4 eq bgp<br />
R4(config-ext-nacl)#permit tcp host 2.2.2.2 eq bgp host 4.4.4.4 est<br />
R4(config-ext-nacl)#permit ospf host 192.1.24.2 host 224.0.0.5<br />
R4(config-ext-nacl)#permit ospf host 192.1.24.2 host 192.1.24.4<br />
R4(config-ext-nacl)#deny ip any any log<br />
c) ACL should be set to inbound on the Serial interface.<br />
R4(config)#int ser0/0/0<br />
R4(config-if)#ip access-group 121 in<br />
8.2 - Cisco IOS Firewall tuning (2 Points)<br />
a) Set the IOS Firewall such that it blocks half-open connections if they exceed 1000 and stop<br />
deleting the connections if the reach 800.<br />
b) Also set it for a one-minute high.<br />
c) Set the TCP idle time to 30 Minutes.<br />
R4(config)#ip inspect max-incomplete high 1000<br />
R4(config)#ip inspect max-incomplete low 801<br />
R4(config)#ip inspect one-minute high 1000<br />
R4(config)#ip inspect one-minute low 801<br />
R4(config)#ip inspect tcp idle-time 1800<br />
362 Copyright IPexpert, Inc. (http://www.ipexpert.com) 2007. All Rights Reserved.
IPexpert’s CCIE Security Proctor Guide – Version 4.1 Section 13<br />
8.3 - Cisco IOS Firewall on R4 (2 points)<br />
a) Set the global UDP idle timeout to 110 seconds.<br />
R4(config)#ip inspect udp idle-time 110<br />
b) Changes the max-incomplete host number to 32 half-open sessions, and changes the block-time<br />
timeout to 1 minute.<br />
R4(config)#ip inspect tcp max-incomplete host 32 block 1<br />
c) Turn on an audit trail messages which will be displayed on the console after each CBAC session<br />
closes.<br />
R4(config)#ip inspect audit-trail<br />
d) Globally specify the TCP session will still be managed after the firewall detects a FIN-exchange to<br />
be 15 seconds for all TCP sessions.<br />
R4(config)#ip inspect tcp finwait-time 15<br />
<br />
Double check your settings with show ip inspect all<br />
R4#show ip inspect all<br />
Session audit trail is enabled<br />
Session alert is enabled<br />
one-minute (sampling period) thresholds are [801:1000] connections<br />
max-incomplete sessions thresholds are [801:1000]<br />
max-incomplete tcp connections per host is 32. Block-time 1 minute.<br />
tcp synwait-time is 30 sec -- tcp finwait-time is 15 sec<br />
tcp idle-time is 1800 sec -- udp idle-time is 110 sec<br />
dns-timeout is 5 sec<br />
Inspection Rule Configuration<br />
Inspection name MYFW<br />
tcp alert is on audit-trail is on timeout 1800<br />
udp alert is on audit-trail is on timeout 110<br />
icmp alert is on audit-trail is on timeout 10<br />
Interface Configuration<br />
Interface Serial0/0/0<br />
Inbound inspection rule is not set<br />
Outgoing inspection rule is MYFW<br />
tcp alert is on audit-trail is on timeout 1800<br />
udp alert is on audit-trail is on timeout 110<br />
icmp alert is on audit-trail is on timeout 10<br />
Inbound access list is 121<br />
Outgoing access list is not set<br />
R4#<br />
Copyright IPexpert, Inc. (http://www.ipexpert.com) 2007. All Rights Reserved. 363
Section 13 IPexpert’s CCIE Security Proctor Guide – Version 4.1<br />
9 - Advanced Security and Attacks Configuration (12 Points)<br />
9.1 - Filtering Java and ActiveX applets (2 Points)<br />
a) Setup the PIX to block the downloading of Java and ActiveX applets from anywhere.<br />
pixfirewall(config)#filter java 80 0 0 0 0<br />
pixfirewall(config)#filter activex 80 0 0 0 0<br />
9.2 - Allow Remote Management of the PIX (2 Points)<br />
a) Setup the PIX firewall so that the PC at 10.1.1.100 can telnet into the PIX for remote<br />
management. Change the default Telnet password to ccie.<br />
pixfirewall(config)#telnet 10.1.1.100 255.255.255.255 inside<br />
pixfirewall(config)#passwd ccie<br />
<br />
Verify by telnetting from the ACS server.<br />
9.3 - Time-Based Access List (2 Points)<br />
a) You do not want users on R6 Ethernet Network access a special application that uses TCP port<br />
25000, during the Weekdays between 9:00 AM to 4:00 PM.<br />
b) It is OK for them to use the application at other times.<br />
R6(config)#time-range WEEKDAYS<br />
R6(config-time-range)#periodic weekdays 09:00 to 15:59<br />
R6(config)#access-list 131 deny tcp 192.1.6.0 0.0.0.255 any eq 25000<br />
time-range WEEKDAYS<br />
R6(config)#access-list 131 permit ip any any<br />
R6(config)#int fa0/0<br />
R6(config-if)#ip access-group 131 in<br />
9.4 - Time-Based Access List (2 Points)<br />
a) You do not want users on R6 Ethernet Network to use a customized application that uses UDP<br />
port 20000, on the Weekend between 10:00 AM to 3:00 PM.<br />
b) It is OK for them to use the application at other times.<br />
<br />
Since this is on the same interface, make sure to merge this into the existing accesslist.<br />
R6(config)#time-range WEEKEND<br />
R6(config-time-range)#periodic weekend 10:00 to 14:59<br />
R6(config)#ip access-list extended 131<br />
R6(config-ext-nacl)#no permit ip any any<br />
364 Copyright IPexpert, Inc. (http://www.ipexpert.com) 2007. All Rights Reserved.
IPexpert’s CCIE Security Proctor Guide – Version 4.1 Section 13<br />
R6(config-ext-nacl)#deny udp 192.1.6.0 0.0.0.255 any eq 20000 timerange<br />
WEEKEND<br />
R6(config-ext-nacl)#permit ip any any<br />
R6#show access-list 131<br />
Extended IP access list 131<br />
10 deny tcp 192.1.6.0 0.0.0.255 any eq 25000 time-range WEEKDAYS<br />
(inactive)<br />
20 deny udp 192.1.6.0 0.0.0.255 any eq 20000 time-range WEEKEND<br />
(inactive)<br />
30 permit ip any any<br />
R6#show time-range<br />
time-range entry: WEEKDAYS (inactive)<br />
periodic weekdays 9:00 to 15:59<br />
used in: IP ACL entry<br />
time-range entry: WEEKEND (inactive)<br />
periodic weekend 10:00 to 14:59<br />
used in: IP ACL entry<br />
R6#<br />
9.5 - Disable Unnecessary Services (2 Points)<br />
a) Disable the DHCP Service on R6.<br />
b) Verify that it is disabled by typing Show ip socket.<br />
R6#show ip socket<br />
Proto Remote Port Local Port In Out Stat TTY OutputIF<br />
17 0.0.0.0 0 6.6.6.6 5060 0 0 211 0<br />
17 --listen-- 6.6.6.6 68 0 0 1 0<br />
17 --listen-- 6.6.6.6 2887 0 0 11 0<br />
17 0.0.0.0 0 6.6.6.6 67 0 0 2211 0<br />
17 0.0.0.0 0 6.6.6.6 2517 0 0 11 0<br />
88 --listen-- 6.6.6.6 26 0 0 0 0<br />
17 192.1.12.65 514 6.6.6.6 56286 0 0 211 0<br />
17 --listen-- 6.6.6.6 123 0 0 1 0<br />
R6#<br />
R6(config)#no service dhcp<br />
R6#show ip socket<br />
Proto Remote Port Local Port In Out Stat TTY OutputIF<br />
17 0.0.0.0 0 6.6.6.6 5060 0 0 211 0<br />
17 --listen-- 6.6.6.6 68 0 0 1 0<br />
17 --listen-- 6.6.6.6 2887 0 0 11 0<br />
17 0.0.0.0 0 6.6.6.6 2517 0 0 11 0<br />
88 --listen-- 6.6.6.6 26 0 0 0 0<br />
17 192.1.12.65 514 6.6.6.6 56286 0 0 211 0<br />
17 --listen-- 6.6.6.6 123 0 0 1 0<br />
R6#<br />
Copyright IPexpert, Inc. (http://www.ipexpert.com) 2007. All Rights Reserved. 365
Section 13 IPexpert’s CCIE Security Proctor Guide – Version 4.1<br />
9.6 - Spoofing (2 Points)<br />
a) Remove problems caused by the introduction of malformed or forged (spoofed) IP source<br />
addresses into a network by discarding IP packets that lack a verifiable IP source address in R2's<br />
F1/0. Only packets with a source address of 10.5.5.100 arriving at interface FastEthernet0/0 are<br />
verified and dropped if needed.<br />
R2(config)#access-list 96 deny 10.5.5.100<br />
R2(config-if)#ip verify unicast reverse-path 96<br />
Technical Verification and Support<br />
To verify your router configurations please ensure that you have downloaded the<br />
latest configurations at www.IPexpert.com. Please visit the following web site for<br />
instructions: http://www.ipexpert.com/configs<br />
Support is also available in the following ways:<br />
• Email: support@ipexpert.com<br />
• Telephone (US and Canada): +1.866.225.8064<br />
• Telephone (Outside U.S. & Canada): +1.810.326.1444<br />
• Support Ticket System (Elite Members): http://www.ipexpert.com<br />
• Mailing List: http://www.OnlineStudyList.com<br />
• Online Forum: http://www.CertificationTalk.com<br />
366 Copyright IPexpert, Inc. (http://www.ipexpert.com) 2007. All Rights Reserved.
IPexpert, Inc.<br />
Product Order Form<br />
For prompt processing of your order, please observe these pointers:<br />
1. Be sure to provide all information requested on this form.<br />
2. Please print all information clearly.<br />
Your Name:<br />
_________________________________________________<br />
Date of Purchase: _________________________________________________<br />
Please list the product(s) you wish to order here:<br />
__________________________________________________<br />
__________________________________________________<br />
__________________________________________________<br />
Subtotal from above:<br />
Price of Product:<br />
_____________<br />
_____________<br />
_____________<br />
_____________<br />
Add shipping / handling: $25.00 $55.00<br />
USA International<br />
Total purchase amount: _____________<br />
Credit Card number:<br />
Expiration Date:<br />
Name exactly as it appears on card:<br />
_____________________________________________<br />
_____________________________________________<br />
_____________________________________________<br />
Billing address for this credit card: Address 1: ________________________________<br />
Address 2:<br />
________________________________<br />
City, State, Zip: ________________________________<br />
Telephone Number:<br />
Email Address:<br />
_____________________________________________<br />
_____________________________________________<br />
Shipping Address: Address 1: ________________________________<br />
(If different than Billing Address)<br />
Address 2: ________________________________<br />
City, State, Zip: ________________________________<br />
Signature: _____________________________________<br />
Date: _______________<br />
FAX THIS FORM TO +1.810.454.0130<br />
IPexpert, Inc. | Product Order Form