Chapter 9. BIND DNS Server
Chapter 9. BIND DNS Server
Chapter 9. BIND DNS Server

Create successful ePaper yourself
Turn your PDF publications into a flip-book with our unique Google optimized e-Paper software.
<strong>Chapter</strong> <strong>9.</strong> <strong>BIND</strong> <strong>DNS</strong> <strong>Server</strong><br />
The <strong>BIND</strong> <strong>DNS</strong> <strong>Server</strong> module creates and edits domains, <strong>DNS</strong> records and <strong>BIND</strong> options for the 8.x and <strong>9.</strong>x<br />
releases. <strong>BIND</strong> (Berkeley Internet Name Domain) is an implementation of the Domain Name System (<strong>DNS</strong>)<br />
protocol and provides an open, redistributable reference implementation of the major components of the Domain<br />
Name System. A <strong>DNS</strong> server allows to associate a name to an IP address and vice versa. For example:<br />
www.mandrakesoft.com (“Name”) is associated to 63.20<strong>9.</strong>80.236 (“Address”).<br />
<strong>BIND</strong> is very useful for simple configurations, but there are a few differences between the 8.x end <strong>9.</strong>x releases.<br />
However, you must be careful with this Webmin module because not all <strong>BIND</strong> <strong>9.</strong>x options are supported yet.<br />
Hence, if you try to use the advanced options, you will have to look at the log files more carefully than with<br />
the other Webmin modules, in order to make sure <strong>BIND</strong> is working properly.<br />
<strong>9.</strong>1. Installation<br />
First of all, you must install the RPM package which contains the <strong>DNS</strong> server. The server we will use is <strong>BIND</strong>.<br />
The first thing to do is to install the three following packages: bind, bind-utils, and caching-nameserver.<br />
In order to use the Webmin module, <strong>BIND</strong> <strong>DNS</strong> <strong>Server</strong> , you will have to select the <strong>Server</strong>s category and then<br />
the <strong>BIND</strong> <strong>DNS</strong> <strong>Server</strong> button (with the number 8 in the icon, not number 4).<br />
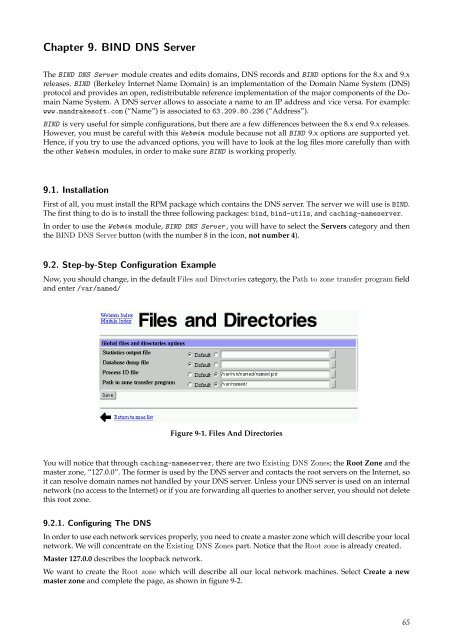
<strong>9.</strong>2. Step-by-Step Configuration Example<br />
Now, you should change, in the default Files and Directories category, the Path to zone transfer program field<br />
and enter /var/named/<br />
Figure 9-1. Files And Directories<br />
You will notice that through caching-nameserver, there are two Existing <strong>DNS</strong> Zones; the Root Zone and the<br />
master zone, “127.0.0”. The former is used by the <strong>DNS</strong> server and contacts the root servers on the Internet, so<br />
it can resolve domain names not handled by your <strong>DNS</strong> server. Unless your <strong>DNS</strong> server is used on an internal<br />
network (no access to the Internet) or if you are forwarding all queries to another server, you should not delete<br />
this root zone.<br />
<strong>9.</strong>2.1. Configuring The <strong>DNS</strong><br />
In order to use each network services properly, you need to create a master zone which will describe your local<br />
network. We will concentrate on the Existing <strong>DNS</strong> Zones part. Notice that the Root zone is already created.<br />
Master 127.0.0 describes the loopback network.<br />
We want to create the Root zone which will describe all our local network machines. Select Create a new<br />
master zone and complete the page, as shown in figure 9-2.<br />
65
<strong>Chapter</strong> <strong>9.</strong> <strong>BIND</strong> <strong>DNS</strong> <strong>Server</strong><br />
Figure 9-2. Creating a Forward Master Zone<br />
A new page with many icons will be displayed: don’t worry since most of them can be ignored if you do not<br />
need advanced configuration. You will be able to add all network machine names through this page, but you<br />
should create the reverse part of your master zone first. In fact, a <strong>DNS</strong> zone is composed of two parts; one for<br />
name-to-address conversion (i.e.: forward) and another for address-to-name conversion (i.e.: reverse).<br />
Then, select Return to the zone list and choose Create a new master zone once more but this time, you must<br />
change the selection from Forward to Reverse. Instead of writing your domain name, you must write the<br />
network class like described: for a 192.168.1.0/24 network, you should write 192.168.1.<br />
Figure 9-3. Creating a Reverse Master Zone<br />
<strong>9.</strong>2.2. Recording Your Network’s Computers<br />
This step is the only one you have to restart each time you add a new machine in your network; all other<br />
parameters are configured only once, as long as your network does not change and you do not add other <strong>DNS</strong><br />
servers.<br />
Return to the zone list and select one of the new Existing <strong>DNS</strong> Zones (in our example, they are named<br />
192.168.1 or mydomain.test). If you select mydomain.test, click on Address and you can add as many machi-<br />
66
<strong>Chapter</strong> <strong>9.</strong> <strong>BIND</strong> <strong>DNS</strong> <strong>Server</strong><br />
ne Names as your IP class allows you to (254 machine names in our example). Notice that the Update reverse<br />
option is selected by default. Through this option, the Reverse part of your <strong>DNS</strong> is updated automatically.<br />
Figure 9-4. Adding Machine Names<br />
<strong>9.</strong>2.3. Starting The Service<br />
We created a very simple <strong>DNS</strong>. To start it and load the new configuration, you must go back to the zone list<br />
and click on Start Name <strong>Server</strong>.<br />
Figure 9-5. Starting Bind<br />
If the button is not replaced by a new one named Apply Changes, then the server did not start because of a<br />
configuration error. In this case, you should read the next section.<br />
Figure 9-6. Apply Changes to Bind<br />
67
<strong>Chapter</strong> <strong>9.</strong> <strong>BIND</strong> <strong>DNS</strong> <strong>Server</strong><br />
<strong>9.</strong>2.4. Configuring The Client<br />
In order to use your local network to resolve Internet addresses, you have to configure the client to access the<br />
<strong>DNS</strong>. Go back to Webmin ’s index, and select the Hardware tab, then click on the Network Configuration icon.<br />
Then, select the <strong>DNS</strong> Client and type your <strong>DNS</strong>’s IP if it is a remote client, or 127.0.0.1 if you are on the<br />
server.<br />
Figure 9-7. Configuring The Client<br />
<strong>9.</strong>3. Advanced Configuration<br />
<strong>9.</strong>3.1. How to Debug<br />
If the service did not start, you should look at the /var/log/messages file to read the debug output of <strong>BIND</strong> .<br />
If you do not find the error, you can use the named-checkconf program and named-checkzone to check your<br />
configuration.<br />
Through the bind-utils package, you can use many utilities and therefore, test your <strong>DNS</strong> (nslookup or dig).<br />
To use them, you should add the <strong>DNS</strong> server’s IP, preceded by the word “nameserver”, in your local /etc/<br />
resolv.conf file.<br />
<strong>9.</strong>3.2. The rndc Command<br />
<strong>BIND</strong> ’s configuration is not done yet, since rndc is not yet configured to work in all your network. rndc is the<br />
name server control utility. You can, for example, have statistics (using the rndc stats command), or you can<br />
ask for status (using the rndc status command). For more information about this powerful command, you<br />
should read the man page: rndc.<br />
rndc communicates with the nameserver over a TCP connection, sending commands authenticated with digital<br />
signatures; you should change the default key using the /usr/sbin/new_key.pl command. If you installed<br />
the caching-nameserver RPM package, a default rndc configuration will be done and you can use it. If not,<br />
you will have to add the key which is in the /etc/rndc.conf file to your /etc/named.conf file.<br />
The control statement declares control channels to be used by system administrators in order to affect the operation<br />
of the local nameserver. These control channels are used by the rndc utility, to send commands to and<br />
retrieve non-<strong>DNS</strong> results from a nameserver. To modify it, you should not select the Control Interface Options<br />
icon. Indeed, Webmin removes the key options, which is in the “controls” statement. You should modify the<br />
/etc/named.conf file using a text editor. Here is an example of local-only rndc use with key:<br />
// secret must be the same as in /etc/rndc.conf<br />
key "key" {<br />
algorithm hmac-md5;<br />
secret<br />
"cOb0cEDYZIQKNXDjnRJLmcTuZiXADGfVBahwsAnOd0yJbTmzPeHWO0LTTeCt";<br />
};<br />
controls {<br />
inet 127.0.0.1<br />
allow { 127.0.0.1;<br />
68
<strong>Chapter</strong> <strong>9.</strong> <strong>BIND</strong> <strong>DNS</strong> <strong>Server</strong><br />
};<br />
}<br />
keys { "key";<br />
};<br />
For security reasons, the Mandrake Linux <strong>BIND</strong> server is started with limited user privileges. If you create<br />
a secondary <strong>DNS</strong> in your network, the <strong>BIND</strong> server could have to create its own files using the master <strong>DNS</strong>.<br />
That’s why you should change the owner of the “zones files” created by Webmin . The command to use is chown<br />
named -R /var/named/.<br />
<strong>9.</strong>3.3. Documentation<br />
If you want to do more with <strong>BIND</strong> , it is strongly recommended you read the <strong>BIND</strong> 9 Administrator Reference<br />
Manual, which is available in PDF format on the official <strong>BIND</strong> web site. More documentation is available in<br />
HTML format, if you click on Search docs, in the upper-right corner of Webmin ’s Network Configuration or<br />
<strong>BIND</strong> <strong>DNS</strong> <strong>Server</strong> page. At their bottom, there are a lot of very interesting Internet links. Notice that the<br />
Reference Manual is available in HTML if you click on bind-<strong>9.</strong>2.0/html/Bv9ARM.html.<br />
Figure 9-8. The <strong>BIND</strong> 9 Administrator Reference Manual Through Webmin<br />
<strong>9.</strong>3.4. A Few More Options<br />
For all the options which are not detailed in this document, we advise you to leave the default ones, unless you<br />
really know what you are doing. Each time you change the configuration, you should click on Apply Changes<br />
to verify that the server configuration is not broken by your change.<br />
<strong>9.</strong>3.4.1. Global <strong>Server</strong> Options<br />
• Logging and Errors: you can add logging channels or categories to allow you to sort out your logs the way<br />
you want to;<br />
• Access Control Lists: the ACL statement assigns a symbolic name to an address match list (the IPs are<br />
separated by a “space”);<br />
• Forwarding and Transfers: the forwarding facility can be used to create a large, site-wide cache on a few<br />
servers, therefore reducing traffic over links to external nameservers. It can also be used to allow queries by<br />
69
<strong>Chapter</strong> <strong>9.</strong> <strong>BIND</strong> <strong>DNS</strong> <strong>Server</strong><br />
servers that do not have direct access to the Internet, but wish to look up exterior names anyhow. Forwarding<br />
occurs only on those queries for which the server is not authoritative and does not have the answer in<br />
its cache.<br />
<strong>9.</strong>3.4.2. Creating a New View<br />
The view statement is a powerful new feature of <strong>BIND</strong> 9 which lets a nameserver answer a <strong>DNS</strong> query differently,<br />
depending on who is asking. It is particularly useful for implementing split <strong>DNS</strong> setups without having<br />
to run multiple servers.<br />
70
Security And Network Issues<br />
Up until now in this manual, you have been reading very practical information. You should be able to efficiently<br />
configure your server and be happy with it by now.<br />
However, all that is just a glimpse of your Mandrake Linux system’s possibilities. In order to dig in a little<br />
deeper, we chose to add two chapters to complete your Mandrake Linux knowledge:<br />
• “Security Under GNU/Linux”, page 73: this is a must read for any system administrator. Even though you can<br />
make your Mandrake Linux system quite secure with default tools, efficient security can only be achieved<br />
through active administration, taking care of both physical and logical global system security;<br />
• “Networking Overview”, page 111: a server is meant to bring services to a network. This manual would have<br />
been incomplete without a chapter dedicated to networking. The configuration of the network itself and the<br />
different protocols are tackled.