Chapter 9. BIND DNS Server
Chapter 9. BIND DNS Server
Chapter 9. BIND DNS Server

You also want an ePaper? Increase the reach of your titles
YUMPU automatically turns print PDFs into web optimized ePapers that Google loves.
<strong>Chapter</strong> <strong>9.</strong> <strong>BIND</strong> <strong>DNS</strong> <strong>Server</strong><br />
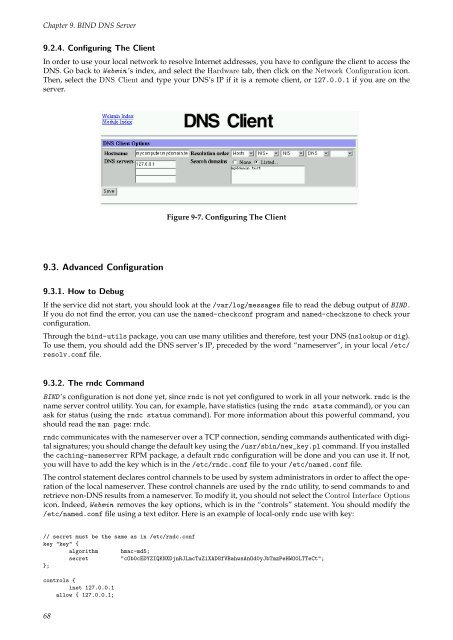
<strong>9.</strong>2.4. Configuring The Client<br />
In order to use your local network to resolve Internet addresses, you have to configure the client to access the<br />
<strong>DNS</strong>. Go back to Webmin ’s index, and select the Hardware tab, then click on the Network Configuration icon.<br />
Then, select the <strong>DNS</strong> Client and type your <strong>DNS</strong>’s IP if it is a remote client, or 127.0.0.1 if you are on the<br />
server.<br />
Figure 9-7. Configuring The Client<br />
<strong>9.</strong>3. Advanced Configuration<br />
<strong>9.</strong>3.1. How to Debug<br />
If the service did not start, you should look at the /var/log/messages file to read the debug output of <strong>BIND</strong> .<br />
If you do not find the error, you can use the named-checkconf program and named-checkzone to check your<br />
configuration.<br />
Through the bind-utils package, you can use many utilities and therefore, test your <strong>DNS</strong> (nslookup or dig).<br />
To use them, you should add the <strong>DNS</strong> server’s IP, preceded by the word “nameserver”, in your local /etc/<br />
resolv.conf file.<br />
<strong>9.</strong>3.2. The rndc Command<br />
<strong>BIND</strong> ’s configuration is not done yet, since rndc is not yet configured to work in all your network. rndc is the<br />
name server control utility. You can, for example, have statistics (using the rndc stats command), or you can<br />
ask for status (using the rndc status command). For more information about this powerful command, you<br />
should read the man page: rndc.<br />
rndc communicates with the nameserver over a TCP connection, sending commands authenticated with digital<br />
signatures; you should change the default key using the /usr/sbin/new_key.pl command. If you installed<br />
the caching-nameserver RPM package, a default rndc configuration will be done and you can use it. If not,<br />
you will have to add the key which is in the /etc/rndc.conf file to your /etc/named.conf file.<br />
The control statement declares control channels to be used by system administrators in order to affect the operation<br />
of the local nameserver. These control channels are used by the rndc utility, to send commands to and<br />
retrieve non-<strong>DNS</strong> results from a nameserver. To modify it, you should not select the Control Interface Options<br />
icon. Indeed, Webmin removes the key options, which is in the “controls” statement. You should modify the<br />
/etc/named.conf file using a text editor. Here is an example of local-only rndc use with key:<br />
// secret must be the same as in /etc/rndc.conf<br />
key "key" {<br />
algorithm hmac-md5;<br />
secret<br />
"cOb0cEDYZIQKNXDjnRJLmcTuZiXADGfVBahwsAnOd0yJbTmzPeHWO0LTTeCt";<br />
};<br />
controls {<br />
inet 127.0.0.1<br />
allow { 127.0.0.1;<br />
68