METROLOGY 101: PISTON PROVER DESIGN - Cal Lab Magazine
METROLOGY 101: PISTON PROVER DESIGN - Cal Lab Magazine
METROLOGY 101: PISTON PROVER DESIGN - Cal Lab Magazine
You also want an ePaper? Increase the reach of your titles
YUMPU automatically turns print PDFs into web optimized ePapers that Google loves.
Metrology: Standardize and Automate!<br />
Mark Kuster<br />
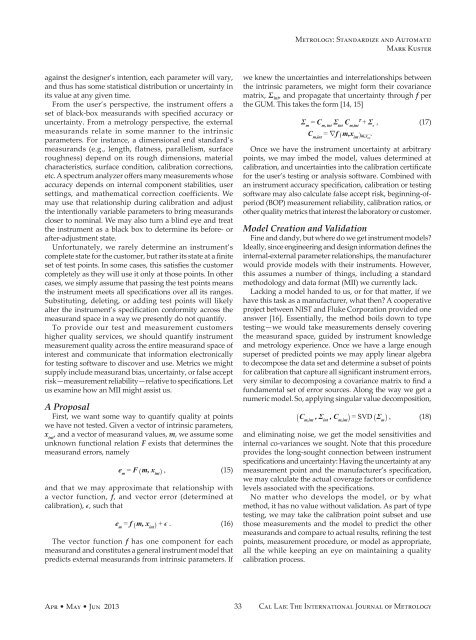
against the designer’s intention, each parameter will vary,<br />
and thus has some statistical distribution or uncertainty in<br />
its value at any given time.<br />
From the user’s perspective, the instrument offers a<br />
set of black-box measurands with specified accuracy or<br />
uncertainty. From a metrology perspective, the external<br />
measurands relate in some manner to the intrinsic<br />
parameters. For instance, a dimensional end standard’s<br />
measurands (e.g., length, flatness, parallelism, surface<br />
roughness) depend on its rough dimensions, material<br />
characteristics, surface condition, calibration corrections,<br />
etc. A spectrum analyzer offers many measurements whose<br />
accuracy depends on internal component stabilities, user<br />
settings, and mathematical correction coefficients. We<br />
may use that relationship during calibration and adjust<br />
the intentionally variable parameters to bring measurands<br />
closer to nominal. We may also turn a blind eye and treat<br />
the instrument as a black box to determine its before- or<br />
after-adjustment state.<br />
Unfortunately, we rarely determine an instrument’s<br />
complete state for the customer, but rather its state at a finite<br />
set of test points. In some cases, this satisfies the customer<br />
completely as they will use it only at those points. In other<br />
cases, we simply assume that passing the test points means<br />
the instrument meets all specifications over all its ranges.<br />
Substituting, deleting, or adding test points will likely<br />
alter the instrument’s specification conformity across the<br />
measurand space in a way we presently do not quantify.<br />
To provide our test and measurement customers<br />
higher quality services, we should quantify instrument<br />
measurement quality across the entire measurand space of<br />
interest and communicate that information electronically<br />
for testing software to discover and use. Metrics we might<br />
supply include measurand bias, uncertainty, or false accept<br />
risk—measurement reliability—relative to specifications. Let<br />
us examine how an MII might assist us.<br />
A Proposal<br />
First, we want some way to quantify quality at points<br />
we have not tested. Given a vector of intrinsic parameters,<br />
x int<br />
, and a vector of measurand values, m, we assume some<br />
unknown functional relation F exists that determines the<br />
measurand errors, namely<br />
e m<br />
= F ( m, x int ) , (15)<br />
and that we may approximate that relationship with<br />
a vector function, f, and vector error (determined at<br />
calibration), ϵ, such that<br />
e m<br />
= f ( m, x int ) + ϵ . (16)<br />
The vector function f has one component for each<br />
measurand and constitutes a general instrument model that<br />
predicts external measurands from intrinsic parameters. If<br />
we knew the uncertainties and interrelationships between<br />
the intrinsic parameters, we might form their covariance<br />
matrix, Σ int , and propagate that uncertainty through f per<br />
the GUM. This takes the form [14, 15]<br />
Σ m<br />
= C m, int<br />
Σ int<br />
C m,int<br />
T + Σ ϵ<br />
, (17)<br />
C m,int<br />
= ∇f ( m,x int ) <br />
_____<br />
m,x int<br />
.<br />
Once we have the instrument uncertainty at arbitrary<br />
points, we may imbed the model, values determined at<br />
calibration, and uncertainties into the calibration certificate<br />
for the user’s testing or analysis software. Combined with<br />
an instrument accuracy specification, calibration or testing<br />
software may also calculate false accept risk, beginning-ofperiod<br />
(BOP) measurement reliability, calibration ratios, or<br />
other quality metrics that interest the laboratory or customer.<br />
Model Creation and Validation<br />
Fine and dandy, but where do we get instrument models?<br />
Ideally, since engineering and design information defines the<br />
internal-external parameter relationships, the manufacturer<br />
would provide models with their instruments. However,<br />
this assumes a number of things, including a standard<br />
methodology and data format (MII) we currently lack.<br />
Lacking a model handed to us, or for that matter, if we<br />
have this task as a manufacturer, what then? A cooperative<br />
project between NIST and Fluke Corporation provided one<br />
answer [16]. Essentially, the method boils down to type<br />
testing—we would take measurements densely covering<br />
the measurand space, guided by instrument knowledge<br />
and metrology experience. Once we have a large enough<br />
superset of predicted points we may apply linear algebra<br />
to decompose the data set and determine a subset of points<br />
for calibration that capture all significant instrument errors,<br />
very similar to decomposing a covariance matrix to find a<br />
fundamental set of error sources. Along the way we get a<br />
numeric model. So, applying singular value decomposition,<br />
( C m,int<br />
, Σ int<br />
, C m,int ) = SVD ( Σ m ) , (18)<br />
and eliminating noise, we get the model sensitivities and<br />
internal co-variances we sought. Note that this procedure<br />
provides the long-sought connection between instrument<br />
specifications and uncertainty: Having the uncertainty at any<br />
measurement point and the manufacturer’s specification,<br />
we may calculate the actual coverage factors or confidence<br />
levels associated with the specifications.<br />
No matter who develops the model, or by what<br />
method, it has no value without validation. As part of type<br />
testing, we may take the calibration point subset and use<br />
those measurements and the model to predict the other<br />
measurands and compare to actual results, refining the test<br />
points, measurement procedure, or model as appropriate,<br />
all the while keeping an eye on maintaining a quality<br />
calibration process.<br />
Apr • May • Jun 2013<br />
33<br />
<strong>Cal</strong> <strong>Lab</strong>: The International Journal of Metrology


