Service & Repair Manual - Frogkick.dk
Service & Repair Manual - Frogkick.dk
Service & Repair Manual - Frogkick.dk
Create successful ePaper yourself
Turn your PDF publications into a flip-book with our unique Google optimized e-Paper software.
SeaAir Regulator<br />
der any circumstances, use an adjustable wrench or an open<br />
end wrench that does not fit completely over the flats on both<br />
sides. Doing so may result in permanent damage to the yoke<br />
retainer, requiring its replacement.<br />
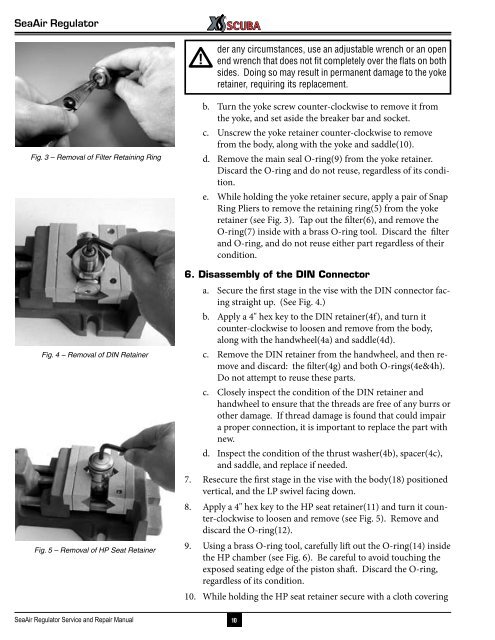
Fig. 3 – Removal of Filter Retaining Ring<br />
Fig. 4 – Removal of DIN Retainer<br />
Fig. 5 – Removal of HP Seat Retainer<br />
b. Turn the yoke screw counter-clockwise to remove it from<br />
the yoke, and set aside the breaker bar and socket.<br />
c. Unscrew the yoke retainer counter-clockwise to remove<br />
from the body, along with the yoke and saddle(10).<br />
d. Remove the main seal O-ring(9) from the yoke retainer.<br />
Discard the O-ring and do not reuse, regardless of its condition.<br />
e. While holding the yoke retainer secure, apply a pair of Snap<br />
Ring Pliers to remove the retaining ring(5) from the yoke<br />
retainer (see Fig. 3). Tap out the filter(6), and remove the<br />
O-ring(7) inside with a brass O-ring tool. Discard the filter<br />
and O-ring, and do not reuse either part regardless of their<br />
condition.<br />
6. Disassembly of the DIN Connector<br />
a. Secure the first stage in the vise with the DIN connector facing<br />
straight up. (See Fig. 4.)<br />
b. Apply a 4" hex key to the DIN retainer(4f), and turn it<br />
counter-clockwise to loosen and remove from the body,<br />
along with the handwheel(4a) and saddle(4d).<br />
c. Remove the DIN retainer from the handwheel, and then remove<br />
and discard: the filter(4g) and both O-rings(4e&4h).<br />
Do not attempt to reuse these parts.<br />
c. Closely inspect the condition of the DIN retainer and<br />
handwheel to ensure that the threads are free of any burrs or<br />
other damage. If thread damage is found that could impair<br />
a proper connection, it is important to replace the part with<br />
new.<br />
d. Inspect the condition of the thrust washer(4b), spacer(4c),<br />
and saddle, and replace if needed.<br />
7. Resecure the first stage in the vise with the body(18) positioned<br />
vertical, and the LP swivel facing down.<br />
8. Apply a 4" hex key to the HP seat retainer(11) and turn it counter-clockwise<br />
to loosen and remove (see Fig. 5). Remove and<br />
discard the O-ring(12).<br />
9. Using a brass O-ring tool, carefully lift out the O-ring(14) inside<br />
the HP chamber (see Fig. 6). Be careful to avoid touching the<br />
exposed seating edge of the piston shaft. Discard the O-ring,<br />
regardless of its condition.<br />
10. While holding the HP seat retainer secure with a cloth covering<br />
SeaAir Regulator <strong>Service</strong> and <strong>Repair</strong> <strong>Manual</strong><br />
10


