

Service & Repair Manual - Frogkick.dk
Service & Repair Manual - Frogkick.dk
Service & Repair Manual - Frogkick.dk

You also want an ePaper? Increase the reach of your titles
YUMPU automatically turns print PDFs into web optimized ePapers that Google loves.
<strong>Service</strong> & <strong>Repair</strong> <strong>Manual</strong><br />
the polished cone facing in. Using a small wooden or plastic<br />
down, press the orifice in so that it rests against the threads<br />
inside the air barrel. (See Fig. 33.)<br />
16. Turn the adjustment knob counterclockwise until it stops.<br />
17. Apply a medium blade screwdriver to the slotted head of the<br />
orifice inside the air barrel, and turn it clockwise while closely<br />
watching the lever. When the lever starts to drop, stop – do not<br />
turn the orifice any further. This will indicate that the orifice<br />
has made contact against the LP seat. (See Fig. 34.)<br />
Fig. 32 – Installing Retaining Clip<br />
NOTE: To pre-set the orifice at exactly the correct depth<br />
inside the air barrel, XS Scuba recommends using the Poppet<br />
Align/ Orifice Preset Tool (P/N 20-785-400), available from<br />
Peter Built Co. Complete instructions are provided with the<br />
tool. (See Fig. 35.)<br />
18. Lay the diaphragm(14) inside the housing, directly over the<br />
lever with its raised surface facing up, and then the thrust<br />
washer(15).<br />
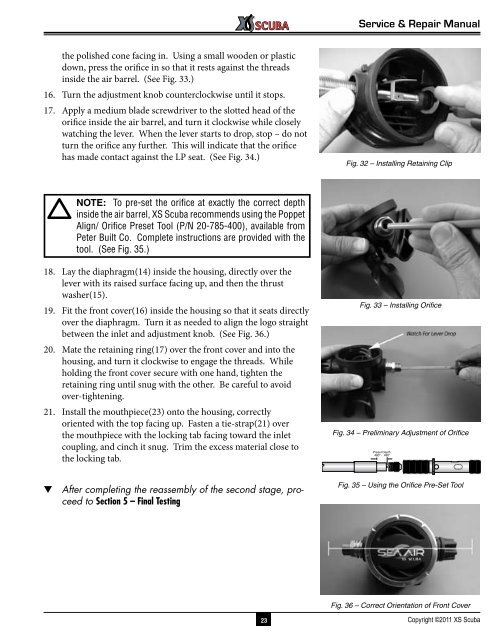
19. Fit the front cover(16) inside the housing so that it seats directly<br />
over the diaphragm. Turn it as needed to align the logo straight<br />
between the inlet and adjustment knob. (See Fig. 36.)<br />
20. Mate the retaining ring(17) over the front cover and into the<br />
housing, and turn it clockwise to engage the threads. While<br />
holding the front cover secure with one hand, tighten the<br />
retaining ring until snug with the other. Be careful to avoid<br />
over-tightening.<br />
21. Install the mouthpiece(23) onto the housing, correctly<br />
oriented with the top facing up. Fasten a tie-strap(21) over<br />
the mouthpiece with the locking tab facing toward the inlet<br />
coupling, and cinch it snug. Trim the excess material close to<br />
the locking tab.<br />
Fig. 33 – Installing Orifice<br />
Fig. 34 – Preliminary Adjustment of Orifice<br />
Preset Depth<br />
.480” - .490”<br />
▼ After completing the reassembly of the second stage, proceed<br />
to Section 5 – Final Testing<br />
Fig. 35 – Using the Orifice Pre-Set Tool<br />
Fig. 36 – Correct Orientation of Front Cover<br />
23 Copyright ©2011 XS Scuba


