198934 Roof Stairs INSTALLATION INSTRUCTIONS.pdf - Westeel
198934 Roof Stairs INSTALLATION INSTRUCTIONS.pdf - Westeel
198934 Roof Stairs INSTALLATION INSTRUCTIONS.pdf - Westeel

Create successful ePaper yourself
Turn your PDF publications into a flip-book with our unique Google optimized e-Paper software.
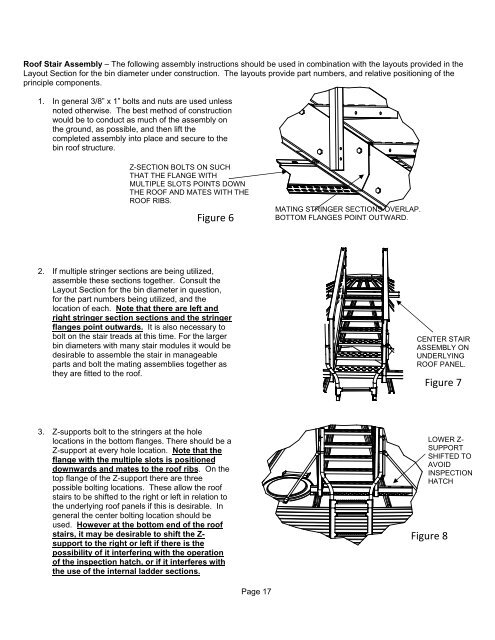
<strong>Roof</strong> Stair Assembly – The following assembly instructions should be used in combination with the layouts provided in the<br />
Layout Section for the bin diameter under construction. The layouts provide part numbers, and relative positioning of the<br />
principle components.<br />
1. In general 3/8” x 1” bolts and nuts are used unless<br />
noted otherwise. The best method of construction<br />
would be to conduct as much of the assembly on<br />
the ground, as possible, and then lift the<br />
completed assembly into place and secure to the<br />
bin roof structure.<br />
Z-SECTION BOLTS ON SUCH<br />
THAT THE FLANGE WITH<br />
MULTIPLE SLOTS POINTS DOWN<br />
THE ROOF AND MATES WITH THE<br />
ROOF RIBS.<br />
Figure 6<br />
MATING STRINGER SECTIONS OVERLAP.<br />
BOTTOM FLANGES POINT OUTWARD.<br />
2. If multiple stringer sections are being utilized,<br />
assemble these sections together. Consult the<br />
Layout Section for the bin diameter in question,<br />
for the part numbers being utilized, and the<br />
location of each. Note that there are left and<br />
right stringer section sections and the stringer<br />
flanges point outwards. It is also necessary to<br />
bolt on the stair treads at this time. For the larger<br />
bin diameters with many stair modules it would be<br />
desirable to assemble the stair in manageable<br />
parts and bolt the mating assemblies together as<br />
they are fitted to the roof.<br />
CENTER STAIR<br />
ASSEMBLY ON<br />
UNDERLYING<br />
ROOF PANEL.<br />
Figure 7<br />
3. Z-supports bolt to the stringers at the hole<br />
locations in the bottom flanges. There should be a<br />
Z-support at every hole location. Note that the<br />
flange with the multiple slots is positioned<br />
downwards and mates to the roof ribs. On the<br />
top flange of the Z-support there are three<br />
possible bolting locations. These allow the roof<br />
stairs to be shifted to the right or left in relation to<br />
the underlying roof panels if this is desirable. In<br />
general the center bolting location should be<br />
used. However at the bottom end of the roof<br />
stairs, it may be desirable to shift the Z-<br />
support to the right or left if there is the<br />
possibility of it interfering with the operation<br />
of the inspection hatch, or if it interferes with<br />
the use of the internal ladder sections.<br />
LOWER Z-<br />
SUPPORT<br />
SHIFTED TO<br />
AVOID<br />
INSPECTION<br />
HATCH<br />
Figure 8<br />
Page 17