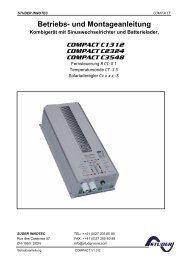
bcm v3.5.qxp - Philippi
bcm v3.5.qxp - Philippi
bcm v3.5.qxp - Philippi

Create successful ePaper yourself
Turn your PDF publications into a flip-book with our unique Google optimized e-Paper software.
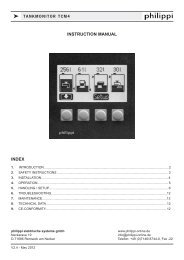
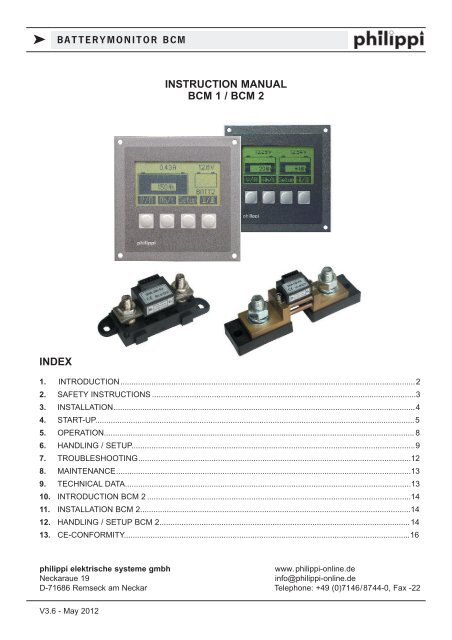
k BATTERYMONITOR BCM<br />
INSTRUCTION MANUAL<br />
BCM 1 / BCM 2<br />
INDEX<br />
1. INTRODUCTION.....................................................................................................................................2<br />
2. SAFETY INSTRUCTIONS .......................................................................................................................3<br />
3. INSTALLATION........................................................................................................................................4<br />
4. START-UP................................................................................................................................................5<br />
5. OPERATION............................................................................................................................................ 8<br />
6. HANDLING / SETUP................................................................................................................................9<br />
7. TROUBLESHOOTING...........................................................................................................................12<br />
8. MAINTENANCE.....................................................................................................................................13<br />
9. TECHNICAL DATA.................................................................................................................................13<br />
10. INTRODUCTION BCM 2 .......................................................................................................................14<br />
11. INSTALLATION BCM 2..........................................................................................................................14<br />
12. HANDLING / SETUP BCM 2.................................................................................................................14<br />
13. CE-CONFORMITY.................................................................................................................................16<br />
philippi elektrische systeme gmbh<br />
www.philippi-online.de<br />
Neckaraue 19<br />
info@philippi-online.de<br />
D-71686 Remseck am Neckar Telephone: +49 (0)7146/8744-0, Fax -22<br />
V3.6 - May 2012
k BATTERYMONITOR BCM<br />
1. INTRODUCTION<br />
Dear customer,<br />
Thank you for buying the Battery monitor BCM. This digital unit is state of the art in battery monitoring<br />
technology. A 16-bit-microcontroller captures consumer and charging currents with very high accuracy<br />
over an active precision shunt.<br />
On the large, illuminated display you can read:<br />
x the current charge status of the service battery<br />
x load/discharge current<br />
x the voltage<br />
x the remaining running time until the battery will be empty<br />
x the voltage of up to two starting/additional batteries<br />
You have the possibility of adjusting an alarm threshold:<br />
x either if the capacity of the main battery is low<br />
x or the voltage of the additional batteries are low.<br />
The software of the BCM supervises the voltage and current of the main battery permanently and recognises<br />
when the battery is fully charged or even totally discharged. Every cycle the value of the capacity of the battery<br />
and the charging efficiency factor (CEF) will be stated and corrected to get the most exact value of the<br />
capacity.<br />
Please, read the Instruction Manual carefully and follow all instructions before putting the<br />
equipment in operation.<br />
1.1. PURPOSE<br />
The battery monitors of the BCM series can only be used with a shunt SHA 300 or SHA 610 (also with former<br />
types SHA 150 & SHA 600) for low voltage purposes DC 8-30V (model BCM 48V: DC 12-60V). They were<br />
designed for the use on yachts or camper vans and must be used in an enclosed environment which is protected<br />
against rain, moisture, dust and condensation. Don`t use the BCM battery monitors in places where<br />
there could be danger of explosion by gas or dust.<br />
1.2.CONTENT<br />
x Battery monitor BCM 1 or BCM 2<br />
x Connecting cable to the shunt including plug-in clamps<br />
x This Instruction Manual<br />
1.3. ACCESSORIES (TO BE ORDERED SEPARATLY)<br />
x Active shunt 300A, max. current 300A (400A 1 min, 1500A 0,5s) Ord.Nr. 0 7000 0300<br />
x Active shunt 600A, max. current 600A Ord.Nr. 0 7000 0610<br />
x Active shunt 300A, adress A2 Ord.Nr. 0 7000 0302<br />
x Active shunt 600A, adress A2 Ord.Nr. 0 7000 0612<br />
x Connecting cable 10m including plug-in clamps Ord.Nr. 0 7000 1091<br />
x Fuseholder incl. 1A-Fuse for the measuring lines (add. batteries) Ord.Nr. 6 0030 3411<br />
Page 2 V3.6 - May 2012
k BATTERYMONITOR BCM<br />
1.4. WARRANTY<br />
philippi elektrische systeme gmbh grants a two year limited and not transferable warranty for the first buyer of<br />
this equipment, commencing on the date of purchase and covers defects in manufacturing, parts and materials.<br />
Production or material defects will be corrected without costs if:<br />
x the equipment will be send to us at the expense of the sender<br />
x enclose the receipt (copy) of purchase<br />
x the equipment was treated in the intended use<br />
x no strange spare parts were built in or external effects happened<br />
Not included in the warranty are damages from:<br />
x overvoltage in the inputs or reverse polarity<br />
x entered liquids in the device or oxydation through condensation<br />
x lightning<br />
Not under warranty are follow-up costs and normal wear and tear.<br />
In case of warranty there must be a specification of the defect. A detailed description of the<br />
defect will ease and speed up the repair.<br />
Please note that we cannot accept carriage forward deliveries.<br />
1.5. EXCLUSION OF LIABILITY<br />
Both the adherence to the operating instruction, and the conditions and methods during installation, using<br />
and maintenance of the BCM cannot be supervised by philippi electrical systems. Therefore we do not take<br />
any responsibility for loss, damage or costs, which develop due to incorrect installation and/or<br />
inappropriate enterprise.<br />
1.6. QUALITY MANAGEMENT<br />
During the process of manufacturing all devices pass several checks, controls and tests. Production, controls<br />
and tests are due to given protocols. Each BCM has its own serial number. Please do not remove this label.<br />
The assembly and testing of all BCM devices is carried out completely in our company at Remseck am Neckar.<br />
2. SAFETY REFERENCES<br />
x unautorised change to the equipment will invalidate the CE sign<br />
x the installation of the BCM may be made only by electrical specialists.<br />
x before connection of the BCM the battery terminals must be clamped.<br />
x Important! Pay attention to the correct polarity of the batteries!<br />
x the inlet of the current supply shunt must be secured<br />
The assembly and operating instruction is a component of the BCM package. It must be kept<br />
(for reference). Importantly: - for later maintenance work - and for the use of subsequent owners<br />
of the equipment.<br />
V3.6 - May 2012 Page 3
k BATTERYMONITOR BCM<br />
3. INSTALLATION<br />
3.1. TIP<br />
IMPORTANT NOTE: Do not insert the fuse (1A) in the red supply wire at the shunt SHA into<br />
the fuseholder before finishing the complete installation of all components! Otherwise the<br />
system could be damaged or even totally destroyed! Before disconnecting the plug-in clamps<br />
of the components the fuse must first be removed.<br />
The battery monitor BCM should be connected always to the power supply and switched on to supervise every<br />
small amount of current, even if the system is supposed to be switched off. Often it is possible to charge the<br />
batteries with a “switched-off” mainswitch. This current has to be recorded, otherwise the BCM is unable to<br />
calculate the uptodate capacity.<br />
Only during the winterstorage, if the system is totally out of service, the power supply of the BCM can be switched<br />
off. Due to the very small amount of power consumption the continuous operating isn`t a handicap for<br />
your battery. The power consumption is 2,5mA during operation (display on). The BCM goes to sleep mode<br />
(display off), if there is no current measured for about 24 hours. In the sleep mode the power consumption is<br />
reduced to 0,5mA.<br />
3.2. NECESSARY EQUIPMENT<br />
following parts are needed for the installation of the BCM:<br />
x an active shunt type SHA 150 or SHA 600<br />
x in case the distance between battery monitor BCM and shunt is longer than 5m, a shielded cable<br />
5x0,25mm² or the optional 10m-cable is required<br />
x 2 cables with min.1mm² cross section long enough to connect the BCM with the starting batteries<br />
x 2 fuse holders with 1A fuses to fuse the wires from the two starting batteries<br />
x a battery cable, which is as short as possible, to connect the shunt and the negative pole of the main battery<br />
leads. The cross section of this cable should be usually 35 to 70 mm².<br />
3.3. INSTALLATION AND CONNECTION<br />
Please install the BCM in a visible place, so that it can be read off at any time. The necessary installation<br />
cutout is 88 x 88mm, the necessary minimum depth is 40mm. Install the active shunt SHA as close as<br />
possible at the service battery. Avoid however that the shunt has contact with the plus - connection of the<br />
batteries. Connect the B- marked side of the shunt with the minus connection of the main battery by a short,<br />
thick cable (35-70mm²). Connect the negative pole of the up to two starting batteries with the other side of<br />
the shunt.<br />
Note: If the main battery consists of several parallel switched batteries, then their negative poles must<br />
all be attached to the side marked B- of the shunt. The negative cables of the starting batteries are<br />
attached at the other side (V -) shunt. We recommend all minus connections of the consumers and<br />
charging units and the negative poles of the starting batteries on a mass bus bar and to put from there<br />
a short line into the V- connection of the shunt.<br />
Page 4 V3.6 - May 2012
k BATTERYMONITOR BCM<br />
- Connect the red measuring and supply line of the shunt with the in-line switch to the positive terminal of the<br />
main battery. This wire is already equipped with an in-line safety device (1A). Over this line the voltage of the<br />
main battery is measured and at the same time the battery monitor BCM is supplied. This line is put in at the<br />
connector at pin No. 6 (+).<br />
The fuse must not be inserted before finishing the whole installation!<br />
- Put the plug of the provided 5-pole cable at the shunt and on the back of the BCM into the suitable<br />
counterparts. When the line have to be extended or shortened, the contacts (1,2,3,4,5) with same number had<br />
to be connected to each other.<br />
- Install a positive measuring line from the BCM to the additional starter and/or further groups of batteries,<br />
whose voltages are to be supervised. Insert the fuse holders in the plus wires of the measuring wires as close<br />
to the battery as possible. Insert the fuse into the holder and check whether the display indicates values for the<br />
additional batteries.<br />
PRINCIPLE OF WIRING:<br />
4. START UP<br />
BRIEF INSTRUCTION:<br />
1) Enter the value for charging voltage and thresholds for the batteries 2 & 3 in the SETUP.<br />
We recommend following values: 13,6V for 12V-plants and 27,2V for 24V-plants.<br />
The thresholds should be adjusted to 11,5 V for 12V-plants or 23V for 24V-plants.<br />
2) Charge your main battery until the BCM itself has recognized the capacity as 100%.<br />
3) Adjust the capacity of your battery in the SETUP-Menu.<br />
V3.6 - May 2012 Page 5
k BATTERYMONITOR BCM<br />
4.1. SYNCHRONISATION WITH THE BATTERY<br />
To initialize the BCM the first time it is necessary to adapt the setup so that the battery monitor works correctly.<br />
In order to synchronize the battery monitor with the main battery, the main battery must be<br />
full-loaded with a modern battery charger, in order to guarantee that the batteries are loaded 100%.<br />
We recommend the modern digital controlled philippi-battery chargers series AL. If the main battery is fully<br />
charged, the BCM capacity-value goes to 100%. When delivered, the factory setting was 70%.<br />
So, the BCM is now synchronized with the main battery.<br />
Now the capacity of your battery can be adjusted in the SETUP, so that the BCM can work correctly.<br />
4.2. SETUP THE PARAMETERS<br />
For normal function it is necessary to adjust the BCM to the existing battery plant.<br />
ADJUSTING THE CAPACITY<br />
The factory setting of the battery capacity is 100Ah. To get a meaningful accuracy of the remainder time<br />
function as well as the proportional charge announcement, the capacity of the installed main battery must be<br />
adjusted. The battery capacity is stored in the SETUP menu.<br />
Please note that the capacity of the battery should be set only, if the batteries are loaded 100%. During this<br />
procedure the actual capacity is set to 100% and all other internal values are set to 0.<br />
ADJUSTING THE VOLTAGE<br />
The automatic battery full identification supervises several parameters which must be fulfilled, so that the BCM<br />
recognizes the battery as completely loaded. One parameter is the charging voltage, which must be achieved.<br />
The charging voltage must be lower than the minimum charging voltage, which rests against the batteries during<br />
the float charge. This voltage has to be adjusted with 12V systems between 12V and 15V,<br />
with a 24V system according to the double values between 24V and 30V.<br />
We recommend 13.6V for 12V plants and 27,2V for 24V plants.<br />
ADJUSTING THE ALARM OF THE MAIN BATTERY<br />
The BCM supervises the charge of the main battery and produces an alarm, if the main battery falls below an<br />
adjustable capacity threshold. If the battery capacity falls below the adjusted threshold a warning appears in<br />
the display and at the same time a buzzing signal is sounding, which can be acknowledged by you.<br />
The alarm for the capacity threshold is pre-setted to 45% of the overall capacity of the battery. For an average<br />
application this value normally is correct; the alarm can be adjusted however according to the requirements of<br />
the application.<br />
Page 6 V3.6 - May 2012
k BATTERYMONITOR BCM
k BATTERYMONITOR BCM<br />
ADJUSTING THE ALARM OF THE ADDITIONAL BATTERIES<br />
The BCM supervises the battery voltage of the groups of batteries of 2 and 3 and produces an alarm, if the<br />
battery voltage falls for a fixed time (4min) under an adjustable value. A warning appears in the display and at<br />
the same time a buzzing signal will sound, which can be acknowledged by you.<br />
The pre-setting for the voltage alarm amounts to 11.5V. If the battery is strongly discharged, then the tension<br />
alarm can be stopped somewhat lower, for example to 10.8V. If different battery systems (12V/24V) are<br />
connected, the thresholds have to be adapted according to the rated voltages.<br />
If no groups of batteries 2 and/or 3 are attached, then the alarm threshold can be arbitrarily adjusted, because<br />
the BCM recognise that and it cannot cause an alarm.<br />
5. OPERATION<br />
The voltage and current of the main battery will be under constant survey of the BCM software. The BCM<br />
recognizes, if the battery is fully charged or completely discharged. The values of the battery capacity<br />
and the charging efficiency factor (CEF) were adjusted at each cycle to get the most exact indication of the<br />
capacity.<br />
THE MAIN BATTERY IS CLASSIFIED AS COMPLETELY LOADED (100%), IF:<br />
1) all taken amp hours are back charged into the battery<br />
2) the charging voltage has reached (normally adjusted to 13.6/27.2V)<br />
3) the charging current sinks under 2% of the preselected battery capacity (e.g. 100Ah x 2% = 2A)<br />
If all specified parameters (1, 2 and 3) are fulfilled for 4minutes, then the value is put back for the used up<br />
ampere-hours to 100%. Then the charging efficiency factor is calculated by the actual cycle and the average<br />
of the past 4 cycles. This new value is the calculation basis of the next cycle.<br />
THE MAIN BATTERY IS CLASSIFIED AS COMPLETELY DISCHARGED (0%), IF:<br />
the voltage of the main battery measured by the shunt goes for a certain time (30sec - 3min) under a voltage,<br />
which is given by the software. In that case the determined capacity of this discharging cycle is the base for the<br />
new battery capacity. To compensate the variation, the average is made over the actual and the last cycle.<br />
Then a warning appears “Battery 1 empty” and at the same time a buzzing signal is sounding, which can be<br />
acknowledged by you.<br />
If no current is measured for min. 24 hours, the BCM goes to the sleep mode (Display off). As soon as a<br />
current will be measured (delay max.1 min) the BCM switches on automatically.<br />
Alternatively the BCM can be activated by pressing a button.<br />
All these functions are automatic and do not need any external adjustment.<br />
SELF-DISCHARGING OF A BATTERY<br />
Because each lead-battery discharges itself internal, that amount cannot be registered by the shunt and BCM.<br />
Hence the battery has to be synchronised again if the battery isn`t used for a long time (>1 month).<br />
The only thing you have to do is to charge the battery completely again. The BCM will recognise the full<br />
charging automatically.<br />
If a new main battery set is used, then the number of cycles and the number of deep-dischargings must be set<br />
to zero. In the SETUP menu the menupoint "deep discharge" must be called and the plus button has to be<br />
pressed for 10 seconds. Subsequently, the two values are set to zero.<br />
Page 8 V3.6 - May 2012
k BATTERYMONITOR BCM<br />
6. HANDLING<br />
The L/H side of the large operating back-lit display informs you of the charge status of your main battery.<br />
The illustration shows in the upper position the main batteries load/discharge current (A), whilst in the lower<br />
(boxed) area the remaining available capacity is indicated in Amp-hours (Ah). Alternatively the voltage (V)<br />
and /or the remaining time (t) can be displayed respectively.<br />
If up to two further sets of batteries (like starting batteries) are attached, the voltage of one set will automatically<br />
be displayed at the top R/H corner of screen. A touch of the button will alternate the voltage reading between<br />
both sets of batteries.<br />
BUTTON V/A: VOLTAGE OR CURRENT OF THE MAIN BATTERY<br />
Display shows the main battery voltage or the load/discharge current. The current is displayed dynamically,<br />
i.e. to better readability only 3 digits (e.g. 120A, 45,0 A or 0.01A) are represented. A minus sign before the<br />
amperage means that the battery will be discharging. If no minus sign is present, then the battery will be<br />
charging with the amperage shown.<br />
BUTTON AH/T: AMP HOURS OR REMAINING TIME OF THE MAIN BATTERY<br />
The charge of the main battery is indicated in Ah of the present available battery capacity. During charging<br />
the charge efficiency factor (C.E.F.) is automatically computed into the calculation.<br />
The remaining time is the time that the main battery with the current consumption can be used, before it is<br />
completely empty.<br />
Note: - the battery must be recharged before depletion to avoid damage!<br />
During charging the remaining time indicates 99.9 h.<br />
The maximum value during a discharge process amounts to 99.9 hours (> 4 days). The remainder time is<br />
corrected automatically with consideration of the Peukert exponent, if the battery is discharged stronger than<br />
the C20 rate.<br />
BUTTON II/III: DISPLAY VOLTAGE BATTERY 2/3<br />
If an additional (starter -) battery is connected, its voltage will be displayed. If two additional (starters -) sets of<br />
batteries are attached, then one of the two voltages is shown automatically on the display. By pressing the<br />
button you can switch between the two readings as only one at a time can be indicated.<br />
V3.6 - May 2012 Page 9
k BATTERYMONITOR BCM<br />
BUTTON SETUP<br />
In the SETUP -menu all necessary settings can be adjusted and statistical values can be shown (Chapter 6.1).<br />
By pressing the SETUP-Button for 5 sec. the SETUP - menu can be locked. Again long pressing will unlock the<br />
SETUP - menu.<br />
6.1. SETUP<br />
In the SETUP - menu following points will be displayed:<br />
Battery capacity: Nominal capacity of the battery in Ah<br />
Charging voltage: Charging voltage for battery 1 for battery full identification<br />
Alarm % Threshold for capacity alarm battery 1 in %<br />
(ext. switching contact "on", used for" generator")<br />
Generator off Threshold with that the external contact switches off (generator out),<br />
(generator in/out only with appropriate hardware available.)<br />
Alarm U2 Threshold for voltage alarm, battery2 alarm<br />
Alarm U3 Threshold for voltage alarm, battery3 alarm<br />
Further informations about the battery can be queried. This can be very useful to obtain knowledge of<br />
the history of your battery. The following values can be queried:<br />
CEF<br />
Peukert<br />
Charging efficiency factor<br />
Peukert Exponent<br />
CEF: CHARGE EFFICIENCY FACTOR<br />
Each battery has an efficiency. This means that more ampere-hours have to be loaded into the battery than<br />
can be used. The efficiencies of lead batteries lies between 80% and 99%. When the CEF drops below 70%,<br />
then this means that maybe the battery has reached the end of its life span. But if the battery is charged only in<br />
trickle charging (for example with solar panels) this factor drops too. If you use the battery again, this factor<br />
should rise again. The factory-installed pre-setting is 95%. The CEF is adapted automatically by the BCM while<br />
operation of a sliding averaging over the 4 last cycles.<br />
PEUKERT EXPONENT<br />
Standard batteries are appropriate for 20 hours discharge. That means for example, that a 100 amphours<br />
battery can produce 20 hours long 5 ampere, before the battery is empty. If the discharge current is higher, for<br />
example 10 amps, then the battery is not able to supply the full 100 ampere-hours. In this case the battery<br />
voltage sinks under the lower limit of 10,8V for 12V batteries, before the battery supplied its nominal capacity.<br />
This can be adjusted mathematically with the Peukert equation. With the remaining time function this equation<br />
is used, in order to adapt the remainder time with high unloading rates. Under normal conditions the Peukert<br />
exponent does not need to be changed.<br />
The factory setting is 1,27.<br />
Page 10 V3.6 - May 2012
k BATTERYMONITOR BCM<br />
CONTRAST<br />
The contrast of the display can be adjusted by pressing the +/- button (ref.: see setup display page 6)<br />
LANGUAGE<br />
By pressing the buttons +/- the language of the SETUP - menue can be changed. Available are following<br />
languages:<br />
German / English / French / Spanish / Dutch / Danish<br />
NUMBER OF CYCLES<br />
A cycle is counted, if the battery was discharged below the adjustable capacity border (alarm %) and afterwards<br />
charged again on at least 85% its capacity. With the number of cycles you are able to estimate the life span of<br />
your battery. Standard starting batteries possess one life span of 30-50 cycles, while however in the case of<br />
cycle batteries with one life span from up to 300 cycles to is to be counted, if a modern battery charger is used.<br />
These values can be obtained only with normal care and worsen rapidly if the battery is damaged or misused.<br />
NUMBER OF DEEP DISCHARGES<br />
If the main battery will be discharged for 4 min under 10,0V for a 12V battery, then this is rated as an deep<br />
discharge. Deep discharge should be absolutely avoided, since they damage the battery and a premature loss<br />
of capacity is to be expected. If a deep discharge should occur nevertheless, then the battery must be<br />
charged immediately again, in order to avoid a further damage.<br />
V3.6 - May 2012 Page 11
k BATTERYMONITOR BCM<br />
7. TROUBLESHOOTING<br />
The software of the BCM is under continuous updating. Depending on your type of software it`s possible that<br />
some functions aren`t available in your BCM. Please ask for a free update.<br />
NO DISPLAY ON THE MONITOR (BCM, BCM2, BLM)<br />
x The BCM is in sleep mode (automatically after 24h without current-measuring to reduce the power<br />
consumption). Press any button (from 6/2007) or switch on a consumer.<br />
x Check the power supply. The BCM is supplied through the shunt. On the rear clamp SHA 1 of the BCM<br />
there is minus and on the SHA 5 the plus, which is supplied through the +measuring line at the shunt.<br />
If there is no voltage measurable between the clamps SHA1 and SHA 5 (see diagram on page 7), check<br />
the fuse of the shunt and the wiring respectively.<br />
x BCM is shut down. Reset by interrupting the powersupply for min.20sec at the fuse of the shunt.<br />
x Reset isn`t successful: the production series spring 2006 has a small integrated battery under the white<br />
ribbon cable which is discharged. Please remove this small battery and interrupt the powersupply again for<br />
20sec. You don`t need to replace the small battery.<br />
x Communication interface RS485 has failed. Please send the BCM and the shunt to our company.<br />
DISPLAY VOLTAGE/CURRENT OF THE MAIN BATTERY IS ALWAYS “ZERO” (BCM, BCM2, BLM)<br />
x Data transfer between shunt and BCM has failed. Shunt needs to be reset. Reset by interrupting the<br />
power supply. This can be done by taking the fuse out for 20sec.<br />
x Check the powersupply of the shunt. The shunt is supplied from the BCM. Between the clamp SHA 1 (minus)<br />
and the clamp SHA 5 should be a voltage of 7V. If there is no voltage, either the BCM or the shunt is defect.<br />
Please send the BCM and the shunt to our company.<br />
IMPOSSIBLE VALUES IN THE SETUP-MENU (BCM, BCM2, BLM)<br />
x Press SETUP and get back to the factory settings. By pressing the minus-button for 10sec in the menu<br />
SETUP with the display of “deep charge cycles” the BCM is reset to the factory settings.<br />
A software-update is recommended!<br />
ONLY NEGATIVE (DISCHARGING) VALUES ARE SHOWN (BCM, BCM2, BLM)<br />
x check the correct wiring of the shunt SHA: the B- must be connected to the negative pole of the battery, the<br />
V- has to be connected to the minus-busbar and the minus of the charger/alternator. No consumer or charger<br />
has to be connected directly to the negative pole of the battery, otherwise this amount of current cannot be<br />
measured.<br />
FUSE IS BLOWN WHILE SWITCHING ON<br />
x Between the printed circuit board of the shunt and the shunt itself must be distancewashers mounted.<br />
Otherwise the contacts underneath the board are connected directly to the shunt and produce a short circuit.<br />
x The wiring isn`t correct. Check the colourcodes of the shunt and the BCM.<br />
Page 12 V3.6 - May 2012
k BATTERYMONITOR BCM<br />
ONLY ONE BATTERY IS DISPLAYED ALTHOUGH TWO SHUNTS ARE INSTALLED (BCM 2)<br />
x Check if both shunts have different adresses. (one is the normal, the other must be a “A2” version)<br />
8. MAINTENANCE<br />
The BCM does not request special maintenance. The frontpanel can be cleaned with a damp cloth without<br />
using agressive detergents.<br />
9. TECHNICAL DATA<br />
BCM 1, 2 BCM 1, 2 (48V) Resolution<br />
Measuring range voltage 8,5-30 V DC 10,5-60 V DC (0,01 V)<br />
Measuring range current 0-600 A 0-600 A (0,01A)<br />
Measuring range Amphours 0-6000 Ah 0-6000 Ah (1 Ah)<br />
Remaining time 0-99,9 h 0-99,9 h (6 min)<br />
Power supply 8,5-30 V DC 10,5-60 V DC<br />
Power consumption<br />
3,5mA during operation, 55mA with illumination (for 12V-plants)<br />
Dimensions:<br />
105x105x40mm<br />
SHA 150 / SHA 600, active shunt 150 A /60mV or 600 A/60mV<br />
Accuracy voltage:<br />
Accuracy current:<br />
± 0,6% ± 1 digit<br />
± 0,8% ± 1 digit<br />
V3.6 - May 2012 Page 13
k BATTERYMONITOR BCM 2<br />
10. INTRODUCTION BCM 2<br />
The BCM 2 is based on the BCM1 with all functions, but it has in addition the possibility to supervise two<br />
battery-capacities through two shunts. Hence resulting in a more complicated installation and a slightly diverse<br />
display to the BCM 1. But the basic function is the same. It is urgently recommended to study the former<br />
chapters carefully to understand the functions of the device!<br />
11. INSTALLATION OF THE BCM 2<br />
The communication between the BCM2 and the shunts are on a digital base. For the correct<br />
operating of the system two shunts with different identification is required. Please take care,<br />
that one shunt has the A2 - label and the second not.<br />
Depending on the hardware both of the shunts have to be connected parallel to the plug-in clamps or on<br />
separate clamps. Please take special care on the correct wiring according to the connecting diagram.<br />
Otherwise the components could be destroyed!<br />
12. HANDLING BCM 2<br />
The display shows both battery-banks. By pressing the buttons<br />
the function/display can be switched in the same manner as<br />
the BCM1 for both of the batteries at the same time.<br />
The shunt with the label SHA xxx is shown on the left hand side,<br />
the shunt with the label SHA xxx-A2 is shown on the right hand<br />
side.<br />
By pressing the (I/II) / (III/IV) button you can supervise both of<br />
the main batteries (capacity) or the voltage of the additional<br />
batteries.<br />
Switching is only possible, if there is minimum one of the batteries<br />
3 or 4 connected to the BCM2.<br />
12.1. SETUP BCM 2<br />
In the SETUP-menu the specific adjustments existing twice for the two batteries and are adjustable for both<br />
battery banks.<br />
Batterycapacity 1/2 Capacity of batterybank in Ah<br />
Charging voltage 1/2 Charging voltage for full-identification in V<br />
Alarm Ah % 1/2 Threshold for capacity - alarm in % (1-100)<br />
Alarm U3<br />
Threshold for tension - alarm battery 3 in V<br />
Alarm U4<br />
Threshold for tension - alarm battery 4 in V<br />
All other values are only for statistics and don`t need to be adjusted.<br />
Page 14 V3.6 - May 2012
k BATTERYMONITOR BCM 2<br />
Rear view version until ser.nr.1999:<br />
V3.6 - May 2012 Page15
k BATTERYMONITOR BCM<br />
13. CE-CONFORMITY<br />
philippi elektrische systeme gmbh<br />
Neckaraue 19<br />
71686 Remseck am Neckar<br />
Deutschland<br />
certifies herewith, that the<br />
products:<br />
Batterymonitor BCM1<br />
Batterymonitor BCM2<br />
Shunt SHA 150<br />
Shunt SHA 600<br />
fulfills the requirements of the European Regulation 2004/108/EG<br />
Following harmonised standards were implemented:<br />
Immunität: EN 61000-6-1:2007<br />
Emission: EN 61000-6-3:2007<br />
Remseck, August 2008<br />
Dipl.-Ing. Michael Kögel<br />
general manager philippi<br />
Page 16 V3.6 - May 2012