
You also want an ePaper? Increase the reach of your titles
YUMPU automatically turns print PDFs into web optimized ePapers that Google loves.
<strong>Basic</strong> <strong>Workouts</strong> <strong>Console</strong><br />
FPO
GETTING STARTED<br />
2<br />
Getting Started: Table of Contents<br />
GETTING STARTED<br />
3 Your Purchase<br />
4 Radio/Television Interference<br />
5 Safety Instructions<br />
6 Contact Heart Rate<br />
QUICK REFERENCE<br />
7 <strong>Basic</strong> <strong>Workouts</strong> <strong>Console</strong><br />
HOW TO<br />
9 How to Use the <strong>Basic</strong> <strong>Workouts</strong> Display<br />
10 How to Use the <strong>Basic</strong> <strong>Workouts</strong> <strong>Console</strong><br />
18 How to Use the <strong>Workouts</strong><br />
23 How to Use the Settings Menu<br />
SERVICE AND TECHNICAL DATA<br />
25 Preventative Maintenance Tips<br />
26 Troubleshooting<br />
27 How to Obtain Product Service<br />
28 For Product Service Internationally<br />
29 Warranty Information<br />
32 Specifications
This Manual describes the<br />
functions of the<br />
following product:<br />
<strong>Life</strong> <strong>Fitness</strong> <strong>Basic</strong> <strong>Workouts</strong><br />
<strong>Console</strong>.<br />
Caution:<br />
Health related injuries may result<br />
from incorrect or excessive use of<br />
exercise equipment.<br />
<strong>Life</strong> <strong>Fitness</strong> STRONGLY<br />
recommends seeing a physician for<br />
a complete medical exam before<br />
undertaking an exercise program,<br />
particularly if the user has a family<br />
history of high blood pressure or<br />
heart disease, is over the age of<br />
45, smokes, has high cholesterol,<br />
is obese or has not exercised<br />
regularly in the past year.<br />
Getting Started: Your Purchase<br />
Thank you for purchasing a <strong>Life</strong> <strong>Fitness</strong> product. Before using this product please read this<br />
user manual along with the base assembly manual in it’s entirety to ensure that you have the<br />
knowledge to safely and properly operate all of this product’s features. We hope you achieve<br />
the product experience that you expect, but if you do have service issues please go to the<br />
How to Obtain Product Service page in the How To section which will provide information on<br />
obtaining domestic and international product service.<br />
<strong>Life</strong> <strong>Fitness</strong> also recommends<br />
consulting a fitness professional on<br />
the correct use of this product.<br />
If at any time while exercising the<br />
user experiences faintness,<br />
dizziness, pain or shortness of<br />
breath, he or she must stop<br />
immediately.<br />
3<br />
GETTING STARTED
GETTING STARTED<br />
4<br />
Getting Started: Radio/Television Interference<br />
Before using this product, it is essential to read this ENTIRE user manual<br />
and ALL installation instructions.<br />
This will help in setting up the equipment quickly and in instructing others on<br />
how to use it correctly and safely.<br />
FCC WARNING:<br />
POSSIBLE RADIO/TELEVISION<br />
INTERFERENCE<br />
Note: This equipment has been<br />
tested and found to comply with<br />
the limits for a Class B digital<br />
device, pursuant to part 15 of<br />
the FCC rules. These limits are<br />
designed to provide reasonable<br />
protection against harmful<br />
interference in a residential<br />
installation. This equipment<br />
generates, uses and can radiate<br />
radio frequency energy, and if not<br />
installed and used in accordance<br />
with the user manual, may cause<br />
harmful interference to radio<br />
communications. However, there<br />
is no guarantee that the<br />
interference will not occur in<br />
a particular installation. If this<br />
equipment does cause harmful<br />
interference to radio or television<br />
reception, which can be<br />
determined by turning the<br />
equipment off and on, the user<br />
is encouraged to try to correct<br />
the interference by one or more<br />
of the following measures:<br />
• Reorient or relocate the receiving<br />
antenna.<br />
• Increase the separation between<br />
the equipment and the receiver.<br />
• Connect the equipment into an<br />
outlet on a circuit different from<br />
that to which the receiver is<br />
connected.<br />
• Consult the dealer or an<br />
experienced radio/TV technician<br />
for help.<br />
CAUTION:<br />
ANY CHANGES OR<br />
MODIFICATIONS TO THIS<br />
EQUIPMENT COULD VOID<br />
THE PRODUCT WARRANTY.<br />
Any service, other than cleaning<br />
or user maintenance, must be<br />
performed by an authorized<br />
service representative. There are<br />
no user-serviceable parts.
IMPORTANT SAFETY INSTRUCTIONS<br />
SAVE THESE SAFETY INSTRUCTIONS<br />
SAFETY WARNING:<br />
THE SAFETY OF THE PRODUCT<br />
CAN BE MAINTAINED ONLY IF<br />
IT IS EXAMINED REGULARLY<br />
FOR DAMAGE AND WEAR. SEE<br />
PREVENTATIVE MAINTENANCE<br />
FOR DETAILS.<br />
• Before using this product,<br />
it is essential to read this ENTIRE<br />
user manual and ALL<br />
instructions.<br />
• Always follow the console<br />
instructions for proper operation.<br />
• If the product does not function<br />
properly after it has been<br />
dropped, damaged, or even<br />
partially immersed in water,<br />
contact Customer Support<br />
Services for assistance.<br />
• Never insert objects into any<br />
openings on the product. If an<br />
object should drop inside,<br />
carefully retrieve it. If the item is<br />
beyond reach, contact Customer<br />
Support Services.<br />
• Never place liquids of any type<br />
directly on the unit, except in an<br />
accessory tray. Containers with<br />
lids are recommended.<br />
• Do not use the product outdoors,<br />
near swimming pools or in areas<br />
of high humidity.<br />
• Keep all loose clothing,<br />
shoelaces, and towels away from<br />
the product.<br />
• Keep the area around the product<br />
clear of any obstructions,<br />
including walls and furniture.<br />
• Always be careful and exercise<br />
caution when mounting or<br />
dismounting the product.<br />
Getting Started: Safety Instructions<br />
• Wear shoes with rubber or hightraction<br />
soles. Do not use shoes<br />
with heels, leather soles, cleats or<br />
spikes. Do not use the product in<br />
bare feet.<br />
• Do not tip the product on its side<br />
during operation.<br />
• Keep hands and feet away from<br />
all moving parts.<br />
• To ensure proper functioning of<br />
this product, do not install<br />
attachments or accessories that<br />
are not provided or recommended<br />
by the manufacturer.<br />
• Use this product in a<br />
well-ventilated area.<br />
• Use this product on a solid, level<br />
surface.<br />
• Make sure that all components<br />
are fastened securely.<br />
5<br />
GETTING STARTED
GETTING STARTED<br />
6<br />
Getting Started: Contact Heart Rate<br />
Contact Heart Rate<br />
When using Contact Heart Rate make certain to grasp sensors firmly and keep hands still. If heart rate seems<br />
substantially higher or lower than expected, remove hands from sensors until heart rate disappears. Dry hands<br />
and grasp sensors again until heart rate seems accurate. If this does not work you may need to slow the machine<br />
to get an accurate reading. On treadmills we recommend for safety and accurate heart rate readings that the user<br />
stand on the siderails when attempting to monitor heart rate with contact electrodes.<br />
Note: The contact heart rate system may be less or more accurate with different individuals.
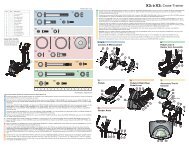
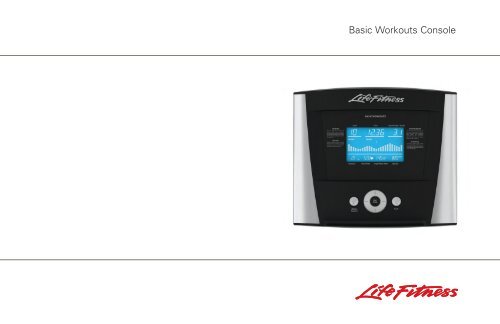
Quick Reference: <strong>Basic</strong> <strong>Workouts</strong> <strong>Console</strong><br />
Read the entire user manual before<br />
setting up your equipment.<br />
a b c<br />
d e<br />
f g h<br />
1 Level Display – Shows the<br />
difficulty level or<br />
incline percentage<br />
(for treadmills).<br />
2 Time Display – During a<br />
workout the time display<br />
will show time remaining<br />
and countdown.<br />
3 Speed Display – Speed is<br />
displayed in miles per hour.<br />
Speed can be converted to<br />
kilometers per hour in the<br />
settings menu. See<br />
settings section.<br />
4 Setup Steps Icon (1,2,3,4,5)<br />
– Number refers to the<br />
setup step you are<br />
currently programming (not<br />
seen<br />
in image).<br />
Quick Reference: <strong>Basic</strong> <strong>Workouts</strong> <strong>Console</strong><br />
5 Workout Profile Display –<br />
The height of the segments<br />
indicate the difficulty level<br />
during the current time interval.<br />
6 Distance Display – Distance is<br />
shown in miles. Distance can<br />
be converted to kilometers in<br />
the settings menu. See user<br />
settings section.<br />
7 Heart Rate Display –<br />
Calculates user’s heart rate in<br />
beats per minute when<br />
wearing a chest strap or<br />
holding on to contact heart<br />
rate electrodes (No Heart Rate<br />
will be displayed on an Xl).<br />
8 Target Heart Rate Display –<br />
Calculates the user’s<br />
maximum heart rate based<br />
on 220 minus the user’s age.<br />
Then based on the selected<br />
program shows the target<br />
heart rate.<br />
7<br />
QUICK REFERENCE
QUICK REFERENCE<br />
8<br />
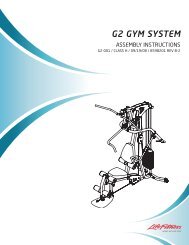
Quick Reference: <strong>Basic</strong> <strong>Workouts</strong> <strong>Console</strong><br />
Quick Reference: <strong>Basic</strong> <strong>Workouts</strong> <strong>Console</strong> continued<br />
j k<br />
l<br />
i<br />
m<br />
9 Calorie Display – Shows the<br />
calculated average caloric<br />
burn based on a <strong>Life</strong><br />
<strong>Fitness</strong> proprietary calorie<br />
equation.<br />
10 Pause/Resume Button –<br />
When pressed once during a<br />
workout the workout is<br />
paused for 5 minutes. When<br />
pressed again the workout is<br />
resumed.<br />
11 Navigation Buttons – Provides<br />
simple forward, back, up, and<br />
down software navigation as<br />
well as level, time, and speed<br />
workout adjustments.<br />
12 Enter/Start Button – When<br />
on the Select Workout<br />
screen press to begin a<br />
quick start workout. Also<br />
used to enter workout data<br />
during a workout.<br />
13 Reset Button – When<br />
entering workout data it will<br />
act as a delete button.<br />
Push three times to exit<br />
any workout.
How to Use the <strong>Basic</strong> <strong>Workouts</strong> Display<br />
How To Use: <strong>Basic</strong> <strong>Workouts</strong> <strong>Console</strong><br />
The <strong>Basic</strong> <strong>Workouts</strong> console was designed to make navigation as simple as possible by using special symbols<br />
and keys. The console display was designed to reduce toggling between workout information. Each piece of<br />
workout feedback, including level, time and speed has its own dedicated window.<br />
9<br />
HOW TO
HOW TO<br />
10<br />
How To Use: <strong>Basic</strong> <strong>Workouts</strong> <strong>Console</strong><br />
How to Use the <strong>Basic</strong> <strong>Workouts</strong> <strong>Console</strong><br />
1 Level/Incline Display<br />
a. Level Display (Bikes/Cross-Trainers) –<br />
There are two types of levels used on<br />
<strong>Life</strong> <strong>Fitness</strong> bikes and cross-trainers. The<br />
first type of level is the actual brake resistance level.<br />
This type of level is only adjustable by the user in a<br />
manual workout. The range of possible brake<br />
resistance levels is 1-20. The second type of level is<br />
difficulty level. There are 20 difficulty levels. Difficulty<br />
level corresponds to a range of actual brake<br />
resistance levels and is only used in random, hill, ez<br />
incline, and sports training workouts. So when %<br />
you<br />
select a difficulty level of 10 it corresponds to a range<br />
of actual brake resistance levels of 5-14. During<br />
random, hill, ez incline, and sports training the<br />
difficulty level will only be displayed during workout<br />
setup and anytime you choose to change the level<br />
during the workout. At all other times during a<br />
workout the actual level will be displayed. Please see<br />
the table on the following page for specific difficulty<br />
level information.<br />
b.Level / Incline Display (Treadmills) – There are two<br />
types of levels used on <strong>Life</strong> <strong>Fitness</strong> treadmills. The<br />
first type of level is an incline level or percentage.<br />
Incline level is only manually adjusted by the user in<br />
a manual workout. The range of possible incline<br />
percentages is 0-12% and can be adjusted in 0.5%<br />
increments. The second difficulty level corresponds<br />
to a range of actual incline percentages. Difficulty<br />
levels are only used in random, hill, ez incline, and<br />
sports training workouts. So when a user selects a<br />
difficulty level of 10 it corresponds to a range of<br />
incline percentages between 3% and 7%. During<br />
random, hill, ez incline, and sports training the<br />
difficulty level will be displayed only during workout<br />
setup and anytime the difficulty level is changed<br />
during the workout. At all other times during these<br />
workouts the incline percentage is displayed. Please<br />
see the table on the following page for specific<br />
difficulty level information.<br />
c. Changing the Level during a Workout –<br />
To change the level during a workout the underscore<br />
beneath the top row of workout feedback needs to<br />
be positioned under level. If the underscore is not<br />
under level, it can be moved using the left/right<br />
arrow keys. To adjust the level simply press the up<br />
and down keys.
How to Use the <strong>Basic</strong> <strong>Workouts</strong> <strong>Console</strong> continued<br />
Difficulty Level Brake Level (CT/Bikes) Incline Level (Treads)<br />
20<br />
19<br />
18<br />
17<br />
16<br />
15<br />
14<br />
13<br />
12<br />
11<br />
10<br />
9<br />
8<br />
7<br />
6<br />
5<br />
4<br />
3<br />
2<br />
1<br />
12 - 20<br />
11 - 19<br />
10 - 18<br />
9 - 17<br />
8 - 17<br />
8 - 16<br />
7 - 16<br />
7 - 15<br />
6 - 15<br />
6 - 14<br />
5 - 14<br />
5 - 13<br />
4 - 13<br />
4 - 12<br />
3 - 12<br />
3 - 11<br />
2 - 11<br />
2 - 10<br />
1 - 10<br />
1 - 9<br />
8.0 - 12.0<br />
7.5 - 11.5<br />
7.0 - 11.0<br />
6.5 - 10.5<br />
6.0 - 10.0<br />
5.5 - 9.5<br />
5.0 - 9.0<br />
4.5 - 8.5<br />
4.0 - 8.0<br />
3.5 - 7.5<br />
3.0 - 7.0<br />
2.5 - 6.5<br />
2.0 - 6.0<br />
1.5 - 5.5<br />
1.0 - 5.0<br />
0.5 - 4.5<br />
0.0 - 4.0<br />
0.0 - 3.0<br />
0.0 - 2.0<br />
0.0 - 1.0<br />
Note: Adjusts in 0.5% increments<br />
Note: Adjusts in 0.5% increments<br />
Note: Adjusts in 0.5% increments<br />
Note: Adjusts in 0.5% increments<br />
Note: Adjusts in 0.5% increments<br />
Note: Adjusts in 0.5% increments<br />
Note: Adjusts in 0.5% increments<br />
Note: Adjusts in 0.5% increments<br />
Note: Adjusts in 0.5% increments<br />
Note: Adjusts in 0.5% increments<br />
Note: Adjusts in 0.5% increments<br />
Note: Adjusts in 0.5% increments<br />
Note: Adjusts in 0.5% increments<br />
Note: Adjusts in 0.5% increments<br />
Note: Adjusts in 0.5% increments<br />
Note: Adjusts in 0.5% increments<br />
Note: Adjusts in 0.5% increments<br />
Note: Adjusts in 0.3% increments<br />
Note: Adjusts in 0.15% increments<br />
Note: Adjusts in 0.1% increments<br />
How To Use: <strong>Basic</strong> <strong>Workouts</strong> <strong>Console</strong><br />
11<br />
HOW TO
HOW TO<br />
12<br />
How To Use: <strong>Basic</strong> <strong>Workouts</strong> <strong>Console</strong><br />
How to Use the <strong>Basic</strong> <strong>Workouts</strong> <strong>Console</strong> continued<br />
2 Time Display<br />
Time displays the amount of<br />
time entered in minutes<br />
during workout setup. Time<br />
can be adjusted in 1:00 minute increments. During<br />
workout setup time can be adjusted from 00:00 to<br />
99:99 minutes. At the beginning of a workout, the<br />
user begins a warm up period, which is not<br />
included in the total time of the workout. To skip<br />
the warm up period press the down key until the<br />
warm up time is 00:00 and your workout time<br />
begins. Note: to adjust % time make sure the<br />
underscore is under the display. During the workout<br />
time can be adjusted by pressing the up and down<br />
key. After the workout is complete an automatic<br />
cool-down period begins. It can be skipped by<br />
pressing the down key and reducing the time to<br />
00:00. There is an option to set the time to count up<br />
or down from 00:00 and end at the time set during<br />
workout setup.<br />
%<br />
3 Speed Display<br />
Speed is displayed in miles per hour<br />
(MPH). The formula tries to replicate<br />
miles per hour as if the exercise was<br />
being conducted outdoors. The speed range on<br />
bikes and cross-trainers is 0.5 mph and up, in<br />
increments of 0.1 mph. The speed range on<br />
treadmills is 0.5 mph to 10.0 mph and is adjustable<br />
in increments of 0.1 mph. Speed can be converted<br />
to kilometers per hour in the settings menu.<br />
See Settings Section.<br />
4 Distance Display<br />
Distance is shown in miles.<br />
The distance formula tries to replicate%<br />
miles as if the exercise was being<br />
conducted outdoors. The distance formula will not<br />
always be consistent with other <strong>Life</strong> <strong>Fitness</strong> products<br />
or other manufacturer’s products. Distance can be<br />
converted to kilometers in the settings menu.<br />
See Settings Section.
How to Use the <strong>Basic</strong> <strong>Workouts</strong> <strong>Console</strong><br />
5 Target Heart Rate Display<br />
6 Heart Rate Display<br />
How To Use: <strong>Basic</strong> <strong>Workouts</strong> <strong>Console</strong><br />
Target heart rate is a desired range<br />
Heart rate is the number of<br />
% during cardiovascular exercise<br />
contractions of % the heart in one<br />
which enables one’s heart and<br />
minute. The heart rate display<br />
lungs to receive the most benefit from a workout. calculates the user’s actual heart rate in<br />
The console calculates target heart rate by taking the contractions or beats per minute during a workout.<br />
maximum heart rate (220 minus the user’s age) and User must be holding on to the contact heart rate<br />
multiplying it by an intensity level. <strong>Life</strong> <strong>Fitness</strong><br />
electrodes for the heart rate display to function<br />
intensity levels are 65% for weight loss and fat<br />
(not available on the X1). In order to get the best<br />
burning and 80% for improving cardiovascular<br />
Heart Rate reading, <strong>Life</strong> <strong>Fitness</strong> recommends<br />
endurance. The display will toggle between the 65% holding the sensors and remaining as still as<br />
and 80% intensity levels. An arrow pointing up or possible to eliminate any muscle “noise” that is<br />
down will illuminate to show when the user’s actual<br />
heart rate is above or below the target heart rate.<br />
(Arrows are not functional with X1)<br />
a.Example: User’s Age is 45. 220 – 45 = 175.<br />
175 is the Maximum Heart Rate for a 45 year<br />
old. 175 x 65% = 114. 114 is the optimal<br />
target heart rate for weight loss and fat burning.<br />
not related to the heart.<br />
13<br />
HOW TO
HOW TO<br />
HOW TO<br />
14<br />
%<br />
How To Use: <strong>Basic</strong> <strong>Workouts</strong> <strong>Console</strong><br />
How to Use the <strong>Basic</strong> <strong>Workouts</strong> <strong>Console</strong> continued<br />
7 Calorie/Watts Display<br />
A calorie is a unit used to<br />
measure energy.<br />
It represents the amount of<br />
energy obtained from food. One calorie is<br />
approximately enough energy to increase the<br />
temperature of 1 gram of water by 1 degree Celsius.<br />
The console calculates an average caloric burn based<br />
on a <strong>Life</strong> <strong>Fitness</strong> proprietary calorie equation. This<br />
formula may not match other manufacturer’s<br />
machines or other <strong>Life</strong> <strong>Fitness</strong> machines. Watts can<br />
also be viewed in this window if turned on in the<br />
settings menu. See settings menu.<br />
8 Workout Profile Display<br />
This display<br />
graphically<br />
represents a<br />
complete resistance profile of a workout. The time<br />
selected during a given workout is evenly distributed<br />
across 24 columns in the profile. The height of the<br />
columns (9 total) indicates the level and displays the<br />
intensity of a selected workout. The height of the<br />
columns does not change during a workout when<br />
the resistance is changed. The current intensity level<br />
in the profile is identified by an arrow pointing down<br />
to the column.<br />
9 Workout Profile Indicator Arrow<br />
The arrow located above the<br />
column in the workout profile<br />
displays the position the user is at<br />
in the workout. The position is<br />
represented by the time entered during workout<br />
setup divided by the number of columns (24). For<br />
example during a 24 minute workout the arrow<br />
would move one column every minute.<br />
10 Pause/Resume Button<br />
When pressed once during a workout the<br />
workout is paused for 5 minutes. When<br />
pressed again the workout is resumed.<br />
If the paused workout is not resumed<br />
within 5 minutes, the console deletes the workout<br />
in progress and returns to the setup workout state.<br />
The pause time can be modified in the user<br />
settings menu. See Settings Section.
How to Use the <strong>Basic</strong> <strong>Workouts</strong> <strong>Console</strong><br />
11 Navigation Button<br />
Provides simple forward, backwards, up,<br />
and down software navigation as well as<br />
level, time, and speed workout<br />
adjustments. While setting up a workout<br />
use the Left/Right arrows to scroll through workout<br />
setup options, and then use the Up/Down arrows to<br />
adjust the values. During a workout, use the<br />
Left/Right arrows to scroll between options to<br />
adjust, and then use the Up/Down arrows to adjust<br />
those values.<br />
12 Enter Button<br />
The enter button can be pressed during<br />
initialization to begin a quick start 30<br />
minute manual workout. After initialization<br />
the enter key acts as a selection key.<br />
13 Reset Button<br />
How To Use: <strong>Basic</strong> <strong>Workouts</strong> <strong>Console</strong><br />
Press this button when programming a<br />
workout to clear incorrect data, such as<br />
weight or age, before pressing the ENTER<br />
key. Pressing RESET three times consecutively<br />
during a workout stops it immediately, at which point,<br />
the user returns to the select workout screen.<br />
15<br />
HOW TO
HOW TO<br />
16<br />
How To Use: <strong>Basic</strong> <strong>Workouts</strong> <strong>Console</strong><br />
How to Use the <strong>Basic</strong> <strong>Workouts</strong> <strong>Console</strong><br />
Workout Overviews<br />
The <strong>Basic</strong> <strong>Workouts</strong> console has five specially designed pre-programmed workouts that have been developed<br />
by <strong>Life</strong> <strong>Fitness</strong>. Each workout has a different goal. Read the workout descriptions carefully so that you can<br />
develop a workout routine that focuses on reaching your specific goals.<br />
The workout descriptions on the following pages are labeled Beginner-Just Starting or Experienced-Fit.<br />
Beginner workouts are designed for users just starting to create a workout routine. Beginner workouts have<br />
limited gradual intensity adjustments. Experienced workouts are workouts designed for users that want a more<br />
challenging workout and have a higher fitness level.<br />
Different workouts require different setup steps. This section provides details on the steps themselves.<br />
The main screen of the console is known as the “Select Workout” screen which looks like the following:<br />
FPO
How to Use the <strong>Basic</strong> <strong>Workouts</strong> <strong>Console</strong><br />
Workout Overviews continued<br />
How To Use: <strong>Basic</strong> <strong>Workouts</strong> <strong>Console</strong><br />
When this screen appears on the console, use either the Up/Down or Left/Right arrows to scroll through all<br />
the workout choices and select a workout by pressing Enter/Start. Also to just begin a Quick Start workout,<br />
press Enter/Start when the above “Select Workout” screen appears.<br />
When a workout is selected the display will appear on the screen. This icon<br />
indicates how many steps are needed to complete in order to begin the workout. Also the step the user is<br />
currently on will blink to show where they are at in the setup process. % Throughout the workout setup process,<br />
the Up/Down arrows can be used to adjust the value that is selected and the left/right arrows can be used to<br />
scroll back and forth between different steps. In order to advance to the next step, either press the right arrow<br />
or enter. When the last step is completed the enter button must be pressed to begin the workout.<br />
QUICK START is the fastest way to begin exercising. It bypasses the steps involved in selecting a specific<br />
workout program. Begin a QUICK START workout by pressing the ENTER/START key at the SELECT WORKOUT<br />
screen. After ENTER is pressed, a constant-level workout begins. The user is responsible for changing the intensity level.<br />
17<br />
HOW TO
HOW TO<br />
18<br />
How To Use: <strong>Basic</strong> <strong>Workouts</strong> <strong>Console</strong><br />
How to Use the <strong>Basic</strong> <strong>Workouts</strong> <strong>Console</strong><br />
How to Use the <strong>Workouts</strong><br />
1 Manual Workout (Beginner – Just Starting)<br />
Access: This workout can be started by using the navigation keys<br />
to scroll to the Manual workout profile and pressing Enter.<br />
Description: Manual workout is a simple workout that has no<br />
pre-defined intensity levels. The manual workout starts the user<br />
at level 1 resistance level for bikes and cross trainers and 0.5<br />
MPH and 0% incline for treadmills. The user is in complete<br />
control of level or speed/incline settings.<br />
Goal: This workout was designed for users that do not<br />
have much experience working out on a product and like<br />
to have control of the level and speed/incline settings.<br />
MANUAL WORKOUT
How to Use the <strong>Workouts</strong> continued<br />
2 Random Workout (Experienced – Fit)<br />
Access: This workout can be started by using the<br />
navigation keys to scroll to the Random workout profile<br />
and pressing Enter.<br />
Description: In this workout the console creates a terrain<br />
of different hills and valleys. Over 1 million different<br />
patterns are possible. Random uses resistance (bikes and<br />
cross-trainers) or incline (treadmills) adjustments to create<br />
hills/valleys. Speed is controlled by the user.<br />
Goal: This workout was designed to provide the end-user<br />
with unlimited workout variety to prevent workout<br />
boredom and improve motivation.<br />
How To Use: <strong>Basic</strong> <strong>Workouts</strong> <strong>Console</strong><br />
RANDOM WORKOUT<br />
19<br />
HOW TO
HOW TO<br />
HOW TO<br />
20<br />
How To Use: <strong>Basic</strong> <strong>Workouts</strong> <strong>Console</strong><br />
How to Use the <strong>Workouts</strong> continued<br />
3 Hill Workout (Experienced – Fit)<br />
Access: This workout can be started by using the navigation keys<br />
to scroll to the Hill workout profile and pressing Enter.<br />
Description: The <strong>Life</strong> <strong>Fitness</strong> patented hill workout is an interval<br />
training workout. Intervals are periods of intense aerobic exercise.<br />
The workout profile window displays the levels of the intervals,<br />
which together have the appearance of hills and valleys.<br />
Resistance and incline adjustments are used to simulate the<br />
hills/valleys and speed is controlled by the user.<br />
The hill workout has two main phases that are in between the<br />
warm-up and cool-down.<br />
1 Plateau: Increases the intensity slightly and keeps<br />
it steady, to bring the heart rate to the low end of the<br />
target zone.<br />
2 Interval Training: Is a series of increasingly<br />
steeper hills, alternating with valleys, or periods of<br />
recovery. The heart rate should rise to the high end of the<br />
target zone during this segment.<br />
Goal: The computerized interval training workout has been<br />
scientifically demonstrated to promote greater cardio-respiratory<br />
improvement than steady-pace training. The goal of this workout is to<br />
improve cardiovascular endurance and break through fitness plateaus.<br />
HILL WORKOUT
How to Use the <strong>Workouts</strong> continued<br />
4 EZ Incline Workout (Beginner – Just Starting)<br />
Access: This workout can be started by using the navigation<br />
keys to scroll to the EZ Incline workout profile and pressing Enter.<br />
Description: The EZ incline program consists of one hill. The<br />
user determines the elevation of the peak during the workout<br />
setup. This peak is reached after 75% of the workout time is<br />
complete. Afterward the resistance or incline gradually returns<br />
to level 1 or 0% respectively.<br />
Goal: In this workout, the gradual changes in elevation are<br />
extremely subtle, which lowers the perceived exertion.<br />
This cardiovascular workout is effective, efficient, and<br />
enjoyable at the same time. The main goal of the workout<br />
is to improve cardiovascular endurance without the stress of<br />
a rigorous workout.<br />
How To Use: <strong>Basic</strong> <strong>Workouts</strong> <strong>Console</strong><br />
EZ INCLINE WORKOUT<br />
21<br />
HOW TO
HOW TO<br />
22<br />
How To Use: <strong>Basic</strong> <strong>Workouts</strong> <strong>Console</strong><br />
How to Use the <strong>Workouts</strong> continued<br />
5 Sports Training Workout (Experienced –Fit)<br />
Access: This workout can be started by using the navigation keys<br />
to scroll to the Sports Training workout profile and pressing Enter.<br />
Description: Sports Training is a workout that simulates working<br />
out outdoors by using a baseline value to simulate a flat surface.<br />
The program then simulates moving uphill with values above the<br />
baseline and downhill with values below the baseline. The<br />
adjustments above and below the baseline are resistance or<br />
incline changes. Speed is controlled by the user.<br />
Goal: The design intent and goal of this workout was<br />
to simulate outdoor training.<br />
SPORTS TRAINING WORKOUT
How to Use the Settings Menu<br />
Settings<br />
How To Use: <strong>Basic</strong> <strong>Workouts</strong> <strong>Console</strong><br />
The Settings menu can be accessed by pressing and holding the Enter key for 5 seconds at the<br />
“Select Workout” screen. Upon entering the Settings menu, the screen will display “SET MENU”<br />
• Scroll through Settings options using the left/right arrows<br />
The Settings options are displayed on the top row of the screen<br />
• Adjust Settings items with up and down arrows<br />
Each Setting option will be able to be adjusted in the workout profile<br />
• Use the Enter key or left/right arrow to save modifications and move to the next option<br />
• Use the Reset key to set the item back to its default value<br />
Below are all of the Settings States and selection options.<br />
• Sleep Mode<br />
Displays “SLEEP MODE”<br />
Selection options are: OFF, 1 Min, 2 Min, 3 Min, 4 Min, & 5 Min<br />
• English Metric Mode<br />
Displays “Unit”<br />
Selection options are: English and Metric<br />
23<br />
HOW TO
HOW TO<br />
24<br />
How To Use: <strong>Basic</strong> <strong>Workouts</strong> <strong>Console</strong><br />
How to Use the Settings Menu continued<br />
• Beeps<br />
Displays “Beep”<br />
Selection options are: On and Off<br />
• Pause Time<br />
Displays “Pause”<br />
Selection options are: 1 Min to 30 Min<br />
• Watts<br />
Displays “Watt”<br />
Selection options are: On and Off<br />
• Contrast<br />
Displays “Contrast”<br />
Selection options are: 1-10 with 10<br />
being the brightest<br />
• Workout Timer<br />
Displays “Time”<br />
Selection options are: Up or Down<br />
• Safety Mode<br />
Displays “Safe Mod”<br />
Selection options are: On (30 seconds) or Off<br />
• Statistics – press Enter to select<br />
“Total Hours” (total number of hours the<br />
product was used in a workout)<br />
“Total Miles” (number of miles that the product<br />
was used for)<br />
“Lift Minutes” (treadmill only: number of<br />
minutes the lift motor was used)<br />
• Software Version – press Enter to select<br />
<strong>Console</strong> Software Version<br />
<strong>Console</strong> Software Part Number<br />
<strong>Console</strong> Software Build Date<br />
Motor Controller Part Number (treadmill only)<br />
Motor Controller Software Part Number<br />
(treadmill only)<br />
Motor Controller Software Build Date<br />
(treadmill only)
Preventive Maintenance Tips<br />
Service and Technical Data: <strong>Basic</strong> <strong>Workouts</strong> <strong>Console</strong><br />
The <strong>Life</strong> <strong>Fitness</strong> products are backed by engineering excellence and are one of the most rugged and trouble-free<br />
pieces of exercise equipment on the market today. <strong>Life</strong> <strong>Fitness</strong> products have proven to be durable in health<br />
clubs, colleges, military facilities and other locations all over the world.<br />
NOTE: The safety of the equipment can be maintained only if the equipment is examined regularly for damage<br />
or wear. If maintenance is required, keep the equipment out of use until defective parts are repaired or replaced.<br />
Pay special attention to parts that are subject to wear as outlined in the Preventive Maintenance Schedule.<br />
The following preventive maintenance tips will keep the console operating at peak performance:<br />
• Locate the product in a cool, dry place.<br />
• Keep the console free of fingerprints and salt build-up caused by sweat.<br />
• Use a 100% cotton cloth, lightly moisten with water and a mild liquid cleaning product, to clean the<br />
exercise equipment. Other fabrics, including paper towels, may scratch the surface. Do not use<br />
ammonia or acid-based cleaners.<br />
• Long fingernails may damage or scratch the surface of the console; use the pad of the finger to press<br />
the selction buttons on the console.<br />
Clean the housing thoroughly on a regular basis.<br />
NOTE: A non-abraisive cleaner and soft cotton cloth are strongly recommended for cleaning the exterior of the<br />
unit. At no time should cleaner be applied directly to any part of the equipment; apply the non-abraisive cleaner<br />
on a soft cloth, and then wipe the unit.<br />
25<br />
SERVICE AND TECH
SERVICE AND TECH<br />
26<br />
Service and Technical Data: <strong>Basic</strong> <strong>Workouts</strong> <strong>Console</strong><br />
Troubleshooting <strong>Basic</strong> Workout <strong>Console</strong><br />
1. The console display looks strange or has an error message and is not functioning.<br />
A. Unplug the unit to reset the console and then plug it back in. Do this multiple times if console error<br />
message still appears. If the problem still exists please call customer service.<br />
2. My console keeps going into a mode where the message center displays “HIT ENTER”<br />
A. Your product is in safety mode and this locked feature is to protect someone from accidentally pressing<br />
a button they are not suppose to. You can go into the Settings Menu to disable this feature or extend the<br />
length of the time it takes for this feature to turn on. Please refer to the Settings Menu section of the manual.<br />
3. My console displays “STUCK KEY”<br />
A. One of the keys is stuck under the plastic console shell; check all the keys and un-stick the one that is stuck<br />
by pressing the sides of the key. If that does not work then try unplugging the unit and plug it back in.<br />
4. My console displays “SLEEP”<br />
A. The console is in sleep mode and can be woken up by pressing any key. Sleep Mode can be turned on<br />
and off in the Settings Menu.<br />
5. My console will not light up.<br />
A. Make sure the unit is plugged in or if you have a R3 or C3 then begin pedaling to light the console.<br />
If the console will still not turn on make sure all the connections in the back of the console are plugged<br />
in correctly according to the assembly instructions. If this still does not work contact Customer Service.<br />
6. The heart rate reading seems erratic.<br />
A. Remove hands from from heart rate sensors and wait until heart rate icon and heart rate number<br />
disappears. This allows the heart rate system to reset. Grasp hand sensors firmly and keep hands still.<br />
The contact heart rate system may be less or more accurate with different individuals.
How to Obtain Product Service<br />
Service and Technical Data: <strong>Basic</strong> <strong>Workouts</strong> <strong>Console</strong><br />
1 Verify the symptom and review the operating instruction. The problem may be unfamiliarity with the product<br />
and its features and workouts.<br />
2 Locate and document the serial number of the base unit and console. The serial number plate is located on<br />
the front stabilizer, below the shroud, and the serial number for the console is located on the back surface.<br />
3 Contact Customer Support Services via the Web at www.lifefitness.com, or call the nearest Customer<br />
Support Services group:<br />
For Product services within the United States and Canada:<br />
Telephone: (+1) 847.451.0036<br />
Fax: (+1) 847.288.3702<br />
Toll-free telephone: 800.351.3737<br />
27<br />
SERVICE AND TECH
SERVICE AND TECH<br />
28<br />
Service and Technical Data: <strong>Basic</strong> <strong>Workouts</strong> <strong>Console</strong><br />
For Product Service Internationally:<br />
<strong>Life</strong> <strong>Fitness</strong> Europe GmbH<br />
Telephone: (+49) 089.317.751.66<br />
Fax: (+49) 089.317.751.38<br />
<strong>Life</strong> <strong>Fitness</strong> (UK) LTD<br />
Telephone: (+44) 1353.665507<br />
Fax: (+44) 1353.666018<br />
<strong>Life</strong> <strong>Fitness</strong> Atlantic BV<br />
<strong>Life</strong> <strong>Fitness</strong> Benelux<br />
Telephone: +31 (0) 180 64 66 66<br />
Fax: +31 (0) 180 64 66 99<br />
<strong>Life</strong> <strong>Fitness</strong> Italia S.R.L.<br />
Telephone: (+39) 0472.835.470<br />
Fax: (+39) 0472.833.150<br />
Toll-free telephone: 800.438836<br />
<strong>Life</strong> <strong>Fitness</strong> Vertriebs GmbH<br />
Telephone: (+43) 1615.7198<br />
Fax: (+43) 1615.7198.20<br />
<strong>Life</strong> <strong>Fitness</strong> Asia Pacific Ltd<br />
Telephone: (+852) 2891.6677<br />
Fax: (+852) 2575.6001<br />
<strong>Life</strong> <strong>Fitness</strong> Latin America and Caribbean<br />
Telephone: (+1) 847.288.3964<br />
Fax: (+1) 847.288.3886<br />
<strong>Life</strong> <strong>Fitness</strong> Brazil<br />
Telephone: (+55) 11.7295.2217<br />
Fax: (+55) 11.7295.2218<br />
<strong>Life</strong> <strong>Fitness</strong> Japan<br />
Telephone: (+81) 3.3359.4306<br />
Fax: (+81) 3.3359.4307<br />
<strong>Life</strong> <strong>Fitness</strong> Iberia<br />
Telephone: (+34) 93.672.4660<br />
Fax: (+34) 93.672.4670
Warranty Information<br />
What is Covered:<br />
Service and Technical Data: <strong>Basic</strong> <strong>Workouts</strong> <strong>Console</strong><br />
This <strong>Life</strong> <strong>Fitness</strong> consumer product (“Product”) is warranted to be free of all defects in material and<br />
workmanship.<br />
Who is Covered:<br />
The original purchaser or any person receiving a newly purchased Product as a gift from the original purchaser.<br />
How Long is it Covered:<br />
Residential: All electrical and mechanical components and labor are covered, after the date of purchase, as listed<br />
on the following chart.<br />
Non-Residential: Warranty void (this Product is intended for residential use only).<br />
Who Pays Shipping & Insurance for Service:<br />
If the Product or any warranted part must be returned to a service facility for repairs, <strong>Life</strong> <strong>Fitness</strong> will pay all<br />
shipping and insurance charges during the warranty period (within the United States only). The purchaser is<br />
responsible for shipping and insurance charges after the warranty has expired.<br />
What We will do to Correct Covered Defects:<br />
We will ship to you any new or rebuilt replacement part or component, or at our option, replace the Product.<br />
Such replacement parts are warranted for the remaining portion of the original warranty period.<br />
continued on next page<br />
29<br />
SERVICE AND TECH
SERVICE AND TECH<br />
30<br />
Service and Technical Data: <strong>Basic</strong> <strong>Workouts</strong> <strong>Console</strong><br />
Warranty Information<br />
continued from previous page<br />
What is Not Covered:<br />
Any failures or damage caused by unauthorized service, misuse, accident, negligence, improper assembly or<br />
installation, debris resulting from any construction activities in the Product’s environment, rust or corrosion as a<br />
result of the Product’s location, alterations or modifications without our written authorization or by failure on<br />
your part to use, operate and maintain the Product as set out in your User Manual (“Manual”). All terms of this<br />
warranty are void if this Product is moved beyond the continental borders of the United States of America<br />
(excluding Alaska, Hawaii and Canada) and are then subject to the terms provided by that country’s local<br />
authorized <strong>Life</strong> <strong>Fitness</strong> Representative.<br />
What You Must Do:<br />
Retain proof of purchase (our receipt of the attached registration card assures registration of purchase<br />
information but is not required); use, operate and maintain the Product as specified in the Manual; notify<br />
Customer Service of any defect within 10 days after discovery of the defect; if instructed, return any defective<br />
part for replacement or, if necessary, the entire Product for repair. <strong>Life</strong> <strong>Fitness</strong> reserves the right to decide<br />
whether or not a Product is to be returned for repair.<br />
User Manual:<br />
It is VERY IMPORTANT THAT YOU READ THE MANUAL before operating the Product. Remember to perform<br />
the periodic maintenance requirements specified in the Manual to assure proper operation and your continued<br />
satisfaction.<br />
continued on next page
Warranty Information<br />
continued from previous page<br />
Product Registration:<br />
Service and Technical Data: <strong>Basic</strong> <strong>Workouts</strong> <strong>Console</strong><br />
Register online at www.lifefitness.com/registration. Our receipt assures that your name, address and date of<br />
purchase are on file as a registered owner of the Product. Failure to return the card will not affect your rights under<br />
this warranty. Being a registered owner assures coverage in the event you lose your proof of purchase. Please<br />
retain your proof of purchase, such as your bill of sale or receipt.<br />
How to get Parts & Service:<br />
Simply call Customer Service at 1-800-351-3737 or (+1) 847-288-3300, Monday through Friday from 8:00 a.m. to<br />
5:00 p.m. Central Standard Time, and tell them your name, address and the serial number of your Product (consoles<br />
and frames may have separate serial numbers). They will tell you how to get a replacement part, or, if necessary,<br />
arrange for Service where your Product is located.<br />
Exclusive Warranty:<br />
THIS LIMITED WARRANTY IS IN LIEU OF ALL OTHER WARRANTIES OF ANY KIND EITHER EXPRESSED OR<br />
IMPLIED, INCLUDING BUT NOT LIMITED TO THE IMPLIED WARRANTIES OF MERCHANTABILITY AND FITNESS<br />
FOR A PARTICULAR PURPOSE, AND ALL OTHER OBLIGATIONS OR LIABILITIES ON OUR PART. We neither<br />
assume nor authorize any person to assure for us any other obligation or liability concerning the sale of this Product.<br />
Under no circumstances shall we be liable under this warranty, or otherwise, of any damage to any person or<br />
property, including any lost profits or lost savings, for any special, indirect, secondary, incidental or consequential<br />
damages of any nature arising out of the use of inability to use this Product. Some states do not allow the exclusion<br />
or limitation of implied warranties or of liability for incidental or consequential damages, so the above limitations or<br />
exclusions may not apply to you. Warranties may vary outside the U.S. Contact <strong>Life</strong> <strong>Fitness</strong> for details.<br />
31<br />
SERVICE AND TECH
SERVICE AND TECH<br />
32<br />
Service and Technical Data: <strong>Basic</strong> <strong>Workouts</strong> <strong>Console</strong><br />
SPECIFICATIONS BASIC WORKOUTS CONSOLE<br />
Number of <strong>Workouts</strong> 5<br />
User Profiles 0<br />
Interactive Heart Rate Programming No<br />
Heart Rate Telemetry No<br />
Contact Heart Rate Yes (except XI)<br />
Race Mode No<br />
Goal <strong>Workouts</strong> No<br />
Levels 20<br />
Message Center No<br />
Display Type Custom-etched LCD<br />
Warranty 3 years
Notes<br />
33
34<br />
Notes
8120601<br />
<strong>Life</strong> <strong>Fitness</strong> offers a full line of premier fitness equipment for the home.<br />
LIFECYCLE EXERCISE BIKES | TREADMILLS | TOTAL-BODY ELLIPTICAL CROSS-TRAINERS | STAIRCLIMBERS | GYM SYSTEMS<br />
Where does your workout take you?<br />
LIFEFITNESS.COM<br />
©2006 <strong>Life</strong> <strong>Fitness</strong>, a division of Brunswick Corporation. All rights reserved. <strong>Life</strong> <strong>Fitness</strong>, <strong>Life</strong>pulse, FlexDeck, and HeartSync are registered trademarks of Brunswick Corporation. EZ Incline, Heart Rate Hill, Heart Rate Interval, Extreme Heart Rate,<br />
GoSystem, MagnaDrive, My Treadmill, My <strong>Workouts</strong>, and Smart Stop, are trademarks of Brunswick Corporation. Polar is a registered trademark of Polar Electro, Inc. PM-005-06 (08.06)