DS-35: Operating Guide
DS-35: Operating Guide
DS-35: Operating Guide

You also want an ePaper? Increase the reach of your titles
YUMPU automatically turns print PDFs into web optimized ePapers that Google loves.
TABLE OF CONTENTS<br />
1 Health, Safety and Environment ...................................................... 2<br />
1.1 Precautions and Safety Issues ................................................... 2<br />
1.2 Country Specific Conditions ...................................................... 3<br />
1.3 End of Life .............................................................................. 4<br />
2 Functional description ..................................................................... 5<br />
2.1 The Folding and Inserting Process .............................................. 5<br />
2.2 <strong>Operating</strong> Controls .................................................................. 7<br />
2.3 Control Panel .......................................................................... 8<br />
2.4 User Interface Description ........................................................ 8<br />
3 <strong>Operating</strong> Instructions .................................................................. 11<br />
3.1 Installing the Envelope Catch Tray ............................................ 11<br />
3.2 Starting Up ............................................................................ 11<br />
3.3 Loading Documents ................................................................ 12<br />
3.4 Loading Envelopes .................................................................. 14<br />
3.5 Filling the Sealing Liquid Reservoir ............................................ 15<br />
3.6 Run a Job .............................................................................. 15<br />
3.7 Daily Mail .............................................................................. 16<br />
3.8 Stopping the system ............................................................... 16<br />
4 Job Programming .......................................................................... 17<br />
4.1 Create a Job .......................................................................... 17<br />
4.2 Edit a Job .............................................................................. 18<br />
4.3 Delete a Job .......................................................................... 18<br />
5 Operator Maintenance ................................................................... 19<br />
5.1 Cleaning or Replacing Moistening Brushes .................................. 19<br />
5.2 Clean the System ................................................................... 19<br />
6 Fault finding .................................................................................. 20<br />
6.1 Error Messages ...................................................................... 20<br />
6.2 Clearing Stoppages ................................................................. 20<br />
6.3 Operator Troubleshooting ........................................................ 22<br />
7 Specifications ................................................................................ 27<br />
7.1 Technical Specifications ........................................................... 27<br />
7.2 Dimensions ........................................................................... 27<br />
7.3 Other Specifications ................................................................ 27<br />
7.4 Document Specifications ......................................................... 27<br />
7.5 Envelope and Insert Specifications ............................................ 28<br />
8 Terminology .................................................................................. 29<br />
Index.............................................................................................. 34<br />
ENGLISH<br />
1
1. HEALTH, SAFETY AND ENVIRONMENT<br />
1.1 Precautions and Safety Issues<br />
Thoroughly read this operator manual, before using this system.<br />
According to the EC declaration (European Commission) following the Low Voltage<br />
Directive (2006/95/EC), this operator manual must be available in the national<br />
language(s) of the country where the system is delivered. Therefore, if you do not have an<br />
operator manual in your country’s language(s), contact your authorized distributor.<br />
Warnings<br />
• Disconnect the mains supply before performing any maintenance.<br />
• Before connecting check if the system is suitable for the local mains voltage. Refer to<br />
the type plate.<br />
Safety Precautions<br />
• Only competent personnel should operate this system.<br />
If incompetent personnel do operate this system, the manufacturer does not accept<br />
responsibility for any resulting accidents or injuries.<br />
• Only skilled persons, who are aware of the risks involved, may open the protective<br />
covers.<br />
For safety reasons, the system will not function when the covers are open.<br />
• Keep long hair, fingers, jewelry, etc. away from rotating and moving parts.<br />
• The power connection must be easily accessible, preferably close to the system.<br />
• For safety reasons, it is essential that the system is connected to a socket outlet that<br />
has a protective earth connection.<br />
• Over-current protection in the equipment also relies on the branch circuit protection<br />
(max. 20 A).<br />
• The following part is considered the equipment disconnect device:<br />
- Power supply cord plug or appliance coupler<br />
2
Conventions<br />
Warning<br />
This symbol:<br />
• Identifies situations where improper use of the system can result in<br />
personal injury or permanent/catastrophic damage to the system.<br />
• Indicates that the operator manual should be consulted.<br />
Note<br />
A note gives additional relevant information.<br />
Caution<br />
Indicates the presence of a hazard that can cause personal injury or property damage, if<br />
the hazard is not avoided.<br />
1.2 Country Specific Conditions<br />
Denmark<br />
In Denmark, certain types of Class 1 appliances may be provided with a plug that does not<br />
provide an adequate earth connection when inserted into a Danish socket outlet.<br />
Make sure the system has a good functioning connection that has protective earthing (the<br />
plug and socket outlet must match).<br />
ENGLISH<br />
Japan<br />
• Establish an earth connection before connecting the mains plug to the power supply.<br />
• First disconnect the power supply before removing the earth connection.<br />
Languages<br />
This manual is also available in other languages. For more information, please contact<br />
your local supplier.<br />
3
1.3 End of Life<br />
The objectives of the European Community's environment policy are, in particular, to<br />
preserve, protect and improve the quality of the environment, protect human health and<br />
utilise natural resources prudently and rationally. That policy is based on the<br />
precautionary principle and principles that preventive action should be taken, that<br />
environmental damage should as a priority be rectified at source.<br />
Separate collection of waste is the precondition to ensure reuse and recycling of waste<br />
that is generated at the disposal of electrical or electronical equipment and is necessary to<br />
achieve the chosen level of protection of human health and the environment in the<br />
European Community.<br />
More particularly, certain materials and components of waste electrical and electronical<br />
equipment needs selective treatment as their injudicious handling or disposing of on or<br />
into land, water or air would represent a major threat to the environment and human<br />
health.<br />
In order to facilitate collection and treatment separated from normal domestic waste,<br />
electrical and electronical equipment is marked with the following logo:<br />
Do not mix with normal domestic waste<br />
Please use the subjoined return or<br />
collection system dedicated to electrical<br />
and electronical waste.<br />
Equipment produced after August 13,<br />
2005.<br />
Not only are you by law not allowed to dispose of the waste equipment via other wastestreams,<br />
but we encourage you to actively contribute to the success of such collection and<br />
to the common good and better quality of life of present and future generations.<br />
For more information on the correct disposal of this product please contact your local<br />
dealer.<br />
4
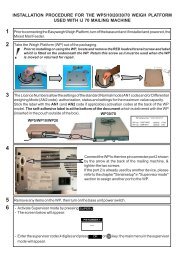
2. FUNCTIONAL DESCRIPTION<br />
The system feeds, folds and inserts documents into envelopes and then seals and stacks<br />
the envelopes. Automatic monitoring ensures the correct number of inserts per envelope.<br />
The system is a sophisticated folding and inserting system which can process large<br />
quantities of mail rapidly and easily.<br />
You can save the settings of the system (document type, envelope type and fold type) in<br />
so-called jobs.<br />
2.1 The Folding and Inserting Process<br />
The figure shows an overview of the document and envelope flow.<br />
1<br />
2<br />
3<br />
ENGLISH<br />
6 5<br />
4<br />
Feeder Area (1)<br />
The system has a feeder block with two document feeders. The feeder block is equipped<br />
with hopper swap. This means that you can link both feeders as pairs. When the first<br />
feeder is empty, the system switches to the other feeder. Meanwhile you can refill the<br />
other empty feeder without stopping the system.<br />
The front feeder (feeder 1) is equipped with a “daily mail” function to process documents<br />
or sets of documents which cannot be processed automatically (e.g. stapled).<br />
5
Double Feed Control (DFC)<br />
Each feeder has double feed control (DFC). In this way the system can detect faulty sets<br />
of documents. When a job is started, the first document taken per feeder is used for a<br />
reference measurement. When a document is exceeding that reference thickness an error<br />
will be displayed.<br />
Note<br />
When Daily mail is selected, the DFC is switched off automatically.<br />
Envelope Hopper (2)<br />
The envelopes are picked up and transported to the insert position inside the system.<br />
Feeder for Business Reply Envelopes (BRE) and Other Enclosures<br />
(feeder 3)<br />
Small enclosures or BREs are fed from feeder 3 and added to the folded document set.<br />
Folding area (4)<br />
In the folding area the documents are folded. The following fold types are possible (see<br />
“Terminology” on page 29):<br />
• No fold<br />
• V-fold (single fold)<br />
• C-fold (letter fold)<br />
• Double V-fold (double parallel fold)<br />
Inserter (5)<br />
The folded document set is transported to the inserter unit and inserted into a waiting<br />
envelope. The inserter can seal the envelope.<br />
Exit (6)<br />
The mail set leaves the system from the exit.<br />
6
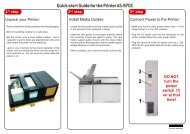
2.2 <strong>Operating</strong> Controls<br />
ENGLISH<br />
A button to open the system K power inlet<br />
B control panel with touch screen L power switch<br />
C standby button M side guides envelope hopper<br />
D paper guides N thumb wheel for adjusting side guides<br />
E document feeder 1<br />
envelope hopper<br />
F document feeder 2 O locking lever for side guides of document<br />
G flap, for access to document path feeder tray 2 and for filling tray 2<br />
of feeder 3 P thumb wheel for adjusting side guides<br />
H support feeder 3 document feeder tray 2<br />
I side guides feeder 3 Q sealing liquid reservoir<br />
J thumb wheel to adjust side guides<br />
feeder 3<br />
R catch tray<br />
7
2.3 Control Panel<br />
The system has a touch screen (D).<br />
There are three buttons next to the touch<br />
screen:<br />
• Standby button A to switch the system<br />
on or off.<br />
• : the stop key (B)<br />
When the stop key is pressed, the<br />
system completes the current set and<br />
stops.<br />
A<br />
B<br />
C<br />
D<br />
• : the start key (C)<br />
When the start key is pressed the system starts processing.<br />
Caution<br />
The touch screen is covered with a thin pressure-sensitive layer. To avoid permanent<br />
damage of the touch screen, do not use sharp objects to press on the touch screen.<br />
2.4 User Interface Description<br />
2.4.1 Explanation of Buttons and icons<br />
Buttons<br />
Opens a selection menu with<br />
language settings and supervisor<br />
menu<br />
Home: return to the ‘job selection’<br />
menu<br />
Back: return to the previous menu<br />
Save: save changes to a job<br />
New job: create a new job<br />
OK or Yes: confirm choice<br />
Edit: open the ‘job settings’ menu<br />
No: reject choice<br />
Meaning of Icons in Upper Left Corner of Touch Screen<br />
The icons in the upper left corner indicate the menu type you are working in.<br />
Home menu or ‘job selection’ menu Settings<br />
‘job settings’ menu<br />
Wizard<br />
8
2.4.2 Home (Job Selection)<br />
When you start up the system, the home menu<br />
‘job selection’ appears. With the arrows you can<br />
scroll through the jobs. If you want more<br />
information on a job, select the job (see<br />
2.4.3 ”Job Description (Current Job)” on page 9).<br />
The Menu button opens a selection menu (see<br />
2.4.4 ”Menu” on page 10).<br />
With the New Job button you can define a new<br />
job (see “Create a Job” on page 17).<br />
2.4.3 Job Description (Current Job)<br />
If you want more information on a job, select the<br />
job in the ‘job selection’ menu.<br />
The ‘current job’ menu shows the following<br />
information of the selected job:<br />
• Job name.<br />
• Job counter: total number of mail sets that<br />
have been processed with this job.<br />
ENGLISH<br />
If you want to set the job counter to zero,<br />
press the edit button<br />
counter.<br />
and Reset job<br />
Note<br />
The counter settings are job related.<br />
• A picture of the system with symbols for the selected features. The following symbols<br />
can be used:<br />
Feeder 1 is set for daily mail.<br />
Sealing is on.<br />
With the home button<br />
you get back to the home menu (‘job selection’).<br />
9
2.4.4 Menu<br />
When you press the Menu button a selection<br />
menu appears. This menu allows you to change<br />
system settings and define jobs. The screen<br />
shows the following functions:<br />
• Language settings: change the language of<br />
the user interface.<br />
• Supervisor menu: define envelope settings<br />
(see “Supervisor Menu” on page 10, only for<br />
authorized personnel).<br />
2.4.5 Supervisor Menu<br />
When you press the Supervisor menu button in the selection menu, a login menu opens.<br />
Enter the PIN-code 2546 to access the ‘supervisor menu’.<br />
When you enter the correct pin code the<br />
‘supervisor menu’ appears. This menu enables<br />
you to:<br />
• Define custom envelope sizes (press the<br />
Adjust stop position button).<br />
• Adjust the envelope stop position (see<br />
“Envelope Position” on page 26).<br />
• Adjust the sealing position (see “Sealing<br />
position” on page 26).<br />
• Switch off popups, like the popup that tells<br />
you to press the 1x button.<br />
2.4.6 Job Settings Menu<br />
When you press on a job and press the edit button<br />
, the ‘job settings’ menu opens. This menu<br />
enables you to:<br />
• Edit a job (see 4.2 ”Edit a Job” on page 18).<br />
• Delete a job (see 4.3 ”Delete a Job” on page<br />
18).<br />
• Reset the job counter: sets counter to zero.<br />
• Switch the double feed control (DFC) on or<br />
off, per feeder. For example, if you have a<br />
document with an address sticker on it,<br />
switch the DFC off. The DFC sees the sticker as a double feed and generates an error<br />
message.<br />
10
3. OPERATING INSTRUCTIONS<br />
3.1 Installing the Envelope Catch<br />
Tray<br />
To install the envelope catch tray:<br />
1. Move the catch tray until the clamps hold the<br />
feet of the system.<br />
2. Adjust the catch tray to the correct envelope<br />
size.<br />
ENGLISH<br />
3.2 Starting Up<br />
Warning<br />
You can severely damage the system if it is connected to the incorrect power supply.<br />
Before plugging in the system, check if the local voltage is the same as the voltage<br />
mentioned on the type plate.<br />
For the location of switches and buttons, see “<strong>Operating</strong> Controls” on page 7.<br />
To start up the system:<br />
1. Connect the system to the mains power<br />
supply.<br />
2. Use the power switch to switch the system<br />
on. The power switch is located at the back of<br />
the system.<br />
3. Press the power button next to the display.<br />
The touch screen shows the home menu.<br />
11
3.3 Loading Documents<br />
3.3.1 Document Orientation<br />
See also the job information on the touch screen. The table shows how to load documents,<br />
depending on the fold type.<br />
one document<br />
feeder linking two documents document + enclosure<br />
V-fold<br />
C-fold<br />
2<br />
2<br />
1 1 1 1<br />
3<br />
double<br />
V-fold<br />
Address carrier in<br />
feeder 1.<br />
Face up and trailing.<br />
Address carrier in<br />
feeders 1 and 2.<br />
Face up and trailing.<br />
Address carrier in<br />
feeder 1.<br />
Face up and trailing.<br />
Address carrier in<br />
feeder 1.<br />
Face up and trailing.<br />
3<br />
no fold<br />
Address carrier in<br />
feeder 3.<br />
Face up and trailing.<br />
12
3.3.2 Adjusting the Side <strong>Guide</strong>s of the<br />
Document Feeder<br />
To adjust the side guides of the document feeder<br />
trays:<br />
1. Pull lever C.<br />
2. Move the side guides A apart as far as possible<br />
with thumb wheel B.<br />
3. Put a small stack of documents between the<br />
side guides.<br />
4. Move the side guides towards the documents<br />
with thumb wheel B.<br />
The space between the side guides and the<br />
documents should be such that the documents<br />
have just enough play to move freely.<br />
5. Return lever C to its original position.<br />
6. Remove the stack of documents.<br />
3.3.3 Loading the Document Feeder<br />
Tray<br />
To load the document feeder tray:<br />
1. Pull lever C at the tray.<br />
2. Place a stack of documents between the side guides.<br />
Feed the documents (depending on the type of documents) as shown in<br />
3.3.1 ”Document Orientation” on page 12.<br />
3. Return lever C to its original position.<br />
ENGLISH<br />
3.3.4 Adjusting the Side <strong>Guide</strong>s of<br />
Feeder 3<br />
To adjust the side guides of feeder 3:<br />
1. Move the side guides C apart as far as<br />
possible with thumb wheel D.<br />
2. Pull back support B.<br />
3. Put a small stack of enclosures (A) between<br />
the side guides.<br />
4. Release support B.<br />
5. Move the side guides towards the enclosures<br />
with thumb wheel D.<br />
The space between the side guides and the<br />
enclosures should be such that the enclosures<br />
have just enough play to move freely.<br />
6. Remove the stack of enclosures.<br />
A<br />
B<br />
C<br />
D<br />
13
3.3.5 Loading Feeder 3<br />
To load feeder 3:<br />
1. Pull back support B.<br />
2. Place a stack of documents or BREs between the side guides.<br />
Place documents with trailing edge down. Place BREs with leading edge down and the<br />
flap at the support side.<br />
3. Release support B.<br />
3.4 Loading Envelopes<br />
To load the envelopes:<br />
1. Move the side guides B apart as far as<br />
possible with thumb wheel A.<br />
2. Fan the stack of envelopes C and place<br />
them between the side guides (flap down<br />
and trailing - bottom side of envelope<br />
pointing to the system).<br />
3. Move the side guides towards the<br />
envelopes with thumb wheel A.<br />
The space between the side guides and<br />
the envelopes should be such that the<br />
envelopes have just enough play to move<br />
freely.<br />
A<br />
B<br />
C<br />
Note<br />
If the distance between the side guides is too large, the envelopes will skew, when<br />
transported into the system.<br />
14
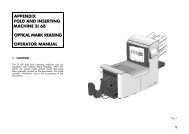
3.5 Filling the Sealing Liquid Reservoir<br />
When you want to seal envelopes,<br />
the sealing liquid reservoir must be<br />
filled.<br />
1. Press the button to open<br />
the system (see “<strong>Operating</strong><br />
Controls” on page 7).<br />
2. Lift the sealing liquid reservoir<br />
D with the blue handles A<br />
carefully out of the system.<br />
3. Remove the strip C from the<br />
reservoir.<br />
4. Fill the three reservoirs with<br />
sealing liquid.<br />
5. Make sure the brushes B are<br />
moistened sufficiently.<br />
6. Replace the liquid reservoir.<br />
7. Close the system.<br />
Before you start the job, wait<br />
approximately 5 minutes for the<br />
brushes to moisten.<br />
ENGLISH<br />
3.6 Run a Job<br />
Note<br />
Before you run a job, make sure the sealing liquid reservoir is filled.<br />
To run a job:<br />
1. From the home menu choose a job.<br />
The job information appears (see “Job<br />
Description (Current Job)” on page 9).<br />
2. Load envelopes as specified in the job.<br />
3. Load the documents face up and trailing, as<br />
specified in the job.<br />
Place the address carrier in feeder 1.<br />
4. Press the 1x button to start a test run or<br />
press the button to start the job.<br />
If you press the 1x test button, the system helps you to adjust the address position<br />
(see 6.3.7 ”Address Position” on page 26).<br />
15
3.7 Daily Mail<br />
To process documents or sets of documents, which can not be processed automatically<br />
(e.g. stapled documents), you can use feeder 1 as a daily mail feeder. Daily mail can<br />
handle sets with a maximum of five sheets (80 g/m 2 ).<br />
1. To use the daily mail function, define a new job with daily mail (see “Job<br />
Programming” on page 17) or use an existing daily mail job.<br />
2. Place the document or document set in the feeder 1.<br />
3. Press the button to start the job.<br />
The document or document set will be folded and inserted into the envelope as<br />
defined in the selected job.<br />
4. Place the next document or document set in the feeder. The system will keep running<br />
to process the inserted document or document set.<br />
5. When finished with Daily Mail, press the button to stop the job.<br />
3.8 Stopping the system<br />
To stop the system press the button. The system completes and inserts the current<br />
set and stops. This results in a cleared system which is ready to process a new job.<br />
16
4. JOB PROGRAMMING<br />
4.1 Create a Job<br />
To create a new job:<br />
1. In the home menu, press the (new job)<br />
button.<br />
The Job Wizard starts and helps you to<br />
choose:<br />
- Envelope size. Custom is only available if<br />
defined by the supervisor (“Supervisor<br />
Menu” on page 10).<br />
- If the envelopes should be sealed or not.<br />
- Document size for feeder 1.<br />
- Daily mail or normal documents.<br />
- Document size for feeder 2. If you choose None, you can use feeder 2 as a linked<br />
feeder. This means that when one feeder is empty, the system automatically<br />
starts picking documents from the other feeder.<br />
- Enclosure size (from feeder 3).<br />
- Fold type.<br />
2. Press the 1x button to make sure that the address position is correct (see “Address<br />
Position” on page 26).<br />
ENGLISH<br />
3. Press the button to start the job or press the button to save the job.<br />
4. If you press the button:<br />
a Enter a name for the job. Use the < button to clear a character left of the cursor<br />
position (backspace).<br />
b Press the > button to confirm the job name.<br />
17
4.2 Edit a Job<br />
To edit an existing job:<br />
1. From the home menu choose a job.<br />
2. Press the edit button .<br />
The ‘job settings’ menu opens.<br />
3. Press Edit job.<br />
The Job Wizard starts and helps you to<br />
change job settings.<br />
4. Press Save to save the job with the changed<br />
settings.<br />
5. Press the 1x button to make sure that the<br />
address position is correct (see “Address Position” on page 26).<br />
4.3 Delete a Job<br />
To delete an existing job:<br />
1. From the home menu choose a job.<br />
2. Press the edit button .<br />
The ‘job settings’ menu opens.<br />
3. Press Delete job.<br />
4. Press the Yes button to confirm.<br />
The job will be deleted without a warning.<br />
18
5. OPERATOR MAINTENANCE<br />
Warning<br />
• Disconnect the mains power supply before performing any maintenance.<br />
The user must not attempt to service the system beyond that described in<br />
this operator manual. All other servicing must be carried out by qualified<br />
service personnel only.<br />
Please contact your authorized distributor.<br />
Maintenance Maintenance<br />
frequency<br />
Daily • Check the system functions.<br />
• Keep the system in proper condition by removing dust, paper<br />
remains, etc.<br />
• When dirty, clean the sealing table and rollers with a slightly wetted<br />
cloth, soaked in warm water.<br />
Weekly • When dirty or saturated, clean the brushes of the envelope sealing<br />
(see “Cleaning or Replacing Moistening Brushes” on page 19).<br />
• Clean rollers (see “Clean the System” on page 19).<br />
ENGLISH<br />
5.1 Cleaning or Replacing Moistening Brushes<br />
See “Filling the Sealing Liquid Reservoir” on page 15 for the location of the brushes.<br />
1. Open the system.<br />
2. Lift the sealing liquid reservoir with the blue handles carefully out of the system.<br />
3. Remove the three brushes.<br />
4. Clean the brushes with a small amount of water.<br />
If the brushes are worn, replace them with new ones.<br />
5. Install the brushes.<br />
6. Fill the tray with sealing liquid.<br />
7. Make sure the brushes are moistened sufficiently.<br />
8. Replace the liquid reservoir.<br />
9. Close the system.<br />
5.2 Clean the System<br />
1. Open the system.<br />
2. Clean the rollers. Use a cleaning product recommended by your authorized distributor<br />
and apply it with a lint-free cloth. Wipe each rubber roller while turning it manually.<br />
3. Clean the casing of the system with a damp cloth and a slightly soapy solution.<br />
19
6. FAULT FINDING<br />
6.1 Error Messages<br />
When an error occurs the touch screen shows a<br />
menu showing the following information:<br />
• An indication of the area in which the error<br />
occurred.<br />
• An error description.<br />
• A suggested solution.<br />
Special Errors<br />
• Technical errors.<br />
The touch screen shows a message. The error<br />
cannot be solved by operating personnel and<br />
assistance of the service support is needed.<br />
Warning Screen<br />
When a cover is opened, the touch screen shows a warning screen with the message<br />
“Cover open” and a suggested solution “Close cover”.<br />
6.2 Clearing Stoppages<br />
Stoppages can occur in the following area’s:<br />
• Document feeders.<br />
• Document path.<br />
• BRE feeder.<br />
• Envelope feeder.<br />
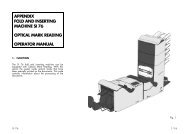
6.2.1 Document<br />
Feeders<br />
When a stoppage occurs in the<br />
document feeders, remove the<br />
documents as follows:<br />
1. Pull the feeder block<br />
forward (see figure).<br />
2. If necessary lift the feeder<br />
block out of the system.<br />
3. Remove the documents<br />
from the bottom of the<br />
feeders.<br />
4. Return the feeder block<br />
into the system.<br />
20
6.2.2 Document Path<br />
When a stoppage<br />
occurs somewhere<br />
in the document<br />
path, remove the<br />
documents as<br />
follows:<br />
1. Press the<br />
button to open<br />
the system.<br />
2. If necessary lift<br />
flap A, or<br />
rotate B or<br />
roller E to<br />
transport the<br />
document.<br />
3. Remove the<br />
documents.<br />
4. Close the<br />
system.<br />
ENGLISH<br />
6.2.3 Feeder 3<br />
When a stoppage occurs in feeder 3,<br />
remove the document or envelope as<br />
follows:<br />
1. Press flap A of feeder 3 and rotate<br />
the feeder downward.<br />
2. Remove the document or envelope.<br />
3. Close the feeder.<br />
A<br />
21
6.2.4 Envelope<br />
Hopper<br />
When a stoppage occurs<br />
in the envelope hopper,<br />
remove the envelopes as<br />
follows:<br />
1. Press the button<br />
to open the system.<br />
2. Remove the envelope.<br />
If this is not possible, try<br />
to remove it from the top<br />
of the hopper:<br />
1. Close the system.<br />
2. Remove the envelope<br />
stack and remove the<br />
envelope.<br />
6.3 Operator Troubleshooting<br />
To solve problems:<br />
1. Write down the error.<br />
2. Consult the troubleshooting tables in sections 6.3.1 up to 6.3.5 to solve the problem.<br />
3. Switch the system off and on again, to verify system operation.<br />
4. When the error still occurs contact your service organization.<br />
Note<br />
When contacting the service organization, you will also be asked for the last error<br />
message.<br />
6.3.1 Startup Problems<br />
Symptom Possible cause Remedy Reference<br />
The system System not<br />
Connect the system -<br />
cannot be started<br />
after switching<br />
on.<br />
connected to mains.<br />
You switched off the<br />
system accidentally.<br />
to the mains.<br />
Switch the system<br />
on.<br />
-<br />
You did not press the<br />
power button next to<br />
the touch screen.<br />
Press the power<br />
button next to the<br />
touch screen.<br />
A cover is opened. Close the covers. -<br />
22
6.3.2 Envelope Sealing Problems<br />
Symptom Possible cause Remedy Reference<br />
Envelope not<br />
closed properly.<br />
Envelope contents<br />
is wet.<br />
Flap not<br />
sufficiently<br />
moistened.<br />
Insufficient<br />
moistening.<br />
The current job has<br />
no envelope sealing.<br />
Document or<br />
enclosure not<br />
compliant with job<br />
specification.<br />
Documents are not<br />
correctly inserted.<br />
Sealing position is<br />
not correctly set.<br />
Make sure if the job<br />
is programmed to<br />
seal envelopes.<br />
Make sure the<br />
document size and<br />
enclosure size equals<br />
the job settings.<br />
Make sure the side<br />
guides of the<br />
document feeders<br />
are in the correct<br />
position.<br />
Check envelope stop<br />
position, adjust if<br />
needed.<br />
In the supervisor<br />
menu change the<br />
settings of the<br />
applicable envelope.<br />
See symptom “Flap not<br />
sufficiently moistened.”<br />
on page 23.<br />
“Job Programming” on<br />
page 17<br />
“Adjusting the Side<br />
<strong>Guide</strong>s of the Document<br />
Feeder” on page 13<br />
“Envelope Position” on<br />
page 26<br />
“Sealing position” on<br />
page 26<br />
Exit roller is wet. Clean the exit roller. “Clean the System” on<br />
page 19<br />
Water level low.<br />
Brushes dry.<br />
Brushes dirty.<br />
Check water level,<br />
refill if needed.<br />
Check brushes,<br />
replace if needed by<br />
the extra soaked set.<br />
Check brushes, clean<br />
if needed.<br />
“Filling the Sealing<br />
Liquid Reservoir” on<br />
page 15<br />
“Operator Maintenance”<br />
on page 19<br />
“Operator Maintenance”<br />
on page 19<br />
Brushes worn out. Replace brushes. “Operator Maintenance”<br />
on page 19<br />
The current job has<br />
no envelope sealing.<br />
Envelope does not<br />
meet the<br />
specifications.<br />
Poor envelope<br />
quality.<br />
Sealing position is<br />
not correctly set.<br />
Choose job with<br />
envelope sealing.<br />
Make sure the<br />
envelope meets the<br />
specifications.<br />
Seal an envelope<br />
manually to test the<br />
adhesion quality.<br />
In the supervisor<br />
menu change the<br />
envelope settings.<br />
“Envelope and Insert<br />
Specifications” on<br />
page 28<br />
ENGLISH<br />
23
6.3.3 Envelope feeding problems<br />
Symptom Possible cause Remedy Reference<br />
Envelopes are<br />
double fed.<br />
Envelope stops<br />
skewed.<br />
Envelopes are fed<br />
irregularly.<br />
Flap is wrinkled<br />
and sometimes<br />
not opened.<br />
Envelopes not placed<br />
properly in the<br />
hopper.<br />
Side guides of the<br />
envelope hopper are<br />
set too wide.<br />
Hopper almost<br />
empty.<br />
Side guides set too<br />
narrow.<br />
Envelope not within<br />
specifications.<br />
Flap sticks.<br />
Flap curled.<br />
6.3.4 Document feeding problems<br />
Check and replace if<br />
needed.<br />
Check side guides<br />
and adjust if needed.<br />
Refill hopper.<br />
Check side guides<br />
and adjust if needed.<br />
Check specifications<br />
and change<br />
envelopes if needed.<br />
Store envelopes<br />
according to<br />
specifications.<br />
Envelopes stored or<br />
manufactured<br />
improperly.<br />
“Loading Envelopes” on<br />
page 14<br />
“Loading Envelopes” on<br />
page 14<br />
“Loading Envelopes” on<br />
page 14<br />
“Loading Envelopes” on<br />
page 14<br />
“Envelope and Insert<br />
Specifications” on<br />
page 28<br />
“Envelope and Insert<br />
Specifications” on<br />
page 28<br />
“Envelope and Insert<br />
Specifications” on<br />
page 28<br />
Symptom Possible cause Remedy Reference<br />
No document fed. Feeder empty. Refill feeder. “Loading the Document<br />
Feeder Tray” on page 13<br />
Skewed<br />
documents fed.<br />
Shifted<br />
documents in<br />
feeder trays.<br />
Side guides set too<br />
narrow.<br />
Feeder trays are not<br />
locked.<br />
Side guides set too<br />
wide.<br />
Feeder trays are not<br />
locked.<br />
Side guides set too<br />
narrow.<br />
Feeder trays are not<br />
locked.<br />
Dirty feeder rollers.<br />
Adjust the side<br />
guides.<br />
Push the lever to lock<br />
the feeder.<br />
Adjust side guides.<br />
Push the lever to lock<br />
the feeder.<br />
Adjust the side<br />
guides.<br />
Push the lever to lock<br />
the feeder.<br />
Clean the feeder<br />
rollers.<br />
“Adjusting the Side<br />
<strong>Guide</strong>s of the Document<br />
Feeder” on page 13<br />
“Loading Documents” on<br />
page 12<br />
“Adjusting the Side<br />
<strong>Guide</strong>s of the Document<br />
Feeder” on page 13<br />
“Loading Documents” on<br />
page 12<br />
“Adjusting the Side<br />
<strong>Guide</strong>s of the Document<br />
Feeder” on page 13<br />
“Loading Documents” on<br />
page 12<br />
24
Symptom Possible cause Remedy Reference<br />
Double<br />
documents are<br />
fed, but the<br />
system does not<br />
notice.<br />
Different types of<br />
documents fed.<br />
Documents out of<br />
specification.<br />
Use daily mail to<br />
process different<br />
document types.<br />
Check document<br />
specifications.<br />
“Document<br />
Specifications” on<br />
page 27<br />
6.3.5 Insert problems<br />
Symptom Possible cause Remedy Reference<br />
System stops with Envelopes stacked Check envelope feed “Loading Envelopes” on<br />
envelope at insert reversed in the adjustments. Place page 14<br />
position (flap not hopper.<br />
envelopes correctly<br />
open).<br />
in hopper.<br />
Fingers are placed<br />
on top of the<br />
envelope.<br />
System stops<br />
while inserting<br />
(stoppage at the<br />
inserting point).<br />
Envelope not<br />
always ejected<br />
from sealer.<br />
Address not<br />
readable from<br />
window<br />
Envelope flap sticks.<br />
Wrong envelope type<br />
used (not according<br />
to specifications or<br />
job settings).<br />
Envelope stops too<br />
early.<br />
Inserted document<br />
too long or not<br />
correctly folded.<br />
Envelope throat<br />
incorrect.<br />
Envelope glued<br />
inside.<br />
Window not glued<br />
properly.<br />
Inserted document<br />
too big.<br />
Document not<br />
inserted deep<br />
enough.<br />
Store envelopes<br />
according to<br />
specifications.<br />
Change envelopes<br />
according to<br />
specifications.<br />
Check envelope stop<br />
position, adjust if<br />
needed.<br />
Make sure the<br />
document size and<br />
enclosure size equals<br />
the job settings.<br />
Check envelope<br />
specifications.<br />
Eliminate faulty<br />
envelopes.<br />
Eliminate faulty<br />
envelopes.<br />
Make sure the<br />
document size and<br />
enclosure size equals<br />
the job settings.<br />
Check adjustment of<br />
envelope stop<br />
position.<br />
“Envelope and Insert<br />
Specifications” on<br />
page 28<br />
“Envelope and Insert<br />
Specifications” on<br />
page 28<br />
“Envelope Position” on<br />
page 26<br />
“Envelope and Insert<br />
Specifications” on<br />
page 28<br />
-<br />
-<br />
“Envelope Position” on<br />
page 26<br />
Sealing area dirty. Clean sealing area. “Operator Maintenance”<br />
on page 19<br />
Address position not Check address “Address Position” on<br />
correctly defined. position.<br />
page 26<br />
ENGLISH<br />
25
6.3.6 Envelope Position<br />
To make a good insert of the document set into<br />
the envelope, the envelope should be positioned<br />
correctly.<br />
To verify the envelope position:<br />
1. Go to the supervisor menu.<br />
2. Press Adjust stop position.<br />
3. Choose the envelope type and press the<br />
arrow button.<br />
4. Press the 1x button. Make sure that the<br />
document set is completely inserted into the envelope.<br />
5. If not, use the arrow buttons to adjust the envelope position.<br />
6. Repeat step 3 and 4 until the envelope position is correct.<br />
7. Press the button.<br />
6.3.7 Address Position<br />
The address on the document set should be<br />
positioned in a way that you can read it from the<br />
envelope window. If it is not readable, adjust the<br />
address position as follows:<br />
1. Choose a job and press the 1x button.<br />
2. Press the No button if asked if the address is<br />
visible.<br />
3. Use the arrow buttons to adjust the address<br />
position.<br />
4. Press the 1x button again to verify the new<br />
position.<br />
5. Press the Yes button if the position is correct.<br />
6.3.8 Sealing position<br />
If the sealing area of the envelope is not correctly<br />
moistened, adjust the sealing position as follows:<br />
1. Go to the supervisor menu.<br />
2. Press Adjust moistening position.<br />
3. Choose the envelope type and press the<br />
arrow button.<br />
4. Use the arrow buttons to adjust the sealing<br />
position.<br />
5. Press the 1x button to test the new position.<br />
6. Press the button if the position is<br />
correct.<br />
26
7. SPECIFICATIONS<br />
7.1 Technical Specifications<br />
Model <strong>DS</strong>-<strong>35</strong>, M1500, Carat ISIPLI, FD 6102, FPi 600<br />
Type<br />
Theoretical max.<br />
speed<br />
Power consumption<br />
Voltage tolerance<br />
Approvals<br />
7.2 Dimensions<br />
Height<br />
Width<br />
Length<br />
Weight<br />
Fold and insert system for small office use<br />
1<strong>35</strong>0 inserts per hour, depending on application<br />
100-240 VAC/ 50-60 Hz /Maximum 3 A<br />
100-240 VAC:+6%/-10%<br />
230 VAC: +10%/-10%<br />
EMC Certificate conform EMC-Directive<br />
FCC Certificate conform 47CFR, part 15<br />
CB Certificate conform IEC 60950-1<br />
UL Listed I.T.E. (Information Technology Equipment), conform<br />
UL-IEC 60950-1, file E153801<br />
Conform NEN-EN-IEC 60950-1 and derivatives<br />
560 mm (22.0 inch)<br />
430 mm (16.9 inch)<br />
660 mm (26.0 inch) without catch tray<br />
36 kg (79.3 lb)<br />
ENGLISH<br />
7.3 Other Specifications<br />
Noise level < 69 dBA (according to ISO 11202)<br />
<strong>Operating</strong><br />
17°C - 34°C (62.6°F - 93.2°F)<br />
temperature<br />
Humidity 20%-90%<br />
7.4 Document Specifications<br />
Paper quality<br />
minimum 70 g/m² (17.5 lb bond)<br />
maximum 120 g/m² (30 lb bond)<br />
Paper size Minimum width: 142 mm (5.6")<br />
Maximum width: 225 mm (8.9")<br />
Minimum length: 90 mm (3.5")<br />
Maximum length: <strong>35</strong>6 mm (14.0")<br />
Folding capacity<br />
Enclosure sizes<br />
V-fold - 5 sheets (80 g/m²)<br />
C-fold - 3 sheets (80 g/m²)<br />
Double V-fold - 2 sheets (80 g/m²)<br />
Standard BRE (Business Reply Envelopes)<br />
Maximum length: 158 mm (6.22")<br />
27
Enclosure quality<br />
BRE, minimum: 75 g/m² (18.75 lb bond)<br />
BRE, maximum: 120 g/m² (30 lb bond)<br />
Insert, minimum: 75 g/m² (18.75 lb bond)<br />
Insert, maximum: 250 g/m² (62.5 lb bond)<br />
7.5 Envelope and Insert Specifications<br />
Envelope quality<br />
Minimum: 75 g/m² (18.75 lb bond)<br />
Maximum: 120 g/m² (30 lb bond)<br />
A B C D E F G<br />
Minimum size mm 229 105 32 10 142 90* 70 g/m 2<br />
inches 9.0 4.1 1.25 0.40 5.6 3.5<br />
Maximum size mm 241 162 54 <strong>35</strong> A-12** B-6 1.5<br />
inches 9.5 6.4 2.1 1.4 A-0.47** B-0.24 0.06<br />
* In case of fold only (no insert): height > 120 mm / 4.7<br />
** When insert is more than 1 mm (0.04 inch): A-15 mm / A-0.6 inch<br />
Remarks:<br />
• Maximum insert specifications are based on single sheets. When multiples are<br />
handled, more room inside the envelope is needed depending on the application.<br />
• The specification of the paper handling equipment is often wider than that of the<br />
envelopes and documents handled. The condition of material handled will limit the<br />
specified environmental conditions.<br />
• We recommend that materials to be handled are stored at a temperature of 20°C<br />
(68°F) with a relative humidity factor of 50%. If difference in temperature occurs<br />
between store room and mailing area, the material has to be stored near the system<br />
at least 24 hours before use.<br />
• Self-copying paper may cause rubber parts to wear quicker. The rubber used in this<br />
system has the best resistance to Wiggins Teape material.<br />
28
8. TERMINOLOGY<br />
Term<br />
Address carrier<br />
Address position<br />
Description<br />
The address carrier is the document that carries the address of the<br />
person for who the mail set is meant. The address carrier can consist<br />
of one or more sheets, from which at least the first sheet must contain<br />
the address. The address must remain visible while enclosures are<br />
added and the document set is folded. The fold type and selected<br />
envelope must ensure that the address is visible behind the window in<br />
the envelope. For personalized mailings there is always an address<br />
carrier present as long as envelope printing is not supported. Normally<br />
there is one address carrier.<br />
Position of the address on the address carrier,<br />
measured from the upper left corner. The address<br />
position consists of a horizontal x coordinate, a<br />
vertical y coordinate, a horizontal width w and a<br />
vertical height h.<br />
ENGLISH<br />
Business Reply<br />
Envelope (BRE)<br />
C-fold<br />
Envelope included in outgoing mail sets for addressee response<br />
purposes.<br />
Fold type in which a document set is folded twice in which the folded<br />
flaps are on top of each other. This fold is illustrated in the picture<br />
below. The position of both folds is adjustable.<br />
Daily Mail<br />
Document<br />
Synonym: letter fold.<br />
Capability of an inserting system to manually insert mail sets one by<br />
one into the system, which are then inserted into an envelope.<br />
Optionally, depending on settings, additional enclosures can be added<br />
and the mail set can be folded. This function is intended for small<br />
amounts of mail that each can have a different build-up.<br />
A document is one of the components of a mail set. A document can<br />
consist of one or more sheets. Documents can be divided into address<br />
carriers and enclosures. For personalized mailings there is always one<br />
address carrier and an optional number of enclosures.<br />
29
Term<br />
Document set<br />
Double Feed<br />
Control (DFC)<br />
Double V-fold<br />
Description<br />
The document set is the physical collection of address carrier and<br />
enclosure(s) that is under production in the inserting system. The<br />
document set is completed during production and is to be inserted into<br />
the envelope. The number of enclosures can range from 0 to the limit<br />
opposed by the number of available feeders. Once the document set<br />
has been inserted into an envelope it is called mail set.<br />
Double Feed Control is the sensor that measures the thickness of a<br />
sheet to check if the inserting system does not accidentally take more<br />
sheets than intended. DFC sensors exist on feeders (double sheet<br />
detection). Currently DFCs on Neopost inserting systems perform<br />
relative measurements, which means that they need a cycle to 'learn'<br />
the thickness of a sheet.<br />
Also the length of the document is measured so partly overlapping<br />
sheets will be detected.<br />
The double V-fold is a type of fold where the document is first folded<br />
halfway and the resulting folded set is again folded halfway. This fold is<br />
illustrated in the picture below. The position of both folds is adjustable.<br />
Envelope<br />
Face down<br />
Face down<br />
leading<br />
Face down<br />
trailing<br />
Face up<br />
Face up leading<br />
Face up trailing<br />
Feeder<br />
Synonym: double parallel fold.<br />
The envelope is the packaging of a mail set. Window envelopes are<br />
envelopes that have a transparent section through which the address<br />
on the address carrier can be read. Besides the normal top closing<br />
window envelopes there are also bottom closing envelopes.<br />
Situation in which the front of a sheet is facing downwards when<br />
placed in a document feeder.<br />
Situation in which the front of a sheet is facing downwards and the top<br />
of the sheet is closest to the separation unit in a document feeder.<br />
Situation in which the front of a sheet is facing downwards and the<br />
bottom of the sheet is closest to the separation unit in a document<br />
feeder.<br />
Situation in which the front of a sheet is facing upwards when placed<br />
in a document feeder.<br />
Situation in which the front of a sheet is facing upwards and the top of<br />
the sheet is closest to the separation unit in a document feeder.<br />
Situation in which the front of a sheet is facing upwards and the<br />
bottom of the sheet is closest to the separation unit in a document<br />
feeder.<br />
A feeder is a module for the input of documents to the inserting<br />
system. The feeder separates documents sheet by sheet from the<br />
stack of documents in the feeder tray.<br />
30
Term<br />
Feeder linking<br />
Feeder tray<br />
Description<br />
The ability to load two feeders with the same document type where<br />
the inserting system automatically switches to a second feeder when<br />
the first feeder is empty and vice versa. In the mean time the first<br />
feeder can be refilled, so the inserting system can keep running<br />
without having to stop for refilling the feeders.<br />
Part of the feeder that contains the stack of documents.<br />
Insert • An insert is the action of inserting a document set into an<br />
envelope.<br />
• For native English speaking customers an insert is also a short,<br />
not to be folded document, usually an enclosure.<br />
Inserter<br />
An inserter is the module where the document set is inserted into the<br />
envelope, the envelope is closed and if necessary sealed.<br />
Inserting system The system of all the modules that cooperate to perform the inserting<br />
function (accumulate document set, fold and insert) and have a single<br />
point of control.<br />
Job<br />
A job is an actually produced collection of mail sets based on a certain<br />
job definition at a certain point in time for a specific purpose. It<br />
consists of:<br />
• The job definition used for the production<br />
• Information about the batch size<br />
Job counter The counter that registers the number of mail sets that is produced as<br />
part of a specific job.<br />
Linking<br />
See feeder linking.<br />
Multifeed The feature of an inserting system in which more than one sheet is<br />
taken from a feeder.<br />
Operator The person operating an inserting system.<br />
Service engineer Technical engineer whose task it is to resolve problems with systems<br />
in the field. Besides dealing with problems, service engineers are also<br />
responsible for preventive maintenance.<br />
Supervisor Person who is responsible for the technical state of the system.<br />
Normally a supervisor has access to programming functions, which are<br />
restricted for standard users.<br />
ENGLISH<br />
31
Term<br />
Test run<br />
Tray<br />
V-fold<br />
Description<br />
A test run is intended to validate the settings of the inserting system:<br />
• Inspect and adjust the stop position of the envelope.<br />
• Check the fold settings for one set.<br />
• Check whether the address is correctly positioned behind the<br />
envelope window.<br />
Contains a stack of paper for a printer or inserter. This paper is<br />
supplied to the system for further processing.<br />
A V-fold implies the document set is folded once. The fold position is<br />
adjustable. This fold is illustrated in the picture below:<br />
Synonym: single fold.<br />
32
EC DECLARATION OF CONFORMITY FOR ELECTRICAL PRODUCTS<br />
(According to Annex III B of the Low Voltage Directive)<br />
Manufacturer: Neopost Technologies BV<br />
Address: De Tijen 3, 9201 BX Drachten<br />
The Netherlands,<br />
herewith declares that the:<br />
4148<strong>35</strong>3A,<br />
• which this declaration refers to, is in accordance with:<br />
the conditions of the Low Voltage Directive 2006/95/EC<br />
• and the following Directive:<br />
EMC Directive 2004/108/EC<br />
• and is in conformity with the following harmonised standard(s) or other such specifications:<br />
EN 60950-1 (2006)<br />
EN 55022 (2006), A1 (2007)<br />
EN 55024 (1998), A1 (2001), A2 (2003)<br />
EN 61000-3-2 (2006)<br />
EN 61000-3-3 (2002), T:(1995), A1(2001), A2(2005)<br />
EN 61000-4-2 (1995), A1(1998), A2(2001)<br />
EN 61000-4-3 (1995)<br />
EN 61000-4-4 (1995)<br />
EN 61000-4-5 (1995)<br />
EN 61000-4-6 (1996)<br />
EN 61000-4-11 (1994), T:(2005)<br />
ENGLISH<br />
The Netherlands, Drachten, 01-08-2011<br />
F. Bosveld<br />
Managing Director<br />
This is a class A product. In a domestic environment this product may cause radio interference in<br />
which case the user may be required to take adequate measures.<br />
Note: this equipment has been tested and found to comply with the limits for class A digital device,<br />
pursuant to Part 15 of the FCC Rules. These limits are designed to provide reasonable protection<br />
against harmful interference when the equipment is operated in a commercial environment. This<br />
equipment generates, uses, and can radiate radio frequency energy and, if not installed and used in<br />
accordance with this instruction manual, may cause harmful interference to radio communications.<br />
Operation of this equipment in a residential area is likely to cause harmful interference in which case<br />
the user will be required to correct the interference at his own expense.<br />
33
Index<br />
A<br />
address carrier 30<br />
address position 26, 30<br />
B<br />
brush replacement 19<br />
business reply envelope 30<br />
button 8<br />
C<br />
catch tray 7, 11<br />
cleaning 19<br />
control panel 7, 8<br />
counter 9<br />
current job menu 9<br />
D<br />
daily mail 30<br />
DFC 6, 10<br />
dimensions 28<br />
display<br />
see touch screen<br />
document 30<br />
feeder 7<br />
specifications 28<br />
document set 30<br />
document stoppage<br />
see stoppage<br />
double feed control 6, 10, 30<br />
double feeding envelopes 24<br />
double parallel fold 31<br />
E<br />
envelope 31<br />
catch tray 11<br />
feed 14<br />
insert position 26<br />
load 14<br />
specifications 29<br />
envelope hopper<br />
side guides 14<br />
error messages 20<br />
F<br />
face down<br />
leading 31<br />
trailing 31<br />
face up<br />
leading 31<br />
trailing 31<br />
feed<br />
document 13<br />
envelope 14<br />
feeder 5, 31<br />
load 13<br />
side guides 13<br />
feeder 3<br />
load 14<br />
side guides 13<br />
feeder linking 17, 31<br />
feeder tray 31<br />
feeding process 5<br />
fill sealing liquid reservoir 15<br />
fold<br />
double parallel 31<br />
letter 32<br />
single 32<br />
folding area 6<br />
folding process 5<br />
H<br />
home menu 9<br />
I<br />
insert 31<br />
insert position 26<br />
insert specifications 29<br />
inserter 31<br />
inserting process 5<br />
J<br />
job 32<br />
choose 15, 18<br />
counter 32<br />
create 17<br />
delete 18<br />
description 9<br />
edit 18<br />
information 9<br />
job menu 10<br />
new 17<br />
start 15<br />
job list 9<br />
job selection menu 9<br />
L<br />
letter fold 32<br />
loading documents 13<br />
loading envelopes 14<br />
34
M<br />
maintenance 19<br />
menu 10<br />
menu button 9<br />
moistening position 26<br />
multifeed 32<br />
N<br />
noise level 28<br />
O<br />
operating controls 7<br />
operating instructions 11<br />
P<br />
paper quality 28<br />
paper size 28<br />
power consumption 28<br />
power inlet 7<br />
power switch 7<br />
process overview 5<br />
R<br />
reservoir<br />
fill 15<br />
run a job 15<br />
S<br />
safety 2<br />
sealing liquid reservoir 7<br />
sealing position 26<br />
select a job 15<br />
single fold 32<br />
software<br />
see user interface<br />
speed 28<br />
standby button 8<br />
start button 8<br />
starting the job 15<br />
stop button 8<br />
stop the system 16<br />
stoppage<br />
document feeders 20<br />
document path 21<br />
envelope hopper 22<br />
feeder 3 21<br />
inserting area 25<br />
supervisor menu 10<br />
T<br />
technical specifications<br />
inserter 28<br />
test run 33<br />
touch screen 8<br />
tray 33<br />
troubleshooting 22<br />
U<br />
user interface description 8<br />
ENGLISH<br />
<strong>35</strong>
*4151325W*<br />
4151325W/B 01/08/2011<br />
Internet: www.neopost.com