User Guide Product(range) - Neopost
User Guide Product(range) - Neopost
User Guide Product(range) - Neopost
- No tags were found...

Create successful ePaper yourself
Turn your PDF publications into a flip-book with our unique Google optimized e-Paper software.
WARNING!<br />
Do not under any circumstances attempt to remove the machine<br />
covers or attempt to repair the IJ35/45. There are no operator<br />
serviceable parts thereunder.<br />
The IJ35/45 product is licensed for use under the conditions of P.O.<br />
Authority. This license is issued subject to the product being secure<br />
at all times. Any removal of covers or dis-assembly of the product<br />
will result in the license being revoked and may result in P.O.<br />
Authority requesting <strong>Neopost</strong> to remove the product from use.<br />
The ink cartridge system used within the IJ35/45 contains P.O.<br />
Authority approved ink. This cartridge should not be tampered with<br />
in any way or the use of non approved inks be undertaken. This will<br />
breach any P.O. Authority licence agreement on the product and<br />
may result in P.O. Authority requesting <strong>Neopost</strong> to remove the<br />
product from use.<br />
EC DIRECTIVE 1999/5/EC<br />
<strong>Neopost</strong> declares that this Franking Machine is in compliance with<br />
the Essential Requirements and other provisions of Directive<br />
1999/5/EC. A full copy of this Declaration may be found at<br />
www.neopost.co.uk/docs/IJ35Compliance.htm<br />
MODEM APPROVAL REQUIREMENTS<br />
This equipment contains a modem which has been approved in<br />
accordance with Council Decision 98/482/WC-CTR21 for pan-<br />
European single terminal connection to the Public Switched<br />
Telephone Network (PSTN). However, due to differences between<br />
individual PSTNs provided in different countries, the approval<br />
does not, of itself, give an unconditional assurance of successful<br />
operation on every PSTN network termination point.<br />
The modem is designed to work on analogue telephone lines only.<br />
In the event of problems, you should contact your equipment<br />
supplier in the first instance.<br />
1<br />
4128500V/B<br />
01/02/2006<br />
IJ35-0024-1/A
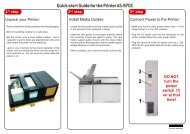
INSTALLATION<br />
The mains plug on this equipment is intended to serve as the device<br />
for isolation of the mains supply. The equipment should be installed<br />
in close proximity to easily accessible power supply and telephone<br />
sockets.<br />
WARNING: FOR SAFETY THIS EQUIPMENT MUST BE<br />
EARTHED<br />
The IJ35 and IJ45 Franking Machines have been designed to meet<br />
the safety requirements of IEC EN60950. The peripheral interfaces<br />
meet the SELV requirements of that standard, therefore in order to<br />
maintain the level of safety provided by the IJ35 and IJ45, the<br />
interface of any equipment connected to the IJ35 and IJ45 interfaces<br />
must also meet the SELV requirements of IEC EN 60950.<br />
No part of this document may be reproduced or transmitted in any<br />
form or by means, electronic or mechanical, for any purpose without<br />
the express written permission of <strong>Neopost</strong> Limited.<br />
Copyright© <strong>Neopost</strong> 2004<br />
2<br />
4128500V/B<br />
01/02/2006<br />
IJ35-0024-2/A
INTRODUCTION<br />
Congratulations on choosing the <strong>Neopost</strong> IJ35/45 franking system.<br />
The IJ35/45 is the result of the expertise and innovative capabilities<br />
of the worldwide <strong>Neopost</strong> group and, using ink jet technology, it will<br />
integrate into your working environment to enhance your mail<br />
processing operation.<br />
The IJ35/45 has many capabilities that will be important to your<br />
business:<br />
As well as being productive (up to 5400 items per hour), the IJ35/<br />
45 is designed to be a user friendly machine that can fit into any<br />
working environment with its innovative and attractive design,<br />
simple user settings and very low noise level. The high volume<br />
capacity and sealed inker makes it easy and safe to handle, and<br />
the user interface is particularly clear with a graphic interface and<br />
5 memories to store favourite jobs.<br />
The IJ35/45 is adaptable and as such can handle many different<br />
types of mail up to 10mm thick. The optional feeder can be used<br />
to process, in a continuous cycle, items of sizes ranging from DL<br />
to C4 and up to 6 mm thickness. For thicker mail items or<br />
packages, adhesive labels can be automatically dispensed.<br />
The IJ35/45 is connectable. It can exchange data with <strong>Neopost</strong><br />
scales and RS232 serial printers in order to provide optimal mail<br />
processing and reporting.<br />
Finally, the IJ35/45 is a unique communication tool for your company.<br />
Its high quality printing combined with its integrated library of<br />
message/slogans, mini dies and free format text will afford you<br />
extra tools to enhance your company’s image and the impact of<br />
your mail.<br />
Copyright © <strong>Neopost</strong> 2004<br />
3<br />
4128500V/B<br />
01/02/2006<br />
IJ35-0024-3/A
WARNING!<br />
It is the responsibility of the <strong>User</strong> to ensure that all franked<br />
impressions taken from this machine clearly print the postal<br />
mark.<br />
The postal mark comprises: the postage amount plus the<br />
date and place of posting, and may also include a slogan<br />
(advert) die impression.<br />
The use or re-use of cartridges that are filled with non-approved ink<br />
(non-<strong>Neopost</strong> ink), is strictly prohibited and will invalidate any<br />
warranty and / or service contract that is offered by your supplier. It<br />
may also invalidate your licence to use any franking machine<br />
granted by your national postal authority.<br />
The use of a <strong>Neopost</strong> ink cartridge in any unlicensed machine or<br />
other printing device is strictly prohibited and will invalidated any<br />
warranty and / or service contract that is offered by your supplier. It<br />
may also invalidate your licence to use any franking machine<br />
granted by your national postal authority.<br />
The disassembly of this licensed franking machine by any nonauthorised<br />
person is strictly prohibited and will invalidate any<br />
warranty and / or service contract that is offered by your supplier. It<br />
may also invalidate your licence to use any franking machine<br />
granted by your national postal authority.<br />
4<br />
4128500V/B<br />
01/02/2006<br />
IJ35-0024-4/A
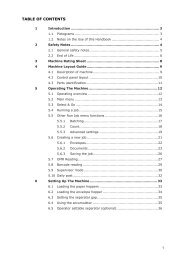
CONTENTS<br />
1. GENERAL SPECIFICATIONS ............................................... 9<br />
2. INSTALLATION ..................................................................... 10<br />
2.1 Introduction ............................................................. 10<br />
2.2 Franking machine ................................................... 11<br />
2.2.1 Attach the Platform Infill to the Hand Feed<br />
Platform ......................................................... 11<br />
2.2.2 Attach the Platform Infill to the Autofeed<br />
(Option).......................................................... 11<br />
2.2.3 Attach the IJ35/45 to the Hand Feed Platform<br />
or Autofeed .................................................... 12<br />
2.2.4 Attach the Weigh Platform & Support (Option) 12<br />
2.2.5 Machine Connections .................................... 13<br />
2.2.5 Machine Connections (continued) .................. 14<br />
2.2.6 Position Receiving Tray.................................. 15<br />
2.2.7 Fill the Label Hopper ...................................... 15<br />
3. CONTROLS AND FEATURES ............................................ 16<br />
3.1 Introduction ............................................................. 16<br />
3.2 Machine ................................................................. 17<br />
3.2.1 Display Panel................................................. 19<br />
3.2.2 Function Keys ................................................ 20<br />
4. FRANKING YOUR MAIL ...................................................... 21<br />
4.1 Introduction ............................................................. 21<br />
4.2 Getting started........................................................ 22<br />
4.2.1 Log On (Entering <strong>User</strong> Mode) ........................ 22<br />
4.2.2 Departmental Operation ................................. 23<br />
4.2.3 How To Select a Postage Value ..................... 24<br />
4.2.4 Low Credit (for machine with credit<br />
downloaded by a Server) ............................... 25<br />
4.2.5 Insufficient Credit (for machine with credit<br />
downloaded by a Server) ............................... 25<br />
5<br />
4128500V/B<br />
01/02/2006<br />
IJ35-0024-5/A
4.2.6 High Value Selection ...................................... 26<br />
4.2.7 Franking an Envelope .................................... 27<br />
4.2.8 To Change a Department ............................... 27<br />
4.2.9 To Log Off ...................................................... 28<br />
5. FRANKING WITH AUTOFEED ............................................ 29<br />
6. FRANKING LABELS ............................................................ 31<br />
6.1 Filling the Label Dispenser ..................................... 31<br />
6.2 Printing a Label ...................................................... 32<br />
7. FRANKING WITH WEIGH PLATFORM ............................... 34<br />
7.1 Weigh Platform Preparation ................................... 34<br />
7.2 How do I calculate the correct postage and rate .... 35<br />
8. PRINTING OPTIONS ........................................................... 38<br />
8.1 What can I print ..................................................... 38<br />
8.2 Print mode selection (depending<br />
of P.O. Specification) .............................................. 39<br />
8.3 Modifying the imprint .............................................. 40<br />
8.3.1 Choosing a Slogan, Mini Die or Text............... 40<br />
8.3.2 Date Advance (for Pre Dated Mail) in<br />
accordance with P.O.Specification ................. 41<br />
9. MAINTAINING PRINT QUALITY.......................................... 43<br />
9.1 Cleaning the Ink Cartridge ...................................... 43<br />
9.2 Making a Test Print ................................................. 44<br />
9.3 Low Ink ................................................................... 45<br />
9.4 No Ink ..................................................................... 45<br />
9.5 Replacing an Ink Cartridge ..................................... 46<br />
10. METER REGISTERS ........................................................... 49<br />
10.1 Selection ................................................................ 49<br />
10.2 Printing a Register .................................................. 50<br />
10.3 Printing with External Printer ................................... 51<br />
6<br />
4128500V/B<br />
01/02/2006<br />
IJ35-0024-6/A
11. CLEARING MAIL PATH ........................................................52<br />
12. SERVER RECREDITING .....................................................53<br />
12.1 Remote credit setting (for machine with Server<br />
Connection) ............................................................ 53<br />
12.2 ‘INSPECTION DUE - RECREDIT’ Call Server<br />
Procedure .............................................................. 55<br />
12.3 Unused or Spoilt Impressions ................................. 56<br />
12.4 Application for a new Credit PIN ............................. 56<br />
13. MEMORY FUNCTIONS ....................................................... 57<br />
13.1 Saving a Memory Function ..................................... 57<br />
13.2 Recalling a Memory Function .................................. 58<br />
14. SUPERVISOR SETTINGS................................................... 59<br />
14.1 Introduction ............................................................. 59<br />
14.2 Entry to supervisor mode ........................................ 60<br />
14.3 Security & Dept ...................................................... 61<br />
14.3.1 Changing the <strong>User</strong> PIN ............................. 63<br />
14.3.2 Setting the <strong>User</strong> Status .................................. 63<br />
14.3.3 To Assign a Department ................................. 64<br />
14.4 IJ35/45 machine setup menu .................................. 68<br />
14.5 Texts....................................................................... 75<br />
14.6 Memory Cards ....................................................... 77<br />
14.6.1 How To Load Data Using a Memory Card ...... 77<br />
14.6.2 How To Replace Data Using a Memory Card . 78<br />
14.7 Reports .................................................................. 79<br />
14.7.1 Typical Reports .............................................. 79<br />
14.7.2 Printing a Report ............................................ 79<br />
14.7.3 Setting the Report Destination ....................... 81<br />
14.7.4 Printing with External Printer ........................... 81<br />
15. TROUBLE SHOOTING ....................................................... 83<br />
15.1 Clearing a mail jam from the autofeeder ................. 85<br />
15.2 Clearing error messages ........................................ 85<br />
17. QUICK REFERENCE GUIDE ..............................................86<br />
7<br />
4128500V/B<br />
01/02/2006<br />
IJ35-0024-7/A
8<br />
4128500V/B<br />
01/02/2006<br />
IJ35-0024-8/A
1. GENERAL SPECIFICATIONS<br />
IJ35<br />
IJ45<br />
Speed (Items/hr) 3,600 5,400<br />
Thickness (mm) - Automatic 6 6<br />
- Manual 10 10<br />
Printer Type Ink Jet Ink Jet<br />
Automatic Label Dispenser Yes Yes<br />
Automatic Feeder Optional Optional<br />
Weigh Platform (2kg) Optional Optional<br />
Scale Interface Optional Optional<br />
Cost Centre Accounting 35 45<br />
Job Memories 5 5<br />
Preloaded Mini-dies 8 8<br />
Slogans 10 10<br />
Texts 5 5<br />
Information Printout Yes Yes<br />
(on labels or RS232 Serial Printers)<br />
Recrediting Method Server only Server only<br />
Dimensions - Franking Machine 265 x 360 x250mm<br />
(w x d x h)<br />
- Autofeed 325 x 240 x 250mm<br />
- Feed - platform 120 x 240 x 160mm<br />
Envelope Size DL to C4 DL to C4<br />
General specifications<br />
9<br />
4128500V/B<br />
01/02/2006<br />
IJ35-0024-9/A
2. INSTALLATION<br />
2.1 Introduction<br />
Your IJ35/45 should be installed on a flat horizontal surface<br />
adjacent to easily accessible power and telephone line outlets.<br />
Allow sufficient free space as follows:<br />
- above the machine to enable opening of the covers.<br />
- at the rear of the machine for cooling.<br />
The power plug on this equipment is intended to serve as the<br />
device for isolation of the mains supply, where possible it is<br />
advisable to connect to a switched power outlet.<br />
Please do not connect your IJ35/45 Franking Machine to the<br />
power outlet until you have attached the accessories.<br />
10<br />
Installation<br />
4128500V/B<br />
01/02/2006<br />
IJ35-0024-10/A
2.2 Franking machine<br />
2.2.1 Attach the Platform Infill to the Hand Feed<br />
Platform<br />
When attaching the Platform Infill to the Hand Feed Platform,<br />
ensure that the Tabs and Slots interlock as illustrated.<br />
2.2.2 Attach the Platform Infill to the Autofeed (Option)<br />
If an Autofeed is to be fitted, first attach the Platform Infill to the<br />
Autofeed ensuring that the slots on the Autofeed fit tightly over the<br />
tabs on the Infill Platform as illustrated.<br />
Installation<br />
11<br />
4128500V/B<br />
01/02/2006<br />
IJ35-0024-11/A
2.2.3 Attach the IJ35/45 to the Hand Feed Platform or<br />
Autofeed<br />
Lower the IJ35/45 into position so that the slots fit over the tabs as<br />
illustrated.<br />
2.2.4 Attach the Weigh Platform & Support (Option)<br />
Sufficient cable has been provided with your weigh platform to<br />
enable the unit to be placed on the desk adjacent to the franking<br />
machine if this is preferred.<br />
For machine mounting, position the weigh platform on its support.<br />
Excess cable can be loosely coiled under the support.<br />
Position the Support Platform so that the pins on the underside<br />
mate with the locating points on the rear casing of the IJ35/45.<br />
12<br />
Installation<br />
4128500V/B<br />
01/02/2006<br />
IJ35-0024-12/A
2.2.5 Machine Connections<br />
Weigh Platform/Scale Connection (Option)<br />
Autofeed Connection (Option)<br />
Installation<br />
13<br />
4128500V/B<br />
01/02/2006<br />
IJ35-0024-13/A
2.2.5 Machine Connections (continued)<br />
Telephone Connection<br />
Power Cord Connection<br />
14<br />
Installation<br />
4128500V/B<br />
01/02/2006<br />
IJ35-0024-14/A
2.2.6 Position Receiving Tray<br />
2.2.7 Fill the Label Hopper<br />
Tab<br />
Printing<br />
Surface<br />
Installation<br />
15<br />
4128500V/B<br />
01/02/2006<br />
IJ35-0024-15/A
3. CONTROLS AND FEATURES<br />
3.1 Introduction<br />
The following pages detail the Controls and Features associated<br />
with your IJ35/45 Franking Machine, please take the time to read<br />
them carefully.<br />
16<br />
Controls and features<br />
4128500V/B<br />
01/02/2006<br />
IJ35-0024-16/A
3.2 Machine<br />
1. Display presents a visual indication of<br />
the machine set up andstatus.<br />
2. Soft Keys keys with functions as depicted<br />
on the display.<br />
3. NumericalKeypad & enables the operator to access<br />
Function Keys user functions.<br />
4. Start/Stop Button used to Start/Stop the Machine.<br />
5. Envelope <strong>Guide</strong> adjustable envelope guide.<br />
6. Side <strong>Guide</strong> adjustable envelope guide.<br />
7. Receiving Tray collects franked mail.<br />
8. Precut Label Dispenser holds up to 50 labels.<br />
9. Label Release Lever release to fill the Precut Label Dis<br />
penser.<br />
10. Blanking Unit platform infill.<br />
11. Memory Card Reader used to load new postage rate and<br />
customer data.<br />
12. Ink Cartridge Ink Cartridge/Printing Head.<br />
13. Power Input 220 - 240V AC 50Hz input.<br />
14. Accessory Port connection for printer etc.<br />
15. Weigh Platform connection for weigh platform or<br />
Connection<br />
external scale.<br />
16. Autofeed Connector connection for Autofeed Unit.<br />
17. Telephone Socket enables connection to Server<br />
Recrediting Centre if required by<br />
P.O. Authority.<br />
18. Meter Cover may be removed to allow access<br />
to meter.<br />
Controls and features<br />
17<br />
4128500V/B<br />
01/02/2006<br />
IJ35-0024-17/A
Weigh Platform and Support (optional)<br />
1<br />
2<br />
3<br />
10<br />
8<br />
7<br />
Automatic Feeder<br />
(Optional)<br />
4<br />
18<br />
Franking Machine<br />
11<br />
5 6<br />
9<br />
12<br />
12<br />
Feed<br />
Platform<br />
13<br />
14<br />
15<br />
16<br />
17<br />
18<br />
Controls and features<br />
4128500V/B<br />
01/02/2006<br />
IJ35-0024-18/A
3.2.1 Display Panel<br />
Text Message Slogan Message Mini Die (1) Date Postage Value<br />
Low Credit Ink Level Total Credit<br />
Indicator<br />
Indicator<br />
A<br />
B<br />
C<br />
LOW CREDIT<br />
LOW INK<br />
50.00<br />
MARKETING<br />
DEPT<br />
MODE<br />
IMPRINT<br />
0.00<br />
15/01/2002<br />
Department<br />
In Use<br />
Soft Keys<br />
Function Keys<br />
Numerical Keypad<br />
M<br />
MENU<br />
7 8 9<br />
4 5 6<br />
START<br />
STOP<br />
Envelope/Label Feed<br />
Start/Stop Button<br />
1 2 3<br />
C<br />
0<br />
OK<br />
(1) : not applicable in Ireland<br />
Clear Key<br />
Confirmation Key<br />
Controls and features<br />
19<br />
4128500V/B<br />
01/02/2006<br />
IJ35-0024-19/A
3.2.2 Function Keys<br />
Job Memory Key<br />
Label Key<br />
Menu Key<br />
: Storing and recalling memorised jobs.<br />
(please refer to Memory functions)<br />
: Label mode selection.<br />
(please refer to Printing labels)<br />
: Access to Function Menu.<br />
Lock<br />
: Return to Standby/Locking.<br />
Funds Key<br />
: Access to Recredit.Server centre if<br />
required by P.O. Authority.<br />
(please refer to Adding postage)<br />
Weigh Platform Key : Weigh Platform Mode Selection.<br />
(please refer to Printing with weigh<br />
platform)<br />
20<br />
Controls and features<br />
4128500V/B<br />
01/02/2006<br />
IJ35-0024-20/A
4. FRANKING YOUR MAIL<br />
4.1 Introduction<br />
In the event that a satisfactory print cannot be achieved due to bulky<br />
contents (Max.10mm) the envelope should be treated as a packet<br />
and a label used.<br />
It is recommended that the IJ35/45 is left powered on at all times.<br />
This will assist in maintaining print quality. In the event that you have<br />
to power the machine down, first press to allow the machine to<br />
return to standby mode, then WAIT for approximately ONE MI-<br />
NUTE to allow the ink cartridge to return to the park position before<br />
removing the power.<br />
Franking your mail<br />
21<br />
4128500V/B<br />
01/02/2006<br />
IJ35-0024-21/A
4.2 Getting started<br />
4.2.1 Log On (Entering <strong>User</strong> Mode)<br />
To enter USER mode from the Standby screen:<br />
SUPERVIS<br />
Press the key.<br />
If the machine is protected by a USER PIN, the following screen<br />
will be observed:<br />
ENTER USER PIN<br />
- - - -<br />
USER<br />
ESCAPE<br />
Using the numerical key pad enter the USER PIN.<br />
The Default <strong>User</strong> PIN is factory set to 1 2 3 4.<br />
This number may be changed or removed by the<br />
supervisor, please refer to "Supervisor Settings".<br />
If the correct PIN is entered the Ready Mode screen will be<br />
observed.<br />
0.00<br />
75.55<br />
USER<br />
MODE<br />
IMPRINT<br />
15/01/2002<br />
If an incorrect PIN is entered the machine will continue to prompt<br />
for USER PIN entry.<br />
22<br />
Franking your mail<br />
4128500V/B<br />
01/02/2006<br />
IJ35-0024-22/A
If an incorrect PIN is entered for eight or more attempts, the meter<br />
will be locked and prompt to call the supervisor (please refer to<br />
"Supervisor Settings", and follow the instructions to reactivate the<br />
user PIN again).<br />
The Default Stamp Value is factory set to a value precognised by<br />
P.O. Authority, to change this value, please refer to "IJ35/45 Machine<br />
Setup Menu".<br />
The machine is supplied with all departments set to OFF.<br />
In order to activate the departments, please refer to<br />
Supervisor Settings.<br />
4.2.2 Departmental Operation<br />
You will need to set up your machine for departmental operation<br />
(please refer to "Supervisor Settings"), once this has been done,<br />
the following screens will be observed:<br />
DEPARTMENTS<br />
e.g.<br />
ESC<br />
1 MARKETING<br />
2 ACCOUNTS<br />
3 SALES<br />
4<br />
5<br />
OK<br />
Using the and keys, or an appropriate number key,<br />
select your department from the list and press to confirm.<br />
Alternatively if “DEPARTMENT SELECTION” by “ACCOUNT<br />
NUMBER” is set up, the following screen will be observed:<br />
SELECT ACCOUNT<br />
_<br />
ESC<br />
LIST<br />
OK<br />
Enter the account number of the department you wish to select<br />
using the numerical keypad, and press to confirm, (to change<br />
department selection method please refer to "Supervisor Settings").<br />
Franking your mail<br />
23<br />
4128500V/B<br />
01/02/2006<br />
IJ35-0024-23/A
If your department is protected, you will be prompted to enter your<br />
Department PIN:<br />
ENTER DEPARTMENT PIN<br />
- - - -<br />
ESC<br />
Enter the PIN using the numerical keypad. If the PIN is correct the<br />
Department will show in user screen:<br />
0.00<br />
75.55<br />
MARKETING<br />
DEPT<br />
MODE<br />
IMPRINT<br />
15/01/2002<br />
If not you will be prompted to try again. (The Department PIN is not<br />
the same as the <strong>User</strong> PIN. The Department PIN may be changed<br />
or removed by the supervisor, please refer to "Supervisor<br />
Settings").<br />
If your department is not protected, the Department Ready screen<br />
will be observed.<br />
4.2.3 How To Select a Postage Value<br />
Using the numerical keypad, enter the required postage, (e.g. 27<br />
cent) the value display will flash:<br />
75.55<br />
MARKETING<br />
ESC<br />
0.27<br />
15/01/2002<br />
OK<br />
24<br />
Franking your mail<br />
4128500V/B<br />
01/02/2006<br />
IJ35-0024-24/A
If an incorrect value is entered, press and enter the correct<br />
value.<br />
To confirm the value, press , the following display will now be<br />
observed.<br />
75.55<br />
MARKETING<br />
DEPT<br />
MODE<br />
IMPRINT<br />
0.27<br />
15/01/2002<br />
The icon will only be present if the machine is set for<br />
departmental operation.<br />
4.2.4 Low Credit (for machine with credit downloaded<br />
by a Server)<br />
When machine credit falls below or equal to the low credit level, the<br />
LOW CREDIT indicator will be observed:<br />
LOW CREDIT<br />
0.27<br />
49.00<br />
MARKETING<br />
DEPT<br />
MODE<br />
IMPRINT<br />
15/01/2002<br />
It is now time to add more credit, please refer to "Credifon<br />
Recrediting".<br />
To change the low credit level, please refer to "IJ35/45 Machine<br />
Setup Menu".<br />
4.2.5 Insufficient Credit (for machine with credit<br />
downloaded by a Server)<br />
When the value selected exceeds the available credit, franking will<br />
be disabled and the INSUFFICIENT CREDIT screen will be<br />
observed:<br />
I N S U F F I C I E N T C R E D I T<br />
0.26<br />
0.27<br />
MODE<br />
IMPRINT<br />
Franking your mail<br />
25<br />
4128500V/B<br />
01/02/2006<br />
IJ35-0024-25/A
To ADD CREDIT, please refer to "Credifon Recrediting".<br />
4.2.6 High Value Selection<br />
If a value greater than or equal to the High Value setting is<br />
selected, the machine will not print unless the high value setting is<br />
confirmed.<br />
The default High Value Threshold is set at a value fixed by P.O.<br />
Authority (To change the High Value setting, please refer to "IJ35/<br />
45 Machine Setup Menu").<br />
Printing a high value<br />
If the high value is set to 1.00, from Ready Mode, set the required<br />
postage value (e.g. 1.75) and press to confirm.<br />
The High Value warning screen will now be observed:<br />
HIGH VALUE - ARE YOU SURE <br />
1.75<br />
DEPT MODE IMPRINT OK<br />
Printing is disabled.<br />
Press to return to Ready Mode screen with the High Value<br />
confirmed.<br />
If you wish to reject the High Value selection, enter the correct<br />
value and press to confirm.<br />
If you are franking more than one item at a high value, always check<br />
that the value is correct for all items being processed.<br />
YOU ARE NOW READY TO PROCESS YOUR MAIL<br />
26<br />
Franking your mail<br />
4128500V/B<br />
01/02/2006<br />
IJ35-0024-26/A
4.2.7 Franking an Envelope<br />
Insert the envelope with the side to be printed facing upwards as<br />
illustrated.<br />
Press the<br />
button, after a short<br />
pause the motor will start.<br />
Franked envelopes will subsequently<br />
be deposited into the receiving tray.<br />
For an envelope exceeding<br />
10mm thick, a label must be<br />
used, refer to "Franking Labels".<br />
4.2.8 To Change a Department<br />
From Department Ready Mode, press the button to display<br />
the list of available departments, then using the and<br />
keys, or the appropriate number key, select your department from<br />
the list. Alternatively if selection is by Account number use the<br />
numerical keypad to input the account number of the department.<br />
Press to confirm.<br />
DEPARTEMENTS<br />
ESC<br />
1 MARKETING<br />
2 ACCOUNTS<br />
3 SALES<br />
4<br />
5<br />
OK<br />
If the department is protected, you will be prompted to enter your<br />
new Department PIN.<br />
Franking your mail<br />
27<br />
4128500V/B<br />
01/02/2006<br />
IJ35-0024-27/A
If the PIN is correct the new Department will show in the <strong>User</strong><br />
screen:<br />
75.55<br />
ACCOUNTS<br />
DEPT<br />
MODE<br />
IMPRINT<br />
0.27<br />
15/01/2002<br />
If the PIN is incorrect the prompt to enter the Department PIN will<br />
be repeated.<br />
4.2.9 To Log Off<br />
From any screen, press the<br />
key to go to the Standby screen.<br />
28<br />
Franking your mail<br />
4128500V/B<br />
01/02/2006<br />
IJ35-0024-28/A
5. FRANKING WITH AUTOFEED<br />
Used in conjunction with the IJ35/45, the Automatic Feeder permits<br />
a large <strong>range</strong> of envelope sizes and thicknesses to be processed.<br />
Envelope feeding<br />
Check that all envelopes have been sorted into stacks of same size<br />
with the address facing upwards and the top edge of the envelopes<br />
all the same side of the stack.<br />
Fan the envelopes to separate them<br />
Bevel the edge of the stack<br />
Take the stack and place it on the platform, address side upwards<br />
with the top edge against the left-hand side as shown.<br />
Move the rear guide forward until the edge of the envelope aligns<br />
with the face of the guide. Move the side guide towards the<br />
envelope leaving sufficient clearance to allow the envelope to move<br />
freely.<br />
Franking with autofeed<br />
29<br />
4128500V/B<br />
01/02/2006<br />
IJ35-0024-29/A
Press the<br />
button,<br />
after a short pause the motor will start.<br />
Franked envelopes will subsequently be deposited into the<br />
receiving tray.<br />
Envelopes exceeding 6mm in thickness should be hand<br />
fed, for an envelope exceeding 10mm thick, a label must<br />
be used, refer to "Franking Labels".<br />
30<br />
Franking with autofeed<br />
4128500V/B<br />
01/02/2006<br />
IJ35-0024-30/A
6. FRANKING LABELS<br />
6.1 Filling the Label Dispenser<br />
The label dispenser is an integral part of the IJ35/45 Franking<br />
Machine and when filled will hold up to 50 labels.<br />
Open the top cover to gain access to the label release lever.<br />
Labels are inserted in the dispenser with the tab uppermost and the<br />
label side to be franked facing the direction of travel.<br />
Tab<br />
Printing Surface<br />
Hold the label release lever fully to the left to allow the labels to<br />
engage with the feed mechanism, then release the lever.<br />
DO NOT force too many labels into the Dispenser or push labels in<br />
without operating the release lever.<br />
Close the top cover.<br />
<strong>Neopost</strong> Approved Labels are supplied in boxes of 1000.<br />
Please refer to "Contacting <strong>Neopost</strong>" for information on ordering<br />
<strong>Neopost</strong> approved supplies.<br />
Franking labels<br />
31<br />
4128500V/B<br />
01/02/2006<br />
IJ35-0024-31/A
6.2 Printing a Label<br />
First select the postage value required, then the slogan, text and<br />
mini die.<br />
To frank a single label press the label key<br />
will be observed:<br />
. The following screen<br />
PLEASE ENTER NO. OF LABELS<br />
1<br />
ESC<br />
Press .<br />
The printed label will be deposited in the receiving tray and the<br />
Screen will return to Ready Mode.<br />
If you do not wish to print a label, press .<br />
If you are required to print more than one label, enter the number of<br />
labels to be processed (1 - 99), using the numerical keypad.<br />
If an incorrect quantity is entered, press<br />
correct quantity.<br />
and re-enter the<br />
When the correct quantity is entered, press the<br />
frank labels.<br />
button to<br />
The machine will print automatically the required number of labels<br />
at the displayed value.<br />
32<br />
Franking labels<br />
4128500V/B<br />
01/02/2006<br />
IJ35-0024-32/A
If during the label printing process the following display is observed:<br />
1<br />
0.27<br />
75.55<br />
ACCOUNTS<br />
ESC<br />
15/01/2002<br />
CONTINUE<br />
First replenish the label dispenser as detailed on "Franking Labels",<br />
then press to complete the label printing process.<br />
Take up the franked label, peel off the backing sheet and affix the<br />
label to the parcel or packet.<br />
The machine will return automatically to the Ready Mode screen<br />
with label selection cancelled.<br />
Franking labels<br />
33<br />
4128500V/B<br />
01/02/2006<br />
IJ35-0024-33/A
7. FRANKING WITH WEIGH PLATFORM<br />
BENEFITS OF USING A WEIGH PLATFORM (OPTION)<br />
Used in conjunction with your IJ35/45, the weigh platform will<br />
weigh and calculate the correct rate and value for items up to 2kg.<br />
Setting of values for printing is automatic.<br />
When postal rates change, your machine may be updated by<br />
installing a Rate Card which can be obtained from <strong>Neopost</strong> or<br />
<strong>Neopost</strong> Representative.<br />
For information relating to the installation of new postal rates,<br />
please refer to "Memory Cards".<br />
7.1 Weigh Platform Preparation<br />
Ensure that the weigh platform is plugged in to the correct port at<br />
the back of the machine (please refer to Controls and Features)<br />
and that the platform surface is clear of any obstruction.<br />
From Ready mode, press .<br />
The WEIGH PLATFORM screen will now be observed:<br />
WEIGH PLATFORM<br />
1 RATE Letter 1st class<br />
2 DESTINATION World<br />
3 FORMAT Priority<br />
ACCEPT<br />
5g 0.39<br />
MODIFY<br />
Current RATE setting will be displayed.<br />
If NO PLATFORM is displayed instead of the Weight and Postage<br />
Rate, check scale connection and start again.<br />
If the weight indicated exceeds 0g press<br />
weigh platform.<br />
to Zero the<br />
34<br />
Franking with weigh platform<br />
4128500V/B<br />
01/02/2006<br />
IJ35-0024-34/A
7.2 How do I calculate the correct postage and rate<br />
To change the RATE setting press , the RATE screen will be<br />
observed:<br />
RATES<br />
1 Letter<br />
2 Large env.<br />
CANCEL<br />
SELECT<br />
A list of Postage Rates currently available will now be displayed.<br />
To return to the previous screen with Rate setting unchanged, press<br />
.<br />
Using the and keys, or the appropriate number key,<br />
select required Rate option from list, (e.g. 2 Large env.) press<br />
to confirm.<br />
The following typical screen will now be observed:<br />
WEIGH PLATFORM<br />
1 Rate Large env.<br />
2 Destination World<br />
3 Format Priority<br />
ACCEPT<br />
MODIFY<br />
Franking with weigh platform<br />
35<br />
4128500V/B<br />
01/02/2006<br />
IJ35-0024-35/A
For some rates you may be prompted to scroll down and make<br />
further selections for example:<br />
DESTINATION<br />
FORMAT<br />
will require in this case a choice between<br />
1 Ireland 2 Britain 3 Europe 4 World.<br />
will require in this case a choice between<br />
1 Priority 2 Economy.A service can be added<br />
to the selected rate by pressing then<br />
.<br />
Make your selections and return to the WEIGH PLATFORM<br />
screen by pressing .<br />
Place item to be weighed on the platform, the weight and postage<br />
will be displayed.<br />
WEIGH PLATFORM<br />
ACCEPT<br />
1 Rate Large env.<br />
2 Destination World<br />
3 Format Priority<br />
153g 5.00<br />
MODIFY<br />
To accept the selection and set the value, press .<br />
36<br />
Franking with weigh platform<br />
4128500V/B<br />
01/02/2006<br />
IJ35-0024-36/A
If you wish to accept the Postage displayed, press<br />
to Ready Mode with the postage value selected.<br />
to return<br />
Alternatively, press<br />
to accept the postage value displayed<br />
and frank the postage value on to your envelope or label.<br />
YOU ARE NOW READY TO FRANK YOUR MAIL<br />
AT THE CORRECT POSTAGE VALUE<br />
If you wish to reject the Postage displayed, press , you will be<br />
returned to the RATE screen where you may revise your settings.<br />
To weigh further items repeat the procedure.<br />
TARE FUNCTION<br />
1. Press: .<br />
2. Place an empty container on the platform.<br />
3. Press: , zero weight will now be displayed.<br />
4. Place the filled container on the platform. The weight<br />
now displayed will be that of the contents of the container.<br />
5. To return to normal use, clear the scale platform and<br />
press the displayed weight will return to 0g.<br />
RE-ZERO THE WEIGH PLATFORM<br />
If the Weigh Platform indicates a weight over 0g when it is clear, it<br />
must be re-zeroed by pressing when already in scale mode.<br />
Franking with weigh platform<br />
37<br />
4128500V/B<br />
01/02/2006<br />
IJ35-0024-37/A
8. PRINTING OPTIONS<br />
8.1 What can I print<br />
Your IJ35/45 is capable of operating in various modes:<br />
IN NORMAL (POSTAGE) MODE<br />
In Normal (Postage) mode, you can print postage, select a<br />
message from a number of pre-loaded or customised slogans<br />
(when ordered from <strong>Neopost</strong>), in addition to a Slogan, you can<br />
compose and print your own Text Message, you can also select<br />
from a number of pre-loaded Mini Dies. It is also possible to<br />
Advance Date your mail by up to seven days.<br />
The IJ35/45 franking machine offers a choice of up to 10<br />
customised slogans. There are currently 8 preloaded<br />
slogans, as a factory setting, which are overwritable.<br />
up to 10<br />
Slogans*<br />
Your Own<br />
Text Message<br />
up to 32 characters<br />
up to 8 Pre-loaded Mini Dies<br />
(not applicable in Ireland)<br />
38<br />
Printing options<br />
4128500V/B<br />
01/02/2006<br />
IJ35-0024-38/A
* A Pre-loaded slogan can be overwritten by a customised slogan.<br />
To download a customised slogan, please refer to Supervisor<br />
Settings on "Memory Cards".<br />
8.2 Print mode selection (depending of P.O. Specification)<br />
From Ready Mode, press the key, the MODE selection<br />
screen will be observed:<br />
Current Mode will be displayed.<br />
MODE<br />
ESC<br />
1 NORMAL<br />
2 DATE ONLY<br />
3 SLOGAN ONLY<br />
4 SLOGAN & DATE<br />
5 TEXT ONLY<br />
In addition to the Normal (Postage) Mode, the following functions<br />
may be accessed directly from the MODE screen:<br />
DATE ONLY : Prints the date instead of a franking<br />
mark.<br />
SLOGAN ONLY : Prints a slogan instead of a frank<br />
mark.<br />
SLOGAN & DATE : Prints a slogan and the date instead<br />
of a frank mark.<br />
TEXT ONLY : Prints your personalised text mes<br />
sage instead of a frank mark.<br />
Using the and keys, or the appropriate number key,<br />
select required option from list, (e.g. SLOGAN ONLY) press<br />
to confirm.<br />
OK<br />
SLOGAN ONLY<br />
ACCOUNTS<br />
DEPT MODE IMPRINT<br />
15/01/2002<br />
Or to return to Ready Mode with mode setting unchanged, press<br />
.<br />
Printing options<br />
39<br />
4128500V/B<br />
01/02/2006<br />
IJ35-0024-39/A
8.3 Modifying the imprint<br />
The IMPRINT menu is used to modify the setup of the imprint as<br />
follows:<br />
From Ready Mode, press the key the following screen will<br />
be observed:<br />
IMPRINT<br />
1 SLOGAN Good news<br />
2 MINI DIE As Requested<br />
3 TEXT OFF<br />
4 DATE ADVANCE 15/01/02<br />
ESC<br />
OK<br />
SLOGAN : you may select one Message from<br />
a maximum of 10 Messages.<br />
MINI DIE : you may select one Mini Die from<br />
eight pre-loaded Mini Dies according<br />
to P.O.Specification.<br />
TEXT : up to five personal text messages<br />
may be set (see "IJ35/45 Machine<br />
Setup")<br />
DATE : the posting date can be advanced by<br />
ADVANCE several days according to P.O.<br />
Specification.<br />
8.3.1 Choosing a Slogan, Mini Die or Text<br />
You can select a Slogan and/or Mini Die (not applicable in Ireland)<br />
from a number of pre-loaded messages, you can even compose<br />
(please refer to "IJ35/45 Machine Setup) and print your own Texts.<br />
Slogans, Mini Dies and Texts may be combined within the same<br />
Imprint. (Provided the envelope or label is long enough to take the<br />
print).<br />
The method of selection for Slogans, Mini Dies and Texts is the<br />
same, therefore for the purpose of this example we will illustrate<br />
selecting a Slogan.<br />
40<br />
Printing options<br />
4128500V/B<br />
01/02/2006<br />
IJ35-0024-40/A
Using the and keys, or the appropriate number,<br />
make your selection from the list e.g. 1 SLOGAN and press<br />
to confirm, the SLOGAN screen will be observed.<br />
If a slogan is already selected, that slogan will be highlighted:<br />
SLOGAN<br />
ESC<br />
1 OFF<br />
2 YOUR SLOGAN 1<br />
3 YOUR SLOGAN 2<br />
4 Air Mail<br />
5 First Class<br />
OK<br />
Using the and keys, or the appropriate number,<br />
make your selection from the list, press to confirm.<br />
If you wish to retain the current selection, press the<br />
return to the IMPRINT menu screen.<br />
key to<br />
To return to Ready Mode screen press .<br />
0.00<br />
75.55<br />
ACCOUNTS<br />
DEPT<br />
MODE<br />
IMPRINT<br />
15/01/2002<br />
The Icon displayed in the top lefthand corner of the screen indicates<br />
that a slogan has been selected.<br />
8.3.2 Date Advance (for Pre Dated Mail) in accordance<br />
with P.O.Specification<br />
Your machine is fitted with its own calendar/clock, therefore current<br />
date setting is automatic. If you wish to prepare mail ahead of time<br />
it is possible to advance the posting date by up to seven days.<br />
Printing options<br />
41<br />
4128500V/B<br />
01/02/2006<br />
IJ35-0024-41/A
From the IMPRINT screen select DATE ADVANCE, the following<br />
screen will be observed:<br />
DATE ADVANCE<br />
ESC<br />
1 15/01/02<br />
2 16/01/02<br />
3 17/01/02<br />
4 18/01/02<br />
5 19/01/02<br />
OK<br />
Next, using the and keys, select from the list the date<br />
on which you wish to post your mail.<br />
Press to confirm and return to the IMPRINT screen.<br />
To return to Ready Mode with all selections confirmed, press<br />
.<br />
YOU ARE NOW READY TO FRANK YOUR<br />
PRE DATED MAIL<br />
On completion of your pre dated mail run, your meter MUST be<br />
reset to the current date.<br />
However, if the Timeout period is exceeded, your meter will go to<br />
Standby and the Date Advance setting cancelled.<br />
42<br />
Printing options<br />
4128500V/B<br />
01/02/2006<br />
IJ35-0024-42/A
9. MAINTAINING PRINT QUALITY<br />
Under normal operating conditions, your IJ35/45 postage meter will<br />
produce excellent quality prints.<br />
However, if lines are missing from the stamp or the machine has<br />
remained unused for several days it will be necessary to clean the<br />
print-head.<br />
9.1 Cleaning the Ink Cartridge<br />
From Ready Mode, press the<br />
now be observed:<br />
key, the MAIN MENU screen will<br />
MAIN MENU<br />
ESC<br />
1 REGISTERS<br />
2 CARTRIDGE<br />
3 SUPERVISOR<br />
4 CLEAR MAIL PATH<br />
5 WEIGHING MODE Differential<br />
OK<br />
Using the and keys, or the appropriate number key,<br />
move the cursor to CARTRIDGE and press to confirm.<br />
The CARTRIDGE menu will now be observed:<br />
CARTRIDGE<br />
1 TEST PRINT<br />
2 CLEAN<br />
3 REMOVE<br />
ESC<br />
OK<br />
Select the CLEAN option from the list and press to start the<br />
cleaning cycle.<br />
On completion of the cleaning cycle the screen will revert to the<br />
CARTRIDGE menu.<br />
You may now make a test print, if you wish.<br />
Maintaining print quality<br />
43<br />
4128500V/B<br />
01/02/2006<br />
IJ35-0024-43/A
9.2 Making a Test Print<br />
Select the TEST PRINT option from the CARTRIDGE menu and<br />
press to confirm.<br />
CARTRIDGE<br />
1 TEST PRINT<br />
2 CLEAN<br />
3 REMOVE<br />
ESC<br />
OK<br />
The prompt to produce a Test Print will now be displayed.<br />
PRESS START & INSERT ITEM<br />
15/01/2002<br />
To make a Test Print, insert a blank envelope or card and press<br />
.<br />
Inspect the Test Print to ensure that all lines are clear and present.<br />
To set the alignment, use the numerical keypad to enter the<br />
number that provides the straightest vertical line (for the example<br />
above line 5).<br />
44<br />
Maintaining print quality<br />
4128500V/B<br />
01/02/2006<br />
IJ35-0024-44/A
ENTER STRAIGHTEST LINE NO.<br />
PRESS 5START<br />
ESC<br />
OK<br />
Press to confirm, you will be returned to the CARTRIDGE<br />
menu screen. If any lines are missing, repeat the cleaning and test<br />
print process up to three times, if this process fails to restore print<br />
quality, fit a new ink cartridge as detailed on "Replacing an ink<br />
cartridge".<br />
If the test print is satisfactory, press<br />
Mode.<br />
twice to return to Ready<br />
9.3 Low Ink<br />
Should the ink cartridge require replacing, the LOW INK display<br />
will be observed:<br />
LOW INK<br />
75.55<br />
ACCOUNTS<br />
DEPT MODE IMPRINT<br />
0.27<br />
15/01/2002<br />
To allow completion of batch, approximately 200 impressions are<br />
available, after which the Ink Cartridge MUST be replaced (see<br />
below).<br />
9.4 No Ink<br />
When the NO INK display is observed, printing is disabled and the<br />
Ink Cartridge MUST be replaced immediately.<br />
NO INK<br />
75.55<br />
ACCOUNTS<br />
DEPT MODE IMPRINT<br />
0.27<br />
15/01/2002<br />
Maintaining print quality<br />
45<br />
4128500V/B<br />
01/02/2006<br />
IJ35-0024-45/A
9.5 Replacing an Ink Cartridge<br />
From Ready Mode, press the key. Using the and<br />
keys, or the appropriate number key, move the cursor to<br />
CARTRIDGE and press to confirm.<br />
Select the REMOVE option from the CARTRIDGE menu:<br />
CARTRIDGE<br />
1 TEST PRINT<br />
2 CLEAN<br />
3 REMOVE<br />
ESC<br />
OK<br />
Press to confirm.<br />
After a short time, the following screen will be observed:<br />
CARTRIDGE<br />
INSERT CARTRIDGE & PRESS OK<br />
OK<br />
Open the machine top cover.<br />
Press down & forward on the<br />
Ink Cartridge as shown in order<br />
to release it.<br />
46<br />
Maintaining print quality<br />
4128500V/B<br />
01/02/2006<br />
IJ35-0024-46/A
Carefully withdraw the used Ink Cartridge and discard.<br />
Remove the new Ink Cartridge from its packaging and carefully<br />
remove the tape seals.<br />
Do NOT touch or remove the copper strip on Ink Cartridges.<br />
Place the new Ink Cartridge into its holder. Hold the Cartridge down<br />
with light pressure on the top and firmly push the Cartridge rearwards<br />
(see arrow) until it clicks into position.<br />
Close the machine top cover and press .<br />
Maintaining print quality<br />
47<br />
4128500V/B<br />
01/02/2006<br />
IJ35-0024-47/A
After a short delay the prompt to make a Test Print will be<br />
observed:<br />
PRESS START & INSERT ITEM<br />
15/01/2002<br />
Please refer to Making a Test Print.<br />
Your IJ35/45 is supplied with a cartridge. You should<br />
order your next standard cartridge from <strong>Neopost</strong> or<br />
<strong>Neopost</strong> representative.<br />
THE USE OF INK CARTRIDGES IN UNLICENSED METERS<br />
OR OTHER PRINTERS IS PROHIBITED.<br />
48<br />
Maintaining print quality<br />
4128500V/B<br />
01/02/2006<br />
IJ35-0024-48/A
10. METER REGISTERS<br />
Your franking machine is equipped with a series of electronic<br />
registers to monitor franking transactions. A number of departments<br />
are available in which separate registers showing postage used<br />
and items printed are stored. The values of these registers may be<br />
displayed and printed as follows. (All register values illustrated are<br />
typical).<br />
10.1 Selection<br />
To select a Meter Register from Ready Mode, press the<br />
following screen will be observed:<br />
key, the<br />
MAIN MENU<br />
ESC<br />
1 REGISTERS<br />
2 CARTRIDGE<br />
3 SUPERVISOR<br />
4 CLEAR MAIL PATH<br />
5 WEIGHING MODE Differential<br />
OK<br />
Using the and keys, or the appropriate number key,<br />
move the cursor to REGISTERS and press to confirm, the list<br />
of registers available to view will now be displayed:<br />
REGISTERS<br />
1 BATCH REGISTERS<br />
2 MAIN REGISTERS<br />
3 RECREDIT STATEMENT<br />
4 DEPARTMENT REGISTERS<br />
ESC<br />
OK<br />
Using the and keys, or the appropriate number key,<br />
select a register option from the list then press to confirm.<br />
Meter registers<br />
49<br />
4128500V/B<br />
01/02/2006<br />
IJ35-0024-49/A
e.g. DEPARTMENT REGISTERS:<br />
DEPARTMENT REGISTERS<br />
DEPT NAME<br />
MARKETING<br />
TOTAL 25.67<br />
ITEMS 75<br />
LAST RESET 15/01/02<br />
ESC<br />
PRINT<br />
Current Department Displayed.<br />
If no department has been set up, this register will show DEPT<br />
NAME USER.<br />
10.2 Printing a Register<br />
To print a register press , if the method of print is set to<br />
Internal, the following screen will be observed:<br />
REPORTS<br />
1 15/01/2002<br />
After a few seconds, your register data will be printed on a label<br />
and you will be returned to the REGISTERS screen.<br />
If during the register printing process the following display is<br />
observed:<br />
REPORTS<br />
1 15/01/2002<br />
ESC<br />
CONTINUE<br />
First replenish the label dispenser as detailed on "Franking<br />
Labels", then press to complete the report printing process.<br />
50<br />
Meter registers<br />
4128500V/B<br />
01/02/2006<br />
IJ35-0024-50/A
If after a short wait, you are returned to the register screen your<br />
method of print may be set to External Printer, please refer to<br />
Printing with External Printer below.<br />
The method of print (Label or External Printer) is set in<br />
Supervisor Mode, please refer to "Reports".<br />
Press to return to the REGISTERS screen.<br />
To return to Ready Mode press three times.<br />
10.3 Printing with External Printer<br />
Before proceeding to print registers using an external printer<br />
ensure that the printer lead is connected to the Upper Accessory<br />
Port at the back of the machine, (please refer to Controls and<br />
Features) and that the printer power lead is connected to an<br />
adjacent power outlet.<br />
Set the printer to ON and the status to ONLINE.<br />
From your selected registers screen press , after a short<br />
period of time, you will be returned to the screen and the register<br />
data will have been printed.<br />
If the registers screen does not re-appear after a few seconds and<br />
the printer does not print, re-check all printer connections and<br />
ensure that the printer status is set to ONLINE.<br />
Meter registers<br />
51<br />
4128500V/B<br />
01/02/2006<br />
IJ35-0024-51/A
11. CLEARING MAIL PATH<br />
In the unlikely event of an envelope misfeed, and an item of mail is<br />
in the mail path, the following procedure must be followed:<br />
From Ready Mode, press the<br />
be observed:<br />
key, the MAIN MENU screen will<br />
MAIN MENU<br />
ESC<br />
1 REGISTERS<br />
2 CARTRIDGE<br />
3 SUPERVISOR<br />
4 CLEAR MAIL PATH<br />
5 WEIGHING MODE Differential<br />
OK<br />
Using the and keys, or the appropriate number key,<br />
move the cursor to CLEAR MAIL PATH and press to<br />
confirm, the following screen will be observed:<br />
PRESS START<br />
ESC<br />
Press the<br />
button.<br />
After a short pause the track should clear and the screen returned<br />
to the MAIN MENU.<br />
Press to return to Ready Mode.<br />
If you are using an Autofeed and have completed the above but still<br />
have an envelope misfeed, please refer to "Clearing a Mail Jam<br />
from the Autofeeder".<br />
52<br />
Clearing mail path<br />
4128500V/B<br />
01/02/2006<br />
IJ35-0024-52/A
12. SERVER RECREDITING<br />
12.1 Remote credit setting (for machine with Server<br />
Connection)<br />
Credit may be purchased from <strong>Neopost</strong> Server, using the Server resetting<br />
system, in accordance with P.O. Authority.<br />
Check that the Telephone Cable is connected to the Telephone<br />
Socket at the rear of the machine and the other end to an adjacent<br />
telephone line outlet.<br />
The machine only requires connection to the telephone<br />
line outlet during the re-credit transaction.<br />
As a Server user you will have been issued with your own CREDIT<br />
SERVER PIN, therefore to initiate a valid credit-resetting sequence,<br />
the correct PIN must be used.<br />
1. From Ready Mode or ‘Inspection Due - Recredit’ screen,<br />
press .<br />
The prompt to enter your CREDIT PIN will be observed,<br />
please remember this is NOT the same as your <strong>User</strong> PIN.<br />
CREDIT PIN<br />
- - - -<br />
ESC<br />
OK<br />
2. Enter your CREDIT PIN, the following screen will now be<br />
observed:<br />
ENTER AMOUNT<br />
0.00<br />
ESC<br />
OK<br />
Server recrediting<br />
53<br />
4128500V/B<br />
01/02/2006<br />
IJ35-0024-53/A
3. Using the numerical key pad, enter the credit amount you<br />
wish to purchase (e.g. 50).<br />
Press: , and to confirm.<br />
You will now be asked to verify the amount before proceeding.<br />
CONFIRM AMOUNT<br />
50.00<br />
ESC<br />
OK<br />
If amount incorrect, press and start again from the Enter<br />
Amount screen (step 2).<br />
If the amount displayed is correct, press to confirm.<br />
On completion of recrediting, the following screen will be observed:<br />
RECREDIT DONE<br />
50.00<br />
ESC<br />
OK<br />
Press<br />
to return to Ready Mode.<br />
If an incorrect CREDIT PIN was entered, the transaction will be<br />
aborted and the following screen will be observed:<br />
WRONG PIN<br />
PLEASE TRY AGAIN<br />
ESC<br />
OK<br />
In this case, press to return to Ready Mode, then wait for<br />
approximately two minutes before attempting to add credit, this<br />
time using the Correct CREDIT PIN.<br />
54<br />
Server recrediting<br />
4128500V/B<br />
01/02/2006<br />
IJ35-0024-54/A
If for any other reason the re-credit transaction is aborted before the<br />
transfer has been completed, the following MESSAGE will be<br />
observed:<br />
!<br />
RECREDIT FAILED<br />
TRY AGAIN<br />
ESC MODE IMPRINT<br />
Press to return to Ready Mode, then wait for approximately<br />
two minutes before attempting to try again. If a re-credit transaction<br />
is aborted the value is automatically reset to that previously selected<br />
for any subsequent retry.<br />
If recrediting satisfactory, press to return to Ready Mode.<br />
12.2 ‘INSPECTION DUE - RECREDIT’ Call Server Procedure<br />
If you do not apply for credit or connect to Server within a number of<br />
days fixed by P.O. Authority, the following display will be observed:<br />
INSPECTION DUE - RECREDIT<br />
CALL SERVER<br />
ESC<br />
MODE<br />
IMPRINT<br />
To action this message you should complete a zero value re-credit<br />
transaction (see "Remote Credit Setting", step 1).<br />
This allows the Post Authority to inspect your meter and help prevent<br />
possible fraud.<br />
Server recrediting<br />
55<br />
4128500V/B<br />
01/02/2006<br />
IJ35-0024-55/A
12.3 Unused or Spoilt Impressions<br />
The Posts make allowance for any spoiled meter franking impressions<br />
i.e., impressions made in error in respect of envelopes,<br />
wrappers or unused labels, subject to certain conditions. For<br />
details of the qualifying conditions, please contact your Postal<br />
Administration directly.<br />
12.4 Application for a new Credit PIN<br />
If you lose or forget your Credit PIN you must apply for a new PIN<br />
in writing on your company headed paper to <strong>Neopost</strong> or <strong>Neopost</strong><br />
representative.<br />
If you find your old Credit PIN at a later date, it must be destroyed<br />
immediately.<br />
Please do not attempt to use an old Credit PIN to effect a<br />
transaction.<br />
When you receive your new Credit PIN, keep it in a safe place and<br />
separate from your Franking Machine code.<br />
56<br />
Server recrediting<br />
4128500V/B<br />
01/02/2006<br />
IJ35-0024-56/A
13. MEMORY FUNCTIONS<br />
Frequently used print combinations may be pre-programmed as a<br />
memory function, five preset memory slots are available for selection.<br />
13.1 Saving a Memory Function<br />
Setup your preferred print combination, then press and hold the<br />
key for approximately 5 seconds until the following screen is<br />
observed:<br />
MEMORY SAVE<br />
1 M1<br />
2 M2<br />
3 M3<br />
4 M4<br />
5 M5<br />
ESC EDIT OK<br />
Select the Job Memory in which you wish to save your programme<br />
and press to confirm.<br />
If you wish to rename a memory location highlight it using the<br />
key then press the following screen will be observed:<br />
MEMORY NAME<br />
A B C D E F G H I J K L M N O P Q R S T<br />
U V W X Y Z - # & £ / + $ . €<br />
NEXT<br />
Use the , and keys to move the cursor to the<br />
character to be defined.<br />
These keys can be held for fast scrolling.<br />
The key is used to confirm selection and move the cursor to<br />
the next character.<br />
Memory functions<br />
57<br />
4128500V/B<br />
01/02/2006<br />
IJ35-0024-57/A
To delete a character press .<br />
To enter a number in the Memory Name use the numeric keypad.<br />
To return to the previous screen with the Memory Name unchanged<br />
press .<br />
To confirm your entry press .<br />
This operation will overwrite the previous memory name.<br />
To return to Ready Mode press .<br />
13.2 Recalling a Memory Function<br />
From Ready Mode, press and release the<br />
MEMORY RECALL screen:<br />
key to display the<br />
MEMORY RECALL<br />
ESC<br />
1 M1<br />
2 M2<br />
3 M3<br />
4 M4<br />
5 M5<br />
OK<br />
Using the key or the appropriate numerical key, move the<br />
cursor to make your memory recall selection.<br />
To confirm your selection, press .<br />
To return to Ready Mode press .<br />
58<br />
Memory functions<br />
4128500V/B<br />
01/02/2006<br />
IJ35-0024-58/A
14. SUPERVISOR SETTINGS<br />
14.1 Introduction<br />
In Supervisor Mode, the supervisor can access all machine<br />
functions, except franking. Navigation procedure from screen to<br />
screen is the same as in the user mode, except that the supervisor<br />
mode includes a number of extra configuration function keys. By<br />
definition, the supervisor has free access to all the departments<br />
and as such he/she is not prompted by the machine to enter any<br />
code after the Supervisor Code has been entered.<br />
For security purposes, only a supervisor or other responsible<br />
person should be permitted to make changes to these settings.<br />
Supervisor settings<br />
59<br />
4128500V/B<br />
01/02/2006<br />
IJ35-0024-59/A
14.2 Entry to supervisor mode<br />
To enter SUPERVISOR mode from the Standby screen:<br />
SUPERVIS<br />
USER<br />
Press the key.<br />
Or from the MENU key in USER Mode by pressing , 3<br />
SUPERVISOR and .<br />
The prompt to ENTER SUPERVISOR PIN will be observed:<br />
ENTER SUPERVISOR PIN<br />
- - - -<br />
ESC<br />
Enter the Supervisor PIN.<br />
If an incorrect PIN is entered the machine will continue to prompt for<br />
SUPERVISOR PIN Entry until the correct PIN is used.<br />
Having successfully entered Supervisor Mode, the SUPERVISOR<br />
screen will be observed:<br />
SUPERVISOR<br />
ESC<br />
1 SECURITY & DEPT<br />
2 REGISTERS<br />
3 TEXT<br />
4 LOAD FROM MEMORY CARD<br />
5 SETUP<br />
OK<br />
60<br />
Supervisor settings<br />
4128500V/B<br />
01/02/2006<br />
IJ35-0024-60/A
The following functions may be accessed directly from the<br />
Supervisor Ready screen:<br />
SECURITY & DEPT<br />
REGISTERS<br />
TEXT<br />
: allows the supervisor to<br />
access the department<br />
setup functions and to set<br />
the <strong>User</strong> PIN.<br />
: provides access to<br />
registers<br />
: enables supervisor to set<br />
personalised messages.<br />
LOAD FROM MEMORY CARD : enables supervisor to en<br />
ter data to the machine<br />
memory e.g. Slogan Cards,<br />
Rate Cards (When postal<br />
rates change) and Town<br />
Cards (When you change<br />
location) in accordance with<br />
P.O. Authority.<br />
SETUP<br />
: allows access to machine<br />
setup.<br />
14.3 Security & Dept<br />
In Non-Departmental Operating mode, all values are assigned to<br />
<strong>User</strong>.<br />
In Departmental mode IJ35 has 35 departments, whilst IJ45 has<br />
45 departments, available for assignment by the supervisor.<br />
From the SUPERVISOR menu, move the cursor to option<br />
1 SECURITY & DEPT.<br />
Supervisor settings<br />
61<br />
4128500V/B<br />
01/02/2006<br />
IJ35-0024-61/A
Press<br />
to confirm. The following screen will now be observed:<br />
SECURITY & DEPT<br />
1 DEPARTMENT MODE DISABLED<br />
2 SET UP DEPT<br />
3 DEPARTMENT SELECTION PICK FROM LIST<br />
4 LAST RESET ALL 00/00/00<br />
5 USER PIN<br />
1234<br />
ESC<br />
OK<br />
The following functions may be accessed directly from the<br />
SECURITY & DEPT screen:<br />
DEPARTMENT MODE : allows supervisor to enable<br />
Departmental operation.<br />
SETUP DEPT<br />
: allows supervisor to setup<br />
Departments by naming<br />
them and allocating if needed<br />
an account number.<br />
DEPARTMENT SELECTION : allows supervisor to select a<br />
department from a list or by<br />
entering the relevant account<br />
number.<br />
LAST RESET ALL<br />
: allows supervisor to reset All<br />
Registers to zero.<br />
USER PIN : allows supervisor to set the 4<br />
digit <strong>User</strong> PIN.<br />
USER STATUS<br />
: allows supervisor to set <strong>User</strong><br />
Status. If the <strong>User</strong> PIN is invalid<br />
after 8 attempts, the <strong>User</strong> Status<br />
will become Locked. The<br />
Supervisor will have to open it<br />
again for the user to operate<br />
the machine.<br />
When in Departmental Operating Mode access to Non-<br />
Departmental Operating Mode (Department 0) is disabled.<br />
62<br />
Supervisor settings<br />
4128500V/B<br />
01/02/2006<br />
IJ35-0024-62/A
14.3.1 Changing the <strong>User</strong> PIN<br />
From the "Security & Dept" screen, using the and<br />
keys, or the appropriate number key, move the cursor to 5 USER<br />
PIN and press to confirm, the following screen will be<br />
observed:<br />
USER PIN<br />
- - - -<br />
ESC<br />
OK<br />
To return to the previous screen with the <strong>User</strong> PIN unchanged,<br />
press .<br />
To change the <strong>User</strong> PIN, enter the new 4 digit value, then press<br />
to confirm.<br />
To return to the SUPERVISOR screen press .<br />
14.3.2 Setting the <strong>User</strong> Status<br />
From the SECURITY & DEPT screen, using the and<br />
keys, or the appropriate number key, move the cursor to<br />
6 USER STATUS and press to confirm, the following<br />
screen will be observed:<br />
USER STATUS<br />
1 CLOSED<br />
2 OPEN<br />
3 LOCKED<br />
ESC<br />
OK<br />
To return to the previous screen with the <strong>User</strong> Status unchanged,<br />
press<br />
Supervisor settings<br />
63<br />
4128500V/B<br />
01/02/2006<br />
IJ35-0024-63/A
Using the and keys, or the appropriate number key,<br />
make your selection and press to confirm.<br />
To return to the SUPERVISOR screen press .<br />
To reactivate the user PIN select 2 OPEN, then to confirm.<br />
Press once to return to the Supervisor main menu, or twice to<br />
return to Standby "Sleep" mode.<br />
14.3.3 To Assign a Department<br />
From the SECURITY & DEPT menu, move the cursor to<br />
DEPARTMENT MODE.<br />
Press to confirm.<br />
The following screen will be observed:<br />
DEPARTMENT MODE<br />
1 DISABLED<br />
2 ENABLED<br />
ESC<br />
OK<br />
Using the and keys, or the appropriate number key,<br />
move the cursor to ENABLED and press to confirm, you will<br />
be returned to the SECURITY & DEPT screen with department<br />
mode ENABLED.<br />
SECURITY & DEPT<br />
1 DEPARTMENT MODE ENABLED<br />
2 SET UP DEPT<br />
3 DEPARTMENT SELECTION PICK FROM LIST<br />
4 LAST RESET ALL 00/00/00<br />
5 USER PIN<br />
1234<br />
ESC<br />
OK<br />
Using the and keys, or the appropriate number key,<br />
move the cursor to SETUP DEPT and press to confirm.<br />
64<br />
Supervisor settings<br />
4128500V/B<br />
01/02/2006<br />
IJ35-0024-64/A
The following screen will be observed:<br />
SET UP DEPT<br />
ESC<br />
1 DEPT C 1 C<br />
2 DEPT C 2<br />
3 DEPT C 3<br />
4 DEPT C 4<br />
5 DEPT C 5<br />
OK<br />
Again using the and keys, or the appropriate number<br />
key, move the cursor to the Number you wish to set and press<br />
to confirm, the DEPT SETTINGS screen for the selected<br />
department will be observed:<br />
DEPT SETTINGS<br />
ESC<br />
1 DEPT NAME DEPT<br />
2 DEPT CODE 1<br />
3 DEPT PIN 0000<br />
4 STATUS CLOSED<br />
5 LAST RESET 00/00/00<br />
OK<br />
To set a Department Name, move the cursor to DEPT NAME<br />
and press to confirm, the following screen will be observed:<br />
D E P T<br />
DEPT NAME<br />
A B C D E F G H I J K L M N O P Q R S T<br />
U V W X Y Z - # & £ / + $ . €<br />
NEXT<br />
Use the , and keys to move the cursor to the<br />
character to be defined.If a key is held pressed then the cursor will<br />
scroll along each character in turn until the key is released.<br />
The key is used to confirm the selection and move the cursor<br />
to the next character. To delete a character press .<br />
To enter numbers in the text use the numeric keypad, you do not<br />
need to press the key to confirm selection when entering<br />
numbers.<br />
Supervisor settings<br />
65<br />
4128500V/B<br />
01/02/2006<br />
IJ35-0024-65/A
A department name is limited to 16 characters including spaces.<br />
To return to the previous screen with the Department Name<br />
unchanged press until the screen changes to the previous one.<br />
To confirm your entry press .<br />
To Change a Department Name, select DEPT NAME as<br />
described above.<br />
Using the key, delete characters of the old Department Name.<br />
Press as many times as required to erase the Department<br />
Name completely, then enter the new name as previously detailed.<br />
To set a Dept Code, move the cursor to DEPT CODE and press<br />
to confirm, the following screen will be observed:<br />
DEPT N° CODE DPT<br />
- --- -<br />
ESC<br />
OK<br />
Using the numerical keypad enter/change the dept code, press<br />
to confirm.<br />
To return to the previous screen with dept code unchanged press<br />
.<br />
To set a Department PIN, move the cursor to DEPT PIN and<br />
press to confirm, the following screen will be observed:<br />
CODE DEPT ACCES PIN DPT<br />
- - - -<br />
ESC<br />
OK<br />
66<br />
Supervisor settings<br />
4128500V/B<br />
01/02/2006<br />
IJ35-0024-66/A
To change the Department PIN, enter the new value, then press<br />
to confirm.<br />
To return to the previous screen with the Department PIN<br />
unchanged, press .<br />
To Change the Department Status, move the cursor to STATUS<br />
and press to confirm, the following screen will be observed:<br />
STATUS<br />
1 CLOSED<br />
2 OPEN<br />
ESC<br />
OK<br />
Using the and keys, or the appropriate number key,<br />
move the cursor to OPEN and press to confirm.<br />
To Reset the Department Registers, move the cursor to LAST<br />
RESET and press to confirm, the following screen will be<br />
observed:<br />
EFFACER DONNEES<br />
DEPT DATA WILL BE ERASED!<br />
ESC<br />
CONTINUE<br />
To return to the previous screen with data unchanged, press<br />
.<br />
To reset current Department Data to zero, press to confirm,<br />
the following screen will now be observed with the current date<br />
displayed as LAST RESET:<br />
DEPT SETTINGS<br />
ESC<br />
1 DEPT NAME ACCOUNTS<br />
2 DEPT CODE 01<br />
3 DEPT PIN 1 1 1 1<br />
4 STATUS OPEN<br />
5 LAST RESET 15/01/02<br />
Your Department is assigned and ready for use.<br />
To return to the SUPERVISOR screen press<br />
OK<br />
three times.<br />
Supervisor settings<br />
67<br />
4128500V/B<br />
01/02/2006<br />
IJ35-0024-67/A
14.4 IJ35/45 machine setup menu<br />
The SETUP menu, provides access to the following supervisor<br />
functions :<br />
1. High Value<br />
A High Value Warning will be displayed in <strong>User</strong> Mode when a<br />
value exceeding or equal to the High Value threshold is selected,<br />
this value may be changed (Default High Value set to the P.O.<br />
Specification).<br />
2. Low Credit<br />
The Low Credit Warning will be displayed in <strong>User</strong> Mode when the<br />
credit level falls below or equal to the Low Credit threshold, this<br />
value may be changed (Default Low Credit value set to the P.O.<br />
Specification).<br />
3. Time<br />
The machine clock is set to local time, the year cannot be<br />
changed, however to facilitate Summer/Winter time may be<br />
changed.<br />
4. Sleep Mode<br />
If the machine is left running for a period of time it will automatically<br />
return to Sleep Mode, this is called time out. The time out period<br />
may be changed (Default Timeout period set to 10 mins)<br />
5. Motor Timeout<br />
This can be set to LONG, MEDIUM or SHORT. After the last<br />
impression, the motor will stop according to the setting (Default<br />
set to LONG)<br />
6. Key Beep<br />
It may be set to sound when a key is pressed, this setting may be<br />
changed (Default set to ON)<br />
68<br />
Supervisor settings<br />
4128500V/B<br />
01/02/2006<br />
IJ35-0024-68/A
7. Default Stamp Value<br />
Enables the supervisor to define a default postage value (Default<br />
Stamp Value set to the P.O. Specification).<br />
8. Telephone Settings<br />
The telephone numbers of the <strong>Neopost</strong> Credit Re-setting Centre<br />
and Helpdesk are stored in the postage meter.<br />
If required, the telephone numbers may be changed. Such a<br />
change may be necessary in case of modification of your telephone<br />
network (for example a new prefix for an external line), or if you are<br />
advised that the number/s have changed.<br />
9. Language<br />
Details Language setting.<br />
10. Report ON<br />
Enables the supervisor to determine report printing mode e.g.<br />
label or external printer (Factory set to label).<br />
11. Firmware Update<br />
<strong>Neopost</strong> Service Only.<br />
Supervisor settings<br />
69<br />
4128500V/B<br />
01/02/2006<br />
IJ35-0024-69/A
MACHINE SETUP<br />
From the SUPERVISOR menu, move the cursor to the SETUP<br />
option.<br />
Press to confirm.<br />
The following screen will now be observed:<br />
SETUP<br />
ESC<br />
1 HIGH VALUE 1.00<br />
2 LOW CREDIT 50.00<br />
3 TIME 09:50<br />
4 SLEEP MODE 10<br />
5 MOTOR TIME OUT LONG<br />
OK<br />
High Value<br />
From the SETUP screen select HIGH VALUE and press<br />
confirm, the following screen will be observed:<br />
to<br />
VALEUR HIGH VALUE HAUTE<br />
€ 0.00<br />
ESC<br />
OK<br />
To return to the SETUP menu with the original value unchanged,<br />
press .<br />
To change the High Value, enter the new value (with no point or<br />
comma, e.g. 100 corresponds to 1.00), then press to confirm.<br />
To return to the Supervisor screen press twice.<br />
Low Credit<br />
From the SETUP screen select LOW CREDIT and press to<br />
confirm, the following screen will be observed:<br />
PE LOW MODE CREDIT<br />
VEILLE<br />
0.000<br />
ESC<br />
OK<br />
70<br />
Supervisor settings<br />
4128500V/B<br />
01/02/2006<br />
IJ35-0024-70/A
To return to the previous screen with the original value unchanged,<br />
press .<br />
To change the Low Credit Threshold, enter the new value (with no<br />
point or comma, e.g. 5000 corresponds to 50.00), then press<br />
to confirm.<br />
To return to the Supervisor screen press twice.<br />
Time<br />
From the SETUP screen select TIME and press to confirm,<br />
the following screen will be observed:<br />
NUMEROTE<br />
PATIENTEZ TIME SVP<br />
- - : - -<br />
ESC<br />
OK<br />
To return to the previous screen with the Time Setting unchanged,<br />
press .<br />
To change the Time Setting, enter the new value, (with no point or<br />
comma, e.g.:1345 corresponds to 1.45 pm, maximum variance<br />
in accordance with P.O. Specification), then press to<br />
confirm.<br />
To return to the Supervisor Ready screen press twice.<br />
Sleep Mode<br />
From the SETUP screen select SLEEP MODE and press<br />
to confirm, the following screen will be observed:<br />
TRANSFERT<br />
NUMEROTE<br />
PATIENTEZ SLEEP MODE<br />
SVP<br />
0<br />
ESC<br />
OK<br />
To return to the previous screen with the original value unchanged,<br />
press .<br />
Supervisor settings<br />
71<br />
4128500V/B<br />
01/02/2006<br />
IJ35-0024-71/A
To change the Time Out period, enter the new value (with no point<br />
or comma, e.g. 5 corresponds to 5 minutes), then press to<br />
confirm.<br />
To return to the Supervisor Ready screen press twice.<br />
Motor Timeout<br />
From the SETUP screen select MOTOR TIMEOUT and press<br />
to confirm, the following screen will be observed:<br />
MOTOR TIMEOUT<br />
1 LONG<br />
2 MEDIUM<br />
3 SHORT<br />
ESC<br />
OK<br />
To return to the previous screen with the Setting unchanged, press<br />
.<br />
Use the and keys to change the setting, then press<br />
to confirm.<br />
To return to the Supervisor Ready screen press twice.<br />
Key Beep<br />
From the SETUP screen select KEY BEEP and press<br />
confirm, the following screen will be observed:<br />
to<br />
KEY BEEP<br />
1 ON<br />
2 OFF<br />
ESC<br />
OK<br />
To return to the previous screen with the Setting unchanged, press<br />
.<br />
Use the and keys to change the setting, then press<br />
to confirm.<br />
To return to the Supervisor screen press twice.<br />
72<br />
Supervisor settings<br />
4128500V/B<br />
01/02/2006<br />
IJ35-0024-72/A
Default Stamp Value<br />
From the SETUP screen select DEFAULT STAMP VALUE and<br />
press to confirm, the following screen will be observed:<br />
DEFAULT STAMP VALUE<br />
0.00<br />
ESC<br />
OK<br />
To return to the SETUP menu with the original value unchanged,<br />
press .<br />
To change the DEFAULT STAMP VALUE, enter the new value<br />
(with no point or comma, e.g. 27 corresponds to 27 cent), then<br />
press to confirm.<br />
To return to the Supervisor screen press twice.<br />
Telephone Settings<br />
The telephone number of the <strong>Neopost</strong> credit re-setting centre is<br />
stored in your franking machine. This is used when you want to<br />
purchase credit.<br />
Modification of the telephone number is permitted only by the<br />
supervisor. Such a setting may be necessary in case of modification<br />
of your telephone network (for example a new prefix for an<br />
external line), or if you are advised that the <strong>Neopost</strong> Center number<br />
has changed.<br />
Supervisor settings<br />
73<br />
4128500V/B<br />
01/02/2006<br />
IJ35-0024-73/A
Telephone Number Change<br />
From the SETUP screen select TELEPHONE SETTINGS and<br />
press to confirm, the following screen will be observed:<br />
TELEPHONE SETTINGS<br />
1 SERVER NO. 09063420342<br />
2 HELPDESK NO. 01708714111<br />
3 REMOTE NO. NONE<br />
4 PREFIX NONE<br />
5 PAUSE 0<br />
ESCAPE<br />
If you are advised of a telephone number change, move the cursor<br />
to the number to be changed (e.g. 1 SERVER NUMBER) and<br />
press to confirm, the following screen will now be observed:<br />
OK<br />
SERVER NO.<br />
ESC<br />
To return to the SETUP menu with the telephone number<br />
unchanged, press .<br />
Or enter the new number using the numeric key pad, then press<br />
to confirm.<br />
Changes to Prefix, Pause, Tone Detect and Dial Delay<br />
Settings<br />
PREFIX If your outside line is routed through a<br />
switchboard, telephone numbers must be prefixed by the<br />
appropriate outside line digit (for most systems this is a 9 or a 0).<br />
PAUSE With some telephone networks it may be<br />
necessary to enter a pause<br />
between the outside line digit and the telephone number.<br />
TONE DETECT You may wish to wait for a dial tone to be<br />
detected before dialling out.<br />
DIAL DELAY You may wish to enter a delay between<br />
dialling attempts (in seconds).<br />
OK<br />
74<br />
Supervisor settings<br />
4128500V/B<br />
01/02/2006<br />
IJ35-0024-74/A
Using the and keys, or the appropriate number key,<br />
move the cursor to make a selection and press to confirm, the<br />
following typical screen will be observed:<br />
PREFIX<br />
NONE<br />
ESC<br />
OK<br />
Using the numerical key pad enter your prefix and press to<br />
confirm.<br />
Or, to return to the TELEPHONE SETTINGS screen with the prefix<br />
unchanged press .<br />
14.5 Texts<br />
Starting from the SUPERVISOR menu, move the cursor to the<br />
TEXT option.<br />
Press to confirm.<br />
The following screen will now be observed:<br />
TEXT<br />
ESC<br />
1<br />
2<br />
3<br />
4<br />
5<br />
OK<br />
Supervisor settings<br />
75<br />
4128500V/B<br />
01/02/2006<br />
IJ35-0024-75/A
Using the and keys, or the appropriate number key,<br />
move the cursor to the message you wish to set and press<br />
to confirm, the TEXT screen will be observed:<br />
TEXT<br />
A BCDEFGH I JK LMNOPQRST<br />
UVW X Y Z - # & £ / + $ .€<br />
Use the , and keys to move the cursor to the<br />
character to be defined.<br />
Press and hold keys to scroll cursor.<br />
The key is used to confirm the selection and move the cursor<br />
to the next character.<br />
To delete a character press .<br />
To enter numbers in the text use the numeric keypad, you do not<br />
need to press the key to confirm selection when entering<br />
numbers.<br />
A text is limited to two lines of 16 characters including spaces.<br />
To return to the previous screen with the text message unchanged<br />
press until the screen changes to the previous one.<br />
To confirm your entry press .<br />
To Change a Text Message, select TEXT as described above.<br />
Using the key, delete characters of the old text message. Press<br />
as many times as required to erase the message completely,<br />
then enter the new message as previously detailed.<br />
NEXT<br />
76<br />
Supervisor settings<br />
4128500V/B<br />
01/02/2006<br />
IJ35-0024-76/A
14.6 Memory Cards<br />
The following memory cards are currently available from <strong>Neopost</strong><br />
or <strong>Neopost</strong> representative:<br />
Message/Slogan Cards (one message per card)<br />
Rate Card (when postal rates change) in accordance<br />
with P.O. Specification<br />
Town Card (if you move to a different postal area) in<br />
accordance with P.O. Specification<br />
14.6.1 How To Load Data Using a Memory Card<br />
The following example illustrates the loading of a slogan, (remember<br />
only 2 customised slogans can be stored in the machine at any one<br />
time).<br />
1. From the SUPERVISOR screen select LOAD FROM<br />
MEMORY CARD and press to confirm, the following screen<br />
will be observed:<br />
INSERT CARD<br />
ESC<br />
Insert the memory card face<br />
uppermost into the card reader,<br />
on the right hand side of the<br />
machine as illustrated:<br />
OK<br />
2. Press to confirm.<br />
The name of the slogan will now be observed:<br />
LOAD FROM MEMORY CARD<br />
1 SLOGAN NAME<br />
ESC<br />
To return to the previous screen press .<br />
OK<br />
Supervisor settings<br />
77<br />
4128500V/B<br />
01/02/2006<br />
IJ35-0024-77/A
3. Press to initiate the downloading operation:<br />
On completion of the downloading process the following screen<br />
will be observed:<br />
LOADING FROM MEMORY CARD<br />
LOADING COMPLETE<br />
ESC<br />
Once all slogan memory locations are full, you will be asked to<br />
select a file to replace.<br />
14.6.2 How To Replace Data Using a Memory Card<br />
Repeat operations 1 and 2 then:<br />
Press to confirm.<br />
The following display will now be observed:<br />
REPLACE FILE<br />
ESC<br />
1 SLOGAN NAME 1<br />
2 SLOGAN NAME 2<br />
3 SLOGAN NAME 3<br />
4 SLOGAN NAME 4<br />
5 SLOGAN NAME 5<br />
OK<br />
If you do not wish to replace a file, press twice to return to<br />
the Supervisor screen.<br />
If you wish to replace a file, use the and keys, or the<br />
appropriate number key to move the cursor to the slogan to be<br />
replaced.<br />
Now press to initiate the downloading operation, the<br />
following screens will now be observed:<br />
LOADING...<br />
and<br />
ERASING FILE...<br />
SLOGAN NAME 1<br />
78<br />
Supervisor settings<br />
4128500V/B<br />
01/02/2006<br />
IJ35-0024-78/A
On completion of the downloading process the following screen will<br />
be observed:<br />
LOADING FROM MEMORY CARD<br />
LOADING COMPLETE<br />
ESC<br />
To return to the Supervisor screen press<br />
twice.<br />
14.7 Reports<br />
Supervisor Reports can be printed using your franking machines<br />
own printer (printed on self adhesive labels) or by connection to an<br />
approved external printer. Your IJ35/45 has been factory set for<br />
internal (LABEL) printing, to select external (PRINTER) printing,<br />
see below.<br />
14.7.1 Typical Reports<br />
DEPARTMENT REGISTERS<br />
NAME ACCOUNT TOTE<br />
LAST RESET<br />
ITEMS<br />
EXAMPLE 1 8.52<br />
00/00/00 18<br />
14.7.2 Printing a Report<br />
Starting from the SUPERVISOR menu, move the cursor to the<br />
REGISTERS option.<br />
Press<br />
to confirm.<br />
Supervisor settings<br />
79<br />
4128500V/B<br />
01/02/2006<br />
IJ35-0024-79/A
The following screen will now be observed:<br />
REGISTERS<br />
1 MAIN REGISTERS<br />
2 SET UP<br />
3 DEPARTMENT REGISTERS<br />
4 EVENTS<br />
ESC<br />
OK<br />
Using the and keys, or the appropriate number key,<br />
select a register option from the list and press to confirm.<br />
e.g. DEPARTMENT REGISTERS:<br />
DEPARTMENT REGISTERS<br />
NAME<br />
ACCOUNT<br />
LAST RESET<br />
TOTE<br />
ITEMS<br />
EXAMPLE 1<br />
00/00/00<br />
ESC<br />
0.00<br />
0<br />
PRINT<br />
The and keys may be used to view department<br />
registers in blocks of four registers to each screen.<br />
To print department registers press , if the method of print is<br />
set to LABELS, the following screen will be observed:<br />
REPORTS<br />
10<br />
15/01/2002<br />
PRINTING……..<br />
On completion of printing, the DEPARTMENT REGISTERS<br />
screen will be observed.<br />
80<br />
Supervisor settings<br />
4128500V/B<br />
01/02/2006<br />
IJ35-0024-80/A
If the method of print is set to EXTERNAL PRINTER, please refer<br />
to Printing with External Printer below.<br />
To change the method of print please refer to Setting the<br />
Print Destination below.<br />
Press to return to the REGISTERS screen.<br />
To return to Supervisor screen press twice.<br />
14.7.3 Setting the Report Destination<br />
From the SETUP screen select REPORT ON and press<br />
confirm, the following screen will be observed:<br />
to<br />
REPORT ON<br />
1 LABELS<br />
2 EXTERNAL PRINTER<br />
ESC<br />
OK<br />
Using the and keys, or the appropriate number key,<br />
move the cursor to make a selection and press to confirm.<br />
Or, to return to the SETUP screen with the print destination<br />
unchanged press .<br />
14.7.4 Printing with External Printer<br />
Before proceeding to print registers using an external printer<br />
ensure that the printer lead is connected to the Upper Accessory<br />
Port at the back of the machine, (please refer to "Controls and<br />
Features") and that the printer power lead is connected to an<br />
adjacent power outlet.<br />
Supervisor settings<br />
81<br />
4128500V/B<br />
01/02/2006<br />
IJ35-0024-81/A
Set the printer to ON and the status to ONLINE.<br />
From your selected registers screen, press<br />
screen will now be observed:<br />
, the WAIT<br />
PLEASE WAIT…...<br />
After a short period of time, the screen will return to DEPARTMENT<br />
REGISTERS and the registers will have been printed.<br />
There is no external printer feedback to your franking<br />
machine, therefore if the DEPARTMENT REGISTERS<br />
screen does not re-appear after a few seconds and the<br />
printer does not print, re-check all printer connections<br />
and ensure that the printer status is set to ONLINE.<br />
PRINTER INFORMATION<br />
The output from the IJ35/45 is serial therefore it will only operate<br />
correctly with a serial printer. Alternatively connect a serial to<br />
parallel converter to the IJ35/45 and then connect a parallel printer<br />
to the converter. (Suitable printers and converters can be<br />
purchased from <strong>Neopost</strong> Ltd.) Please use the following Printer<br />
settings.<br />
Baud Rate 9600<br />
Data<br />
8 Bits<br />
Xon/Xoff Control<br />
ON<br />
Carriage Return & Line Feed ON<br />
Interface Selection<br />
Serial Interface<br />
CSF Mode<br />
OFF<br />
Parity Selection<br />
No Parity<br />
For further information about printer compatibility, please contact<br />
<strong>Neopost</strong> or <strong>Neopost</strong> representative.<br />
82<br />
Supervisor settings<br />
4128500V/B<br />
01/02/2006<br />
IJ35-0024-82/A
15. TROUBLE SHOOTING<br />
PROBLEM<br />
IJ35/45 will not start:<br />
The printer does not<br />
operate:<br />
The Autofeed does not<br />
operate:<br />
The machine does not<br />
print:<br />
Poor print quality:<br />
Envelopes not fed<br />
properly or fed double:<br />
SOLUTION<br />
Is the IJ35/45 connected to the power<br />
supply<br />
Is the main power outlet switch set to<br />
ON<br />
Is the machine Top Cover properly<br />
closed<br />
Check plug fuse (5A) if there is one.<br />
Check machine fuse (1.6A).<br />
Is the printer switched to ON<br />
Is the printer connected to the power<br />
supply<br />
Is the main power outlet switch set to<br />
ON<br />
Is the printer connected to IJ35/45<br />
Check plug fuse.<br />
Have you selected the correct print<br />
mode (please see "Setting the report<br />
destination).<br />
Check the connection to the IJ35/45<br />
(please see "Machine connections").<br />
Check that you have made the correct<br />
Print Mode Selection (please<br />
see "Printing options").<br />
Did you remove the protective tape<br />
from the Ink Cartridge before fitting<br />
(please see "Replacing an ink<br />
cartridge").<br />
Clean the Inker (please see "Cleaning<br />
the ink cartdridge").<br />
Autofeed incorrectly loaded (please<br />
see "Postage printing with autofeed")<br />
Trouble shooting<br />
83<br />
4128500V/B<br />
01/02/2006<br />
IJ35-0024-83/A
Check the scale connection.<br />
(please see "Machine connec-<br />
tions").<br />
Labels do not feed properly:<br />
The scale does not<br />
communicate with the<br />
machine:<br />
Avoid leaving the labels in the<br />
machine for too long.<br />
Avoid overloading the dispen<br />
ser (50 max).<br />
Ensure labels are fed correctly<br />
(please see "Franking labels").<br />
"NO DIAL TONE<br />
CHECK CONNECTION<br />
& RETRY”.<br />
Refer to "Machine Connections<br />
Check the modem cable is<br />
connected to the rear of the machine.<br />
The telephone line may not be<br />
available.<br />
Try another telephone line (analogue<br />
only).<br />
Call <strong>Neopost</strong> or <strong>Neopost</strong><br />
representative if the above<br />
actions do not solve the<br />
problem.<br />
84<br />
Trouble shooting<br />
4128500V/B<br />
01/02/2006<br />
IJ35-0024-84/A
15.1 Clearing a mail jam from the autofeeder<br />
Envelope misfeed<br />
In the unlikely event of an envelope misfeed, the following procedure<br />
must be followed:<br />
WARNING!<br />
POWER DOWN MACHINE BEFORE CONTINUING.<br />
DO NOT RUN MACHINE WITH FEED MECHANISM OPEN<br />
1. Remove all free envelopes from the feed tray;<br />
2. Open the Autofeed top cover;<br />
3. Using the thumb and fore finger,<br />
squeeze the sliders to release the<br />
feed mechanism as illustrated;<br />
4. Remove the obstruction;<br />
5. Close the feed mechanism by<br />
applying downwards pressure<br />
to the top of the feed mechanism<br />
until it is heard to click home;<br />
6. Close the Autofeed top cover;<br />
7. Power Up your machine.<br />
You are now ready to resume franking your mail<br />
15.2 Clearing error messages<br />
In the unlikely event of an error message being displayed, the<br />
following procedure must be followed:<br />
ERROR MESSAGES REMEDY<br />
Error 1 to Error 43 Press until back to <strong>User</strong> screen.<br />
If the Error does not clear, please call our Customer Care Centre.<br />
(please see Telephone No.on "Contacting <strong>Neopost</strong>")<br />
Trouble shooting<br />
85<br />
4128500V/B<br />
01/02/2006<br />
IJ35-0024-85/A
17. QUICK REFERENCE GUIDE<br />
HOW TO<br />
Enter Department/<strong>User</strong> Mode USER PIN To Dept Choice DEPT PIN<br />
Enter PIN (e.g. 1 2 3 4 )<br />
Set Value (e.g. 27 cent)<br />
Confirm High Value<br />
(e.g. 175 cent) Are you sure<br />
Set Print Mode To Choice<br />
Select Slogan Slogan To Choice<br />
Select Text Message Text Message To Choice<br />
Advance Date Date Advance Advanced Date<br />
Print Label Label Quantity<br />
Recall Memorised Jobs Memory 1 to 5<br />
Recredit (e.g. 50.00) Credit PIN<br />
Display Registers Registers To Choice<br />
To Print Registers As Registers<br />
86<br />
Quick reference guide<br />
4128500V/B<br />
01/02/2006<br />
IJ35-0024-86/A
IJ-35/45<br />
FRANKING MACHINE<br />
USER'S GUIDE<br />
4128500V/C<br />
23/09/2009 IJ35-0023-01
<strong>Product</strong>s presented in this guide are conform<br />
to requirements of directives nbr 73/23/CEE<br />
and 89/336/CEE (Europe only).<br />
Your franking machine is Energy Star<br />
compliant: it helps you to save energy and<br />
money while protecting the environment.<br />
<strong>Neopost</strong> has implemented a program for the<br />
recycling of worn franking machines and machines<br />
at the end of their lifetime. Contribute in<br />
a responsible way to the environmental protection<br />
by consulting your retailer internet site,<br />
or by contacting him. He will inform you of the<br />
collection and treatment processes of these<br />
machines (Europe only).<br />
4128500V/C<br />
23/09/2009<br />
IJ35-0023-03
4128500V/C<br />
23/09/2009 IJ35-0023-04<br />
Edition 23/09/2009 - 4128500V/C