User Guide DS-100 Product(range) - Neopost
User Guide DS-100 Product(range) - Neopost
User Guide DS-100 Product(range) - Neopost
Create successful ePaper yourself
Turn your PDF publications into a flip-book with our unique Google optimized e-Paper software.
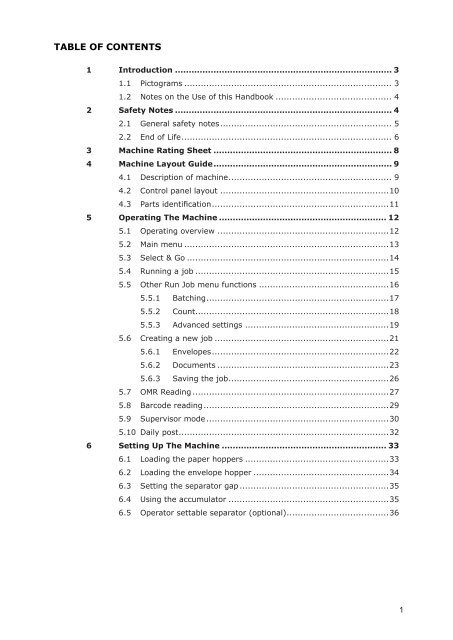
Table of Contents<br />
1 Introduction................................................................................ 3<br />
1.1 Pictograms............................................................................ 3<br />
1.2 Notes on the Use of this Handbook........................................... 4<br />
2 Safety Notes................................................................................ 4<br />
2.1 General safety notes.............................................................. 5<br />
2.2 End of Life............................................................................ 6<br />
3 Machine Rating Sheet.................................................................. 8<br />
4 Machine Layout <strong>Guide</strong>................................................................. 9<br />
4.1 Description of machine........................................................... 9<br />
4.2 Control panel layout..............................................................10<br />
4.3 Parts identification................................................................11<br />
5 Operating The Machine.............................................................. 12<br />
5.1 Operating overview...............................................................12<br />
5.2 Main menu...........................................................................13<br />
5.3 Select & Go..........................................................................14<br />
5.4 Running a job.......................................................................15<br />
5.5 Other Run Job menu functions................................................16<br />
5.5.1 Batching..................................................................17<br />
5.5.2 Count......................................................................18<br />
5.5.3 Advanced settings.....................................................19<br />
5.6 Creating a new job................................................................21<br />
5.6.1 Envelopes................................................................22<br />
5.6.2 Documents...............................................................23<br />
5.6.3 Saving the job..........................................................26<br />
5.7 OMR Reading........................................................................27<br />
5.8 Barcode reading...................................................................29<br />
5.9 Supervisor mode ..................................................................30<br />
5.10 Daily post............................................................................32<br />
6 Setting Up The Machine............................................................. 33<br />
6.1 Loading the paper hoppers.....................................................33<br />
6.2 Loading the envelope hopper..................................................34<br />
6.3 Setting the separator gap ......................................................35<br />
6.4 Using the accumulator...........................................................35<br />
6.5 Operator settable separator (optional).....................................36<br />
1
7 Operator Maintenance............................................................... 37<br />
7.1 Clearing paper crashes..........................................................37<br />
7.2 Cleaning rollers and sensors...................................................39<br />
7.3 Maintaining the wetting system...............................................43<br />
8 Document orientation tables..................................................... 44<br />
9 General Specifications............................................................... 46<br />
9.1 Form Sizes...........................................................................47<br />
9.2 Insert Feeder Unit.................................................................49<br />
9.3 Envelope Specification...........................................................50<br />
9.4 Mechanical & Electrical ..........................................................52<br />
9.5 Machine Dimensions..............................................................54<br />
10 High Capacity Conveyor CS-2.................................................... 55<br />
2
1 Introduction<br />
With this inserter you have an advanced, medium-volume folding and inserting machine.<br />
Its modular construction allows up to 8 feed units to be fitted, with a maximum of 17 feed<br />
trays. Sophisticated software control optimises the order and flow of documents for collating<br />
at the insert head before insertion into the envelope. All fold and adjustments take place<br />
automatically according to the requirements programmed in by the operator.<br />
In order to ensure the long usage of this machine and its components, and<br />
above all the safe use of the machine, you must read and adhere to the<br />
operating instructions and safety notes. Always be aware of all warnings and<br />
notes that are mounted or noted on the machine itself.<br />
All persons entrusted with the handling of this machine must also be familiar with the<br />
operating manual.<br />
Save this handbook carefully, so that the information it contains may be available at all<br />
times.<br />
1.1 Pictograms<br />
General Warnings<br />
Warning of danger from electricity or electrical shock<br />
Information / Note indicating important information regarding the handling of<br />
the machine.<br />
3
1.2 Notes on the Use of this Handbook<br />
This document contains all general information and explanatory text necessary in order to<br />
be able to carry out the operation of the machine.<br />
When some action is expected from the operator, this will always be explicitly stated, and<br />
where relevant, accompanied by an illustration or graphic.<br />
Always read through each step, so that you will obtain all of the necessary information. Do<br />
not anticipate what you believe will follow in the handbook: It will prevent you from making<br />
mistakes!<br />
Chronology and Reference<br />
This handbook is structured chronologically, and therefore ordered sequentially for the<br />
operationally ready machine. It assumes that the machine has been installed in the<br />
correct environment by an Authorised Service Engineer and that the operator or his or her<br />
supervisor has had a degree of operator training.<br />
When you are unfamiliar with the machine, it is best to read through the handbook from<br />
beginning to end. You will be guided step by step, and in this way you can easily and quickly<br />
have the machine in operation.<br />
If you are already familiar with the machine, it will make thing easy if you use this<br />
handbook as a reference work.<br />
2 Safety Notes<br />
For your own safety and the operating safety of the machine, read the following notes<br />
carefully before starting your machine. Always be aware of all warnings and notes that<br />
are mounted or noted on the machine itself. Save this handbook carefully, so that the<br />
information it contains may be available at all times.<br />
The machine is of advanced construction and reliable in operation.<br />
Nevertheless, the device does present hazards when operated by untrained personnel. The<br />
same applies to use that is inappropriate and not in keeping with its intended purpose.<br />
In not adhering to this handbook, there is the danger of<br />
• an electrical shock,<br />
• injuries from the intake at the rotating rollers,<br />
• damage to the machine.<br />
4
2.1 General safety notes<br />
Caution!<br />
Please, read these notes with care.<br />
Save these instructions for later use.<br />
All notes and warnings found on the machine are to be followed.<br />
Installing<br />
the<br />
machine<br />
Important! The machine must be installed only by an Authorised<br />
Service Engineer. A safe, level position is necessary, when installing the<br />
machine, with sufficient space all round to operate it. The machine is to be<br />
protected from moisture. If moving the machine, ensure that the castor<br />
brakes are off, and push on the stand, not the machine.<br />
Ensure there is at least 1 metre of free space between the operator side of<br />
the machine and a wall or barrier. To provide access to the mains switch, the<br />
opposite side of the machine must be at least 150mm from a wall or barrier.<br />
Do not place surrounding furniture or other objects where your path may be<br />
obstructed.<br />
Electrical<br />
danger<br />
Operating<br />
safety<br />
Cleaning<br />
the<br />
machine<br />
Cleaning<br />
sensors<br />
The machine may only be connected to a voltage of 230V/50Hz or 115V/60<br />
Hz,depending upon model.<br />
The mains plug may only be connected with a socket having an installed<br />
protective contact! The protective effect will be compromised by the use of<br />
an extension line without a protective grounding conductor. All interruptions<br />
of the protective grounding conductor, within or outside of the machine,<br />
are prohibited. The device is double pole fused! When fuse failure occurs,<br />
electrical machine parts can still carry voltage. When making the connection<br />
to the mains power, be aware of the connection values on the nameplate.<br />
Inspect the voltage setting on the device’s power input module. Run the<br />
supply lines in such a way, that no-one may trip over them. Do not place any<br />
objects upon the supply line. When the machine is not in use over a long<br />
period of time, it should be disconnected from the power supply. In this way,<br />
damage would be prevented in the event of excess voltage. Protect the device<br />
from moisture. When moisture enters the machine, there is the danger of<br />
electrical shock. Never open the machine except the top cover. For reasons<br />
of electrical safety, the machine may only be opened by authorized Service<br />
Agents.<br />
Never reach into the machine when it is running! This could only occur if a<br />
safety interlock were to fail.<br />
The danger of injuries exists, through pulling in and crushing on the rotating<br />
rollers. In addition, keep long hair and parts of loose clothing far from the<br />
machine in operation. If a safety interlock fails, your Service Agent must<br />
be contacted immediately!<br />
In order to prevent damage to the machine, only factory authorized accessory<br />
parts should be used.<br />
Prior to cleaning the exterior of the machine, it should be disconnected from<br />
the power supply. When cleaning the machine, do not use liquid or spray<br />
cleaners, but only a cloth dampened with water.<br />
When cleaning sensors use only non-flammable airdusters, eg. part number<br />
E0070A. Other types may use flammable propellants, which could result in fire<br />
or explosion.<br />
5
Allow<br />
machine<br />
to be<br />
checked<br />
by the<br />
Service<br />
Agent<br />
Spare<br />
Parts<br />
Repairs<br />
In the following cases, the mains plug must be unplugged and the device<br />
left for the authorized Service Agents:<br />
• When the mains cable or plug is worn or damaged.<br />
• When water or other liquid has entered the device.<br />
• When the device does not function properly, in spite of<br />
following the instructions provided.<br />
• When the device has fallen down or the housing is<br />
damaged.<br />
• When there are noticeable differences in the normal<br />
operation of the machine.<br />
When repair work is carried out, only original spare parts or spare parts<br />
corresponding to the original parts may be used.<br />
Do not disassemble the machine any further than is described in this<br />
handbook. Other than the top cover, the opening of the machine by<br />
unauthorized personnel is not permitted. Repairs may only be carried out<br />
by an authorized Service Agent.<br />
Modification is not permitted:<br />
For safety reasons, your own reworking and modifications are not<br />
permitted.<br />
2.2 End of Life<br />
Please contact your Service Agent, for all questions relating to service and<br />
repair. In this way, you ensure the operational safety of your machine.<br />
The objectives of the European Community’s environment policy are, in particular, to<br />
preserve, protect and improve the quality of the environment, protect human health and<br />
utilise natural resources prudently and rationally. That policy is based on the precautionary<br />
principle and principles that preventive action should be taken, that environmental damage<br />
should as a priority be rectified at source.<br />
Separate collection of waste is the precondition to ensure reuse and recycling of waste that<br />
is generated at the disposal of electrical or electronic equipment and is necessary to achieve<br />
the chosen level of protection of human health and the environment in the European<br />
Community.<br />
More particularly, certain materials and components of waste electrical and electronic<br />
equipment needs selective treatment as their injudicious handling or disposing of on or into<br />
land, water or air would represent a major threat to the environment and human health.<br />
6
In order to facilitate collection and treatment separated from normal domestic waste,<br />
electrical and electronic equipment is marked with the following logo:<br />
Do not mix with normal domestic waste.<br />
Please use the subjoined return or<br />
collection system dedicated to electrical<br />
and electronical waste.<br />
Equipment produced after<br />
August 13, 2005<br />
Not only are you by law not allowed to dispose of the waste equipment via other wastestreams,<br />
but we encourage you to actively contribute to the success of such collection and<br />
to the common good and better quality of life of present and future generations.<br />
For more information on the correct disposal of this product please contact your local dealer.<br />
7
3. Machine rating sheet<br />
1. CAUTION: In order to ensure correct safety and operation, this machine must<br />
only be installed and maintained by an authorized Service Engineer.<br />
2. CAUTION: Should any cover or safety interlock be damaged, the machine must<br />
not be used until service repairs have been completed.<br />
3. CAUTION: This machine must be earthed. The wire colours in the mains<br />
power cord are:<br />
(Green/Yellow 230v) (Green 115v) which must be connected to Earth (Ground).<br />
(Blue 230v) (White 115v)<br />
which must be connected to Neutral.<br />
(Brown 230v) (Black 115v) which must be connected to Live (Line).<br />
4. CAUTION: This machine must not be used if the power cord becomes damaged.<br />
It must be replaced with a similar power cord:<br />
(Part No. 162-311 Euro, 162-210 UK, 162-321 US).<br />
5. CAUTION: For continued protection against risk of fire, replace with same type<br />
and rating of fuse. The fuse rating/type for this machine is :<br />
T 6.3 A Amps 230Volts (Part No. 135-106).<br />
T 10 A Amps 115Volts (Part No. 135-110).<br />
6. Model Details:<br />
Model Name:<br />
<strong>100</strong> series<br />
Model Number: 1430<br />
Input Voltage: 230 Volts @ 50 Hz 115 Volts @ 60 Hz<br />
Input current: 3.5 Amps 7 Amps<br />
Sound Reading: 75dBA 75dBA<br />
(measured at a distance of 1 meter from the nearest cover and a height of 1.6 meters<br />
from the ground)<br />
7. The use for this machine is for collating, folding and inserting documents into an<br />
envelope.<br />
8. The weight of this machine is: 290 kgs (unpackaged)<br />
400 kgs (packaged, with accessories)<br />
Based on a configuration 3 x Feeders and a Tower Folder<br />
Lifting or handling must only be carried out by competent persons using appropriate<br />
means.<br />
8
4 Machine Layout <strong>Guide</strong><br />
4.1 Description of machine<br />
The function of the machine is to feed forms from a number of hoppers, fold them in either<br />
‘C’, ‘Z’, ‘V’ or double forward fold and insert them into an envelope which is then sealed and<br />
ejected. Further form(s) may optionally be collated with the first form, either by folding<br />
together or collating on the track. Inserts (cards, cheques etc.) may also be collated on the<br />
track before inserting. The machine is OMR/Barcode compatible, allowing a group of forms<br />
to be collated in the accumulator prior to folding. Forms may be inserted without sealing<br />
the envelope for subsequent hand insertion of card, gift etc. Multiple insertions may also<br />
be used, ie. a preset number of forms (or combination of forms) are separately inserted<br />
into the collation pocket in the inserter head. There is a batch processing facility, allowing a<br />
preset number of cycles to be completed before the machine automatically stops.<br />
The machine consists of a number of modules, depending upon the build ordered - these<br />
modules are briefly described below:<br />
a) Inserter head - Collates all documents in a pocket before insertion, feeds<br />
the envelope, inserts the pack and seals the flap.<br />
b) Insert Feeder - Feeds shortform inserts (cards, cheques, booklets etc.) onto<br />
the track for subsequent insertion. Available as a single feeder with one feed<br />
hopper, or tower feeder with two feed hoppers. An OMR/Barcode version (with<br />
one feed hopper) is also available.<br />
c) Feeder Folder - Mounts on the track, either in conjunction with a tower<br />
folder (see below) or as the last station. Feeds and folds same size stationery as<br />
a tower folder, but using a 2-plate folding mechanism. An OMR/Barcode version<br />
(with one feed hopper) is also available.<br />
d) Tower Folder - Mounts in the last station position and fitted with either one<br />
or three trays depending upon option. Includes a 3-plate folding mechanism,<br />
handfeed tray and an optional accumulator and/or single divert bin.<br />
The machine has a capacity for 20 programs which allow combinations of settings to be retained<br />
in memory. Any program can then be recalled later and immediately run, and can also be<br />
changed or renamed by the operator. Select & Go, a self-programming facility is also fitted.<br />
This allows a temporary program with reduced settings to be rapidly set up by an untrained<br />
operator, who need only load the stationery into any suitable hopper. For full programs, the<br />
machine’s software decides which hoppers to use, according to the job parameters - the display<br />
then tells the operator where to load the stationery for optimum efficiency and speed.<br />
A daily post function can be used on the handfeed tray built into a tower folder, or as an option<br />
on a feeder folder. This allows groups of documents, stapled or loose, to be hand-fed; they<br />
will then be folded and inserted into an envelope. If other hoppers are loaded, further forms<br />
can be collated.<br />
No manual setting of the fold plates or envelope closer is required, these being adjusted<br />
automatically according to the settings in the selected program.<br />
A Graphical <strong>User</strong> Interface is fitted to the control panel from which all functions and programming<br />
operations are performed and which also provides advice messages should errors occur.<br />
An optional output conveyor can be specified, to replace the standard receiving tray. This is<br />
available in two lengths<br />
9
4.2 Control panel layout<br />
Help button Scroll up Enter/Select button Run button<br />
button<br />
Exit button<br />
Scroll down button<br />
Display<br />
Stop button<br />
EXPLANATION OF BUTTONS<br />
Help button:<br />
Provides context-sensitive Help at any time. Help information<br />
displayed will match what you are doing when you press the<br />
button.<br />
Scroll up/down buttons:<br />
Scrolls display up or down on the screen, and adjusts speed<br />
when running. To accept or modify settings, press the Enter<br />
button (see below). Some settings provide a list of options -<br />
use the Scroll buttons to select your choice and press Enter<br />
again.<br />
Enter button:<br />
Selects a setting when highlighted on the display.<br />
Run button:<br />
Starts the machine operating when in ‘Run’ mode.<br />
Exit button:<br />
Steps back to the previous display. Also use it to take you<br />
back if you make a mistake.<br />
Stop button:<br />
Stops the machine operating after completing the insertion<br />
currently in progress.<br />
Display:<br />
The graphic on the display will reflect the action that the<br />
machine is performing, either in operating or editing mode.<br />
10
4.3 Parts identification<br />
Daily post tray<br />
Control panel<br />
Insert feeders<br />
Tower folder<br />
(see below)<br />
Insert/collate area<br />
Envelope hopper<br />
Note: Station 1 is the first<br />
feed unit after the insert/<br />
collate area.<br />
Filled envelope<br />
tray<br />
Storage cupboards<br />
Tower Folder<br />
Feed trays<br />
(either 3 or 1)<br />
Accumulator<br />
(optional)<br />
Forms diverter<br />
(optional)<br />
Accumulator sideguide<br />
11
5 Operating The Machine<br />
5.1 Operating overview<br />
Shown below is a brief summary of the operating procedure of the machine. Full details of the<br />
functions referred to can be found in the section numbers indicated.<br />
Other functions<br />
1. Load document and/or insert hoppers (page 33).<br />
2. Load envelope hopper (page 34).<br />
3. To run a pre-programmed job, see page 15.<br />
4. To quickly set up a one-off program using Select & Go, see page 14.<br />
5. To fully program a new job, see page 21, or to modify an existing job, see<br />
page 16.<br />
Further additional features include:<br />
Menu Explanations<br />
i) Daily post (to fold and insert documents or groups of documents<br />
which may vary in size or type) - see page 32.<br />
There are a number of screens on the machine, showing either menus or lists. These are<br />
described in on the pages shown below:<br />
Main menu see page 13<br />
Select & Go screen see page 14<br />
Run screen see page 15<br />
Create Job menu see page 21<br />
Save screen see page 26<br />
OMR menu see page 27<br />
Barcode menu see page 29<br />
Supervisor menu see page 30<br />
12
Read this first:<br />
Throughout this section, selections are made using the button after using the Scroll<br />
Up/Down buttons to reach the option. Options that have a scroll box are changed by first<br />
pressing to highlight the box, then using the Scroll Up/Down buttons to change the<br />
setting. Press again to finish. The x button aborts the changes in any menu and returns<br />
you back one step.<br />
5.2 Main menu<br />
When the machine first starts, the Main Menu is displayed as shown*<br />
For full details of each menu option, see the following sections:<br />
Select & Go see page 14<br />
Run Job see page 15<br />
New Job see page 21<br />
Supervisor see page 30<br />
Note that on-screen help is available at any time by pressing the button, or by selecting<br />
‘Help’ from the menu above. This will be specific to what you are doing when the button is<br />
pressed.<br />
* Main Menu is the default startup mode. It is possible to change this in Supervisor menu<br />
(see page 30) so that the machine starts up in other modes.<br />
13
5.3 Select & Go<br />
Select & Go is a rapid method of setting up a job without the need for full programming.<br />
You as the user decide which hoppers to load - the machine’s software then automatically<br />
creates a simplified programme. First select the fold type and press . Load the hoppers<br />
and press again. This takes you to the Run screen - press the Start button to calibrate<br />
the machine and begin running. See section 5.4 on the following page for details of<br />
calibrating the machine.<br />
Points to note:<br />
1. You must load each hopper with the default size form set for that hopper (see<br />
Supervisor menu on page 30 for details on setting defaults).<br />
2. For folded documents, the fold type will be the default setting for that hopper.<br />
3. The prime (address) document must be in the hopper furthest from the insert<br />
head, eg. if the lower and middle hoppers are loaded on a tower folder module,<br />
the prime document must be the middle hopper. The prime document must be<br />
loaded address side down and leading for all fold types.<br />
4. There is no OMR or Barcode facility for Select & Go - for this, full programming<br />
by authorised personnel must be used (see page 21).<br />
14
5.4 Running a job<br />
The Run Job menu shows the currently available jobs that have previously been<br />
programmed (or you can run the last job from the Main menu).<br />
The graphic<br />
indicates which<br />
hoppers are active,<br />
and whether a<br />
folded document or<br />
an insert.<br />
Highlight the required job and press to reach the status box, showing the machine is<br />
currently stopped. If using Select & Go, just press , otherwise press the Start button and<br />
the machine will perform a double document calibration cycle and then stop, displaying the<br />
screen shown below.<br />
As the calibration is performed on each loaded hopper, check the filled envelope to confirm<br />
that only one document per hopper has been fed. If in doubt, select ‘Recalibrate’. Also check<br />
the address position in the envelope - if it is too far up or down, this can be adjusted to suit.<br />
Positive numbers move the address upwards. If you adjust the position, select ‘Recalibrate’<br />
to check it is now correct.<br />
If required, the job can also be edited from this screen (see page 16 for full details of<br />
editing a job).<br />
When you are satisfied, select ‘Done’. Press the Start button and the machine will<br />
begin running. Use the Up / Down buttons to adjust the speed if required.<br />
15
5.5 Other Run Job menu functions<br />
From the Run Job menu, select the job you wish to edit and press . This displays the Run<br />
screen, as shown below, which will be in ‘Ready’ mode. Now press x and a list of options will<br />
be shown, described below:<br />
Edit: Enters the same edit mode as described on page 21.<br />
Advanced: Allows adjustments to various machine functions as described on page 19.<br />
Flush Machine: Continues the current cycle until all inserts are in the collate area, then<br />
stops the machine. Note: the machine flushes by default when the Stop button is pressed in<br />
normal running. Using the function in this screen simply forces a flush manually.<br />
Global / Job Count: Explains the count displays, described on page 18.<br />
Batch Count: This is part of the batching function, described on page 17.<br />
16
5.5.1 Batching<br />
Batching allows a preset number of filled envelopes to be processed before the machine<br />
automatically stops. From the Run Job menu, select the job you wish to set a batch for, and<br />
press . This displays the Status screen, which will be in ‘Ready’ mode. Now press x and<br />
a list of options will be shown. Select ‘Batch Count’, and you will enter the batch screen, as<br />
shown below.<br />
Batch settings<br />
apply only to the<br />
job you are in<br />
when settings are<br />
made, not to the<br />
machine itself.<br />
For ‘Batch’, select ‘Auto-restart’ (machine will pause for a set length of time and then restart<br />
- see below for ‘Pause time’) or ‘Pause’ (machine will stop and will only restart when the Run<br />
button is pressed).<br />
Enter the required quantity in the batch.<br />
‘Jog Step’ allows a gap between envelope batches to be set on the conveyor. The units<br />
shown are multiples of the envelope overlap, as adjusted by the knob on the conveyor. This<br />
means a suitable gap can be set without disturbing the knob.<br />
‘Pause Time’ is the number of seconds before the machine auto-restarts.<br />
17
5.5.2 Count<br />
The ‘Count’ function allows the global or job counts shown on the display to be set to<br />
zero. The global count continues to accrue even if you switch to another job; the job count<br />
applies only to the job you are running. To zero either count, stop the job you are running<br />
by pressing the Stop button. This will display the status screen in ‘Ready’ mode, as shown<br />
below.<br />
Job count<br />
Running count<br />
Running output rate<br />
Batch count (where<br />
applicable)<br />
Now press x and a list of options will be shown. Select ‘Global Count’ or ‘Job Count’, and you<br />
will enter the count reset screen:<br />
If you are sure you want to zero the count, press . This will reset the appropriate count<br />
shown above. Note that the machine’s internal count is not reset. This count can be seen in<br />
Supervisor mode (see page 30).<br />
Note: If you zero either either global or job count, this does not affect the batch<br />
count. This will reset at the end of each batch.<br />
18
5.5.3 Advanced settings<br />
Advanced settings allow adjustments to be made to various machine functions. It is specific<br />
only to the job you are in when you make changes, and will be saved with the job,<br />
even when the machine is switched off. Note that this function is password protected.<br />
Warning: Changes made in this function may adversely affect the machine. Use it<br />
only if you know what you are doing!<br />
Collate Pocket Adj.<br />
Adjusts the width of the insert head collate pocket. In steps of<br />
0.1mm.<br />
Fingers Adj.<br />
Adjusts the width of the insert fingers. In steps of 0.1mm.<br />
Start Speed Speed at calibration and first running. Default = 1.<br />
Seal Time<br />
Adjusts time that the filled envelope is held in the closer for<br />
sealing. Note that increasing will slow the machine. In steps of<br />
milliseconds.<br />
Adjust wetter<br />
Adjusts the point at which the wetter beam drops to wet the flap<br />
(+ve = more wetting). In steps of 1mm.<br />
Adjust wetter start Adjustment of the point at which the wetter beam lifts (+ve =<br />
more flap length is wetted). In steps of 1mm.<br />
Adjust env seal stop Adjusts how far into the closer rollers the envelope is fed (+ve =<br />
more infeed). In steps of 1mm.<br />
Adjust env stop pos<br />
Adjusts the envelope stop position at insert (+ve = further<br />
forward). In steps of 1mm.<br />
Insert in env pos.<br />
Adjusts the amount of insertion of the insert pack into the<br />
envelopes (+ve = further in to envelope). In steps of 1mm.<br />
Adjust env rev pos<br />
Adjustment of the amount of envelope foward travel after flap<br />
wetting, before reversing to enter the sealing rollers. +ve =<br />
further forward into the output rollers, towards the exit direction.<br />
19
Maximum folds<br />
Adjusts up or down the maximum number of forms that can be<br />
folded together in a tower folder. If multiples are set to greater<br />
than this number, the multiple will be split into sections. Default<br />
for C, Z or V = 5, max. = 8. Default for double-V = 4. max. = 6.<br />
Addr. on every page<br />
Gives software greater flexibility by allowing, for example, a<br />
group to be split over more than one envelope, or swapping<br />
prime document.<br />
When all changes have been made, select ‘Done’ to return to the Run screen.<br />
20
5.6 Creating a new job<br />
Select ‘New Job’ from the main menu to display the Create screen as shown:<br />
The graphic indicates<br />
where the inserts and<br />
folded documents<br />
should be placed.<br />
Note that it may<br />
be different to that<br />
shown, depending upon<br />
machine configuration<br />
Enter the total number of folded sheets (max. 6), the number of inserts (max. 6), whether<br />
handfeeding is to be used and whether the document is a card carrier(only available<br />
if a card folder is fitted). Note: the possible settings will depend upon the hardware<br />
configuration of the machine - if you attempt to create an ‘illegal’ setup, an error message<br />
will be displayed.<br />
If you select Handfeed, by default the machine will expect the document to be fed into the<br />
handfeed hopper in the folder unit on the last station (when fitted). If a track mounted<br />
folder unit is also fitted, the graphic on the display will indicate which one to use. Select<br />
Card Carrier only if a card folder is fitted to the machine.<br />
Select ‘Done’ when finished to move on to editing the envelope and document settings.<br />
Note: when ‘Done’ is selected, you cannot return to this screen, hence sheets or inserts<br />
cannot later be added to or removed from the job.<br />
21
5.6.1 Envelopes<br />
When you enter the edit screen, the first ‘Edit Item’ shown will be #1 which is the envelope<br />
- higher numbers will be documents (folded sheets or inserts). Press to highlight the<br />
scroll box, then press it again to display the envelope settings.<br />
Select the envelope from the standard <strong>range</strong>, or ‘Custom’ (this allows depth and width to<br />
be set). Choose whether flap is to be sealed always, by OMR select, no seal with flap closed<br />
or no seal with flap open. Select required deskew level (high slows machine more). Select<br />
‘Done when finished to return to the Edit screen. Note: If you wish these settings to be<br />
default, see ‘Supervisor Mode’ on page 30.<br />
22
5.6.2 Documents<br />
Press to highlight ‘Edit item’ scroll box, then use the scroll-up button to select #2 (this is<br />
usually the prime, or address document). Options are explained below.<br />
<br />
The settings that appear may be<br />
fewer than those described below,<br />
depending upon whether the item<br />
is a folded form or an insert. If<br />
a card carrier is selected at the<br />
previous screen, settings shown<br />
here will be slightly different.<br />
Address<br />
Add. Position<br />
Deselect only if #2 is not the address document. Note that #2 is<br />
assumed to be address document, #3 onwards is assumed not to<br />
be.<br />
Options are Top / Middle / Bottom.<br />
Sel. Template<br />
Select from the available list if required. Restore means no<br />
template.<br />
Size<br />
Use a standard size, or ‘Custom’ (this enables length and width<br />
settings).<br />
Feed Count Multiples of the document, up to 8.<br />
Feed Mode<br />
Options are Feed always / OMR or Barcode selects / Off<br />
Packlength<br />
Adjust as required only if calculated setting is not suitable.<br />
Fold Type<br />
Use a standard size, or ‘None’ (this should be selected only if<br />
you have a special job and intend to use advanced settings in<br />
‘View Fold Settings’ (see below).<br />
View Fold Set. Displays your settings and allows custom adjustment if<br />
‘Advanced’ is selected. Note: ‘Advanced’ should only be<br />
used if you have a special job and know what fold-plate<br />
settings are required - inappropriate settings may result<br />
in operating problems. When you have finished with ‘View Fold<br />
Settings’, select ‘Done’ to return to the remainder of the settings.<br />
Feed Orient.<br />
Select Face up (which will be top of form leading) or Face down<br />
(top of form trailing). Default is Face Up which will suit most<br />
jobs.<br />
Fold Mode<br />
‘Together’ means all sheets fed from tower folder unit will be<br />
collated, then folded. ‘Singly’ means sheets will be fed and<br />
folded individually. ‘Via accumulator’ means sheets will feed into<br />
accumulator before folding. Note: options available will depend<br />
upon the actual unit fitted.<br />
Mark read<br />
Options are OMR / Barcode / None. If OMR or Barcode are<br />
selected, you will move to further settings (see below) when you<br />
have finished in the above screen - see sections pages 27 & 29<br />
for full details.<br />
Cascade<br />
If selected, continues to feed from the next hopper down if this<br />
one runs out of paper.<br />
23
Doubles Det.<br />
Detects for double documents. On by default. Deselect only if<br />
you are using unusual stationery that may cause spurious errors<br />
(eg. some sheets heavy, dark text and some almost none).<br />
Deskew Straightens a document if it is skewed. Options are Off/ Low /<br />
Medium / High. If deskew is selected, note that the operating<br />
speed is slowed; a setting of ‘High’ will slow the machine more<br />
than ‘Low’.<br />
Select Hopper You can decide where on the machine this hopper will be located.<br />
If selected, you will move to further settings (see below) when<br />
you have finished in the above screen.<br />
Save As Temp. Saves these settings as a template. If selected, you will move to<br />
further settings (described later) when you have finished in this<br />
screen.<br />
Note: If you wish these settings to be default, see ‘Supervisor Mode’ on page 30.<br />
When all options for #2 have been set, select ‘Done’. Depending upon your settings, further<br />
choices may now need to be made, as decribed below.<br />
Mark reading:<br />
If this was set to OMR or Barcode, the appropriate settings screen will then be displayed.<br />
See page 27 for details of OMR setting, page 29 for Barcode settings.<br />
Select Hopper:<br />
If this was selected, the following screen will be displayed, allowing you to choose which<br />
hopper this item is to be fed from, instead of using machine default. Note that the selected<br />
hopper will be highlighted in the graphic. Select ‘Done’ when finished to return to the edit<br />
screen.<br />
Save As template:<br />
If this was selected, the following screen will be displayed,<br />
allowing you to save the edited item as a template for future<br />
items. Up to four templates can be defined, and when all are<br />
used, you must replace an existing template to save the new<br />
one.<br />
24
Select the named sheet you wish to replace, then ‘Done’. When the<br />
New Name screen appears, use the Scroll Up/Down buttons to select<br />
the first character, then press . This moves to the second character,<br />
and so on, up to the maximum 10 characters. When finished, press x<br />
to exit the screen. Confirm your changes, and your new template is<br />
now saved.<br />
Repeat the edit process for all the remaining document or insert items. When<br />
finished, select ‘Done’ to move to the Save screen, as described on the following<br />
page.<br />
25
5.6.3 Saving the job<br />
When all documents and inserts have been edited, you move to the Save screen, which<br />
allows you ‘Save As’ to a new jobname (for a new job), or ‘Save’ (if editing an existing job).<br />
To enter a new jobname, select ‘Save As’, as shown below:<br />
Use the Scroll Up/Down buttons to select the first character, then press . This moves to<br />
the second character, and so on, up to the maximum 10 characters. When finished, press x<br />
to exit the screen. Confirm your changes, and your new job is now saved and will appear on<br />
the Run Job menu.<br />
26
5.7 OMR Reading<br />
If ‘Mark read’ was set to OMR when editing a document or insert, the following screen will<br />
appear when all other settings have been made.<br />
Note: Barcode definitions can only be created by authorised personnel.<br />
Explanation of settings<br />
OMR definition<br />
This is the name of the setup that defines the function of each of the marks. It<br />
can only be created by authorised personnel and must already exist in order to<br />
be used. Up to 9 definitions can be created.<br />
Read head ID<br />
This stipulates the location of the read head on the machine, ie. which hopper<br />
and whether LH or RH side.<br />
Gate position<br />
Defines how far the gate mark is from the leading edge of the paper.<br />
Pitch adjust<br />
Allows the operator to make fine adjustments to the length of the mark set if<br />
small deviations in the mark pitch allow the overall length to increase or reduce.<br />
Positive figures increas the length, negative figures reduce it.<br />
Gate margin<br />
Tolerance in front of the first mark outside which mark will not be read. Reduce<br />
the default setting of 5mm if other printing is very close to the mark.<br />
Tail margin<br />
Tolerance beyond the last mark outside which mark will not be read. Reduce the<br />
default setting of 5mm if other printing is very close to the mark.<br />
Mark threshold A & B<br />
If marks are not clearly defined, reduce the read head voltage threshold to allow<br />
reading, or preferably use clearer printing. Default is 0.391v; try 0.3v initially if<br />
adjustment is required. Note: The 2 thresholds apply only to 2-track OMR definitions.<br />
For 1-track, only mark threshold A is used.<br />
Divert blank sheets<br />
Diverts sheet with no gate mark without stopping machine. Sheet must be between<br />
groups; if a mid-group sheet is diverted, then machine will stop with ‘no<br />
gate mark’ error - operator must then intervene. Only one consecutive blank<br />
sheet allowed - more will cause same error as above.<br />
cont.<br />
27
Divert oversize group<br />
Diverts groups that are larger than setting of ‘Default Max. Folds’, set in Supervisor.<br />
Defaults are 5 for C, Z or V fold, 4 for Double V fold.<br />
When all character positions have been defined, select ‘Done’ to return to the edit screen.<br />
28
5.8 Barcode reading<br />
If ‘Mark read’ was set to Barcode when editing a document or insert, the following screen<br />
will appear when all other settings have been made.<br />
Note: Barcode definitions can only be created by authorised personnel.<br />
Explanation of settings<br />
BCR definition<br />
This is the name of the setup that defines the function of each of the marks. It<br />
can only be created by authorised personnel and must already exist in order to<br />
be used. Up to 9 definitions can be created.<br />
Read head ID<br />
This stipulates the location of the read head on the machine, ie. which hopper<br />
and whether LH or RH side.<br />
Divert oversize group<br />
Diverts groups that are larger than setting of ‘Default Max. Folds’, set in Supervisor.<br />
Defaults are 5 for C, Z or V fold, 4 for Double V fold.<br />
Good decode reads<br />
Set the number of consecutive good reads required before the label is acepted.<br />
Set to low number is print quality is poor.<br />
When all character positions have been defined, select ‘Done’ to return to the edit screen.<br />
29
5.9 Supervisor mode<br />
Supervisor mode can only be accessed by input of the correct PIN. It allows a variety of<br />
machine functions, as described below.<br />
Language<br />
Select required operating language from available list.<br />
Firmware version<br />
Read-only display of firmware for each module fitted.<br />
Machine Count<br />
Read-only display of the total cycle count to date (this count cannot be reset).<br />
Enable Supervisor PIN<br />
Enables/disables the need to enter a PIN for Supervisor access.<br />
Change Supervisor PIN<br />
Change the PIN to any 3-digit number.<br />
Delete Job<br />
Presents a list of all jobs to allow deletion. When asked to confirm, press for ‘yes’ or x for<br />
‘no’. Note that once deleted, a job cannot be recalled.<br />
<strong>User</strong> Access<br />
Use to set the screen displayed at startup and the level of operator access to machine<br />
functions. If any box is deselected, user will not be able to change or use this function - it<br />
does not mean the function is disabled.<br />
Default Max. Folds<br />
Use to set the max. sheets to fold for ‘C’, ‘Z’, ‘V’ & double ‘V’. (defaults are 5, 5, 8 & 4<br />
respectively). Used by the software to determine how to split a pack for folding. Adjust only<br />
if using non-standard paper, or for other specific purposes. Note that these maxima can be<br />
overidden in ‘Advanced Settings’ described on page 19.<br />
Default Sheet / Insert / Envelope<br />
Use to set the defaults for these items (these can overidden when setting size options in<br />
‘Create Job’).<br />
30
Analogue Sensors (only available if this option is set in Engineer mode)<br />
A read-only display of analogue sensor settings, as described below:<br />
Settings are shown in the format:<br />
abc d.d C or B<br />
The meaning of the numbers is as follows:<br />
a = emitter current value (0 - 9).<br />
b = receiver pot setting value (0- 9). Both ‘a’ & ‘b’ are mostly of use only to Technical<br />
Support for fault checking in combination with other parameters.<br />
c = threshold voltage value (0 - 9). Should be approx. 4/5<br />
If the values differ substantially from those shown above, the sensor is suspect.<br />
d.dd = receiver voltage in volts. If clear, should be approx. 0.5v. If blocked, should be<br />
> 4v.<br />
C / B = clear or blocked<br />
Note: depending upon unit fitted, some sensors may show receiver voltage only, and<br />
whether clear or blocked.<br />
These figures are read-only – prior to analysing them, sensors should be auto-calibrated<br />
and if any sensor fails, it should first be cleaned and its connector checked. Re-calibrate,<br />
and then if failure still occurs it must be replaced by a Service Engineer. The figures may<br />
help in fault finding if failure still occurs - contact Technical Support for further assistance.<br />
When you have finished making selections, press x to exit and save your changes.<br />
31
5.10 Daily post<br />
Daily post allows a group of forms to be hand-fed, folded and inserted. Up to 8 forms of<br />
80gsm (20lbs bond) may be fed, and they may be stapled or not, as required.<br />
To use daily post, you must first create a new job using Handfeed. Select ‘New Job’ from the<br />
Main Menu and ensure that the Handfeed box is ticked. Note that other sheets and inserts<br />
can also be collated with the hand-fed daily post if required, up to the limits shown in<br />
‘Specifications’. Select ‘Done’ and edit the envelope and mail items in the same way as any<br />
other new job (‘Creating a New Job’ on page 21). When finished, save the job to a suitable<br />
name.<br />
To run daily post, load feed hoppers as required if you have selected additional folded sheets<br />
or inserts (‘Loading Paper Hoppers’ on page 33). Select the job from ‘Run Job’ on the Main<br />
Menu and press the Run button. Insert the daily post documents into the handfeed tray<br />
on the folder as shown below - the forms will then automatically be fed and the machine<br />
will await further documents. Note that the tower folder is shown – feeder folder is similar<br />
principle, but design is different.<br />
Load the daily post<br />
with print side facing<br />
rearwards and top of<br />
form downwards.<br />
Other paper orientations are<br />
possible for non-standard<br />
envelopes - see Appendix A<br />
for details.<br />
When you have finished running daily post, Press the stop button as normal.<br />
32
6 Setting Up The Machine<br />
6.1 Loading the paper hoppers<br />
Insert Feeder<br />
Slacken the locklever<br />
and adjust the<br />
side guides to give<br />
1 - 2mm clearance<br />
across the width of<br />
the inserts. Tighten<br />
the lock lever.<br />
Pull the weighted roller back and load<br />
the inserts, ensuring they are fully down.<br />
Release the weighted roller so that it<br />
‘tips’ the inserts into the pickup roller. An<br />
alternative heavier roller is also available<br />
(part no. C3656A) which can improve<br />
feeding of thick booklets. This must be<br />
fitted by an Authorised Service Engineer.<br />
Note: A single feeder is<br />
shown – if the unit is a tower<br />
or OMR/Barcode feeder, the<br />
method of loading is identical,<br />
but the hopper capacities are<br />
different.<br />
Tower Folder<br />
Slacken the lock- lever<br />
and adjust the side<br />
guides to give 1 - 2mm<br />
clearance across the<br />
width of the forms.<br />
Tighten the lock lever.<br />
Press down on the tray<br />
and load the fanned<br />
stack of forms. Ensure<br />
that the leading edges<br />
are firmly contacting the<br />
chassis bridge at the<br />
lower end of the tray.<br />
Use the indicator lights<br />
on the rear edge to<br />
orientate the paper.<br />
1. Tower folder is shown; feeder<br />
folder is similar except only 1<br />
tray is fitted and there is no<br />
indicator.<br />
2. See the following page for<br />
setting the curled forms stop.<br />
33
Tower Folder - curled forms stop<br />
Documents that are slightly curled may not feed properly, as the leading edge may become<br />
snagged at the infeed. To help overcome this, each hopper tray is fitted with a 2-position<br />
stop that can be raised or lowered.<br />
1. Withdraw the hopper and pull both of the spring-loaded knobs outwards.<br />
2. For flat forms or forms curling upwards, select the upper (default) position.<br />
3. For forms curling downwards, select the lower position.<br />
Pull both knobs<br />
out together<br />
Raise or lower<br />
moveable stop<br />
4. Ensure both knobs are properly located before replacing the tray.<br />
6.2 Loading the envelope hopper<br />
Slacken the lock- lever<br />
and adjust the side<br />
guides to give 1 - 2mm<br />
clearance across the<br />
width of the envelopes.<br />
Tighten the lock lever.<br />
Pull the weighted roller back and load the envelopes,<br />
ensuring they are fully down - flaps must be facing<br />
forwards. Release the weighted roller so that it ‘tips’ the<br />
envelopes into the pickup roller. An alternative heavier<br />
roller is also available (part no. C3656A) which can<br />
improve feeding of thick booklets. This must be fitted by<br />
an Authorised Service Engineer.<br />
34
6.3 Setting the separator gap<br />
The feeder separator has 4 settings, marked A to C on the slide. Before running the job,<br />
the gap must be set to suit the thickness of material being processed - this prevents more<br />
than one item being fed at a time. Note that there is an intermediate setting between each<br />
marked position, allowing finer adjustment.<br />
Lower the side<br />
cover and move<br />
the slide to suit<br />
the thickness of<br />
the insert.<br />
Slide positions:<br />
A = 0 to 0.75mm<br />
B = 0.75 to 1.5mm<br />
C = 1.5 to 2.5mm<br />
D = 2.5 to 4.0mm<br />
(A - C only on Tower Feeder)<br />
Most jobs will use<br />
position A. If you<br />
use the wrong<br />
setting, an error<br />
will appear on<br />
the control panel.<br />
6.4 Using the accumulator<br />
If the machine is fitted with an accumulator, this can be used for grouping forms prior to<br />
folding, or for OMR/Barcode grouping for subsequent removal by hand. It can also be used<br />
to hold diverted forms for subsequent hand removal. With an optional diverter tray fitted,<br />
diverted forms can be fed into this instead. The accumulator is located behind the tower<br />
folder. Prior to use, the side-guides and diverter must first be set to suit the width and<br />
length of the paper, as shown below.<br />
Slacken the lock screw<br />
underneath and adjust the<br />
diverter stop to suit the<br />
length of the paper.<br />
Raise the<br />
accumulator channel<br />
to remove grouped<br />
or diverted forms<br />
(where applicable).<br />
Slacken the lock screw and adjust the side guides to<br />
give 1 - 2mm clearance across the paper.<br />
35
6.5 Operator settable separator (optional)<br />
The standard separator on the tower folder is spring-loaded and operates with a preset<br />
gap for 80gsm (20lbs bond) paper. Under certain circumstances (eg. extra thick material)<br />
it may be necessary to open the gap, or in some cases to close it. As standard, this can<br />
only be carried out by a Service Engineer, but with some stationery, this may not provide<br />
a sufficiently sensitive adjustment. The optional operator-settable separator allows the<br />
operator to set the gap using a knurled knob on each of the hoppers fitted (1 or 3). It can<br />
be specially useful when double feeding has been a problem with the standard separator, as<br />
it allows ‘fine tuning’.<br />
Where fitted, the separator is accessed by opening the side cover of the tower folder – the<br />
separator is behind an opening.<br />
Set the separator gap to suit 80gsm (20lbs bond) paper, or to a different setting as<br />
required. This is most easily achieved by removing the top tray, and for 3-tray machines,<br />
the second tray also. Lift out the infeed bridge (with cork strips) to prevent drag from the<br />
pre-feeder. Slide a sheet of the stationery into the separator gap and adjust the knurled<br />
knob until a moderate drag is felt on the paper as it is withdrawn rearwards. Refit the infeed<br />
plate and trays.<br />
Turn the adjusting knob<br />
to achieve the required<br />
setting (see above).<br />
Note: separator is shown with black inner<br />
cover not fitted.<br />
36
7 Operator Maintenance<br />
7.1 Clearing paper crashes<br />
If a paper crash occurs, the machine will stop and indicate the position of the crash on the<br />
screen. Clear the crash as shown below, then press the Run button to resume operating.<br />
contact your Authorised Service Agent.<br />
Insert head and feeder<br />
Raise the top perspex cover and<br />
small feeder cover. Lift the green<br />
latch bars as shown to access<br />
the paper paths below. Carefully<br />
withdraw any jammed paper, taking<br />
care not to tear it. To clear a crash<br />
in the feeder, lower the feeder side<br />
cover and swing the green handles<br />
upwards to access the paper paths.<br />
If necessary, use the green knob<br />
to turn the shafts for ‘winding out’<br />
jammed paper.<br />
If a jam occurs at the input of the<br />
envelope or feeder hoppers, remove<br />
all material and withdraw the<br />
jammed item. For feeders, ensure<br />
that the separator gap is correctly<br />
set (see page 35). For the envelope<br />
hopper, if jams occur frequently,<br />
Tower feeder & OMR Feeder<br />
If a paper crash occurs, this is most<br />
likely to be at the eject sensor at<br />
the exit. To clear the jam, it can<br />
be awkward to pull the paper out if<br />
raising the roller carrier at the exit.<br />
An easier method is described beow:<br />
1. Lower the operator side cover<br />
of the tower feeder, and of the<br />
feed unit in front (if the unit in<br />
front is the insert head, raise<br />
the perspex cover).<br />
2. Use the green knob on the feed<br />
unit in front to swing down the<br />
lower conveyor, or raise the<br />
rearmost clam assembly if the<br />
unit in front is the insert head.<br />
3. Turn the green knobs on the tower feeder to wind the crashed document into the<br />
cavity ahead – it can then be easily removed.<br />
37
Tower Folder<br />
Open the side cover and operate<br />
the two green latches to raise the<br />
roller platten and open the dailypost<br />
hopper. Also open the top cover<br />
to access the upper part of the feed<br />
hopper. Carefully withdraw any<br />
jammed paper, taking care not to tear<br />
it - turn the green knobs to help wind<br />
jammed paper out of the rollers.<br />
38
7.2 Cleaning rollers and sensors<br />
Periodically, all rollers, feed wheels and sensors should be cleaned, especially if a long run<br />
is envisaged. Use only Rubber Roller Restorer (part no. E0438A), except for the pick-up<br />
rollers on the feed and envelope hoppers - these must be cleaned using only a<br />
cloth dampened with water. Clean the full circumference of rubber rollers, feed wheels<br />
and conveyors in the area of:<br />
a) Feeder, folder and envelope hoppers<br />
b) Insert area at the head end<br />
c) Closer area at the head end<br />
Ensure the machine is switched off before cleaning rollers or sensors.<br />
To access rollers in the insert area, raise the perspex cover and lift the green handles to<br />
reach the paper path. Rotate rollers by hand when cleaning.<br />
To access feeder rollers, lower the LH side cover and lift the infill cover in front of the<br />
hopper. Use the green knob to rotate the rollers for cleaning. Note: after a long period of<br />
time, some inserts can cause a jam with the insert stuck between the rollers - this may<br />
especially occur on coated material. If this happens, open the upper roller plate with the<br />
green latch and using a cloth dampened with Rubber Roller Restorer, clean all the rollers,<br />
both upper and lower. Use the green knob to help rotate them.<br />
Clean all 12 rollers<br />
To access tower folder rollers, open the LH side covers and use the green latches to open<br />
the daily-post hopper and paper path platten. Also open the front cover using the black<br />
latch on the top edge.<br />
Cleaning sensors<br />
When cleaning the rollers, the sensors should also be cleaned by blowing away dust and<br />
debris using the supplied airduster. It is important that sensors are regularly cleaned,<br />
or operating errors may occur. Locations are shown on the following page - note that<br />
each sensor is in two halves, receiver and transmitter. Both halves must be cleaned.<br />
Use only non-flammable airdusters, eg part no. A0070A.<br />
39
Cleaning sensors (contd.)<br />
Note: in most places the sensor or access hole is indicated with an arrow punched into the<br />
sheet metal. Spray the air jet liberally into holes to ensure thorough cleaning.<br />
Insert and collate area<br />
For all positions shown, direct the jet of air onto the sensors, indicated by arrows in the<br />
following views. Note that sensors are in two halves, receiver & transmitter - both halves<br />
must be cleaned.<br />
Open the perspex cover and front feeder<br />
cover, then lift the front-most green<br />
handle to raise the mechanism - this is<br />
held in the raised position by a latch.<br />
For the sensor pairs, liberally spray<br />
the air jet in the gap between them.<br />
Feeders<br />
Lower the feeder side cover and<br />
raise the top cover. Swing the<br />
green latch upwards to raise the<br />
roller platten.<br />
Note: station 1 feeder is shown -<br />
others are similar.<br />
40
Tower Feeder<br />
Open the cover in front of the feeder trays and direct a jet of air onto the sensors shown by<br />
the arrows in the diagram below. Ensure that all sensors, including those inside the pivoting<br />
cover are thoroughly cleaned as some sensors are located deep behind the apertures.<br />
Closer area<br />
Open the closer cover below the envelope hopper and direct the jet of air onto the sensors,<br />
indicated by arrows in the following view. For the sensor pairs, liberally spray the air jet in<br />
the gap between them.<br />
41
Tower Folder<br />
There are sensors in three locations.<br />
Open the side cover and swing the<br />
lower green latch upwards to raise<br />
the roller platten. Clean both halves<br />
as shown.<br />
With the side cover open, swing<br />
the upper green latch forwards to<br />
open the daily post hopper. Clean<br />
both halves as shown.<br />
Hinge the top cover forwards<br />
and liberally spray the air jet in<br />
the gap indicated to ensure both<br />
halves are cleaned.<br />
42
7.3 Maintaining the wetting system<br />
The wetter tank supplies the fluid for wetting the envelope flaps and needs topping up from<br />
time to time. It is located on the left hand side of the machine, below the closer area at the<br />
output. To gain access, lower the side cover on the insert head. Fill the tank through the<br />
spout until the level reaches the indicator visible inside - be careful not to overfill.<br />
Note: Use only Envelope Sealing Fluid A0276A, as this has been specially<br />
formulated for greatly enhanced sealing and antibacterial qualities.<br />
Fill through the spout<br />
as shown, up to the<br />
level indicator.<br />
Withdraw the tank by<br />
using the green tab<br />
Check the condition of the sponge at regular intervals and clean off gum residues as<br />
required. Remove the wetter tank to do this by lifting the end slightly using the green tab,<br />
then withdraw it. Note: use a piece of absorbent material to under the drain tube<br />
to catch any drips. Clean the sponge under running water and replace the tank, ensuring<br />
it is fully located. After cleaning, or if the sponge has dried out, it should be primed by<br />
immersing it in Envelope Sealing Fluid.<br />
If the machine is to be left unattended for more than a week, it is advisable to remove the<br />
tank and drain it. Wipe dry after washing to prevent contamination.<br />
The tank must also be removed if the machine is moved, and the reservoir drained.<br />
The reservoir can be drained by pulling out the plastic drain tube tucked underneath it and<br />
pulling out the bung to drain into a suitable receptacle.<br />
43
8. Document orientation tables<br />
Paper orientation on the feed hoppers will depend on fold type, accumulation tray, OMR/<br />
Barcode and feed sequence. The example below shows how to reference the required<br />
orientation from the tables. Note that for most applications, the LEDs on the rear edge of<br />
the tower folder will indicate the required orientation.<br />
Example<br />
Fold Chosen is top address ‘C’<br />
fold.<br />
1. Select configuration from table<br />
1. Note column A (unshaded).<br />
2. OMR or Barcode If NO, use<br />
table 2. If YES, use table 3 for<br />
OMR, table 4 for Barcode. Daily<br />
Post (table 5) is not an option for<br />
this fold type.<br />
See following page for tables<br />
2 - 5.<br />
3. For chosen table, use row<br />
A (from step 1). This indicates<br />
orientation, feed sequence<br />
and read head position (where<br />
applicable).<br />
Note that for Daily Post, only<br />
configurations in table 1, column<br />
B can be used.<br />
Fold generation requires:<br />
Foldplate 1 set to 1/3rd paper<br />
length Foldplate 3 set to 1/3rd<br />
paper length<br />
Preferred fold configurations are indicated bold and<br />
give correct address orientation in window of standard<br />
envelopes.<br />
Shaded areas denote folds that give incorrect address<br />
orientation in window of standard envelope. Reverse<br />
printing and/or non-standard window envelopes may<br />
permit use.<br />
Note: For some complex jobs, not all paper trays may<br />
be loaded in the same way.<br />
44
9. General Specifications<br />
This document covers specifications for general data (form and insert sizes, envelope specification<br />
and physical and electrical data). Separate specification documents are also available<br />
for Barcode Labels and OMR Marks.<br />
Please note that stationery sizes and weights are stated as a guide; specific applications<br />
may use stationery of a finish, rigidity, colour density etc. that are unsuitable and may not<br />
function correctly. Where doubt exists, it is recommended that samples be provided to the<br />
Technical Support department so that running tests can be carried out to simulate the job<br />
requirement. If changes are then required, this can be established at the outset.<br />
A <strong>range</strong> of special rollers and other document feeding aids exist which can often accommodate<br />
problem stationery that other inserter folders may not be able to. These can be advised<br />
upon by the Technical Support department.<br />
46
9.1 Form Sizes<br />
Tower Folder<br />
Depth:<br />
140mm (5 1 / 2<br />
”) min.<br />
406mm (16”) max.<br />
Width: 140mm (5 1 / 2<br />
”) min. (Widths below 168mm (6.6”)<br />
require narrow finger kit A3348A).<br />
Thickness:<br />
Depth of<br />
output doc:<br />
Hopper<br />
capacity:<br />
Collation<br />
pocket:<br />
Folding<br />
capacity:<br />
Daily Post:<br />
229mm (9”) max.<br />
60gsm (16lbs bond) min.<br />
70gsm (18lbs bond) min. for OMR/Barcode paper<br />
120gsm (32lbs bond) max.<br />
89mm (3 1 / 2<br />
”) min.<br />
152mm (6”) max.<br />
Up to 500 sheets of 80gsm for tray 1 (top tray)<br />
Up to 250 sheets 80gsm for trays 2 & 3<br />
Capacity for up to 8 sheets of 80gsm (20lbs bond)<br />
before folding, or up to 10 sheets of 80gsm (20lbs bond)<br />
for diverting.<br />
Up to 8 sheets of 80gsm (20lbs bond) folded together<br />
(C, Z or V fold), up to 4 sheets of 80gsm (20lbs bond)<br />
for double-forward fold. Note that this is dependent upon<br />
stationery type and weight, and may impact on machine<br />
performance.<br />
Up to 8 sheets of 80gsm (20lbs bond) for C, Z or V fold,<br />
up to 4 sheets of 80gsm (20lbs bond) for double forward<br />
fold. May be stapled or not. Max. thickness of staple 3mm.<br />
Allowable staple positions are shown below.<br />
<br />
No staples in<br />
area shown<br />
<br />
47
Feeder Folder<br />
Depth:<br />
140mm (5 1 / 2<br />
”) min. (89mm (3½”) for shortforms*)<br />
406mm (16”) max. (139mm (5½”) for shortforms*)<br />
* Optional Shortform kit A3302A must be fitted if shortforms<br />
are being used.<br />
Width: 140mm (5 1 / 2<br />
”) min. (Widths below 168mm (6.6”)<br />
require narrow finger kit A3348A).<br />
Thickness:<br />
Depth of<br />
output doc:<br />
Hopper<br />
capacity:<br />
229mm (9”) max.<br />
60gsm (16lbs bond) min.<br />
70gsm (18lbs bond) min. for OMR/Barcode paper<br />
120gsm (32lbs bond) max.<br />
89mm (3 1 / 2<br />
”) min.<br />
152mm (6”) max.<br />
Up to 500 sheets of 80gsm (20lbs bond)<br />
Daily Post:<br />
Up to 3 sheets (C or Z fold) or 5 sheets (V fold) of 80gsm<br />
(20lbs bond). May be stapled or not, but staples on ‘Z’ fold<br />
only. Max. thickness of staple 2mm. Allowable staple positions<br />
shown below. Note: all daily post forms must be the<br />
same length.<br />
48
9.2 Insert Feeder Unit<br />
Insert Sizes - Single Hopper<br />
Depth: 76mm (3”) min. for module 1<br />
89mm (3 1 / 2<br />
”) min. for following modules<br />
152mm (6”) max.<br />
Width: 140mm (5 1 / 2<br />
”) min. (Widths below 168mm (6.6”)<br />
require narrow finger kit A3348A).<br />
Thickness:<br />
Notes:<br />
Hopper<br />
capacity:<br />
241mm (9 1 / 2<br />
”) max.<br />
60 gsm (16lbs bond) min.<br />
4mm (5/32”) booklets max.<br />
Insert Sizes - Tower Hopper & OMR Feeder<br />
Depth:<br />
Width:<br />
Thickness:<br />
Notes:<br />
Hopper<br />
capacity:<br />
Inserts must be flexible enough to suit path contraints.<br />
Some inserts may require special feed tyres.<br />
Up to 300 reply-paid envelopes or 150 2mm booklets<br />
76mm (3”) min. for module 1 (either or both hoppers, &<br />
OMR)<br />
89mm (3 1 / 2<br />
”) min. for following modules<br />
152mm (6”) max.<br />
140mm (5 1 / 2<br />
”) min. (Widths below 168mm (6.6”) require<br />
narrow finger kit A3348A).<br />
241mm (9 1 / 2<br />
”) max.<br />
60 gsm (16lbs bond) min.<br />
2mm (5/64”) booklets max. (top tray)<br />
4mm (5/32”) booklets max. (lower tray)<br />
Inserts must be flexible enough to suit path contraints.<br />
Some inserts may require special feed tyres.<br />
Up to 200 reply-paid envelopes or <strong>100</strong> 2mm booklets<br />
Pack thickness for insertion:<br />
6mm (1/4”) max.<br />
Min. Insert pack clearance:<br />
Up to 3mm<br />
thick pack: Depth 6mm (1/4”)<br />
Width 14mm (9/16”)<br />
3-6mm<br />
thick pack: Depth 10mm (3/8”)<br />
Width 19mm (3/4”)<br />
49
9.3 Envelope Specification<br />
Flap Shoulder Angle<br />
50° Min. 90° Max.<br />
Min.<br />
10mm<br />
( 13 32")<br />
Minimum open<br />
throat area<br />
Throat angle<br />
5° Min. 20° Max.<br />
Min. 10mm<br />
( 13 32") Flap Length<br />
Max.50mm( 2")<br />
Min.32mm(1 1 4")<br />
Body Depth<br />
Max.165mm (6 1 2")<br />
Min. 89mm (3 1 2")<br />
Min.70mm (2 3 4")<br />
Horizontal portion of throat<br />
Max. = Envelope Width - 75mm (3")<br />
Side Seam style envelope<br />
Throat Depth<br />
Max.22mm ( 7 8")<br />
Min.10mm ( 13 32")<br />
Envelope Width Max.264mm (10 3 8") Min.153mm (6")*<br />
Flap Shoulder Angle<br />
50° Min. 90° Max.<br />
Min.<br />
10mm<br />
( 13 32")<br />
Minimum open<br />
throat area<br />
Throat angle<br />
5° Min. 20° Max.<br />
Min. 10mm<br />
( 13 32") Flap Length<br />
Max.50mm( 2")<br />
Min.32mm(1 1 4")<br />
Body Depth<br />
Max.165mm (6 1 2")<br />
Min. 89mm (3 1 2")<br />
Min.70mm (2 3 4")<br />
Horizontal portion of throat<br />
Max. = Envelope Width - 75mm (3")<br />
Commercial style envelope<br />
Throat Depth<br />
Max.22mm ( 7 8")<br />
Min.10mm ( 13 32")<br />
Envelope Width Max.264mm (10 3 8") Min.153mm (6")*<br />
* Widths from 153mm (6”) to 182mm (7”) require Narrow Finger Kit A3348A.<br />
Envelope Weight: 70gsm (18lbs bond) min., <strong>100</strong>gsm (26lbs bond) max.<br />
Hopper Capacity:<br />
General Requirements<br />
Up to 400 of 80gsm (20lbs bond) envelopes.<br />
Envelopes to be good quality machine-fill envelope. Dimensions and quality to be<br />
consistent across manufactured batches.<br />
Windows to be securely affixed to within 1.5mm (1/16”) of top and side edges.<br />
Top edge to be flat and free from puckering.<br />
Side seams to be securely glued up to top of seam.<br />
Position of internal side seams to give a minimum 5mm (3/16”) clearance or<br />
overlap to the edge of any insert.<br />
Pre-scored flap crease to enable the envelope flap to open flat.<br />
cont.<br />
50
Envelope requirements (cont.)<br />
No twisting, curling or distortion evident.<br />
No glue seepage on interior or exterior of envelope.<br />
Paper smoothness: <strong>100</strong>-200 Sheffield units.<br />
Large printed areas require approval from the Technical Support Dept.<br />
Envelopes not meeting the above requirements may be acceptable, subject to<br />
testing and approval by Technical Support Dept. Envelopes not meeting the<br />
above requirements may affect machine performance.<br />
51
9.4 Mechanical & Electrical<br />
Speed:<br />
Variable up to:<br />
4500 (3750 for SE versions) filled envelopes per hour (DL envelope with 1<br />
‘C’ fold A4).<br />
Noise level:<br />
75dbA (3 x feeders, 1 x 3-plate folder, measured at 1.6m height, 1m from<br />
nearest cover).<br />
Heat Output (BTU/Hour):<br />
Rated current x rated volts x 3.412 (eg. 2866 BTU/Hour for typical configuration<br />
of 3 x feeders + tower folder).<br />
Heat Output (Watts):<br />
Rated current x rated volts (eg. 840W for typical configuration of 3 x feeders<br />
+ tower folder).<br />
Electrical:<br />
230VAC<br />
115VAC<br />
Frequency 50Hz 60Hz<br />
Input Current Head: 1A Head: 2A<br />
Feeder: 0.5A<br />
OMR Feeder: 0.5A<br />
Tower Feeder: 0.5A<br />
Tower Folder: 1A<br />
Feeder: 1A<br />
OMR Feeder: 1A<br />
Tower Feeder: 1A<br />
Tower Folder: 2A<br />
Feeder Folder: 0.75A Feeder Folder: 1.5A<br />
Fuse Rating T6.3A T10A<br />
(Insert Head)<br />
Weights (nett):<br />
Inserter Head 56Kg<br />
Feeder<br />
25Kg<br />
Tower Feeder 44Kg<br />
Tower Folder* 70Kg<br />
Feeder Folder 43Kg<br />
Cardfolder 2<br />
50Kg<br />
DTI<br />
25Kg<br />
* 3-tray version, including 15Kg accumulator.<br />
52
Ambient light:<br />
Although the machine may operate in sunlight, it is not designed for use in direct sunlight,<br />
or where sunlight is exposed to the machine through windows or skylights. The light-sensitive<br />
sensors can be affected in these conditions. It is therefore recommended to:<br />
a) Locate the machine out of direct sunlight<br />
b) Protect the machine from direct sunlight using blinds or similar blocking devices.<br />
If the machine can only be located where it may be exposed to direct sunlight, then please<br />
contact Technical Support department, who may be able to advise on the use of blocking<br />
material on the inside of the Perspex cover where necessary.<br />
53
9.5 Machine Dimensions<br />
Notes<br />
1. Allow minimum 1 metre working space on the operator side and output end. Allow<br />
minimum 150mm from non-operator side of machine to adjacent wall. Allow sufficient<br />
space at paper trays to enable comfortable loading and access for tray removal.<br />
2. If moving the machine, ensure the wheel brakes are off and push on the stand, not<br />
the machine. The machine must be moved on a smooth surface only.<br />
3. All dimensions are in mm.<br />
54
10. High Capacity Conveyor Belt CS-2 (Optional)<br />
The high capacity conveyor belt is designed for envelope transport from the inserter or<br />
franking device. The conveyor belt has two operation modes:<br />
• The belt moves continuously.<br />
• The belt moves in intervals. The belt moves each time a<br />
sensor detects the passage of an envelope.<br />
Operating the High Capacity Conveyor Belt<br />
The conveyor belt switch has three position:<br />
• Mode A: the belt moves in intervals.<br />
• Mode B: the belt is switched off.<br />
• Mode C: the belt moves continuously.<br />
D<br />
A B C<br />
With the the turning knob it is possible to set the interval distance between envelopes on<br />
the conveyor belt. The distance depends on the type of job and preference of the user.<br />
Minimum interval distance: 15mm - setting for a job with<br />
thin envelopes.<br />
Neutral interval distance: 20mm.<br />
Maximum interval distance: 40mm - setting for a job with<br />
thick envelopes.<br />
Important: If unsealed envelopes are used, envelope flaps must be folded closed.<br />
55
58<br />
Page intentionally<br />
left blank


