User Guide Product(range) - Neopost
User Guide Product(range) - Neopost
User Guide Product(range) - Neopost

You also want an ePaper? Increase the reach of your titles
YUMPU automatically turns print PDFs into web optimized ePapers that Google loves.
as-930<br />
aDDress PrInTer<br />
<strong>User</strong> ManUal
<strong>Product</strong>s presented in this guide are conform to<br />
requirements of directives nbr 2006/42/EG<br />
and 2004/108/EG.<br />
<strong>Neopost</strong> has implemented a program for the<br />
recycling of worn machines and machines at<br />
the end of their lifetime. Contribute in a responsible<br />
way to the environmental protection<br />
by consulting your retailer internet site, or<br />
by contacting him. He will inform you of the<br />
collection and treatment processes of these<br />
machines.
Pos: 3 /[Allgemeines]/0.0a_Note_Trademarks+Manufacturer Address NEOPOST @ 1\mod_1256739001883_912.doc @ 7153 @<br />
Pos: 4 /Bedienungsanleitungen/Geräte spezifisch/Drucker/AS-930/0.0_Revision level_AS-930_Version_3.1 @ 3\mod_1301552585035_912.doc @ 30992 @<br />
Pos: 5 /[Allgemeines]/0.2_Inhaltsverzeichnis @ 0\mod_1242731641668_912.doc @ 1625 @<br />
a<br />
Copyright<br />
© Copyright 2011<br />
All rights reserved. No part of this manual may be reproduced or transmitted in any form or<br />
by any means, copied onto electronic media or translated into any language without the<br />
manufacturer's express written permission.<br />
The manufacturer is not liable for any damage resulting either from incorrect use or from<br />
repairs and modifications carried out by a third unauthorized party. This manual was<br />
produced with great care. However, liability for any errors which it may contain is excluded.<br />
The manufacturer reserves the right to make any technical or design changes to the<br />
equipment during the development process. All specified values are purely nominal.<br />
Consequently, any legal claims made on the basis of this manual cannot be enforced.<br />
The manufacturer is not liable for any damage or disturbance resulting from the use of<br />
options or accessories which are not original products or do not have the express approval<br />
of the manufacturer.<br />
Brands:<br />
HP is a registered brand name of the Hewlett-Packard Company.<br />
Microsoft and Windows are registered brand names of the Microsoft Corporation.<br />
FlexMail is a registered brand name of Flex Systems B.V.<br />
Bulk Mailer is a registered brand name of Satori Software Inc.<br />
Manufacturer Address<br />
<strong>Neopost</strong> Industrie<br />
ZI Tivoli<br />
72800 Le Lude<br />
France<br />
www.neopost.com<br />
Revision level<br />
Version Change description Released<br />
3.0 New document for graphic display and November 2010<br />
firmware version 4.7<br />
3.1<br />
• Added descriptions for new USB 2.0<br />
and TCP/IP interface<br />
April 2011<br />
• Changed description to firmware<br />
version 4.8<br />
• Added Device Class A note<br />
<strong>User</strong> Manual Version 3.1 3
Table of Contents<br />
1 Introduction ...............................................................................9<br />
1.1 Pictograms ............................................................................. 9<br />
1.2 Notes for use of this manual...................................................... 9<br />
1.3 Terms and abbreviations .........................................................10<br />
1.4 System requirements ..............................................................10<br />
2 Safety notes .............................................................................11<br />
2.1 General safety notes ...............................................................11<br />
2.2 Ink safety notice.....................................................................13<br />
2.3 Location of the printer .............................................................13<br />
2.4 Disposal ................................................................................13<br />
3 Scope of delivery and assembly................................................14<br />
3.1 Scope of delivery ....................................................................14<br />
3.2 Delivery ................................................................................14<br />
3.3 Device overview .....................................................................15<br />
3.4 Assembly ..............................................................................16<br />
3.4.1 Connecting the power cable ................................................ 16<br />
3.4.2 How to mount the paper feed ramp and the side guides.......... 17<br />
4 Description of device ................................................................18<br />
4.1 Application <strong>range</strong>....................................................................18<br />
4.2 Description of functions ...........................................................18<br />
4.3 The Operator Panel .................................................................19<br />
4.3.1 Key panel......................................................................... 20<br />
4.3.2 Main Display ..................................................................... 22<br />
5 Initial start-up of the device.....................................................26<br />
5.1 How to power-on the device.....................................................26<br />
5.2 How to install the ink cartridges................................................26<br />
5.3 How to setup the feeder ..........................................................28<br />
5.4 How to adjust the printer to the material thickness......................31<br />
5.5 How to position the print area ..................................................32<br />
5.5.1 Sample print area positions ................................................ 34<br />
5.6 Width measurement of the print media......................................36<br />
5.7 How to set the print direction (orientation).................................36<br />
5.8 How to perform a test print......................................................37<br />
4 <strong>User</strong> Manual Version 3.1
6 Printer menu (firmware V4.8).................................................. 38<br />
7 How to connect the printer to the PC ....................................... 79<br />
7.1 How to install the printer driver ................................................ 79<br />
7.2 Windows XP and Windows Vista................................................ 79<br />
7.2.1 Windows 7........................................................................ 80<br />
7.3 How to use the USB interface................................................... 83<br />
7.4 How to use the Ethernet interface............................................. 83<br />
7.4.1 Adding a TCP/IP port to a printer driver ................................ 84<br />
7.4.2 Connecting the printer to a local area network ....................... 86<br />
7.4.3 Using a fixed IP address ..................................................... 87<br />
7.4.4 Direct Ethernet connection between the printer and the PC ...... 89<br />
8 Service ..................................................................................... 92<br />
8.1 Maintenance and support......................................................... 92<br />
8.1.1 How to clean an ink cartridge .............................................. 92<br />
8.1.2 How to clean the pen board contacts .................................... 94<br />
8.1.3 How to reset the printer...................................................... 95<br />
8.2 Troubleshooting ..................................................................... 95<br />
8.3 The device cannot be turned on................................................ 96<br />
8.3.1 No or only very weak printout with new ink cartridges............. 97<br />
8.3.2 Printed elements positioned incorrectly ................................. 97<br />
8.3.3 White streaks in printed text or graphic ................................ 98<br />
8.3.4 White streak in printed text or graphics (in between cartridges)99<br />
8.3.5 The printed ink doesn’t dry on the substrate ........................ 100<br />
8.4 Error Messages .................................................................... 101<br />
8.4.1 How to read an error message entry................................... 101<br />
8.5 Warning Messages................................................................ 115<br />
8.5.1 How to read a warning message entry ................................ 115<br />
8.5.2 Additional Error Messages ................................................. 121<br />
8.6 Technical Support................................................................. 125<br />
9 Consumables and Accessories ................................................ 126<br />
9.1 Consumables ....................................................................... 126<br />
9.1.1 Standard inks for <strong>Neopost</strong> address printers.......................... 126<br />
9.1.2 Cleaning Towels............................................................... 127<br />
9.2 Accessory devices................................................................. 128<br />
9.2.1 <strong>Neopost</strong> CS-800 conveyor ................................................. 128<br />
10 Technical Specifications ......................................................... 129<br />
11 Appendix ................................................................................ 131<br />
<strong>User</strong> Manual Version 3.1 5
Pos: 6 /[Allgemeines]/0.3_Abbildungsverzeichnis [Figure] @ 0\mod_1250599665953_912.doc @ 2745 @<br />
11.1 How to completely remove printer drivers from Windows Vista<br />
and Windows 7 .......................................................................... 131<br />
11.2 How to completely remove printer drivers from Windows XP and<br />
Windows 2000 ........................................................................... 132<br />
11.2.1 How to use a pre-installed printer driver ..............................133<br />
11.3 USB connection............................................................... 134<br />
11.3.1 Ethernet connection..........................................................135<br />
11.3.2 How to identify the USB port used by the printer ..................135<br />
11.4 How to test the Ethernet connectivity ................................. 137<br />
11.4.1 Sample settings for Ethernet connection ..............................138<br />
11.5 Network connection between the printer (using a fixed IP) and<br />
the PC .................................................................................... 139<br />
11.6 Limitations of paper side guides ........................................ 142<br />
11.7 How to create a print file .................................................. 143<br />
11.8 How to update the firmware.............................................. 145<br />
11.8.1 How to update the firmware...............................................145<br />
11.9 Additional display texts .................................................... 149<br />
11.10 Ink package ID number.................................................... 149<br />
11.10.1 ID: 6030206....................................................................149<br />
11.11 Declaration of conformity ................................................. 150<br />
12 Glossary ................................................................................. 153<br />
13 Index...................................................................................... 159<br />
6 <strong>User</strong> Manual Version 3.1
Table of Figures<br />
Figure 1:AS-930 Overview frontside.......................................................................... 15<br />
Figure 2: AS-930Overview rear side.......................................................................... 16<br />
Figure 3: Mounting the guides.................................................................................. 17<br />
Figure 4: The operator panel.................................................................................... 19<br />
Figure 5: Main display............................................................................................. 22<br />
Figure 6: Inserting the ink cartridge into the pen stall ................................................. 27<br />
Figure 7: Lock the restraining lever........................................................................... 27<br />
Figure 8: Adjusting the separation ............................................................................ 28<br />
Figure 9: Unused separation fingers.......................................................................... 29<br />
Figure 10: Transport roller height ............................................................................. 29<br />
Figure 11: Turned side guide for a narrow medium ..................................................... 30<br />
Figure 12: Position of the slide ................................................................................. 31<br />
Figure 13: Adjusting the printer to the material thickness ............................................ 32<br />
Figure 14: Positioning the vertical print area .............................................................. 33<br />
Figure 15: Unprintable area ..................................................................................... 33<br />
Figure 16: Printing flush to the top edge of a material ................................................. 34<br />
Figure 17: Print area on C5 envelope ........................................................................ 34<br />
Figure 18: Print position on C4 not possible with NOR setting ....................................... 35<br />
Figure 19: Print position on C4 possible with REV setting ............................................. 35<br />
Figure 20: Testprint................................................................................................ 37<br />
Figure 21: Keep Alive function.................................................................................. 47<br />
Figure 22: PRINT CORR.PATT................................................................................... 48<br />
Figure 23: ADJUST TOF test print ............................................................................. 50<br />
Figure 24: Difference Nor/Rev.................................................................................. 59<br />
Figure 25:LEFT MARGIN, transport direction............................................................... 60<br />
Figure 26: Encoder Pattern ...................................................................................... 71<br />
Figure 27: Pattern A ............................................................................................... 72<br />
Figure 28: Pattern A with defects.............................................................................. 72<br />
Figure 29: Cartridge contacts................................................................................... 73<br />
Figure 30: Pattern B ............................................................................................... 73<br />
Figure 31: Pattern C ............................................................................................... 73<br />
Figure 32: Sample character set print ....................................................................... 74<br />
Figure 33: Sample setting dump print ....................................................................... 75<br />
Figure 34: Sample Input Buffer Dump print................................................................ 76<br />
Figure 35: New Hardware Wizard ............................................................................. 80<br />
<strong>User</strong> Manual Version 3.1 7
Pos: 7 /Bedienungsanleitungen/Geräte neutral/1.0_Ü1_Einführung_allgemein @ 0\mod_1242731723794_912.doc @ 1634 @ 1<br />
Figure 36: Recommended install procedure................................................................ 80<br />
Figure 37: Properties of unspecified device ................................................................ 82<br />
Figure 38: Update the printer driver.......................................................................... 82<br />
Figure 39: Update Driver Software Wizard ................................................................. 82<br />
Figure 40: Select the driver source ........................................................................... 82<br />
Figure 41: Ferrite with plastic case ........................................................................... 83<br />
Figure 42: Adding TCP/IP Port.................................................................................. 84<br />
Figure 43: TCP/IP Printer Port Wizard........................................................................ 84<br />
Figure 44: IP address of the printer .......................................................................... 84<br />
Figure 45: Custom settings...................................................................................... 85<br />
Figure 46: Custom settings of printer port ................................................................. 85<br />
Figure 47: Address printer port settings .................................................................... 86<br />
Figure 48: DHCP Table on server.............................................................................. 88<br />
Figure 49: Test of fix IP (ping test on server) ............................................................. 89<br />
Figure 50: Local Area Connection Properties............................................................... 91<br />
Figure 51: TCP/IPv4 settings ................................................................................... 91<br />
Figure 52: Cleaning the nozzle plate ......................................................................... 93<br />
Figure 53: Nozzle plate and contacts......................................................................... 93<br />
Figure 54: Pen board contacts.................................................................................. 94<br />
Figure 55: Position of element on material ................................................................. 97<br />
Figure 56: White streaks in text ............................................................................... 98<br />
Figure 57: White streaks in between two cartridges .................................................... 99<br />
Figure 58: New hardware detected ......................................................................... 134<br />
Figure 59: Found New Hardware Wizard .................................................................. 134<br />
Figure 60: Device Manager .................................................................................... 136<br />
Figure 61: Device Properties - Details ..................................................................... 136<br />
Figure 62: Command Prompt reply OK .................................................................... 137<br />
Figure 63: Command Prompt reply NOT OK ............................................................. 138<br />
Figure 64: Print dialog window ............................................................................... 143<br />
Figure 65: Print to file dialog.................................................................................. 143<br />
Figure 66: Printer port properties ........................................................................... 144<br />
8 <strong>User</strong> Manual Version 3.1
Pos: 8 /Bedienungsanleitungen/Geräte neutral/1.1_Ü2_Piktogramme_allgemein @ 0\mod_1242731723997_912.doc @ 1638 @ 2<br />
Pos: 9 /Bedienungsanleitungen/Geräte neutral/1.2_Ü2_Hinweise zum Gebrauch dieses Handbuches @ 0\mod_1249459443010_912.doc @ 2613 @ 2<br />
Pos: 10 /Bedienungsanleitungen/Geräte spezifisch/Drucker/1.3_Ü2_Terms and abbreviations @ 1\mod_1260869177556_912.doc @ 8380 @ 2<br />
1 Introduction<br />
In order to ensure both long service life of the AS-930 and its<br />
components, as well as safe conditions of use, we recommend that<br />
you read carefully and comply with the operating instructions and<br />
safety notes. Always be aware of all warnings and notes that are<br />
affixed to or printed on the machine itself.<br />
All persons who are to handle this machine must also be familiar with the operating manual.<br />
Store this manual in a safe place where it is easily accessible for future reference at any<br />
time.<br />
1.1 Pictograms<br />
General warnings<br />
Warning of danger from electricity or electrical shock<br />
Warning of possible fire<br />
Information / Note indicating important information regarding<br />
the handling of the machine.<br />
1.2 Notes for use of this manual<br />
This manual is structured chronologically, and therefore ordered sequentially from the<br />
receipt of the machine packed up to its ready-for-use state.<br />
If you are unfamiliar with the machine, it is best to read through the manual from beginning<br />
to end, where you can follow easy step by step instructions to allow you to fully and<br />
correctly operate the machine.<br />
If you are already familiar with the AS-930, it will make things easy if you to use this<br />
manual as a reference work.<br />
<strong>User</strong> Manual Version 3.1 9
Pos: 11 /Bedienungsanleitungen/Geräte spezifisch/Drucker/1.4_Ü2_System requirements_ONLY_619 @ 2\mod_1272530190780_912.doc @ 17229 @ 2<br />
Pos: 12 /Bedienungsanleitungen/Geräte neutral/2.0_Ü1_Sicherheitshinweise @ 0\mod_1242735234414_912.doc @ 1664 @ 1<br />
1.3 Terms and abbreviations<br />
This <strong>User</strong> Manual uses the following terms and abbreviations related to the<br />
<strong>Neopost</strong> AS-930:<br />
• cartridge = Crt = C, C1, C2, C3<br />
• print unit = Unit = U, U1, U2<br />
A print unit always consists of three ink cartridges.<br />
• print media width = expansion of the print media in transport direction.<br />
• print media height = expansion of the print media across the transport direction.<br />
1.4 System requirements<br />
The <strong>Neopost</strong> AS-930 is designed to be used in connection with a PC. To connect the AS-930<br />
to the PC one free USB port or one free Ethernet (TCP/IP) port is required. The PC should be<br />
an up-to-date model and must have enough processing power and free disk space to run<br />
the <strong>Neopost</strong> Addressing Solutions Software.<br />
We recommend using one of the following operating systems:<br />
• Microsoft Windows 2000 (SP4)<br />
• Microsoft Windows XP (SP3)<br />
• Microsoft Windows Vista (SP2) (32- or 64-bit)<br />
• Microsoft Windows 7 (32- or 64-bit)<br />
10 <strong>User</strong> Manual Version 3.1
Pos: 13 /Bedienungsanleitungen/Geräte neutral/2.1a_Ü2_Allgemeine Sicherheitshinweise_Handbuch @ 0\mod_1249563586836_912.doc @ 2673 @ 2<br />
Pos: 14 /Bedienungsanleitungen/Geräte neutral/2.1c_Allgemeine Sicherheitshinweise_Aufstellen des Gerätes @ 0\mod_1242736827044_912.doc @ 1710 @<br />
Pos: 15 /Bedienungsanleitungen/Geräte neutral/2.1e_Allgemeine Sicherheitshinweise_Elektrische Gefahren_ZWEIPOLIG @ 0\mod_1242736827372_912.doc @ 1718 @<br />
Pos: 16 /Bedienungsanleitungen/Geräte neutral/2.1f_Allgemeine Sicherheitshinweise_Betriebssicherheit/Reinigung/Service @ 0\mod_1242736827200_912.doc @ 1714 @<br />
2 Safety notes<br />
Prior to initial operation, please carefully read the following instructions for the sake of both<br />
your own safety and the printer operating safety. Always observe any warnings and<br />
instructions directly attached to the device. Keep this manual available in order to be able to<br />
check back at any time.<br />
Disregarding this manual may cause<br />
• electric shock,<br />
• injury by being drawn into the transport belt or transport rollers,<br />
• damage to the equipment.<br />
2.1 General safety notes<br />
Caution!<br />
Please read these notes with care.<br />
Keep this manual for future reference.<br />
All notes and warnings found on the machine are to be followed.<br />
Setting up the<br />
machine<br />
A safe, level position is necessary, when installing the machine.<br />
Injuries may be caused by tipping, rolling away or falling.<br />
The machine is to be protected from moisture.<br />
The machine is not suitable for outdoor use.<br />
Electrical<br />
Hazards<br />
The power cable must only be connected to a socket with protective<br />
grounding contact! The protective effect must not be compromised by<br />
the use of an extension cable without a protective grounding<br />
conductor. All interruptions of the protective grounding conductor,<br />
within or outside of the machine, are prohibited.<br />
When fuse failure occurs, electrical machine parts can still carry<br />
voltage.<br />
When making the connection to the mains power, be aware of the<br />
connection values on the rating plate.<br />
Run the power cable in such a way, that no one can trip over it. Do<br />
not place any objects on the power cable.<br />
When the machine is not in use over a long period of time, it should<br />
be disconnected from the power supply in order to avoid any damage<br />
in the event of a voltage surge.<br />
Protect the device from moisture. When moisture enters the machine,<br />
there is a danger of electrical shock.<br />
Never open the machine. For reasons of electrical safety, the machine<br />
should only be opened by authorized service personnel.<br />
<strong>User</strong> Manual Version 3.1 11
Pos: 17 /Bedienungsanleitungen/Geräte neutral/2.1g_Allgemeine Sicherheitshinweise_Ersatzteile/Reparaturen/Umbauverbot @ 0\mod_1249462580902_912.doc @ 2637 @<br />
Pos: 18 /Bedienungsanleitungen/Geräte neutral/2.1h_Allgemeine Sicherheitshinweise_Hinweis Service @ 0\mod_1242737415895_912.doc @ 1746 @<br />
Pos: 19 /Bedienungsanleitungen/Geräte spezifisch/Drucker/2.2_Ü2_Ink safety notice @ 1\mod_1260870536312_912.doc @ 8392 @ 2<br />
Operating<br />
safety<br />
Cleaning the<br />
machine<br />
Machine<br />
inspections<br />
only by<br />
authorized<br />
Service<br />
Partners!<br />
Never put your hands inside the machine when it is running!<br />
There is a danger that injuries can occur through being pulled in and<br />
being crushed on the transport belt or the rotating rollers. In addition,<br />
keep long hair and parts of loose clothing away from the machine<br />
while it is in operation.<br />
In order to prevent damage to the machine, only factory authorized<br />
accessory parts should be used.<br />
Prior to cleaning the machine, it should be disconnected from the<br />
power outlet. When cleaning the machine, do not use liquid or spray<br />
cleaners, but only a cloth dampened with water.<br />
Additional information concerning the cleaning of the device can be<br />
found in chapter „Maintenance and support“.<br />
In the following cases, you should unplug the machine from the<br />
power outlet and contact an authorized service technician:<br />
• When the power cable or its plug is worn or damaged.<br />
• When water or other liquid has entered the device.<br />
• When the device has been dropped/knocked over or the housing is<br />
damaged.<br />
• When there is a significant change in the performance of the<br />
machine.<br />
Spare parts<br />
Repairs<br />
Modification is<br />
not permitted<br />
When repair work is carried out, only original spare parts or spare<br />
parts approved by the manufacturer may be used.<br />
Do not disassemble the machine any further than it is described in<br />
this manual. The opening of the machine by unauthorized personnel<br />
is not permitted. Repairs may only be carried out by authorized<br />
service personnel.<br />
For safety reasons, your own reworking and modifications to the<br />
machine are not permitted.<br />
Please contact your authorized <strong>Neopost</strong> dealer or service partner, for<br />
all questions relating to service and repair. In this way, you ensure<br />
the operational safety of your machine.<br />
12 <strong>User</strong> Manual Version 3.1
Pos: 20 /Bedienungsanleitungen/Geräte neutral/2.3_Ü2_Location of the device @ 0\mod_1242737912401_912.doc @ 1759 @ 2<br />
Pos: 21 /Bedienungsanleitungen/Geräte neutral/2.4_Ü2_Entsorgung @ 0\mod_1242738502378_912.doc @ 1762 @ 2<br />
Pos: 22 /Bedienungsanleitungen/Geräte neutral/3.0_Ü1_Scope of delivery and assembly @ 0\mod_1242739012009_912.doc @ 1765 @ 1<br />
2.2 Ink safety notice<br />
Keep ink cartridges away from children. If you get into skin contact<br />
with the ink, immediately clean off the ink under running water. In case<br />
ink has entered your eye, immediately rinse it with plenty of water.<br />
• The ink cartridge should not be shaken, dropped or hit against the palm or hard<br />
surfaces.<br />
• Install the ink cartridge immediately after removing the protective tape. The cartridge<br />
may not be used after date of expiry!<br />
• Do not try to open or refill a cartridge. This can damage the printer and reduce the<br />
print quality.<br />
• For further information regarding the cleaning of the ink cartridge, please see chapter<br />
8.1.1, on page 92.<br />
2.3 Location of the printer<br />
Be aware when installing the machine that it must stand on a smooth and level surface that<br />
is larger than the printer.<br />
When placing the machine, make sure that there is enough clearance around it, so that you<br />
can access all connections easily.<br />
The floor space for the printer must be sufficiently stable. The tipping over or falling of the<br />
machine can lead to injuries, as well as damage to the machine.<br />
When selecting the installation or storage location for the printer, keep in mind that it must<br />
be protected from strong temperature and humidity changes, direct sunlight and excessive<br />
heat.<br />
The printer must not be subject to vibrations or shocks.<br />
Install the printer near a power outlet, so that the power cable can be disconnected troublefree<br />
at all times.<br />
2.4 Disposal<br />
The printer may not be disposed of in the conventional manner of household waste. Please<br />
dispose the printer in accordance with the regulations in force.<br />
<strong>User</strong> Manual Version 3.1 13
Pos: 23 /Bedienungsanleitungen/Geräte neutral/3.1_Ü2_Scope of delivery @ 0\mod_1250854288313_912.doc @ 2837 @ 2<br />
Pos: 24 /Bedienungsanleitungen/Geräte spezifisch/Drucker/AS-930/3.1_Ü2_Lieferumfang_AS-930_ONLY_619 @ 2\mod_1269277575721_912.doc @ 13776 @<br />
Pos: 25 /Bedienungsanleitungen/Geräte neutral/3.2_Ü2_Delivery @ 0\mod_1242739526953_912.doc @ 1770 @ 2<br />
Pos: 26 /Bedienungsanleitungen/Geräte neutral/3.2_Delivery_ohne Transportsicherung @ 2\mod_1268136038686_912.doc @ 13070 @<br />
Pos: 27 /Bedienungsanleitungen/Geräte neutral/3.3_Ü2_Device overview @ 0\mod_1250854288578_912.doc @ 2841 @ 2<br />
3 Scope of delivery and assembly<br />
3.1 Scope of delivery<br />
• 1x AS-930 printer<br />
• 1x Addressing Solution software CD-ROM<br />
• 1x power cable<br />
• 1x paper feed ramp<br />
• 2x paper side guides ‘small’<br />
• 1x paper side guide ‘medium’<br />
• 1x paper side guide ‘large’<br />
• 1x paper stacker extension<br />
• 3x Black Dye ink cartridges<br />
• 1x Inxdinx ink cartridge box<br />
• 1x Catch tray<br />
• 1x USB connection cable<br />
• 1x Network cabel<br />
• 1x Ferrit<br />
3.2 Delivery<br />
The <strong>Neopost</strong> AS-930 is delivered in appropriate packaging so that it reaches its destination<br />
without damage via a regular mode of transport.<br />
Transportation and storage should be carried out in suitable condition. That means an<br />
ambient temperature between +10°C and +31°C at 20-80% relative humidity (noncondensing).<br />
Conditions outside of these <strong>range</strong>s may harm the machine. Damages from<br />
wrong transportation and storage conditions may not be visible on the packaging.<br />
If the printer has to be shipped again, please retain the packaging. If the packaging is no<br />
longer needed, then please dispose it in an environmentally suitable manner.<br />
14 <strong>User</strong> Manual Version 3.1
Pos: 28 /Bedienungsanleitungen/Geräte spezifisch/Drucker/AS-930/3.3_Geräteübersicht_AS-930_ONLY_619 @ 2\mod_1269277821105_912.doc @ 13780 @<br />
Pos: 24 /Bedienungsanleitungen/Geräte spezifisch/Labeler/L326/4.1_Geräteübersicht_L326 @ 0\mod_1250853155201_6.doc @ 2820 @<br />
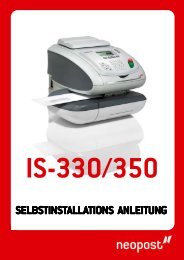
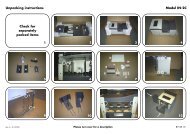
3.3 Device overview<br />
1<br />
3<br />
2<br />
4<br />
5<br />
6<br />
7<br />
9<br />
8<br />
10<br />
Figure 1:AS-930 Overview frontside<br />
1 Paper feed ramp 6 Separators<br />
2 Slide (Runner) 7 Print unit<br />
3 Paper side guides 8 Ink cartridges<br />
4 Operator panel with display 9 Thickness adjustment screw<br />
5 Transport roller adjustment screw 10 Wing screw<br />
<strong>User</strong> Manual Version 3.1 15
Pos: 29 /Bedienungsanleitungen/Geräte neutral/3.3_Ü2_Assembly @ 1\mod_1264168442358_912.doc @ 10763 @<br />
Pos: 30 /Bedienungsanleitungen/Geräte neutral/3.3.1_Ü3_Connecting the power cable @ 1\mod_1264168527578_912.doc @ 10766 @ 3<br />
Pos: 31 /Bedienungsanleitungen/Geräte neutral/5.2b_Warnhinweis Netzkabel @ 0\mod_1246016358876_912.doc @ 1980 @<br />
Pos: 32 /Bedienungsanleitungen/Geräte spezifisch/Drucker/AS-930/3.3.2_Ü3_How to mount the paper feed ramp, side guides and stacker extension_AS-930 @ 2\mod_1269277878394_912.doc @ 13783 @ 3<br />
10 11<br />
12<br />
13<br />
14<br />
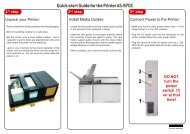
Figure 2: AS-930Overview rear side<br />
10 USB 2.0 interface to the PC for<br />
sending print data<br />
11 Serial interface to the PC for status<br />
feedbacks and service purposes<br />
13 Ethernet (TCP/IP) interface for<br />
sending print data<br />
14 Power input module<br />
12 On/off switch<br />
3.4 Assembly<br />
3.4.1 Connecting the power cable<br />
Power cable<br />
Attention!<br />
The device may only be used in connection to power outlets with<br />
integrated protective conductor (earthing)!<br />
Make sure that the on/off switch is set to off. Plug the power cable<br />
into the power input of the AS-930. Connect the cable to the power<br />
outlet.<br />
16 <strong>User</strong> Manual Version 3.1
Pos: 33 /Bedienungsanleitungen/Geräte neutral/4.0_Ü1_Description of device @ 0\mod_1246003073544_912.doc @ 1919 @ 1<br />
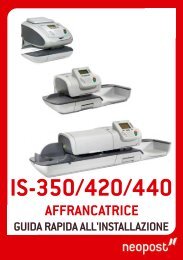
3.4.2 How to mount the paper feed ramp and the side guides<br />
• Mount the paper stacker extension (1) and the paper feed ramp (2) as shown in<br />
Figure 3. Mount one narrow paper side guide (3) next to the printer wall and then<br />
either a narrow (4), medium or large paper side guide on the opposite side.<br />
2<br />
3<br />
1<br />
4<br />
Figure 3: Mounting the guides<br />
<strong>User</strong> Manual Version 3.1 17
Pos: 34 /Bedienungsanleitungen/Geräte neutral/4.2_Ü2_Application <strong>range</strong> @ 0\mod_1250854288985_912.doc @ 2849 @ 2<br />
Pos: 35 /Bedienungsanleitungen/Geräte spezifisch/Drucker/AS-830/4.2_Anwendungsgebiete_AS-830/930 @ 2\mod_1268136311177_912.doc @ 13145 @<br />
Pos: 36 /Bedienungsanleitungen/Geräte neutral/4.3_Ü2_Description of functions @ 0\mod_1250854288782_912.doc @ 2845 @ 2<br />
Pos: 37 /Bedienungsanleitungen/Geräte spezifisch/Drucker/AS-830/4.3_Funktionsbeschreibung_AS830/930 @ 2\mod_1268136433946_912.doc @ 13148 @<br />
Pos: 38 /Bedienungsanleitungen/Geräte neutral/4.4_Ü2_The Operator Panel @ 0\mod_1250854289204_912.doc @ 2853 @ 2<br />
4 Description of device<br />
4.1 Application <strong>range</strong><br />
The <strong>Neopost</strong> AS-930 is an inkjet printer with high font quality.<br />
The main field of application is the printing of mass mailings with addresses and graphics or<br />
postal elements. However, the application is not limited to this purpose.<br />
4.2 Description of functions<br />
The <strong>Neopost</strong> AS-930 printer is a inkjet print system, that is designed for industrial and<br />
professional printing. Different conveyor belts can be placed behind the printer.<br />
The device can be used in connection with an IBM compatible PC and a vary of software<br />
running under Microsoft Windows operation systems.<br />
The print unit of the <strong>Neopost</strong> AS-930 is provided with three HP ink cartridges (C1, C2, C3).<br />
During the printing the unit stays motionless, therefore the device is called a Fixed Head<br />
printer. The alignment of the printed text should be parallel to the paper transport direction.<br />
The print unit covers an area of 500 x 38 mm (19.6 x 1.5"). This corresponds to nine text<br />
lines at a font size of 12 pt.<br />
The nozzles of the print cartridges can automatically be purged with a small amount of ink<br />
before each print start. This allows a constant print quality from the first print on.<br />
For further specifications please see chapter 10 Technical Specifications, on page 129.<br />
18 <strong>User</strong> Manual Version 3.1
Pos: 39 /Bedienungsanleitungen/Geräte spezifisch/Drucker/4.4_Operator_Panel @ 2\mod_1265967728349_912.doc @ 12018 @<br />
Pos: 40 /Bedienungsanleitungen/Geräte spezifisch/Drucker/4.4.1_Ü3_Key Panel_Fixed Head AS-830/930 @ 2\mod_1268137618864_912.doc @ 13153 @ 3<br />
4.3 The Operator Panel<br />
Figure 4: The operator panel<br />
The operator panel is used to easily activate often required functions and select information<br />
from the main display. The operator panel is also used to navigate within the printer menus,<br />
in order to change printer and layout settings, run test modes and look up specific printer<br />
statistics.<br />
The four LEDs (light-emitting diode) on the panel indicate the status of the printer.<br />
LED<br />
Green Online<br />
Blue Offline<br />
O<strong>range</strong> Warning<br />
Red Error<br />
Status indication<br />
Printer is Online<br />
Printer is Offline<br />
Printer displays a warning message<br />
Printer displays an error message<br />
Online and Offline<br />
Only when the printer is Offline you can make changes to printer<br />
settings, use the secondary functions of the arrow key or open printer<br />
menus.<br />
Please note, that when the printer is Online (= able to receive print<br />
data from the PC), the only key that can be used is the Cancel<br />
(Offline) key. The Cancel (Offline) key will turn the printer Offline<br />
(= not able to receive print data from the PC).<br />
<strong>User</strong> Manual Version 3.1 19
4.3.1 Key panel<br />
Below is an explanation of how the different keys of the panel work:<br />
Key<br />
Ok (Online)<br />
Cancel (Offline)<br />
Home<br />
Quick<br />
Arrow up (Test Print)<br />
Arrow right (Paper Length)<br />
Main Function<br />
Turns the printer online and confirms a selection in a<br />
menu<br />
Turns the printer offline and exits the current menu<br />
level.<br />
Opens the main menu of the printer<br />
Opens the quick menu of the printer<br />
Upwards navigation in menus and increasing values in<br />
menus<br />
Navigation to the right<br />
Arrow down (Clean Heads) Downwards navigation in menus and decreasing<br />
values in menus<br />
Arrow left (Run Paper)<br />
Navigation to the left<br />
The four arrow key have secondary functions, which can be executed by hitting one of the<br />
arrow keys and the Quick key together.<br />
Secondary Functions<br />
Please note, that the secondary functions will work slightly different<br />
depending on how long you press the keys.<br />
(Short) = hitting the two buttons just briefly<br />
(Long) = hitting the two keys, and keeping the pressed for a short<br />
amount of time (~ 3 seconds)<br />
20 <strong>User</strong> Manual Version 3.1
Pos: 41 /Bedienungsanleitungen/Geräte spezifisch/Drucker/4.4.2_Ü3_Main_Display @ 1\mod_1261142768887_912.doc @ 9017 @<br />
Below is an explanation of how the different secondary functions of the arrow keys work:<br />
Quick key + Secondary Function<br />
Arrow up (Test Print)<br />
Arrow right (Paper Length)<br />
Arrow down (Clean Heads)<br />
Arrow left (Run Paper)<br />
The printer will display Test and feed pages and print<br />
the test pattern continuously, using the current<br />
printer setting (e.g. print quality). To stop, hit the<br />
Cancel (Offline) key.<br />
(Short) The printer will display PAPER WIDTH: , feed<br />
one page and measure the size of the page. The<br />
measured size will be shown in the display.<br />
(Long) The printer will display PAPER WIDTH: (L),<br />
feed one page and measure the size of the page. The<br />
measured size will be shown in the display. The (L)<br />
indicates that the measured page size will be locked in<br />
the printer, so that the page size cannot be changed<br />
from a PC program.<br />
The printer will feed one page and print a pattern of<br />
bars, using the currently set page size.<br />
The printer will display PapRUN and feed and transport<br />
pages continuously, using the current printer setting<br />
(e.g. transport speed). To stop hit the Cancel (Offline)<br />
key.<br />
This is an useful function to check if, the separation<br />
and the material transport of the printer, are setup<br />
correctly.<br />
<strong>User</strong> Manual Version 3.1 21
Pos: 42 /Bedienungsanleitungen/Geräte spezifisch/Drucker/4.4.3_Main_Display_Fixed_Head_3_cartridges_AS-930_ONLY_ONLY_619 @ 3\mod_1301552853612_912.doc @ 30999 @<br />
4.3.2 Main Display<br />
The main display shows you the most important information about your current print job at<br />
one glance.<br />
J ob Current :1234 5 6 7 ←1<br />
Costs/ 1000 Pg 1 . 5 5 € ←2<br />
M eter/Secon d : 0. 5 4 0 ←3<br />
Pages/ h : 10 5 0 0 ←4<br />
BLA CK DYE<br />
←5<br />
█ █ █ 6x6 d p i ←6<br />
█ █ █ Nor ←7<br />
█ █ █ O n l i n U S B ←8<br />
↑ ↑ ↑<br />
999<br />
Figure 5: Main display<br />
Items per display line<br />
Please note, that there are display lines which contain more that one<br />
item to display. To cycle through all items, select a line (e.g. line 1<br />
counters) with the arrow up or arrow down keys and then hit the<br />
arrow left or arrow right key to show the other items of this line.<br />
Display lines and data<br />
1: Counters This line shows one of the following counters:<br />
Job Current: Shows the number of printed pages<br />
from the current print job (= send from the PC).<br />
Job Power On: Shows the total number of printed<br />
pages from all print jobs, since the printer was turned<br />
on.<br />
TotalService: Shows the number of service pages<br />
printed (e.g. Clean Heads), since the printer was<br />
turned on.<br />
Tot.Power On: Shows the total number of pages<br />
printed, since the printer was turned on. All Print job<br />
pages + all service pages.<br />
To reset one of the counters to zero pages, select this<br />
line and use the arrow right or arrow left key to<br />
show the counter you want to reset and hit the Ok<br />
key. Confirm the reset by selecting Yes and hitting the<br />
Ok key again.<br />
22 <strong>User</strong> Manual Version 3.1
2: Ink costs and ink <strong>range</strong> This line shows one of the following information:<br />
InkCosts/Job Calculates and shows the cost of ink for<br />
the current print job in the set currency.<br />
Costs/1000Pg Calculates and shows the cost of ink<br />
per 1,000 pages of the current print job.<br />
Pages/Cartr. Calculates and shows the number of<br />
pages you can print, of the current print job, with the<br />
remaining amount of ink in the cartridge.<br />
Please consider that the information above are<br />
calculated average values only. Therefore the<br />
accuracy of the values will increase as more pages are<br />
printed.<br />
To show information in this line, you first have to set<br />
a cost per cartridge greater than zero. To do this,<br />
select this line and hit the Ok key. Or you can open<br />
the main menu of the printer and select the following<br />
menu: PRINTER CONFIG. > INK > INK COST CONFIG.<br />
3: Transport speed This line shows the currently set transport speed. To<br />
change the speed, select this line and use the arrow<br />
right or arrow left key to change it. Please note<br />
that the speed is limited by the currently set print<br />
quality (see line 6). E.g. with a print quality of 6 x 6<br />
dpi, the maximum speed is 0.540 meter/second.<br />
4: Throughput This lines shows one of the following information:<br />
Pages/h: Shows the current throughput of the<br />
machine, calculated from the last few pages.<br />
JOB Pages/h: Shows the average throughput since<br />
the beginning of this print job. This is a valuable<br />
information to measure the actual productivity of the<br />
machine.<br />
5: Ink type This line shows the currently set ink type.<br />
6: Print quality This lines shows the currently set print quality. To<br />
change the quality select this line and use the arrow<br />
right or arrow left key to change the quality.<br />
Please note that the selected print quality determines<br />
the maximum speed of the machine.<br />
This setting can be locked, so that a print quality<br />
setting, send from the PC is ignored. To lock this<br />
setting, select this line and press the Ok key for<br />
four seconds. A symbol appears next to the quality<br />
setting, showing that it is locked now.<br />
To unlock the setting select this line again and press<br />
the Ok key for four seconds. The symbol<br />
disappears again.<br />
<strong>User</strong> Manual Version 3.1 23
Pos: 43 /Bedienungsanleitungen/Geräte spezifisch/Drucker/4.4.3_Additional Display Texts_HINWEIS_Table Top @ 2\mod_1275402350991_912.doc @ 17865 @<br />
7: Print direction This line shows the set print direction.<br />
Nor The print layout is printed in normal direction.<br />
Rev The print layout is printed 180° turned.<br />
Please refer to the section “Menu” of this manual, to<br />
get more detailed information about print direction.<br />
This setting can be locked, so that a print direction<br />
setting, send from the PC is ignored. To lock this<br />
setting, select this line and press the Ok key for<br />
four seconds. A symbol appears next to the<br />
direction setting, showing that it is locked now.<br />
To unlock the setting select this line again and press<br />
the Ok key for four seconds. The symbol<br />
disappears again.<br />
8: Status This line shows the printer status and the used<br />
interface.<br />
OnlinUSB The printer is ready to receive print data<br />
from the PC via the USB interface. No changes to<br />
printer settings via a printer menu can be made when<br />
the printer is Online.<br />
OnlinTCP The printer is ready to receive print data<br />
from the PC via the Ethernet interface. No changes to<br />
printer settings via a printer menu can be made when<br />
the printer is Online.<br />
Offline The printer menus can be accessed and<br />
changes to settings can be made when the printer is<br />
Offline.<br />
Changing from OnlinUSB or OnlinTCP to Offline: Hit<br />
the Cancel key.<br />
Changing from Offline to Online: Select this line<br />
(line 8) in the main menu (see Figure 5 above) by<br />
hitting the Cancel key or using the arrow down<br />
key and then hit the Ok key.<br />
9: Ink level cartridge The height of the bars, shows the amount of ink left<br />
per cartridge.<br />
To see the exact percentage of ink left, select one of<br />
the bars with the arrow left key. To manually<br />
change the amount of ink left in the cartridge, change<br />
the value with the arrow up or arrow down keys.<br />
You can access the cartridge menu by selecting one of<br />
the bars with the arrow left key and hitting the Ok<br />
key. In this menu you can reset the amount of ink<br />
to 100% or change the ink type.<br />
24 <strong>User</strong> Manual Version 3.1
Pos: 44 /Bedienungsanleitungen/Geräte neutral/5.0_Ü1_Initial start-up of the device @ 0\mod_1246014198984_912.doc @ 1931 @ 1<br />
Additional display texts<br />
Under certain circumstances additional texts may be shown in the<br />
display. Please see chapter 11.9 Additional display texts, on page<br />
149.<br />
<strong>User</strong> Manual Version 3.1 25
Pos: 45 /Bedienungsanleitungen/Geräte spezifisch/Drucker/5.0_print_first_test_page @ 1\mod_1263302633152_912.doc @ 10181 @<br />
Pos: 46 /Bedienungsanleitungen/Geräte neutral/5.2d_Ü2_How to power-on the device @ 0\mod_1250856526091_912.doc @ 2869 @ 2<br />
Pos: 47 /Bedienungsanleitungen/Geräte spezifisch/Drucker/5.2d_Power-on the device_AS-830/930/960/990 @ 2\mod_1268401851925_912.doc @ 13319 @<br />
Pos: 48 /Bedienungsanleitungen/Geräte spezifisch/Drucker/5.2_Ü2_How to install the ink cartridges _ MEHRERE PATRONEN @ 1\mod_1260880358807_912.doc @ 8482 @ 2<br />
Pos: 49 /Bedienungsanleitungen/Geräte spezifisch/Drucker/5.2b_How to install the ink cartridge_Allgemein @ 1\mod_1261387630600_912.doc @ 10024 @<br />
5 Initial start-up of the device<br />
This section describes all the necessary steps to print the first test page with your <strong>Neopost</strong><br />
AS-930.<br />
5.1 How to power-on the device<br />
Turn on the printer with the on/off switch located on the rear side of the device.<br />
The printer will start an initialization and present the following messages (from top to<br />
bottom):<br />
Message<br />
Loader -01<br />
Version#1.1.xx#<br />
STARTING APPLICATION<br />
Version 4.7.xx –PPC<br />
Printer<br />
Initialization<br />
CHECK CARTRID1,2,3<br />
INSERT ALL CARTRIDG!<br />
CODE: 25<br />
Proceed by pressing the Ok<br />
display will show the main view.<br />
Note<br />
Initialization of the monitor software. The version<br />
number may differ.<br />
Initialization of the printer firmware. The version<br />
number may differ.<br />
Initialization of the printer functions.<br />
This notification is only shown when no cartridges are<br />
inserted in the printer.<br />
key. The printer will switch to the Online mode and the<br />
5.2 How to install the ink cartridges<br />
Cartridge mounting<br />
The restraining lever ensures a safe contact between the ink cartridge<br />
and the electronics of the AS-930.<br />
Please do not force the ink cartridge to its final position by hand<br />
To avoid connection problems and damage, please install the<br />
cartridge as seen in Figure 6 and Figure 7.<br />
26 <strong>User</strong> Manual Version 3.1
Pos: 50 /Bedienungsanleitungen/Geräte spezifisch/Drucker/AS-930/5.3_How to setup the feeder_AS-930 @ 2\mod_1269346259439_912.doc @ 13819 @ 2<br />
Figure 6: Inserting the ink cartridge into the<br />
pen stall<br />
Figure 7: Lock the restraining lever<br />
Installing the<br />
ink cartridge<br />
Please put the cartridge into the mounting (pen stall), by cautiously<br />
pushing it downwards in a straight movement. Do not force or press the<br />
cartridge back into its pen stall by hand.<br />
The cartridge should be in a slightly inclined position. The restraining<br />
lever then tilts the cartridge into its final position.<br />
• Open the restraining lever completely.<br />
• Take the ink cartridge out of the packaging and remove the<br />
protection tape from the print nozzles.<br />
• Insert the ink cartridges one after another with the print nozzles<br />
facing downwards - do not push in the direction of the restraining<br />
lever.<br />
• Lock the lever in direction of the arrow as shown in Figure 7. Thus,<br />
the ink cartridge is tilted into its final position, and the contact is<br />
established correctly.<br />
Setting the ink<br />
type<br />
To ensure the best performance of the ink cartridge the correct ink type<br />
must be set up in the printer. To set the ink type open the menu<br />
PRINTER CONFIG. > INK > SET INK TYPE<br />
Handling ink cartridges<br />
Do not touch the contacts or the nozzle plate of an ink cartridge. This<br />
may lead to reduced print quality.<br />
Ink cartridges<br />
We recommend to use only supported <strong>Neopost</strong> inks in connection<br />
with this printer. Refilled ink cartridges may result in bad printing<br />
quality and may damage the printer.<br />
Please see chapter 9.1 Consumables, on page 126 for applicable ink cartridges.<br />
<strong>User</strong> Manual Version 3.1 27
5.3 How to setup the feeder<br />
To setup the feeder you need to perform the following steps in this order:<br />
1. Adjust the separation<br />
2. Adjust the transport roller height<br />
3. Adjust the paper side guides<br />
4. Fill the feeder with material<br />
5. Adjust the paper feed ramp<br />
1. Adjust the<br />
separation<br />
• Open the fixing screws of both separators and lift them.<br />
• Depending on you medium put one or two pieces under all four<br />
separation fingers.<br />
Thin medium (e.g. single sheets with 100 g/m²)<br />
= two pieces under the fingers<br />
Envelopes<br />
= put the thickest part of the envelope (= flap) under the fingers<br />
When using a narrow medium put two or more pieces next to each<br />
other so that there is material under each separation finger.<br />
Setup all separation fingers<br />
Make sure that there is a medium under each<br />
separation finger. Otherwise unused fingers could<br />
wear the feed rollers (see Figure 9).<br />
• Drop the separation fingers so that they sit on the medium.<br />
• Lock both fixing screws.<br />
• Pull out the medium.<br />
fixing screw<br />
separation<br />
fingers<br />
separator<br />
medium<br />
Figure 8: Adjusting the separation<br />
28 <strong>User</strong> Manual Version 3.1
fixing screws<br />
lift those<br />
separation<br />
fingers as well!<br />
Figure 9: Unused separation fingers<br />
2. Adjust the<br />
transport<br />
rollers height<br />
Set the transport rollers according to the material thickness.<br />
• Lift or lower the transport roller with the transport rollers<br />
adjustment screw (see Figure 10).<br />
• Turn the screw counter-clockwise as far as it will go for thin<br />
materials.<br />
• Turn the screw clockwise to lift the transport rollers when feeding<br />
thicker materials.<br />
transport rollers<br />
adjustment screw<br />
transport rollers<br />
Figure 10: Transport roller height<br />
<strong>User</strong> Manual Version 3.1 29
3. Adjust the<br />
paper side<br />
guides<br />
• Move the two paper side guides apart.<br />
• Put in one medium in the desired position.<br />
• Position the paper feed ramp in the middle of the two side guides.<br />
• Push the side guides back towards the medium.<br />
• The side guides should be close to the medium so that it cannot<br />
turn when it is pulled into the printer. But the side guides should<br />
not clamp the medium.<br />
• When using a very narrow medium, you can turn one of the<br />
narrow paper side guides (see Figure 11).<br />
Figure 11: Turned side guide for a narrow medium<br />
4. Fill the<br />
feeder with<br />
material<br />
• Put one medium into the feeder.<br />
• Push the medium all the way to the separation fingers.<br />
• Shingle the additional media pile.<br />
• Put the pile into the feeder.<br />
5. Adjust the<br />
paper feed<br />
ramp<br />
• Set the tilt of the paper feed ramp according to your material:<br />
flexible material, small width = steep tilt<br />
inflexible material, large width = flat tilt<br />
• Push the slide towards the pile so that the bottom two or three<br />
materials are free from the weight of the pile (as shown in Figure<br />
12).<br />
30 <strong>User</strong> Manual Version 3.1
Pos: 51 /Bedienungsanleitungen/Geräte spezifisch/Drucker/AS-830/5.4_Ü2_Adjusting Printer to the material thickness_AS-830/930 @ 2\mod_1268645618968_912.doc @ 13413 @ 2<br />
Figure 12: Position of the slide<br />
5.4 How to adjust the printer to the material thickness<br />
To ensure a sharp and clean print quality and a safe material transport, you have to adjust<br />
the distance from the print unit to the material.<br />
• Open the wing screw (see Figure 13).<br />
• Turn the thickness adjustment screw to the appropriate value.<br />
For material up to 0.3 mm thickness you can use the lowest position.<br />
• Tighten the wing screw again.<br />
<strong>User</strong> Manual Version 3.1 31
Pos: 52 /Bedienungsanleitungen/Geräte spezifisch/Drucker/AS-830/5.6_Ü2_How to position the print unit_AS-830_930 @ 2\mod_1268645846866_912.doc @ 13419 @ 23<br />
thickness adjustment<br />
screw<br />
wing screw<br />
Figure 13: Adjusting the printer to the material thickness<br />
5.5 How to position the print area<br />
The vertical position of the print area must be setup manually.<br />
• Open the wing screw and move the unit to the desired position.<br />
• As a reference for the position of the print area, the two small rollers underneath the<br />
wing screw can be used. The print area is located between these two rollers (see<br />
indication in Figure 14).<br />
• Lock the wing screw again.<br />
32 <strong>User</strong> Manual Version 3.1
wing screw<br />
print area<br />
Figure 14: Positioning the vertical print area<br />
Unprintable area<br />
Please consider that there is a 15 mm / 0.59" wide area, next to the<br />
side wall of the machine, inside which cannot be printed. This area is<br />
marked grey in Figure 15 below.<br />
To print next to the top edge of a material, please position the<br />
material and the print unit as shown in Figure 16.<br />
unprintable area of 15 mm<br />
Figure 15: Unprintable area<br />
<strong>User</strong> Manual Version 3.1 33
unprintable area of 15 mm<br />
Figure 16: Printing flush to the top edge of a material<br />
5.5.1 Sample print area positions<br />
The possible print area on a C5 envelope is shown in Figure 17 below.<br />
Figure 17: Print area on C5 envelope<br />
34 <strong>User</strong> Manual Version 3.1
Pos: 53 /Bedienungsanleitungen/Geräte spezifisch/Drucker/AS-830/5.5_Ü2_Width Measurement of the Print Media_AS-830/930 @ 2\mod_1268645716308_912.doc @ 13417 @ 2<br />
Using the REV setting<br />
You can use the REVERSE setting to print onto a position that would<br />
be outside the possible 145 mm / 5.7” print area.<br />
Please see Figure 18 and Figure 19 for an example using the REV<br />
setting to print in the desired position on a C4 envelope..<br />
Figure 18: Print position on C4 not possible with NOR setting<br />
Figure 19: Print position on C4 possible with REV setting<br />
<strong>User</strong> Manual Version 3.1 35
Pos: 54 /Bedienungsanleitungen/Geräte spezifisch/Drucker/5.7_Ü2_How to set the print direction @ 1\mod_1260881170148_912.doc @ 8511 @ 2<br />
Pos: 55 /Bedienungsanleitungen/Geräte spezifisch/Drucker/5.7_How to set the print direction_Verweis_Fixed Head Printer/AS-Orbit/AS-OrbitBase @ 2\mod_1276076390012_912.doc @ 18021 @<br />
Pos: 56 /Bedienungsanleitungen/Geräte spezifisch/Drucker/5.9_Ü2_Test print_AS-830/930/960/990 @ 2\mod_1269248556360_912.doc @ 13721 @ 2<br />
5.6 Width measurement of the print media<br />
The printer permanently controls the size of the fed products. Therefore the AS-930 needs<br />
to know the dimension of the paper at the beginning of a new print job. The dimension can<br />
either be measured manually or be send by a PC software. The dimension values are stored<br />
in the memory of the printer as reference values, until new dimensions are measured.<br />
PC software<br />
Sending the correct paper dimensions to the printer, is only available<br />
in PC software designed to work together with this <strong>Neopost</strong> printer.<br />
When you are using a PC software that is able to send the paper dimension, you do not<br />
need to measure the paper size manually.<br />
• Measure the paper dimension manually<br />
Put one media into the feeder and proceed as described in chapter Fehler!<br />
Verweisquelle konnte nicht gefunden werden., on page Fehler! Textmarke<br />
nicht definiert..<br />
• Set paper dimensions in PC software<br />
Please refer to the manual of your PC software.<br />
5.7 How to set the print direction (orientation)<br />
Depending of the direction in which the products are fed into the printer, it could become<br />
necessary to turn the direction of the printed image by 180°. The <strong>Neopost</strong> AS-930 has a<br />
built-in feature that automatically turns the printed image by 180°. This adjustment can<br />
either be set directly in the printer menu, in the software application used to send the data<br />
to the printer or in the printer driver.<br />
Software application and printer driver<br />
Setting the print direction (orientation), is only available in software<br />
applications and printer drivers designed to work together with<br />
<strong>Neopost</strong> printers.<br />
• Set the print direction in the printer driver<br />
Please check the setting of your driver.<br />
• Set the print direction (orientation) in the printer menu ORIENTATION, on page 59 for<br />
more details.<br />
• Set the print direction (orientation) in software application<br />
Please refer to the manual of your software application.<br />
36 <strong>User</strong> Manual Version 3.1
Pos: 57 /Bedienungsanleitungen/Geräte spezifisch/Drucker/AS-930/5.9_Testprint Scan_AS-930 @ 2\mod_1269277957955_912.doc @ 13788 @<br />
Pos: 58 /Bedienungsanleitungen/Geräte spezifisch/Drucker/6.0_Ü1_Printer Menu (firmware V4.8) @ 3\mod_1298994979036_912.doc @ 30615 @ 1<br />
5.8 How to perform a test print<br />
The test print function allows a fast test of the printer settings. The test print can be used to<br />
get a quick impression of the print quality of the inserted ink cartridges as well. There is no<br />
need to have a connection to a PC to use this function.<br />
You can use the following key combination (offline mode):<br />
Quick + Arrow up = TEST PRINT (multiple pages, to abort press the Cancel key)<br />
Test print troubleshooting:<br />
• The test printout shows little gaps or thin white lines.<br />
Some print nozzles may be clogged. Please use the CLEAN HEADS ( Quick +<br />
Arrow down) function to purge the nozzles. You may also clean the nozzles using a<br />
cleaning cloth. Please see chapter 8.1.1 How to clean an ink cartridge, on page 92<br />
for further information.<br />
• The position of the test print is misplaced.<br />
Please check if a paper size measurement has been done.<br />
Check the position of the print unit.<br />
Figure 20: Testprint<br />
<strong>User</strong> Manual Version 3.1 37
Pos: 59 /Bedienungsanleitungen/Geräte spezifisch/Drucker/6.0_Introduction_Printer_Menu @ 2\mod_1265890955551_912.doc @ 11914 @<br />
Pos: 60.1 /Bedienungsanleitungen/Geräte spezifisch/Drucker/Menüpunkte Drucker/0000 Inhaltsverzeichnis_Menü_Drucker @ 0\mod_1253108250855_912.doc @ 3380 @<br />
6 Printer menu (firmware V4.8)<br />
This chapter provides an overview of the menu structure of your <strong>Neopost</strong> printer, as well as<br />
a description for each single item of the menu.<br />
The index below shows the pages numbers for each item of the menu, as well as the<br />
structure of the printer menu. The indention of a menu items shows its position within the<br />
menu. For example:<br />
SERVICE<br />
HARDWARE TEST<br />
Display<br />
(main menu)<br />
(submenu)<br />
(sub-submenu)<br />
QUICK MENU....................................................................................................................... 41<br />
PRINTER RESET ..................................................................................................41<br />
CLEAR PRINT QUEUE ...........................................................................................42<br />
REPEAT PAGES ...................................................................................................42<br />
PAPER MEASUREMENT .........................................................................................43<br />
RUN PAPER ........................................................................................................43<br />
TEST PRINT........................................................................................................43<br />
CLEAN HEADS.....................................................................................................44<br />
PURGE HEADS ....................................................................................................44<br />
SPEED MEASUREMENT .........................................................................................44<br />
SHOW LAST ERRORS ...........................................................................................44<br />
MAIN MENU ........................................................................................................................ 45<br />
PRINTER CONFIG................................................................................................................ 46<br />
MAINTENANCE....................................................................................................46<br />
AUTO CLEAN HEADS...........................................................................46<br />
MANUAL PURGE .................................................................................46<br />
KEEP ALIVE .......................................................................................47<br />
ADJUSTMENTS....................................................................................................48<br />
ADJUSTMENT STEPS...........................................................................48<br />
PRINT CORR.PATT.............................................................48<br />
CORR. C1-C2 ...................................................................49<br />
CORR. C2-C3 ...................................................................49<br />
ADJUST TOF......................................................................................50<br />
BOOT DEFAULTS .................................................................................................50<br />
PC PROGRAM.....................................................................................51<br />
UNIT of MEASUREM. ...........................................................................51<br />
COMMUNICATION ..............................................................................51<br />
PAGE DATA SIZE................................................................................52<br />
INK ...................................................................................................................52<br />
SET INK TYPE ....................................................................................52<br />
RESET INK LEVEL...............................................................................53<br />
INK COST CONFIG. ............................................................................53<br />
WARMING CARTRIDGE........................................................................54<br />
PREWARMING CARTR. ........................................................................54<br />
ERROR HANDLING...............................................................................................55<br />
SOFT FONT ERROR.............................................................................55<br />
SET PAP.TOLERANCE ..........................................................................55<br />
ERROR LOW INK ................................................................................56<br />
BEEPER ............................................................................................56<br />
AUTOM.PAGE REPEAT .........................................................................56<br />
38 <strong>User</strong> Manual Version 3.1
JOB PARAMETERS................................................................................................................57<br />
PRINT QUALITY .................................................................................................. 57<br />
TRANSPORT PARAM............................................................................................. 58<br />
PAPER SPEED .................................................................................... 58<br />
AUTO PAP SPEED............................................................................... 58<br />
PAPER TIME-OUT ............................................................................... 58<br />
LAYOUT ............................................................................................................. 59<br />
ORIENTATION ................................................................................... 59<br />
PAPER SIZE ...................................................................................... 60<br />
LEFT MARGIN.................................................................................... 60<br />
OFFSET EDGE ................................................................................... 60<br />
FONT PARAMETERS ............................................................................................. 60<br />
FONT ............................................................................................... 60<br />
CHARACTER SPACING ........................................................................ 61<br />
CHARACTER SET................................................................................ 61<br />
TYPE OF BARCODE .............................................................................................. 61<br />
PAPER SENSOR................................................................................................... 62<br />
DOS MODE ........................................................................................................ 62<br />
LINE MODE ....................................................................................... 62<br />
HEX TO ASCII ................................................................................... 62<br />
AUTO LINEFEED ................................................................................ 63<br />
LINE SPACING................................................................................... 63<br />
SERVICE ..............................................................................................................................64<br />
SELECT TEST PATT.............................................................................................. 64<br />
HARDWARE TEST................................................................................................ 64<br />
Display............................................................................................. 64<br />
Keyboard.......................................................................................... 64<br />
Ram ................................................................................................ 65<br />
Ram Contin....................................................................................... 65<br />
NV-Ram Cont. ................................................................................... 65<br />
Encoder............................................................................................ 65<br />
Speed Measurment ............................................................................ 65<br />
Paper Sensor .................................................................................... 65<br />
Sensor&Paper Run ............................................................................. 65<br />
Cartridges......................................................................................... 66<br />
Prewarming ...................................................................................... 66<br />
PEN Board ........................................................................................ 66<br />
LED/Beeper ...................................................................................... 67<br />
CONFIGURAT. INFO............................................................................................. 68<br />
Firmware:......................................................................................... 68<br />
Version: ........................................................................................... 68<br />
SerNo.: ............................................................................................ 68<br />
Model: ............................................................................................. 68<br />
Page cnt:.......................................................................................... 68<br />
RAM................................................................................................. 68<br />
Hardware: ........................................................................................ 69<br />
USB rev.: ......................................................................................... 69<br />
PCBA: .............................................................................................. 69<br />
Batch:.............................................................................................. 69<br />
IP .................................................................................................... 69<br />
Port No.: .......................................................................................... 69<br />
MAC: ............................................................................................... 70<br />
SM .................................................................................................. 70<br />
GW.................................................................................................. 70<br />
Monitor: ........................................................................................... 70<br />
Ink pack:.......................................................................................... 70<br />
SERVICE PRINT .................................................................................................. 71<br />
Alignment Horiz................................................................................. 71<br />
Alignment Vertic. ............................................................................... 71<br />
<strong>User</strong> Manual Version 3.1 39
Pos: 60.2 /Bedienungsanleitungen/Geräte spezifisch/Drucker/Menüpunkte Drucker/Ü1/Ü0_0000_Menü_Drucker_QUICK MENU @ 0\mod_1254487154644_912.doc @ 4102 @<br />
Encoder Pattern .................................................................................71<br />
Cartr. Print Patt .................................................................................71<br />
Print char. set....................................................................................74<br />
SETTING DUMP ...................................................................................................75<br />
INPUT BUFFER DUMP ...........................................................................................76<br />
DEALER .............................................................................................................76<br />
SHOW ERORR MESSAG ........................................................................................76<br />
SHOW WARNING MSGS........................................................................................76<br />
LANGUAGE .......................................................................................................................... 77<br />
SETTING ............................................................................................................................. 78<br />
40 <strong>User</strong> Manual Version 3.1
Pos: 60.3 /Bedienungsanleitungen/Geräte spezifisch/Drucker/Menüpunkte Drucker/Quick Menü/Ü2_6001_PRINTER RESET_FW_4.8 @ 3\mod_1287746467437_912.doc @ 27909 @<br />
Pos: 60.4 /Bedienungsanleitungen/Geräte spezifisch/Drucker/Menüpunkte Drucker/Quick Menü/Ü2_6002_CLEAR PRINT QUEUE @ 0\mod_1254923958143_912.doc @ 5266 @<br />
QUICK MENU<br />
The Quick<br />
key opens the following menu:<br />
PRINTER RESET<br />
The PRINTER RESET process is used when a print job needs to be cancelled. This process<br />
will clear the PC's spooler by first accepting all print data being sent from the PC application,<br />
deleting them and then resetting the printer internal buffer.<br />
To perform a PRINTER RESET execute the following steps:<br />
• Select PRINTER RESET in the QUICK MENU and hit the Ok key.<br />
• CLEAR SPOOLER Select and hit the Ok key.<br />
• Hit the Cancel key.<br />
• The o<strong>range</strong> Warning LED will blink until all print data is deleted from the spooler.<br />
While deleting the data, the following information are shown in the display:<br />
Data/s<br />
Current transfer rate in bytes per second<br />
o Data/s<br />
Average transfer rate in bytes per second<br />
Total Data<br />
Total data transferred in bytes<br />
Time [ms]<br />
Total time elapsed in seconds<br />
If your print job is large; pressing cancel from the software application<br />
may shorten the time it takes to complete this task.<br />
• When the o<strong>range</strong> Warning LED stops blinking; check whether your PC application has<br />
sent all print data to the printer. For example check if the progress bar for this print<br />
job reached 100%.<br />
• When the software application shows that all print data has been sent or the job has<br />
been cancelled, hit the Cancel key on the printer.<br />
• The printer will now clear the printer buffer and go back to the QUICK MENU.<br />
Job cancel with PRINTER RESET<br />
Performing a PRINTER RESET is a good way to securely cancel a<br />
running print job. After performing a PRINTER RESET you can start<br />
with a new print job.<br />
<strong>User</strong> Manual Version 3.1 41
Pos: 60.5 /Bedienungsanleitungen/Geräte spezifisch/Drucker/Menüpunkte Drucker/Quick Menü/Ü2_6003_REPEAT PAGES @ 0\mod_1254923973899_912.doc @ 5302 @<br />
Pos: 60.6 /Bedienungsanleitungen/Geräte spezifisch/Drucker/Menüpunkte Drucker/Quick Menü/Ü2_6005_PAPER MEASUREMENT_AS-830/860/960/990 @ 1\mod_1257423727756_912.doc @ 7245 @<br />
CLEAR PRINT QUEUE<br />
Selecting CLEAR PRINT QUEUE will delete all print data within the printer buffer. It will not<br />
delete any print data waiting to be sent from the PC application during a print job.<br />
• Select CLEAR PRINT QUEUE in the QUICK MENU and hit the Ok key.<br />
CLEAR PRINT QUEUE during a print job<br />
Make sure to only perform a CLEAR PRINT QUEUE when the PC<br />
application has sent the complete print data. Performing a CLEAR<br />
PRINT QUEUE during a print job will cause a print data error.<br />
REPEAT PAGES<br />
After a print stop (e. g paper jam) some products can’t be used and have to be thrown<br />
away. The REPEAT PAGES function allows the user to easily reprint up to 20 pages (records)<br />
of the print set. Therefore the printer always keeps the data of the last printouts in its<br />
memory.<br />
• After a print stop the printer will go into Offline mode.<br />
• Select REPEAT PAGES in the QUICK MENU and hit the Ok key<br />
• Using the up or down arrow keys; choose how many pages you want to reprint<br />
• Confirm the value by hitting the Ok key<br />
• Afterwards hit the Cancel key twice<br />
• The printing will continue after switching back to Online mode. The printer will repeat<br />
the chosen amount of pages (records) and will then continue with the print job.<br />
AUTOM.PAGE REPEAT function<br />
You can activate an automatic page repeat function after print stops.<br />
(PRINTER CONFIG. > ERROR HANDLING > AUTOM.PAGE REPEAT)<br />
Double printed pages<br />
Be aware of double printed pages. Please verify the correct sequence<br />
of the printed pages after a printing stop.<br />
After job end<br />
Please be aware that this feature will NOT work after a print job was<br />
finished. Since with the last page of a print job, all job settings are<br />
deleted from the printer.<br />
42 <strong>User</strong> Manual Version 3.1
Pos: 60.7 /Bedienungsanleitungen/Geräte spezifisch/Drucker/Menüpunkte Drucker/Quick Menü/Ü2_6007_RUN PAPER @ 0\mod_1254923965108_912.doc @ 5282 @<br />
Pos: 60.8 /Bedienungsanleitungen/Geräte spezifisch/Drucker/Menüpunkte Drucker/Quick Menü/Ü2_6009_TEST PRINT @ 0\mod_1254923966653_912.doc @ 5286 @<br />
Pos: 60.9 /Bedienungsanleitungen/Geräte spezifisch/Drucker/Menüpunkte Drucker/Quick Menü/Ü2_6010a_CLEAN HEADS_830/930/960/990/Orbit/OrbitB @ 1\mod_1257425319325_912.doc @ 7249 @<br />
PAPER MEASUREMENT<br />
The printer will measure the paper width.<br />
Therefore please put one sheet of paper in the feeding position. After the measurement the<br />
printer will display the detected paper width.<br />
If you wish to lock the measured value in the printer, press the Ok button for 2 seconds<br />
(the PC software settings will not affect the printer set values).<br />
You can also use the following key combinations:<br />
Quick +<br />
Quick +<br />
(short) = PAPER MEASUREMENT<br />
(long) = PAPER MEASUREMENT (locked)<br />
RUN PAPER<br />
The printer will feed and transport paper continuously until you hit the Cancel<br />
key.<br />
• Select RUN PAPER in the QUICK MENU and hit the Ok key.<br />
• Hit the Cancel key to stop the printer.<br />
You can also use the following key combination:<br />
Quick + Arrow left (long) = RUN PAPER<br />
TEST PRINT<br />
The printer will do test prints with the set test pattern. To see which pattern is set go to the<br />
menu SERVICE > SELECT TEST PATT. Please hit the Cancel key to stop the printer.<br />
• Select TEST PRINT in the QUICK MENU and hit the Ok key.<br />
• Hit the Cancel key to stop the printer.<br />
You can also use the following key combination:<br />
Quick + Arrow up (long) = TEST PRINT<br />
<strong>User</strong> Manual Version 3.1 43
Pos: 60.10 /Bedienungsanleitungen/Geräte spezifisch/Drucker/Menüpunkte Drucker/Quick Menü/Ü2_6011_PURGE HEADS_AS-830/930 @ 1\mod_1258121533146_912.doc @ 7547 @<br />
Pos: 60.11 /Bedienungsanleitungen/Geräte spezifisch/Drucker/Menüpunkte Drucker/Quick Menü/Ü2_6014_SPEED MEASUREMENT_Non AS-700/710/Orbit/OrbitBase @ 0\mod_1254924958754_912.doc @ 5310 @<br />
Pos: 60.12 /Bedienungsanleitungen/Geräte spezifisch/Drucker/Menüpunkte Drucker/Quick Menü/Ü2_6017_SHOW LAST ERRORS @ 0\mod_1254924965999_912.doc @ 5322 @<br />
Pos: 60.13 /Bedienungsanleitungen/Geräte spezifisch/Drucker/Menüpunkte Drucker/Ü1/Ü0_0000_MAIN MENU @ 0\mod_1254487458572_912.doc @ 4106 @<br />
CLEAN HEADS<br />
The printer will perform a cleaning cycle.<br />
One sheet of paper will be fed into the printer and all printheads will shoot a small amount<br />
of ink onto it. This function is useful to clear clogged nozzles.<br />
Please make sure to put the print units in a position, where the ink will hit the paper.<br />
• Select CLEAN HEADS in the QUICK MENU and hit the Ok key.<br />
You can also use the following key combination:<br />
Quick + Arrow down = CLEAN HEADS<br />
PURGE HEADS<br />
The printer will perform a cleaning by firing a small amount of ink into the small slots under<br />
the print unit. This function is useful to reactivated clogged nozzles.<br />
SPEED MEASUREMENT<br />
The printer will start a paper run with the current speed setting. In the display the actual<br />
measured transport speed will be shown in mm/s (millimetres per second) and (feet per<br />
minute). This function is used to check the set transport speed.<br />
• Select SPEED MEASUREMENT in the QUICK MENU and hit the Ok key.<br />
• Hit the Cancel key to stop the measurement.<br />
SHOW LAST ERRORS<br />
The last three error messages and there corresponding error code are shown. In addition to<br />
that the page count at which the error occurred is shown for each error message.<br />
• Select SHOW LAST ERRORS in the QUICK MENU and hit the Ok key.<br />
44 <strong>User</strong> Manual Version 3.1
MAIN MENU<br />
The Home key opens the main menu. Here you can access the following menus:<br />
PRINTER CONFIG.<br />
JOB PARAMETERS<br />
SERVICE<br />
LANGUAGE<br />
SETTING<br />
Pos: 60.14 /Bedienungsanleitungen/Geräte spezifisch/Drucker/Menüpunkte Drucker/Ü1/Ü1_1000_Menü_Drucker_PRINTER CONFIG. @ 0\mod_1253108079366_912.doc @ 3374 @<br />
<strong>User</strong> Manual Version 3.1 45
Pos: 60.15 /Bedienungsanleitungen/Geräte spezifisch/Drucker/Menüpunkte Drucker/Ü2/Ü2_1100_MAINENANCE @ 0\mod_1254483965167_912.doc @ 4041 @<br />
Pos: 60.17 /Bedienungsanleitungen/Geräte spezifisch/Drucker/Menüpunkte Drucker/Ü3/Ü4/Ü3_1102_MANUAL PURGE @ 0\mod_1254815684362_912.doc @ 4283 @<br />
Pos: 60.18 /Bedienungsanleitungen/Geräte spezifisch/Drucker/Menüpunkte Drucker/Ü3/Ü4/Ü3_1109_KEEP ALIVE_FROM_FW_4.8 @ 3\mod_1298357904534_912.doc @ 30543 @<br />
PRINTER CONFIG.<br />
This menu provides access to the following features.<br />
MAINTENANCE<br />
Pos: 60.16 /Bedienungsanleitungen/Geräte spezifisch/Drucker/Menüpunkte Drucker/Ü3/Ü4/Ü3_1101_Auto Clean Heads_830/860/960/990/Orbit/OrbitB @ 0\mod_1254489902659_912.doc @ 4114 @<br />
AUTO CLEAN HEADS<br />
Here you can activate the cleaning of the print cartridge prior to a print job sent from the<br />
PC.<br />
When set to 1st, the printer will perform a purge (print a purge image) onto a product and<br />
then start with the first page of the print job.<br />
off, 1st<br />
Default: off<br />
MANUAL PURGE<br />
This feature allows you to set the Quick<br />
key to perform a cleaning of the ink cartridges.<br />
When set to Quick you can purge the nozzles of all cartridges by pressing the Quick key<br />
for more than 1.5 seconds. This will work when the printer is OFFLINE as well when the<br />
printer is ONLINE, except during a print job.<br />
off, Quick<br />
Default: off<br />
46 <strong>User</strong> Manual Version 3.1
KEEP ALIVE<br />
Here you can turn on the KEEP ALIVE maintenance function. This function helps to prevent<br />
the ink from drying inside the nozzles of the cartridge.<br />
During print jobs it can happen that some parts (nozzles) of an ink cartridge are not used<br />
on every page. For example when most addresses in a job consist of 5 lines of text but a<br />
few addresses consist of 6 lines of text. The nozzles used to print the 6 th line are therefore<br />
used only every few pages. The not permanent usages may cause the ink inside these<br />
nozzles to dry. The KEEP ALIVE maintenance function helps to avoid that by printing a<br />
pattern of dots across the whole page.<br />
Test before a print job<br />
Please perform a few test prints with this function, to make sure that<br />
the visual effect of the pattern of dots is acceptable for your print job.<br />
without Keep Alive<br />
with Keep Alive „high“<br />
Figure 21: Keep Alive function<br />
Option<br />
off<br />
low<br />
medium<br />
high<br />
Note<br />
No pattern of dots is printed.<br />
No nozzles maintenance.<br />
A faint pattern of dots is printed.<br />
Low nozzle maintenance.<br />
A more noticeable pattern of dots is printed.<br />
Medium nozzle maintenance.<br />
A stronger pattern of dots is printed.<br />
High nozzle maintenance.<br />
Default: off<br />
Pos: 60.19 /Bedienungsanleitungen/Geräte spezifisch/Drucker/Menüpunkte<br />
Drucker/Ü2/Ü2_1300_ADJUSTMENTS @ 1\mod_1260954224542_912.doc @ 8611 @<br />
<strong>User</strong> Manual Version 3.1 47
Pos: 60.22 /Bedienungsanleitungen/Geräte spezifisch/Drucker/Menüpunkte Drucker/Ü3/Ü4/Ü4_130306_CORR. C1-C2 @ 0\mod_1254908702556_912.doc @ 4799 @<br />
ADJUSTMENTS<br />
Pos: 60.20 /Bedienungsanleitungen/Geräte spezifisch/Drucker/Menüpunkte Drucker/Ü3/Ü4/Ü3_1303_ADJUSTMENT STEPS @ 0\mod_1254483974277_912.doc @ 4053 @<br />
ADJUSTMENT STEPS<br />
Pos: 60.21 /Bedienungsanleitungen/Geräte spezifisch/Drucker/Menüpunkte Drucker/Ü3/Ü4/Ü4_130301_PRINT CORR. PATT._AS-830/930 @ 2\mod_1269513262374_912.doc @ 13912 @<br />
PRINT CORR.PATT.<br />
This correction pattern is a test printout which allows the user to detect easily the right<br />
correction offset. By pressing the Ok button, the printer will start the test printout on the<br />
available paper.<br />
This kind of calibration may become necessary since a completely tolerance-free production<br />
of a print unit is not possible. Slight deviations due to manufacturing tolerances can be<br />
balanced via the software of the control device. Calibration can only be carried out at the<br />
installed device and can therefore not be performed by the manufacturer.<br />
Figure 22 shows an example of this Correction Pattern. Each column of the printout<br />
represents a possible correction value. The user has to choose the pair of bars that matches<br />
best. The number above the chosen column represents the correction value for the<br />
unit/cartridge combination of the correspondent row (please note that already entered<br />
correction values will not have any effect on this test pattern. The test printout is used as a<br />
reference to detect offsets between the units/cartridges).<br />
Figure 22: PRINT CORR.PATT.<br />
To perform this print, all ink cartridges must be inserted in the<br />
printer.<br />
48 <strong>User</strong> Manual Version 3.1
Pos: 60.23 /Bedienungsanleitungen/Geräte spezifisch/Drucker/Menüpunkte Drucker/Ü3/Ü4/Ü4_130308_CORR. C2-C3 @ 0\mod_1254842370770_912.doc @ 4669 @<br />
Pos: 60.24 /Bedienungsanleitungen/Geräte spezifisch/Drucker/Menüpunkte Drucker/Ü3/Ü4/Ü3_1304_Adjust TOF_Fixed_Head @ 1\mod_1260517437834_912.doc @ 8253 @<br />
CORR. C1-C2<br />
To ensure seamlessly transition between the print areas of cartridge C1 and C2, their<br />
relatively horizontal print positions can be calibrated. This adjustment becomes necessary if<br />
there are little stepped offsets in printed vertical lines between two cartridges.<br />
The correction values can be adjusted in a <strong>range</strong> between +24 and -24. One<br />
step = 0.08 mm ( 1 / 300 ’’). Use the PRINT CORR.PATT. test to analyse the offset between the<br />
print units.<br />
Positive values will shift the print start of cartridge C1 a step to the right<br />
(relatively to cartridge C2), negative values will move it to the left (relatively to<br />
cartridge C2).<br />
-24, -23, ... 0, ..., +23, +24<br />
Default: 0<br />
CORR. C2-C3<br />
The (horizontal) correction between the cartridges C2 and C3 can be set in the same way as<br />
described in CORR. C1-C2.<br />
Default: 0<br />
<strong>User</strong> Manual Version 3.1 49
Pos: 60.25 /Bedienungsanleitungen/Geräte spezifisch/Drucker/Menüpunkte Drucker/Menü_Drucker_Warning_Factroy_setting @ 1\mod_1259054235982_912.doc @ 7641 @<br />
Pos: 60.26 /Bedienungsanleitungen/Geräte spezifisch/Drucker/Menüpunkte Drucker/Ü2/Ü2_1500_BOOT_DEFAULTS @ 0\mod_1254483976902_912.doc @ 4057 @<br />
Pos: 60.27 /Bedienungsanleitungen/Geräte spezifisch/Drucker/Menüpunkte Drucker/Menü_Drucker_Hinweis_BOOT DEFAULTS settings remain after printer reset @ 2\mod_1275288488760_912.doc @ 17703 @<br />
Pos: 60.28 /Bedienungsanleitungen/Geräte spezifisch/Drucker/Menüpunkte Drucker/Ü3/Ü4/Ü3_1504_PC PROGRAMM @ 0\mod_1254489913867_912.doc @ 4168 @<br />
ADJUST TOF<br />
The “Top of form” (TOF) sensor or paper sensor detects the edge of every fed paper and<br />
controls the timing of the print heads. To ensure a correct positioning of the printed image<br />
an adjustment value is set in this menu.<br />
To make an adjustment press Quick + (Test Print). The AS-930 will now print an<br />
adjustment page with the one print cartridge, closest to the feeder. Measure the distance<br />
between the paper edge and the printed bars. See Figure 23 below. Enter the measured<br />
distance in the printer menu and press the Ok button.<br />
Figure 23: ADJUST TOF test print<br />
Factory setting<br />
This is a default setting, entered at the initiation of the machine in the<br />
factory. The user should change this setting only in case of a printer<br />
malfunction and after consulting a technician.<br />
BOOT DEFAULTS<br />
All settings made in this menu apply for all print jobs and are retained after switching off<br />
the printer.<br />
• Select BOOT DEFAULTS in the PRINTER CONFIG. menu and hit the Ok key. You will<br />
be presented the following choices:<br />
BOOT DEFAULTS settings remain after printer reset<br />
The settings in the BOOT DEFAULTS menu cannot be changed by<br />
resetting the machine (neither by a "Non-Mechanical Reset" nor by a<br />
"Defaul Reset"). The boot default settings have to be changed in the<br />
BOOT DEFAULTS menu.<br />
50 <strong>User</strong> Manual Version 3.1
Pos: 60.29 /Bedienungsanleitungen/Geräte spezifisch/Drucker/Menüpunkte Drucker/Ü3/Ü4/Ü3_1506_UNIT of MEASUREM. @ 0\mod_1254489917899_912.doc @ 4172 @<br />
Pos: 60.30 /Bedienungsanleitungen/Geräte spezifisch/Drucker/Menüpunkte Drucker/Ü3/Ü4/Ü3_1515_COMMUNICATION_ONLY_619 @ 3\mod_1283333962340_912.doc @ 27443 @<br />
Pos: 60.31 /Bedienungsanleitungen/Geräte spezifisch/Drucker/Menüpunkte Drucker/Ü3/Ü4/Ü3_1517_PAGE DATA SIZE_FROM_FW_4.8 @ 3\mod_1297871830429_912.doc @ 30350 @<br />
PC PROGRAM<br />
Some applications require that you set this option to special.<br />
Option<br />
standard<br />
special<br />
Note<br />
For Microsoft Windows applications<br />
For Cobra, Oracle user<br />
Default: standard<br />
UNIT of MEASUREM.<br />
Here you can choose between „millimeter“ and „inch[feet/min]“ as unit of length. All<br />
length and size settings in the printer will be displayed in the unit set in the menu.<br />
COMMUNICATION<br />
This feature is used to select the interface used for the communication between the printer<br />
and the PC. Select the interface and press the Ok key.<br />
Option<br />
USB<br />
TCP/IP<br />
dynamic IP<br />
fix IP<br />
Note<br />
The USB interface will be used.<br />
The TCP/IP interface will be used.<br />
dynamic IP<br />
Port Number<br />
Default: 9100<br />
fix IP<br />
Port Number<br />
Default: 9100<br />
IP Address<br />
Default: 192.168.50.180<br />
Subnet Mask<br />
Default: 255.255.255.000<br />
Gateway IP Address<br />
Default: 192.168.50.252<br />
Default: USB<br />
<strong>User</strong> Manual Version 3.1 51
Pos: 60.32 /Bedienungsanleitungen/Geräte spezifisch/Drucker/Menüpunkte Drucker/Ü2/Ü2_1600_INK @ 0\mod_1253108139897_912.doc @ 3377 @<br />
Pos: 60.33 /Bedienungsanleitungen/Geräte spezifisch/Drucker/Menüpunkte Drucker/Ü3/Ü4/Ü3_1601_SET INK TYPE_Freigabe Level 0_FW_4.8 @ 0\mod_1254912883313_912.doc @ 4835 @<br />
PAGE DATA SIZE<br />
This menu is used to select how much of the printer memory should be reserved for storing<br />
pages. If the feature AUTOM.PAGE REPEAT is used and the job contains with large graphics it<br />
is recommended to set PAGE DATA SIZE to maxim.<br />
Option<br />
default<br />
level1<br />
level2<br />
maxim<br />
Default: default<br />
Note<br />
Least amount of memory is reserved.<br />
Largest amount of memory is reserved.<br />
INK<br />
Select INK in the PRINTER CONFIG. menu and hit the Ok<br />
the following choices:<br />
key. You will be presented with<br />
SET INK TYPE<br />
Here the used ink type has to be selected. The listed parameters are optimized for the<br />
different <strong>Neopost</strong> inks. The parameters directly affect the electrical signals from the printer<br />
to the cartridge and are important for a correct ink drop formation.<br />
You can either set one type of ink for all cartridges/units or enter an individual combination<br />
of ink types.<br />
The chosen ink type will be displayed above the ink level bars in the printer display. If one<br />
ink type is used for all cartridges/units, the full ink name will be shown (e. g. “VERSATILE”).<br />
When using a combination of different inks, each ink will be represented by one letter above<br />
the correspond ink level bar (e. g. “v” for Versatile Black).<br />
Special application inks<br />
Some special application ink parameters are only available by feature<br />
update.<br />
Please contact your authorized <strong>Neopost</strong> dealer for further information.<br />
Option<br />
d BLACK DYE<br />
m MAX GLOSSY<br />
v VERSATILE BLAC<br />
f FAST DRY BLACK<br />
i IQ INK<br />
x #10 INK<br />
Note<br />
Black Dye ink cartridge<br />
Max Glossy ink cartridge<br />
Versatile Black ink cartridge<br />
Fast Dry Black ink cartridge<br />
IQ ink cartridge<br />
#10 ink cartridge<br />
52 <strong>User</strong> Manual Version 3.1
Pos: 60.34 /Bedienungsanleitungen/Geräte spezifisch/Drucker/Menüpunkte Drucker/Ü3/Ü4/Ü3_1602_RESET INK LEVEL_non-Shuttlehead @ 0\mod_1254908139920_912.doc @ 4737 @<br />
Pos: 60.35 /Bedienungsanleitungen/Geräte spezifisch/Drucker/Menüpunkte Drucker/Ü3/Ü4/Ü3_1603_INK COST CONFIG._without_Bulk @ 0\mod_1254908139420_912.doc @ 4729 @<br />
s SPOT COLOUR<br />
q IMS INK<br />
u USER INK<br />
Spot Color ink cartridge<br />
IMS ink cartridge<br />
Special application ink for printing on difficult<br />
substrate. Please read the additional operation<br />
instructions for this ink typ.<br />
Not optimized default parameter.<br />
This parameter can be used for all not <strong>Neopost</strong><br />
approved inks.<br />
Default: d BLACK DYE<br />
Always set the ink type according to your actually used ink!<br />
The different parameters are optimized for these types.<br />
Wrong assignations can lead to overheating and damage of the<br />
cartridges.<br />
RESET INK LEVEL<br />
This feature is used to reset the calculated ink level of a cartridge. Choose All Units for a<br />
total reset or select individual cartridges to restore their ink level.<br />
This reset should only be done when inserting a new, full cartridge. Otherwise the ink level<br />
bar in the display will not show a correct filling level.<br />
This feature is only accurate if it is used correctly. When cartridges<br />
are removed for cleaning and storage they must be returned to the<br />
location they were originally installed.<br />
Suggestion: Label each cartridge (U1C1, U1C2, …)<br />
When a new cartridge is installed the ink level for the corresponding<br />
cartridge position must be reset.<br />
INK COST CONFIG.<br />
This feature is used to set all parameters required for the InkCosts/Job, the Costs/1000Pg<br />
and the Pages/Cartr. counters.<br />
Parameter<br />
COSTS/CARTRIDGE<br />
CURRENCY<br />
Note<br />
Here you can enter the cost per ink cartridge.<br />
Default: 0<br />
Here you can choose which currency symbol is shown<br />
in the display:<br />
€ Euro<br />
$ Pound<br />
£ Pound<br />
¥ Yuan<br />
other<br />
Default: € Euro<br />
<strong>User</strong> Manual Version 3.1 53
Pos: 60.36 /Bedienungsanleitungen/Geräte spezifisch/Drucker/Menüpunkte Drucker/Ü3/Ü4/Ü3_1605_WARMING CARTRIDGE_All Printer @ 0\mod_1254912882048_912.doc @ 4819 @<br />
Pos: 60.37 /Bedienungsanleitungen/Geräte spezifisch/Drucker/Menüpunkte Drucker/Menü_Drucker_Hinweis_Nicht "Lock"-bar @ 0\mod_1254823525509_912.doc @ 4313 @<br />
Pos: 60.38 /Bedienungsanleitungen/Geräte spezifisch/Drucker/Menüpunkte Drucker/Ü3/Ü4/Ü3_1606_PREWARMING CARTR._All Printer @ 0\mod_1254912880610_912.doc @ 4807 @<br />
Pos: 60.39 /Bedienungsanleitungen/Geräte spezifisch/Drucker/Menüpunkte Drucker/Menü_Drucker_Hinweis_Nicht "Lock"-bar @ 0\mod_1254823525509_912.doc @ 4313 @<br />
Pos: 60.40 /Bedienungsanleitungen/Geräte spezifisch/Drucker/Menüpunkte Drucker/Ü2/Ü2_1700_ERROR HANDLING @ 0\mod_1254485110808_912.doc @ 4071 @<br />
Activate ink related counters<br />
In order to use the InkCosts/Job, the Costs/1000Pg and the<br />
Pages/Cartr. counters in the display, you must enter a value greater<br />
than 0 at COSTS/CARTRIDGE.<br />
WARMING CARTRIDGE<br />
With this option activated, the printer will send warming pulses to non-printing printhead<br />
nozzles. The warming will only be applied if the printhead temperature drops under a<br />
certain value, and only idle nozzles will be heated.<br />
The option ensures that non-printing nozzles keep a certain temperature during the whole<br />
print job time. The temperature affects the viscosity of the ink. Providing a constant<br />
temperature can improve the print quality.<br />
off, on<br />
Default: on<br />
When using a software application that was designed to control this<br />
feature (e. g. Flexmail, BulkMailer), this configuration will be<br />
overwritten with the settings of the software.<br />
In this case use the software options to configure the printer.<br />
PREWARMING CARTR.<br />
With this option activated, the printer will send a preheat pulse to all nozzles of the<br />
cartridge, right before starting a print job.<br />
This function avoids cold starting of the printhead. The cartridge instantly gets heated up<br />
and the quality of the first print impulses will be improved.<br />
on, All Units<br />
Default: on<br />
When using a software application that was designed to control this<br />
feature (e. g. Flexmail, BulkMailer), this configuration will be<br />
overwritten with the settings of the software.<br />
In this case use the software options to configure the printer.<br />
54 <strong>User</strong> Manual Version 3.1
Pos: 60.41 /Bedienungsanleitungen/Geräte spezifisch/Drucker/Menüpunkte Drucker/Ü3/Ü4/Ü3_1701_SOFT FONT ERROR @ 0\mod_1254908138045_912.doc @ 4705 @<br />
Pos: 60.42 /Bedienungsanleitungen/Geräte spezifisch/Drucker/Menüpunkte Drucker/Ü3/Ü4/Ü3_1702_SET PAP. TOLERANCE_non LOG Geräte @ 0\mod_1254908137717_912.doc @ 4701 @<br />
Pos: 60.43 /Bedienungsanleitungen/Geräte spezifisch/Drucker/Menüpunkte Drucker/Ü3/Ü4/Ü3_1703_ERROR LOW INK @ 0\mod_1254908138248_912.doc @ 4709 @<br />
ERROR HANDLING<br />
Select ERROR HANDLING in the PRINTER CONFIG. menu and hit the Ok<br />
presented with the following choices:<br />
key. You will be<br />
SOFT FONT ERROR<br />
This feature is used to set the printer response when it detects a PC font related error.<br />
Option<br />
cont. print<br />
stop print<br />
Default: stop print<br />
Note<br />
If a font error occurs, the machine will continue<br />
printing. A warning message will be displayed.<br />
If a font error occurs, the printer will stop and report<br />
the failure.<br />
SET PAP.TOLERANCE<br />
Use this feature to set the tolerance of the measured paper length. The tolerance can be<br />
varied in nine steps, from 8 mm up to 70 mm (0.31” up to 2.75”). If one sheet of paper<br />
exceeds this tolerance level, the printer will stop and display an error message.<br />
This value is important for detecting paper jams or double sheets inside the printer.<br />
Therefore the default value of 8 mm should only be increased if the media being used truly<br />
varies in length (e.g. magazines with inserts) or is made out of material that is difficult to<br />
transport (e.g. thick, heavy, rough-textured).<br />
When media of longer length is detected, the printer will stop and give the error PAPER JAM<br />
OR WRONG PAPER WIDTH! CODE: 02<br />
8mm, 13mm, 18mm, 23mm, 28mm, 38mm, 48mm, 58mm, 70mm<br />
0.31”, 0.51”, 0,71“, 0.90”, 1.10”, 1.49”, 1.88”, 2.28”, 2.75”<br />
Default: 8mm / 0.31 inch<br />
<strong>User</strong> Manual Version 3.1 55
Pos: 60.44 /Bedienungsanleitungen/Geräte spezifisch/Drucker/Menüpunkte Drucker/Ü3/Ü4/Ü3_1704_BEEPER @ 0\mod_1254908139186_912.doc @ 4725 @<br />
Pos: 60.45 /Bedienungsanleitungen/Geräte spezifisch/Drucker/Menüpunkte Drucker/Ü3/Ü4/Ü3_1705_AUTOM.PAGE REPEAT @ 0\mod_1254908137482_912.doc @ 4697 @<br />
Pos: 60.46 /Bedienungsanleitungen/Geräte spezifisch/Drucker/Menüpunkte Drucker/Ü1/Ü1_2000_Menü_Drucker_JOB PARAMETERS @ 0\mod_1253111357161_912.doc @ 3393 @<br />
ERROR LOW INK<br />
If the calculated ink level of a cartridge goes down to a certain value, the printer can warn<br />
the user or even stop the printing process.<br />
Option<br />
EMPTY CARTRIDGE<br />
cont. print/stop print<br />
SET EMPTY LEVEL<br />
0%, ... 9%<br />
SET LOW INK LEVEL<br />
0%, ... 9%<br />
Note<br />
Here you can set if the printer should stop or continue<br />
to print when the empty level is reached.<br />
Default: stop print<br />
You can adjust the empty level of the cartridge<br />
according to your experience.<br />
Default: 0%<br />
You can adjust the low ink level of the cartridge<br />
according to your experience.<br />
When the ink level reaches this point, the printer will<br />
warn the user.<br />
Default: 2%<br />
BEEPER<br />
Here you can adjust the acoustic warn signals (beeper) of the printer.<br />
Option<br />
off<br />
short<br />
large<br />
interm.<br />
Note<br />
No acoustic warnings.<br />
Acoustic warning by a short beep signal (2 s).<br />
Acoustic warning by a continuous beep signal.<br />
Press any button to switch it off.<br />
Acoustic warning by a pulsing beep signal.<br />
Press any button to switch it off.<br />
Default: off<br />
AUTOM.PAGE REPEAT<br />
After a print stop (e. g. paper jam) the printer can automatically reprint the last one or two<br />
pages of the print job.<br />
no, 1 page, 2 pages<br />
Default: No<br />
Double printed pages<br />
Be aware of double printed pages. Please control the correct<br />
sequence of the printed pages after a printing break.<br />
56 <strong>User</strong> Manual Version 3.1
Pos: 60.47 /Bedienungsanleitungen/Geräte spezifisch/Drucker/Menüpunkte Drucker/Ü2/Ü2_2100_2101_PRINT_QUALITY @ 0\mod_1254485113011_912.doc @ 4075 @<br />
Pos: 60.48 /Bedienungsanleitungen/Geräte spezifisch/Drucker/Menüpunkte Drucker/Menü_Drucker_Hinweis_"Locked" @ 0\mod_1254823271140_912.doc @ 4309 @<br />
Pos: 60.49 /Bedienungsanleitungen/Geräte spezifisch/Drucker/Menüpunkte Drucker/Ü2/Ü2_2200_TRANSPORT_PARAM. @ 0\mod_1254831968116_912.doc @ 4341 @<br />
JOB PARAMETERS<br />
This menu provides access to the following features.<br />
PRINT QUALITY<br />
Here you can set the print quality, the resolution in dpi (dots per inch) the printer will use.<br />
Each of the eight print quality settings consist out of two numbers, one before the x and one<br />
after, e.g. 3x6D.<br />
The first number (1, 2, 3 or 6) tells you the resolution in transport direction or in the<br />
direction of the cartridge carriage. This first number determines the maximum speed you<br />
can run the printer.<br />
The second number (1 or 6) tells you the resolution across the transport direction or across<br />
the direction of the cartridge carriage. This second number has no influence on the speed of<br />
the printer.<br />
The volume of ink printed onto the substrate increases from 1x3D (minimum) to 6x6D<br />
(maximum).<br />
Print quality Note Possible speed (depending on printer type)<br />
6x6D<br />
600 x 600 dpi Up to 0.54 m/s 106.2 ft/min<br />
6x3D<br />
600 x 300 dpi Up to 0.54 m/s 106.2 ft/min<br />
3x6D<br />
300 x 600 dpi Up to 1.08 m/s 212.5 ft/min<br />
3x3D<br />
300 x 300 dpi Up to 1.08 m/s 212.5 ft/min<br />
2x6D<br />
200 x 600 dpi Up to 1.52 m/s 299.2 ft/min<br />
2x3D<br />
200 x 300 dpi Up to 1.52 m/s 299.2 ft/min<br />
1x6D<br />
150 x 600 dpi Up to 2 m/s 393.7 ft/min<br />
1x3D<br />
150 x 300 dpi Up to 2 m/s 393.7 ft/min<br />
Default: 6x6D<br />
Choosing the print quality<br />
The print quality you choose for your print job has a major influence<br />
on the speed of the printer, the darkness of the printed image and<br />
the dry time of the ink on the substrate.<br />
This option can be “locked” in the printer menu. In this case the PC<br />
software cannot overwrite these settings.<br />
<strong>User</strong> Manual Version 3.1 57
Pos: 60.51 /Bedienungsanleitungen/Geräte spezifisch/Drucker/Menüpunkte Drucker/Ü3/Ü4/Ü3_2202_AUTO PAP. SPEED @ 0\mod_1254914052452_912.doc @ 4891 @<br />
Pos: 60.52 /Bedienungsanleitungen/Geräte spezifisch/Drucker/Menüpunkte Drucker/Ü3/Ü4/Ü3_2212_PAPER TIME OUT @ 0\mod_1254914555050_912.doc @ 4939 @<br />
TRANSPORT PARAM.<br />
Pos: 60.50 /Bedienungsanleitungen/Geräte spezifisch/Drucker/Menüpunkte Drucker/Ü3/Ü4/Ü3_2201_PAPER SPEED_Only_AS-930/960/990 @ 1\mod_1259769374173_912.doc @ 8077 @<br />
PAPER SPEED<br />
This feature is used to set the speed of the material transportation. Note that the speed of<br />
the transportation determines the level of print quality you can set. See table below.<br />
Option<br />
1820 mm/s 358.1 ft./min<br />
1520 mm/s 299.1 ft./min<br />
1320 mm/s 259.7 ft./min<br />
1080 mm/s 212.5 ft./min<br />
910 mm/s 179.0 ft./min<br />
720 mm/s 141.6 ft./min<br />
540 mm/s 106.2 ft./min<br />
420 mm/s 82.6 ft./min<br />
270 mm/s 53.1 ft./min<br />
120 mm/s 23.6 ft./min<br />
Possible print quality (dpi)<br />
1x3, 1x6<br />
1x3, 1x6, 2x3, 2x6<br />
1x3, 1x6, 2x3, 2x6<br />
1x3, 1x6, 2x3, 2x6, 3x3, 3x6<br />
1x3, 1x6, 2x3, 2x6, 3x3, 3x6<br />
1x3, 1x6, 2x3, 2x6, 3x3, 3x6<br />
1x3, 1x6, 2x3, 2x6, 3x3, 3x6, 6x3, 6x6<br />
1x3, 1x6, 2x3, 2x6, 3x3, 3x6, 6x3, 6x6<br />
1x3, 1x6, 2x3, 2x6, 3x3, 3x6, 6x3, 6x6<br />
1x3, 1x6, 2x3, 2x6, 3x3, 3x6, 6x3, 6x6<br />
Default: 1820 mm/s<br />
358.1 ft./min<br />
AUTO PAP SPEED<br />
This feature is used to set if and how the printer should control the feeding speed an<br />
integrated or of a serial connected feeder. This options works only with feeders which can<br />
be speed controlled by the print system.<br />
Option<br />
on<br />
off<br />
80%<br />
60%<br />
Note<br />
The printer controls the feeding speed according to<br />
the print and data throughput.<br />
No feeding speed control. Fixed speed.<br />
Feeding speed set to 80% of the maximum speed.<br />
Feeding speed set to 60% of the maximum speed.<br />
Default: on<br />
PAPER TIME-OUT<br />
58 <strong>User</strong> Manual Version 3.1
Pos: 60.53 /Bedienungsanleitungen/Geräte spezifisch/Drucker/Menüpunkte Drucker/Ü2/Ü2_2300_LAYOUT @ 0\mod_1254831971240_912.doc @ 4345 @<br />
Pos: 60.54 /Bedienungsanleitungen/Geräte spezifisch/Drucker/Menüpunkte Drucker/Ü3/Ü4/Ü3_2301_ORIENTATION_Fixed Head/AS-Orbit/AS-OrbitBase @ 1\mod_1257267215646_912.doc @ 7211 @<br />
Pos: 60.55 /Bedienungsanleitungen/Geräte spezifisch/Drucker/Menüpunkte Drucker/Ü3/Ü4/Ü3_2302_PAPER SIZE @ 0\mod_1254914550424_912.doc @ 4911 @<br />
Use this feature to set the behaviour of the printer when no more material is being fed<br />
during and if the printer should continue to run after a print job was finished.<br />
Option<br />
on<br />
off<br />
Default: on<br />
Note<br />
No more material is fed during a print job:<br />
The printer will show NoPaper in the main display view<br />
and after a short while the printers stops and shows<br />
the error message NO PAPER !! CODE 01.<br />
Print job finished:<br />
The printer will stop.<br />
No more material is fed during a print job:<br />
The printer will show NoPaper in the main display view<br />
but will continue to run until either material is fed<br />
again (feeder refilled) or the Cancel key is pressed.<br />
Print job finished:<br />
The printer will continue to run until the Cancel<br />
is pressed.<br />
key<br />
LAYOUT<br />
Here you can configure different layout settings directly in the printer menu. These manual<br />
settings were made for users that print out of Microsoft DOS applications.<br />
All functions in the following submenus are obsolete for users, who<br />
use a modern Microsoft Windows computer with layout softwares like<br />
“Flexmail” or “BulkMailer”. In those cases all layout information is<br />
included in the print job, that is sent from PC to the printer.<br />
ORIENTATION<br />
This feature is used to turn the whole print image by 180°.The print layout on the PC can be<br />
edited in the normal view, while the printouts will be done reversed.<br />
Figure 24: Difference Nor/Rev<br />
Rev, Nor<br />
Default: Nor<br />
<strong>User</strong> Manual Version 3.1 59
Pos: 60.56 /Bedienungsanleitungen/Geräte spezifisch/Drucker/Menüpunkte Drucker/Ü3/Ü4/Ü3_2303_LEFT MARGIN_Fixed Head @ 0\mod_1254914048389_912.doc @ 4871 @<br />
Pos: 60.57 /Bedienungsanleitungen/Geräte spezifisch/Drucker/Menüpunkte Drucker/Ü3/Ü4/Ü3_2307_OFFSET EDGE_Fixed head @ 0\mod_1254914551284_912.doc @ 4919 @<br />
Pos: 60.58 /Bedienungsanleitungen/Geräte spezifisch/Drucker/Menüpunkte Drucker/Ü2/Ü2_2400_FONT_PARAMETERS @ 0\mod_1254831974770_912.doc @ 4349 @<br />
Pos: 60.60 /Bedienungsanleitungen/Geräte spezifisch/Drucker/Menüpunkte Drucker/Ü3/Ü4/Ü3_2402_CHARACTER SPACING @ 0\mod_1254914550940_912.doc @ 4915 @<br />
PAPER SIZE<br />
This feature is used to choose between different predefined paper formats. To use different<br />
paper dimensions, please use the “PAPER MEASUREMENT” function (Quick menu or key<br />
combination Quick + )<br />
Excecutive, Letter, Legal, Ledger, A3, A4, A5, A6, Monarch, C10, Intern.DL, INSD, C4,<br />
C5, C6, B4, B5, B5JIS, Card1, Card2, Hagaki, <strong>User</strong><br />
LEFT MARGIN<br />
This feature is used to set the left margin of the print area in [mm]/[inch].<br />
Figure 25:LEFT MARGIN, transport direction<br />
OFFSET EDGE<br />
This feature is used to set a global offset for the distance between the paper edge (front<br />
edge in paper transport direction) and the beginning of the print area.<br />
FONT PARAMETERS<br />
Pos: 60.59 /Bedienungsanleitungen/Geräte spezifisch/Drucker/Menüpunkte Drucker/Ü3/Ü4/Ü3_2401_FONT @ 0\mod_1254914552628_912.doc @ 4935 @<br />
FONT<br />
This feature is used to choose one of the 13 printer internal fonts. These font types are<br />
totally integrated into the printer firmware (Nevertheless you can print any True Type Font<br />
if you use a modern Microsoft Windows computer).<br />
Cour12, Cour12bo, Cour12it, Helv07, Helv10, Helv12, Helv12bo, Helv12it,<br />
Helv13, LetGot12, TmsRm12, Bru12, OCR-A<br />
Default: Cour12<br />
60 <strong>User</strong> Manual Version 3.1
Pos: 60.61 /Bedienungsanleitungen/Geräte spezifisch/Drucker/Menüpunkte Drucker/Menü_Drucker_Hinweis_Plain text output only @ 2\mod_1268922052172_912.doc @ 13590 @<br />
Pos: 60.62 /Bedienungsanleitungen/Geräte spezifisch/Drucker/Menüpunkte Drucker/Ü3/Ü4/Ü3_2403_CHARACTER SET @ 0\mod_1254913756363_912.doc @ 4863 @<br />
Pos: 60.63 /Bedienungsanleitungen/Geräte spezifisch/Drucker/Menüpunkte Drucker/Ü2/Ü2_2500_2501_TYPE OF BARCODE_FROM_4.8 (with IMB) @ 3\mod_1298294457092_912.doc @ 30505 @<br />
Pos: 60.64 /Bedienungsanleitungen/Geräte spezifisch/Drucker/Menüpunkte Drucker/Ü2/Ü2_2600_PAPER SENSOR_Table_Top_Printers_ONLY @ 2\mod_1269507237536_912.doc @ 13873 @<br />
CHARACTER SPACING<br />
This feature is used to set the spacing between the individual characters from 0 to 90 dots.<br />
Default: 0<br />
Plain text output only<br />
When using a modern Microsoft Windows computer with layout<br />
software like "Flex Mail" or "Bulk Mailer" it is not necessary to use this<br />
menu.<br />
CHARACTER SET<br />
This feature is used to set different 7 and 8-bit character sets according to the countryspecific<br />
notation.<br />
PC8 (PC-8), Rom8 (Roman8), P850 (PC-850), ECMA (ECMA-94 Latin 18), P8DN (PC-8<br />
Denmark/Norway), ICEL (ICEL), P852 (PC-852), P860 (PC-860), P857 (PC-857), Lat5<br />
(Latin-5), USA7 (ASCII USA), UK7 (ASCII UK), Fra7 (ASCII France), Ger7 (ASCII Germany),<br />
Ita7 (ASCII Italy), Spa7 (ASCII Spain), Den7 (ASCII Denmark), Nor7 (ASCII Norway),<br />
Swed7 (ASCII Sweden), SwN7 (ASCII Sweden/Names), Por7 (ASCII Portugal)<br />
TYPE OF BARCODE<br />
You can choose between different predefined bar code systems. When activated, the<br />
incoming ASCII character stream will automatically converted into bar code characters. (You<br />
can print any bar code, if you use a modern Microsoft Windows computer).<br />
zip, bpo4, kix, 2/5i, codabar, code 39, ean, code 128, code 93, AUS4state<br />
(FORMAT CONTROL: 4state11, 4state45, 4state59, 4state62; CUSTOMER ENCODING: C<br />
table, N table), canada, IMB, off,<br />
Default: off<br />
<strong>User</strong> Manual Version 3.1 61
Pos: 60.65 /Bedienungsanleitungen/Geräte spezifisch/Drucker/Menüpunkte Drucker/Ü2/Ü2_2700_DOS_MODE @ 0\mod_1254832327765_912.doc @ 4361 @<br />
Pos: 60.67 /Bedienungsanleitungen/Geräte spezifisch/Drucker/Menüpunkte Drucker/Ü3/Ü4/Ü3_2702_HEX TO ASCII @ 0\mod_1254915739923_912.doc @ 5003 @<br />
Pos: 60.68 /Bedienungsanleitungen/Geräte spezifisch/Drucker/Menüpunkte Drucker/Ü3/Ü4/Ü3_2703_AUTO LINEFEED @ 0\mod_1254915734173_912.doc @ 4975 @<br />
PAPER SENSOR<br />
Here you can adjust the behaviour of the paper sensor.<br />
Option<br />
On<br />
Off<br />
Note<br />
The paper sensor (also Top of Form (TOF) sensor)<br />
detects the front edge and the rear edge of the<br />
material. In this setting the paper sensor is active<br />
over the complete length of the material. The paper<br />
length is controlled in this setting, so paper jams or<br />
double feeds will be detected.<br />
The paper sensor detects the front edge of the<br />
material. Then the paper sensor is set to inactive until<br />
5 mm before the anticipated rear edge of the<br />
material. This allows to process materials that have<br />
e.g. a colourful surface or a hole (die cut) in them.<br />
The paper length is controlled in this setting, so paper<br />
jams or double feeds will be detected.<br />
To properly use this setting, the<br />
correct material size must be<br />
set in the printer. Either sent by<br />
the PC software or measured<br />
manually.<br />
If the material separation and<br />
transport is not setup correctly,<br />
turning off the paper sensor can<br />
cause misprints.<br />
Default: On<br />
DOS MODE<br />
Pos: 60.66 /Bedienungsanleitungen/Geräte spezifisch/Drucker/Menüpunkte Drucker/Ü3/Ü4/Ü3_2701_LINE MODE @ 0\mod_1254915736970_912.doc @ 4987 @<br />
LINE MODE<br />
This feature is used to set a number of lines that separate one page (address) from the<br />
next.<br />
0 to 36<br />
Default: 0<br />
HEX TO ASCII<br />
Conversion from HEX to ASCII.<br />
If the conversion is switched on, the printer interprets the percentage sign “%“ as a nonprintable<br />
control character. The two characters following the % sign are interpreted as HEX<br />
values, e.g. %0C = Form Feed.<br />
off, on<br />
Default: off<br />
62 <strong>User</strong> Manual Version 3.1
Pos: 60.69 /Bedienungsanleitungen/Geräte spezifisch/Drucker/Menüpunkte Drucker/Menü_Drucker_Hinweis_Plain text output only @ 2\mod_1268922052172_912.doc @ 13590 @<br />
Pos: 60.70 /Bedienungsanleitungen/Geräte spezifisch/Drucker/Menüpunkte Drucker/Ü3/Ü4/Ü3_2704_LINE SPACING @ 0\mod_1254915740548_912.doc @ 5011 @<br />
Pos: 60.71 /Bedienungsanleitungen/Geräte spezifisch/Drucker/Menüpunkte Drucker/Menü_Drucker_Hinweis_Plain text output only @ 2\mod_1268922052172_912.doc @ 13590 @<br />
Pos: 60.72 /Bedienungsanleitungen/Geräte spezifisch/Drucker/Menüpunkte Drucker/Ü1/Ü1_3000_Menü_Drucker_SERVICE @ 0\mod_1253111438389_912.doc @ 3396 @<br />
AUTO LINEFEED<br />
This feature defines how the printer should interpret the control characters:<br />
CR = Carriage Return (Moves the cursor back to the first position of the same line.)<br />
LF = Line Feed<br />
(Moves the cursor to the next line.)<br />
FF = Form Feed<br />
(Ejects the current page.)<br />
Option<br />
Note<br />
off<br />
CR = CR<br />
LF = LF<br />
FF = FF<br />
on_1<br />
CR = CR + LF<br />
LF = LF<br />
on_2<br />
FF = FF<br />
CR = CR<br />
LF = CR + LF<br />
on_3<br />
Default: off<br />
FF = CR + FF<br />
CR = CR + LF<br />
LF = CR + LF<br />
FF = CR + FF<br />
Plain text output only<br />
When using a modern Microsoft Windows computer with layout<br />
software like "Flex Mail" or "Bulk Mailer" it is not necessary to use this<br />
menu.<br />
LINE SPACING<br />
Defines the space between the printed text lines.<br />
1, 2, 3, 4 ,5, 6, 7, 8, 9, 10<br />
Default: 6<br />
Plain text output only<br />
When using a modern Microsoft Windows computer with layout<br />
software like "Flex Mail" or "Bulk Mailer" it is not necessary to use this<br />
menu.<br />
<strong>User</strong> Manual Version 3.1 63
Pos: 60.73 /Bedienungsanleitungen/Geräte spezifisch/Drucker/Menüpunkte Drucker/Ü2/Ü2_3100_SELECT TEST PATT. @ 0\mod_1254837069267_912.doc @ 4613 @<br />
Pos: 60.75 /Bedienungsanleitungen/Geräte spezifisch/Drucker/Menüpunkte Drucker/Ü2/Ü2_3200_HARDWARE_TEST @ 0\mod_1254837070345_912.doc @ 4617 @<br />
Pos: 60.77 /Bedienungsanleitungen/Geräte spezifisch/Drucker/Menüpunkte Drucker/Ü3/Ü4/Ü3_3202_Keyboard @ 0\mod_1254914552315_912.doc @ 4931 @<br />
Pos: 60.78 /Bedienungsanleitungen/Geräte spezifisch/Drucker/Menüpunkte Drucker/Ü3/Ü4/Ü3_3203_Ram @ 0\mod_1254916091562_912.doc @ 5047 @<br />
SERVICE<br />
This menu provides access to the following features.<br />
SELECT TEST PATT.<br />
Pos: 60.74 /Bedienungsanleitungen/Geräte spezifisch/Drucker/Menüpunkte Drucker/Ü3/Ü4/Ü3_3101_SELECT TEST PATT. @ 0\mod_1254916093984_912.doc @ 5059 @<br />
You can choose between two default test patterns. One of these patterns will be printed<br />
when you perform a test print (Quick key + Arrow up key).<br />
No 1, No 2<br />
Default: No 1<br />
HARDWARE TEST<br />
Pos: 60.76 /Bedienungsanleitungen/Geräte spezifisch/Drucker/Menüpunkte Drucker/Ü3/Ü4/Ü3_3201_Display @ 0\mod_1254916088030_912.doc @ 5031 @<br />
Display<br />
This feature is used to check the functionality of the printer display. The display will show<br />
different characters, numbers and symbols.<br />
Keyboard<br />
This feature is used to check the functionality of each key on the control panel. In the<br />
display you will see Keytest. In order to complete the test you have to press each of the<br />
eight keys once.<br />
• Home key<br />
• Quick key<br />
• Test Print (up arrow) key<br />
• Run Paper (left arrow) key<br />
• Paper Length (right arrow) key<br />
• Clean Heads key (down arrow) key<br />
• Ok (Online) key<br />
• Cancel (Offline) key<br />
64 <strong>User</strong> Manual Version 3.1
Pos: 60.79 /Bedienungsanleitungen/Geräte spezifisch/Drucker/Menüpunkte Drucker/Ü3/Ü4/Ü3_3204_Ram Contin. @ 0\mod_1254915740236_912.doc @ 5007 @<br />
Pos: 60.80 /Bedienungsanleitungen/Geräte spezifisch/Drucker/Menüpunkte Drucker/Ü3/Ü4/Ü3_3205_NV-Ram Cont. @ 0\mod_1254915736642_912.doc @ 4983 @<br />
Pos: 60.81 /Bedienungsanleitungen/Geräte spezifisch/Drucker/Menüpunkte Drucker/Ü3/Ü4/Ü3_3212_Encoder @ 0\mod_1254916090905_912.doc @ 5039 @<br />
Pos: 60.82 /Bedienungsanleitungen/Geräte spezifisch/Drucker/Menüpunkte Drucker/Ü3/Ü4/Ü3_3214_Speed Measurement_All_Printers_except_Orbit @ 1\mod_1255683471390_912.doc @ 6627 @<br />
Pos: 60.83 /Bedienungsanleitungen/Geräte spezifisch/Drucker/Menüpunkte Drucker/Ü3/Ü4/Ü3_3219_Paper Sensor @ 0\mod_1254916094577_912.doc @ 5067 @<br />
Pos: 60.84 /Bedienungsanleitungen/Geräte spezifisch/Drucker/Menüpunkte Drucker/Ü3/Ü4/Ü3_3220_Sensor&Paper Run @ 1\mod_1255684001736_912.doc @ 6647 @<br />
Pos: 60.85 /Bedienungsanleitungen/Geräte spezifisch/Drucker/Menüpunkte Drucker/Ü3/Ü4/Ü3_3234b_Cartridges_Fixed Head @ 0\mod_1254916801839_912.doc @ 5099 @<br />
Ram<br />
The printer will test its internal memory.<br />
Ram Contin.<br />
The printer will test its internal memory.<br />
NV-Ram Cont.<br />
The printer will test its internal memory.<br />
Encoder<br />
The printer will start its transport and test the encoder signals.<br />
Speed Measurment<br />
This feature is used to check the currently set speed. The printer will start the transport<br />
with the currently set speed (e.g. 1.080 Meter/Second 212.5 Feet/Minute) and display<br />
the actual measured speed in the display.<br />
Paper Sensor<br />
This feature is used to check the status of the paper sensor (top of form sensor).<br />
Status<br />
Sensor is free<br />
Sensor is not free<br />
Note<br />
The sensor detects no material.<br />
The sensor detects material.<br />
Sensor&Paper Run<br />
The printer will start its transport, the feeder and count all TOF sensor signals (= materials)<br />
it detects. You should count the number of materials in the feeder before starting this test,<br />
so you can check the result. When the test is finished all lines of the display must show the<br />
same number. And this number must be the same number as the amount of materials in<br />
the feeder before the test.<br />
Requirements for this test<br />
The material must have a size of at least 200 mm / 7.8“ in transport<br />
direction. The material should be unprinted and unicolour.<br />
<strong>User</strong> Manual Version 3.1 65
Pos: 60.86 /Bedienungsanleitungen/Geräte spezifisch/Drucker/Menüpunkte Drucker/Ü3/Ü4/Ü3_3235_Prewarming @ 1\mod_1255684370577_912.doc @ 6659 @<br />
Pos: 60.87 /Bedienungsanleitungen/Geräte spezifisch/Drucker/Menüpunkte Drucker/Ü3/Ü4/Ü3_3236_PEN Board @ 1\mod_1255684373658_912.doc @ 6663 @<br />
Pos: 60.88 /Bedienungsanleitungen/Geräte spezifisch/Drucker/Menüpunkte Drucker/Ü3/Ü4/Ü3_3241_LED/ Beeper @ 0\mod_1254916802136_912.doc @ 5103 @<br />
Cartridges<br />
This test checks the electronically connections between cartridge mountings and printheads.<br />
The results of the test are shown in the display.<br />
Test<br />
HP PEN ID<br />
MISSING DOTS<br />
Note<br />
The identification code of each PEN board (e. g 13 =<br />
Unit U1, Cartridge C3).<br />
Number of missing dots of the cartridges, that can’t<br />
be controlled by the printer.<br />
If all nozzles response correctly, the display will show<br />
“no”.<br />
Amount of missing dots<br />
The amount of missing dots (MISSING DOTS) can be an evidence, that<br />
the connection between printhead and cartridge mounting is<br />
interfered.<br />
If the amount of missing dots is a multiple of seven (14, 21, 28, ...),<br />
the problem lies most likely in a draggled printhead contacting.<br />
In this case, clean the contacts of the printhead and that of the<br />
cartridge mounting with a piece of cloth, an repeat the test.<br />
Prewarming<br />
The Prewarming function of the printer will be checked in this test. Afterwards the printer<br />
should display the “PREWARMING:o Data/s” status.<br />
PEN Board<br />
This test will check the circuit (PEN) boards that are integrated in the print units. The test<br />
will be performed with all circuit boards of the printer.<br />
Authorised service personal can use the values of this test for service purposes.<br />
Test<br />
AMB.TEMP<br />
REF.RES[h]<br />
TSR [Hex]<br />
Note<br />
The measured temperature close to the printhead<br />
nozzles in degree Celsius °C<br />
“Reference Resistor” – reference value<br />
„Thermal Sense Resistor“ - resistance value inside the<br />
printhead<br />
66 <strong>User</strong> Manual Version 3.1
LED/Beeper<br />
Here you can check if all the LEDs of the display and the beeper work correctly. When<br />
performing this test the printer will run through the following cycle:<br />
ALL LED's OFF<br />
LED ONLINE ON<br />
LED OFFLINE ON<br />
LED WARNING ON<br />
LED ERROR ON<br />
BEEPER ON (you will hear a sound for two seconds)<br />
Pos: 60.89 /Bedienungsanleitungen/Geräte spezifisch/Drucker/Menüpunkte Drucker/Ü2/Ü2_3300_CONFIGURAT._INFO @ 0\mod_1254837071173_912.doc @ 4621 @<br />
<strong>User</strong> Manual Version 3.1 67
Pos: 60.91 /Bedienungsanleitungen/Geräte spezifisch/Drucker/Menüpunkte Drucker/Ü3/Ü4/Ü3_3302_Version: @ 2\mod_1271145334852_912.doc @ 14521 @<br />
Pos: 60.92 /Bedienungsanleitungen/Geräte spezifisch/Drucker/Menüpunkte Drucker/Ü3/Ü4/Ü3_3303_SerNo.: @ 0\mod_1254917242293_912.doc @ 5127 @<br />
Pos: 60.93 /Bedienungsanleitungen/Geräte spezifisch/Drucker/Menüpunkte Drucker/Ü3/Ü4/Ü3_3304_Model : @ 1\mod_1261145262596_912.doc @ 9033 @<br />
Pos: 60.94 /Bedienungsanleitungen/Geräte spezifisch/Drucker/Menüpunkte Drucker/Ü3/Ü4/Ü3_3307_PAGE CNT: @ 0\mod_1254916801511_912.doc @ 5095 @<br />
Pos: 60.95 /Bedienungsanleitungen/Geräte spezifisch/Drucker/Menüpunkte Drucker/Ü3/Ü4/Ü3_3308_RAM @ 0\mod_1254916802870_912.doc @ 5111 @<br />
Pos: 60.96 /Bedienungsanleitungen/Geräte spezifisch/Drucker/Menüpunkte Drucker/Ü3/Ü4/Ü3_3309_Hardware: @ 0\mod_1254917248653_912.doc @ 5147 @<br />
CONFIGURAT. INFO<br />
Pos: 60.90 /Bedienungsanleitungen/Geräte spezifisch/Drucker/Menüpunkte Drucker/Ü3/Ü4/Ü3_3301_Firmware: @ 0\mod_1254916795698_912.doc @ 5087 @<br />
Firmware:<br />
Shows the currently installed firmware version.<br />
For example: 4.7.00<br />
Version:<br />
Shows if the printer is a specially manufactured, not standard version.<br />
For example: ASIA<br />
This information is only shown when the printer is not a<br />
standard version.<br />
SerNo.:<br />
Shows the serial number of the machine.<br />
For example: 61303071234<br />
Model:<br />
Shows the name of your printer model.<br />
For example: AS-930<br />
Page cnt:<br />
Shows the total number of pages printed on the machine. This includes pages from print<br />
jobs as well as service prints (e.g. Test prints). This is a non-resettable life time counter.<br />
For example: 48513<br />
RAM<br />
Shows the size of the printer internal memory.<br />
For example: 64 MByte<br />
68 <strong>User</strong> Manual Version 3.1
Pos: 60.97 /Bedienungsanleitungen/Geräte spezifisch/Drucker/Menüpunkte Drucker/Ü3/Ü4/Ü3_3310_1_USB-REV.:_ONLY_619 @ 1\mod_1259848205834_912.doc @ 8133 @<br />
Pos: 60.98 /Bedienungsanleitungen/Geräte spezifisch/Drucker/Menüpunkte Drucker/Ü3/Ü4/Ü3_3310_2_PCBA:_ONLY_619 @ 3\mod_1282296399850_912.doc @ 26966 @<br />
Pos: 60.99 /Bedienungsanleitungen/Geräte spezifisch/Drucker/Menüpunkte Drucker/Ü3/Ü4/Ü3_3310_3_Batch:_ONLY_619 @ 3\mod_1282296403447_912.doc @ 26982 @<br />
Pos: 60.100 /Bedienungsanleitungen/Geräte spezifisch/Drucker/Menüpunkte Drucker/Ü3/Ü4/Ü3_3310_4_IP_ONLY_619 @ 3\mod_1282296406740_912.doc @ 26988 @<br />
Pos: 60.101 /Bedienungsanleitungen/Geräte spezifisch/Drucker/Menüpunkte Drucker/Ü3/Ü4/Ü3_3310_5_Port No.:_ONLY_619 @ 3\mod_1282296409735_912.doc @ 26994 @<br />
Hardware:<br />
Shows the hardware version number of certain printer components.<br />
For example V32-3-0<br />
Description<br />
V32 -3 -0<br />
FPGA<br />
version<br />
main board<br />
version<br />
assembly type<br />
USB rev.:<br />
Shows the firmware version of the installed USB chip.<br />
For example: 1.0.01<br />
PCBA:<br />
Shows the part number of the installed PCBA (Printed Circuit Board Assembly).<br />
For example: 92xxxxxX<br />
Batch:<br />
Shows the batch number of the installed PCBA (Printed Circuit Board Assembly).<br />
For example: 009230099<br />
IP<br />
Shows the currently set IP address of the printer, when using a TCP/IP connection.<br />
For example: 192.168.0.17<br />
The IP address can be adjusted in the PRINTER CONFIG. > BOOT DEFAULTS ><br />
COMMUNICATION menu.<br />
Port No.:<br />
Shows the currently set port number of the TCP/IP connection.<br />
For example: 9100<br />
The port number can be adjusted in the PRINTER CONFIG. > BOOT DEFAULTS ><br />
COMMUNICATION menu.<br />
<strong>User</strong> Manual Version 3.1 69
Pos: 60.102 /Bedienungsanleitungen/Geräte spezifisch/Drucker/Menüpunkte Drucker/Ü3/Ü4/Ü3_3310_6_MAC:_ONLY_619 @ 3\mod_1282296412325_912.doc @ 27000 @<br />
Pos: 60.103 /Bedienungsanleitungen/Geräte spezifisch/Drucker/Menüpunkte Drucker/Ü3/Ü4/Ü3_3310_7_SN_ONLY_619 @ 3\mod_1282296415327_912.doc @ 27006 @<br />
Pos: 60.104 /Bedienungsanleitungen/Geräte spezifisch/Drucker/Menüpunkte Drucker/Ü3/Ü4/Ü3_3310_8_GW_ONLY_619 @ 3\mod_1282296418690_912.doc @ 27012 @<br />
Pos: 60.105 /Bedienungsanleitungen/Geräte spezifisch/Drucker/Menüpunkte Drucker/Ü3/Ü4/Ü3_3310_9_Monitor_ONLY_619 @ 3\mod_1298294617528_912.doc @ 30511 @<br />
Pos: 60.106 /Bedienungsanleitungen/Geräte spezifisch/Drucker/Menüpunkte Drucker/Ü3/Ü4/Ü3_3318_INK PCK: @ 0\mod_1254917750766_912.doc @ 5179 @<br />
Pos: 60.107 /Bedienungsanleitungen/Geräte spezifisch/Drucker/Menüpunkte Drucker/Ü2/Ü2_3400_SERVICE PRINT @ 1\mod_1261144618001_912.doc @ 9028 @<br />
MAC:<br />
Shows the MAC address (Media Access Control address) of the printer. This value is a preset<br />
and cannot be changed.<br />
For example: 32D2C4FFFFFF<br />
SM<br />
Shows the currently set subnet mask address of the TCP/IP connection.<br />
For example: 255.255.255.0<br />
The address can be adjusted in the PRINTER CONFIG. > BOOT DEFAULTS > COMMUNICATION<br />
menu.<br />
GW<br />
Shows the currently set gateway address of the TCP/IP connection.<br />
For example: 192.168.1.118<br />
The address can be adjusted in the PRINTER CONFIG. > BOOT DEFAULTS > COMMUNICATION<br />
menu.<br />
Monitor:<br />
Shows the software version of the monitor.<br />
For example: 2.0.0<br />
Ink pack:<br />
The “ink package” is a set of optimized parameters for the different <strong>Neopost</strong> inks. New inks<br />
may require an update of this package. You can check which version is installed on your<br />
machine (ID-number).<br />
For further information about the ink package see chapter 11.10, on<br />
page 149.<br />
70 <strong>User</strong> Manual Version 3.1
Pos: 60.109 /Bedienungsanleitungen/Geräte spezifisch/Drucker/Menüpunkte Drucker/Ü3/Ü4/Ü3_3402_Alignment Vertic. @ 0\mod_1254916087390_912.doc @ 5023 @<br />
Pos: 60.110 /Bedienungsanleitungen/Geräte spezifisch/Drucker/Menüpunkte Drucker/Ü3/Ü4/Ü3_3405_Encoder Pattern @ 1\mod_1260954510299_912.doc @ 8614 @<br />
Pos: 60.111 /Bedienungsanleitungen/Geräte spezifisch/Drucker/Menüpunkte Drucker/Ü3/Ü4/Ü3_3409_Cartr. Print Patt_Fixed_Head_AS-830/930_ONLY @ 2\mod_1269512757937_912.doc @ 13908 @<br />
SERVICE PRINT<br />
Pos: 60.108 /Bedienungsanleitungen/Geräte spezifisch/Drucker/Menüpunkte Drucker/Ü3/Ü4/Ü3_3401_Alignment Horiz. @ 0\mod_1254916087046_912.doc @ 5019 @<br />
Alignment Horiz.<br />
The device will print a special test pattern that shows the horizontal alignment of the print<br />
swathes. This is just for test purposes, adjustments can be made in the menu<br />
PRINTER CONFIG. > ADJUSTMENTS > ADJUSTMENT STEPS > CARRIAGE CORRECT.<br />
Alignment Vertic.<br />
The device will print a special test pattern that shows the correct vertical alignment of the<br />
print swathes. This is just for test purposes, adjustments can be made in the menu<br />
PRINTER CONFIG. > ADJUSTMENTS > ADJUSTMENT GAP<br />
Encoder Pattern<br />
This pattern is used for assembly control and service purposes.<br />
Figure 26: Encoder Pattern<br />
Cartr. Print Patt<br />
The printer will print three different patterns which help you to asses the condition of each<br />
cartridge. Depending on the printer model these patterns are printed onto a different<br />
number of pages.<br />
• Pattern A visualizes the condition of each cartridge contact for every cartridge in a<br />
grid patter (see Figure 27 below).<br />
<strong>User</strong> Manual Version 3.1 71
Figure 27: Pattern A<br />
• Figure 28 below shows an sample print with several defects on ink cartridge C1. How<br />
to clean clogged nozzles, the cartridge and pen board is described in chapter 8.1.1,<br />
on page 92 and in chapter 8.1.2, on page 94. If a defect is still visible after cleaning<br />
the cartridge nozzles and contacts as well as the pen board contacts, replace the<br />
cartridge. Figure 29 on page 73 shows a reference diagram of the cartridge contacts<br />
and their descriptions.<br />
n n c1<br />
c2<br />
Figure 28: Pattern A with defects<br />
n = these nozzles are clogged<br />
c1 = no connection on contact "10"<br />
c2 = no connection on contact "K"<br />
72 <strong>User</strong> Manual Version 3.1
Pos: 60.112 /Bedienungsanleitungen/Geräte spezifisch/Drucker/Menüpunkte Drucker/Ü3/Ü4/Ü3_3410_Print char. set @ 0\mod_1254837948450_912.doc @ 4637 @<br />
Cartridge contacts<br />
Figure 29: Cartridge contacts<br />
Nozzle rows<br />
• In print pattern B, every nozzle of each cartridge prints a small dot. Interruptions in<br />
the line of dots indicate clogged nozzles.<br />
Figure 30: Pattern B<br />
• Pattern C is used for assembly control and service purposes.<br />
Figure 31: Pattern C<br />
<strong>User</strong> Manual Version 3.1 73
Pos: 60.113 /Bedienungsanleitungen/Geräte spezifisch/Drucker/Menüpunkte Drucker/Ü2/Ü2_3500_3501_3502_SETTING DUMP @ 0\mod_1254837073673_912.doc @ 4633 @<br />
Print char. set<br />
The printer will print the currently selected printer internal character set.<br />
Figure 32: Sample character set print<br />
74 <strong>User</strong> Manual Version 3.1
Pos: 60.114 /Bedienungsanleitungen/Geräte spezifisch/Drucker/Menüpunkte Drucker/Ü2/Ü2_3600_3601_3602_INPUT BUFFER DUMP @ 0\mod_1254837072876_912.doc @ 4629 @<br />
SETTING DUMP<br />
Here you can print the setting dump. The setting dumps lists all printer settings for each<br />
setting number. The currently used setting is marked with ******. In the top right corner<br />
you will find the page number of the current page as well as the total number of pages (see<br />
Figure 33). In the case of problems, the setting dump provides useful information.<br />
Option<br />
Print settings<br />
Send sett.to port<br />
Note<br />
Prints the current printer settings<br />
Sends the printer setting to the serial “Control”<br />
interface<br />
Figure 33: Sample setting dump print<br />
<strong>User</strong> Manual Version 3.1 75
Pos: 60.115 /Bedienungsanleitungen/Geräte spezifisch/Drucker/Menüpunkte Drucker/Ü2/Ü2_3700_DEALER @ 0\mod_1254918746950_912.doc @ 5233 @<br />
Pos: 60.116 /Bedienungsanleitungen/Geräte spezifisch/Drucker/Menüpunkte Drucker/Ü2/Ü2_3800_SHOW ERORR MESSAG @ 2\mod_1269000641380_912.doc @ 13663 @<br />
Pos: 60.117 /Bedienungsanleitungen/Geräte spezifisch/Drucker/Menüpunkte Drucker/Ü2/Ü2_3900_SHOW WARNING MSGS @ 2\mod_1269001076975_912.doc @ 13667 @<br />
Pos: 60.118 /Bedienungsanleitungen/Geräte spezifisch/Drucker/Menüpunkte Drucker/Ü1/Ü1_4000_Menü_Drucker_LANGUAGE @ 0\mod_1254483872167_912.doc @ 4033 @<br />
INPUT BUFFER DUMP<br />
Here you can either print the input buffer of the printer or send it to a PC via the serial<br />
interface. The input buffer of the printer contains all data (control sequences, text, graphics)<br />
received by the printer. In the case of problems, the input buffer provides useful<br />
information.<br />
Option<br />
Print input buff.<br />
Send data to port<br />
Note<br />
Prints the complete input buffer<br />
Sends the complete input buffer to the serial “Control”<br />
interface<br />
Printing the input buffer<br />
Make sure that you have an ample supply of material available when<br />
printing the input buffer. The ¤ character marks the end of the input<br />
buffer, as soon as this character is printed press the Cancel key to<br />
stop the print.<br />
Figure 34: Sample Input Buffer Dump print<br />
DEALER<br />
This menu is only used for manufacturer adjustments.<br />
SHOW ERORR MESSAG<br />
In this menu you can cycle through all possible error messages. This is useful as a<br />
reference.<br />
SHOW WARNING MSGS<br />
In this menu you can cycle through all possible warning messages. This is useful as a<br />
reference.<br />
76 <strong>User</strong> Manual Version 3.1
Pos: 60.119 /Bedienungsanleitungen/Geräte spezifisch/Drucker/Menüpunkte Drucker/Ü1/Ü1_5000_Menü_Drucker_SETTING @ 0\mod_1254483917964_912.doc @ 4037 @<br />
LANGUAGE<br />
Here you can select one of the following languages for the printer menu.<br />
English<br />
Deutsch<br />
Francais<br />
Italiano<br />
Espaniol<br />
Chinese*<br />
* only available in the Asian version.<br />
<strong>User</strong> Manual Version 3.1 77
Pos: 61.1 /Bedienungsanleitungen/Geräte spezifisch/Drucker/Printer Driver & Cables to PC/7.0_Ü1_How to connect the printer to the PC_ONLY_619 @ 3\mod_1283848196927_912.doc @ 27540 @ 11<br />
SETTING<br />
For Microsoft DOS applications, individual printer configurations can be created and stored<br />
as a setting in the printer. The setting No. 0 is reserved for the factory setting. Here, no<br />
modifications can be executed.<br />
The settings No. 1 to No. 9 may be set individually. The modifications will be automatically<br />
saved for the selected setting number. The settings are maintained in the printer after a<br />
restart.<br />
78 <strong>User</strong> Manual Version 3.1
Pos: 61.2 /Bedienungsanleitungen/Geräte spezifisch/Drucker/Printer Driver & Cables to PC/7.X_Ü2_How to install and configure the printer driver_ONLY_619 @ 3\mod_1295280186142_912.doc @ 29403 @ 2233<br />
7 How to connect the printer to the PC<br />
To connect the printer to a PC, use either the USB interface or the Ethernet interface of the<br />
printer. To connect the printer to a network, use the Ethernet interface.<br />
Independent from the interface (USB or Ethernet), it is necessary to install a printer driver<br />
on the PC that will be used to send data to the printer.<br />
Follow the installation procedures<br />
Please follow the installation procedures described in this chapter.<br />
Please stick to the order of installation steps (e.g connecting the<br />
printer to the PC) as described in this chapter.<br />
• Please see chapter 7.1 on how to install and configure the printer driver.<br />
• Please see chapter 7.3 on how to use the USB interface<br />
• Please see chapter 7.4 on how to use the Ethernet interface<br />
The printer will work either with the USB interface or with the<br />
Ethernet interface. The two interfaces cannot be used together at the<br />
same time.<br />
7.1 How to install the printer driver<br />
7.2 Windows XP and Windows Vista<br />
1. Insert the<br />
driver CD-ROM<br />
• Insert the <strong>Neopost</strong> CD-ROM in the CD drive of your PC.<br />
2. Connect the<br />
PC to the<br />
printer<br />
• Make sure that your printer is turned off.<br />
• Connect the printer with the USB cable to your PC.<br />
• Turn on the printer. Check if the printer shows OnlinUSB in the<br />
bottom line of the main display.<br />
If not press the Ok key to turn the printer online.<br />
If the printer shows OnlinTCP in the bottom line of the main<br />
display use the menu PRINTER CONFIG. > BOOT DEFAULTS ><br />
COMMUNICATION to select the USB interface.<br />
• Wait for the automatic detection of the new hardware.<br />
• Proceed with the installation of the printer driver.<br />
<strong>User</strong> Manual Version 3.1 79
3. Install the<br />
driver with the<br />
New Hardware<br />
Wizard<br />
• Follow the steps of the New Hardware Wizard of Windows XP/Vista<br />
• If asked select the installation choices as shown in Figure 35 and<br />
Figure 36. The Wizard will search the content of the CD-ROM for<br />
the drivers and will install them.<br />
Figure 35: New Hardware Wizard<br />
Figure 36: Recommended install procedure<br />
• After the installation the printer is ready to use.<br />
During the installation, the Wizard might prompt that the driver is not<br />
approved by Windows. Please continue the installation by clicking on<br />
“Continue Anyway”<br />
7.2.1 Windows 7<br />
1. Insert the<br />
driver CD-ROM<br />
• Insert the <strong>Neopost</strong> CD-ROM in the CD drive of your PC.<br />
80 <strong>User</strong> Manual Version 3.1
2. Connect the<br />
PC to the<br />
printer<br />
• Make sure that your printer is turned off.<br />
• Connect the printer with the USB cable to your PC.<br />
• Turn on the printer. Check if the printer shows OnlinUSB in the<br />
bottom line of the main display.<br />
If not press the Ok key to turn the printer online.<br />
If the printer shows OnlinTCP in the bottom line of the main<br />
display use the menu PRINTER CONFIG. > BOOT DEFAULTS ><br />
COMMUNICATION to select the USB interface.<br />
• Wait for the automatic detection of the new hardware.<br />
• By clicking on the message box, Windows will display a status<br />
window.<br />
• Windows 7 is not able to locate the printer drivers on the CD-ROM<br />
or in the Internet automatically. Therefore you have to install the<br />
printer driver manually.<br />
3. Install the<br />
driver<br />
manually<br />
• Click on the Windows button and “Devices and Printers”<br />
• The detected printer is listed under the category “Unspecified”.<br />
Right-click on it and select “Properties”.<br />
• Go to the tab “Hardware” and see the listed device functions (see<br />
Figure 37). Double-click on the printer (Type: Other devices);<br />
another properties window will open.<br />
• Select the button “Change Settings” (administrator rights<br />
required). The window will flicker once.<br />
• Switch to the tab “Driver” and select the button “Update driver”<br />
(see Figure 38). The “Update Driver Software” Wizard will appear.<br />
<strong>User</strong> Manual Version 3.1 81
Pos: 61.3 /Bedienungsanleitungen/Geräte spezifisch/Drucker/Printer Driver & Cables to PC/USB 2.0 (619)/7.X_Ü2_How to use the USB interface_ONLY_619 @ 3\mod_1295877712574_912.doc @ 29696 @ 2<br />
Figure 37: Properties of unspecified device<br />
Figure 38: Update the printer driver<br />
4. Update<br />
Driver<br />
Software<br />
Wizard<br />
• Choose the option “Browse my computer for driver software” (see<br />
Figure 39).<br />
• Select your CD-ROM drive and then click on “Next”. Let the Wizard<br />
look for appropriate drivers. Choose the driver for your <strong>Neopost</strong><br />
printer and click on “Next” (see Figure 40).<br />
• Windows will now locate and install the driver. After the procedure<br />
the printer is ready to use.<br />
Figure 39: Update Driver Software Wizard<br />
Figure 40: Select the driver source<br />
During the installation, the Wizard might prompt that the driver is not<br />
approved by Windows. Please continue the installation by clicking on<br />
“Continue Anyway”<br />
82 <strong>User</strong> Manual Version 3.1
Pos: 61.4 /Bedienungsanleitungen/Geräte spezifisch/Drucker/Printer Driver & Cables to PC/TCP /IP (619)/7.X_Ü2_How to use the Ethernet interface_ONLY_619 @ 3\mod_1289307206814_912.doc @ 28147 @ 23<br />
Pos: 61.5 /Bedienungsanleitungen/Geräte spezifisch/Drucker/Printer Driver & Cables to PC/TCP /IP (619)/7.X.X_Ü3_Adding a TCP/IP port to a printer driver_ONLY_619 @ 3\mod_1295345335701_912.doc @ 29481 @ 33<br />
7.3 How to use the USB interface<br />
Start the the printer driver installation first<br />
Please make sure to start the installation the printer driver before you<br />
connect to the printer to the PC!<br />
See chapter 7.1 on page 79 for a description of how to install the<br />
printer driver.<br />
Plug the USB cable into the USB interface of the printer.<br />
PC you may start to send print jobs to the printer.<br />
After turning on printer and<br />
7.4 How to use the Ethernet interface<br />
The printer can either be connected directly to a PC via the Ethernet (TCP/IP) connection or<br />
the printer can be connected to a local area network (LAN) using the Ethernet (TCP/IP)<br />
connection.<br />
• Please attach the “Splitting Ferrite with plastic case” (part number 9204150F) to the<br />
end of the Ethernet cable that goes into the printer. See Figure 41.<br />
Figure 41: Ferrite with plastic case<br />
• Please see chapter 7.4.2 on how to connect the printer to a network via the Ethernet<br />
connection<br />
• Please see chapter 7.4.4 on how to connect printer directly to a PC via the Ethernet<br />
connection<br />
<strong>User</strong> Manual Version 3.1 83
7.4.1 Adding a TCP/IP port to a printer driver<br />
1. Modify the<br />
existing<br />
printer driver<br />
• Open “Devices and Printers” on your PC (START > Control Panel ><br />
Hardware and Sound).<br />
• Select your printer and click on it with the right mouse button and<br />
select “Printer properties” from the context menu.<br />
• Click on the tab “Ports” and on the button “Add Port…”. This will<br />
open a new window. In this window select “Standard TCP/IP Port”<br />
and click onto “New Port…”.<br />
Figure 42: Adding TCP/IP Port<br />
2. Standard<br />
TCP/IP Printer<br />
Port Wizard<br />
• The “Add Standard TCP/IP Printer Port Wizard” will be opened.<br />
Click onto “Next >” to continue (see Figure 50).<br />
• Now enter the exact IP address of your printer and click onto<br />
“Next>” (See Figure 51. This figure only shows a sample IP<br />
address. Make sure to enter the IP address used in your<br />
installation).<br />
• Wait until the automatic detection is finished.<br />
Figure 43: TCP/IP Printer Port Wizard<br />
Figure 44: IP address of the printer<br />
84 <strong>User</strong> Manual Version 3.1
Correct IP address syntax<br />
Don’t enter the unnecessary “0” digits of the IP address in the<br />
properties window. If the IP address is not entered correct, the PC<br />
cannot establish a connection to the printer.<br />
Example:<br />
NOT correct: 192.168.005.008<br />
Correct: 192.168.5.8<br />
3. Check<br />
customs<br />
settings<br />
• After the detection select “Custom” and click on “Settings…” (see<br />
Figure 45).<br />
• Set the “Port number” to the same value as set in the printer.<br />
Then click on “OK”. Make sure the Protocol is set to “RAW” (See<br />
Figure 46. This figure only shows a sample IP address. Make sure<br />
to enter the IP address used in your installation).<br />
• Check the settings and click on “Finish”.<br />
Figure 45: Custom settings<br />
Figure 46: Custom settings of printer port<br />
• Now this printer driver is ready to send data via the TCP/IP port.<br />
Make sure that the box at the new “Standard TCP/IP Port” is<br />
checked (see Figure 47).<br />
• To use the Ethernet connection for printing, select this printer<br />
driver in your software application.<br />
<strong>User</strong> Manual Version 3.1 85
Pos: 61.6 /Bedienungsanleitungen/Geräte spezifisch/Drucker/Printer Driver & Cables to PC/TCP /IP (619)/7.2.1_Ü3_Connecting the printer to a network_ONLY_619 @ 3\mod_1289307329445_912.doc @ 28163 @ 3344<br />
Figure 47: Address printer port settings<br />
7.4.2 Connecting the printer to a local area network<br />
Configuration of network settings<br />
To connect the printer to a LAN it is necessary to perform certain<br />
configurations on the server of your LAN.<br />
Please contact your company’s network administrator for support.<br />
Connect the<br />
printer to the<br />
LAN<br />
• Connect the printer to the LAN with the Ethernet cable<br />
Insert one Ethernet connector of the cable into the Ethernet<br />
interface of the printer and insert the other connector into an<br />
Ethernet port of the LAN.<br />
• Configure the TCP/IP interface of the printer. There are two<br />
options for the configuration of the printer’s TCP/IP interface:<br />
• Fix IP<br />
• Dynamic IP<br />
Please read the descriptions for these two options below and<br />
choose the one the fits best to your network.<br />
86 <strong>User</strong> Manual Version 3.1
7.4.3 Using a fixed IP address<br />
1. Printer<br />
settings “fix<br />
IP”<br />
• Open the main menu of the printer with the Home key.<br />
• Open the menu PRINTER CONFIG. > BOOT DEFAULTS ><br />
COMMUNICATION > TCP/IP.<br />
• In this menu select the setting fix IP.<br />
In the next menu you can set the values for Port Number, IP<br />
Address, Subnet Mask and Gateway IP Address.<br />
Port number<br />
IP Address<br />
Subnet Mask<br />
Gateway IP Address<br />
The default port 9100 is commonly used by printers. Please make<br />
sure that this port is not blocked in your LAN or use a port number<br />
that is accessible in your LAN.<br />
Please enter an IP address that is valid with your LAN.<br />
Please enter the Subnet Mask of your LAN.<br />
Please enter the IP address of the server of your LAN.<br />
2. Enter/<br />
change the<br />
default<br />
settings<br />
• The printer default values are shown below.<br />
Port Number: 9100<br />
IP Address: 192.168.50.180<br />
Subnet Mask: 255.255.255.0<br />
Gateway IP Address: 192.168.50.180<br />
• Confirm any changes to the values by pressing the Ok key. Now<br />
press the Cancel key until the main view is shown in the display.<br />
• Press the Ok key to turn the printer online. The bottom line of<br />
the display must now show: OnlinTCP<br />
7.4.3.1 Using a dynamic IP address<br />
1. Printer<br />
settings<br />
“dynamic IP”<br />
• Open the main menu of the printer with the Home key.<br />
• Open the menu PRINTER CONFIG. > BOOT DEFAULTS ><br />
COMMUNICATION > TCP/IP.<br />
• In this menu select the setting dynamic IP.<br />
• In the next menu you can set the value for the Port Number.<br />
Port number<br />
The default port 9100 is commonly used by printers. Please make<br />
sure that this port is not blocked in your LAN or set to a port<br />
number that is used in your LAN.<br />
<strong>User</strong> Manual Version 3.1 87
Hinweis<br />
2. Enter/<br />
change the<br />
default<br />
settings<br />
• Confirm any changes to the port number by pressing the Ok<br />
key. Now press the Cancel key until the main view is shown in<br />
the display.<br />
• Press the Ok key to turn the printer online. The bottom line of<br />
the display must now show: OnlinTCP<br />
3. Configure<br />
LAN settings<br />
(server<br />
settings)<br />
The printer is set to a fixed IP address<br />
• Please check that the printer’s IP address is valid within your LAN.<br />
• Please check that the printer’s IP address is not already used in<br />
your LAN.<br />
• Please check that the printer’s IP address can be detected (ping<br />
test) within your LAN. See Figure 49 for an example of such a test.<br />
In this sample the printer was set to a fix IP address<br />
(192.168.1.34). This IP was detected successfully by the server.<br />
The printer is set to dynamic IP address<br />
• It is recommended to use a fixed DHCP (Dynamic Host<br />
Configuration Protocol) table on your server to assign one specific<br />
IP address to the printer.<br />
Therefore you need to lock up the MAC address of the printer. You<br />
can lock up the printer’s MAC address either on your server of in<br />
the following printer menu: SERVICE > CONFIGURAT. INFO<br />
See Figure 48 for an example of such a DHCP table on a server. In<br />
this sample the printer with the MAC address 34 D2 C4 00 00 08<br />
was assigned to the IP address 192.168.1.34. This setup makes<br />
sure that the IP address assigned to the printer will always be the<br />
same.<br />
• Please check that the printer’s IP address can be detected (ping<br />
test) within your LAN.<br />
• Please check in the printer menu that the IP address shown there<br />
matches the one set on your server (SERVICE > CONFIGURAT.<br />
INFO).<br />
Figure 48: DHCP Table on server<br />
Using the printer within a LAN<br />
It is necessary to assign one specific IP address to the printer within the<br />
network. Since this one specific IP address needs to be entered in the<br />
configuration of the printer driver.<br />
88 <strong>User</strong> Manual Version 3.1
Pos: 61.7 /Bedienungsanleitungen/Geräte spezifisch/Drucker/Printer Driver & Cables to PC/TCP /IP (619)/7.X.X_Ü3_Direct ethernet connection between the printer and the PC_ONLY_619 @ 3\mod_1289307250494_912.doc @ 28152 @ 32<br />
Hinweis<br />
Checking the printer’s network settings<br />
You can always check the printer’s current IP address, Port number,<br />
subnet mask, gateway and the MAC address in this printer menu:<br />
SERVICE > CONFIGURAT. INFO<br />
Figure 49: Test of fix IP (ping test on server)<br />
4. Configure<br />
network<br />
settings (PC)<br />
and install<br />
printer driver<br />
• It is not necessary to change any network settings on the PC used<br />
to send data to the printer, given that the PC is working within the<br />
same LAN as the printer.<br />
• Install and configure the printer driver for your printer model as<br />
described in chapter 7.1 on page 79.<br />
7.4.4 Direct Ethernet connection between the printer and the PC<br />
1. Connect the<br />
printer to the<br />
PC with an<br />
Ethernet cable<br />
• Connect the printer to the PC with the Ethernet cable.<br />
Insert one Ethernet connector of the cable into the Ethernet<br />
interface of the printer and insert the other connector into the<br />
interface of your PC.<br />
2. TCP/IP<br />
interface<br />
configuration<br />
of the printer<br />
• Open the main menu of the printer with the Home key.<br />
• Open the menu PRINTER CONFIG. > BOOT DEFAULTS ><br />
COMMUNICATION > TCP/IP.<br />
• In this menu select the setting fix IP. This is the required setting<br />
for a direct Ethernet connection between printer and PC.<br />
<strong>User</strong> Manual Version 3.1 89
3. Enter/<br />
change the<br />
default<br />
settings<br />
• Set the values for Port Number, IP Address, Subnet Mask and<br />
Gateway IP Address according to your needs or leave the default<br />
values.<br />
Port Number: 9100<br />
IP Address: 192.168.50.180<br />
Subnet Mask: 255.255.255.0<br />
Gateway IP Address: 192.168.50.180<br />
• Confirm any changes to the values by pressing the Ok key. Now<br />
press the Cancel key until the main view is shown in the display.<br />
• Press the Ok key to turn the printer online. The bottom line of<br />
the display must now show: OnlinTCP<br />
Changing the PC’s IP address<br />
Please note all your network settings before performing the<br />
configuration described below. When you want to use this PC in your<br />
LAN again, the network settings of this PC have to be reconfigured.<br />
4. Configure<br />
the network<br />
settings of the<br />
PC<br />
In order to use this connection you have to set a fixed IP address for<br />
this PC.<br />
• Open the “Network and Sharing Center” on your PC (START ><br />
Control Panel > Network and Internet).<br />
• Click onto “Change adapter settings”.<br />
• Select the „Local Area Connection” and click onto “Change Settings<br />
of this connection”.<br />
• Deactivate the item “Internet Protocol Version 6 (TCP/IPv6)” and<br />
then select the “Internet Protocol Version 4 (TCP/IPv4)” and click<br />
onto “Properties” (see Figure 50)<br />
• Select “Use the following IP address:” and enter the following<br />
values (see Figure 51):<br />
IP address: The first three parts of the address must be the same<br />
as in the printer. The last part must be different!<br />
Subnet mask: Same as in the printer.<br />
Default gateway: Must be the same as the IP address in the<br />
printer.<br />
• Click onto “OK” and wait until the connection to the printer is<br />
established.<br />
90 <strong>User</strong> Manual Version 3.1
Pos: 62 /Bedienungsanleitungen/Geräte neutral/8.0_Ü1_Service @ 0\mod_1251192378636_912.doc @ 3024 @ 31<br />
Figure 50: Local Area Connection Properties<br />
Figure 51: TCP/IPv4 settings<br />
5. Install and<br />
configure the<br />
printer driver<br />
• Install and configure the printer driver for your printer model as<br />
described in chapter 7.1 on page 79.<br />
<strong>User</strong> Manual Version 3.1 91
Pos: 63 /Bedienungsanleitungen/Geräte neutral/8.1_Ü2_Maintenance and support @ 0\mod_1251203636132_912.doc @ 3106 @ 2<br />
Pos: 64 /Bedienungsanleitungen/Geräte spezifisch/Drucker/8.1.x_Cleaning_the_paper_sensor_REFLECTOR @ 2\mod_1265711553389_912.doc @ 11755 @<br />
Pos: 65 /Bedienungsanleitungen/Geräte spezifisch/Drucker/8.1.2_Ü3_Cleaning the ink cartridge @ 1\mod_1261065320023_912.doc @ 8975 @ 33<br />
8 Service<br />
8.1 Maintenance and support<br />
Cleaning the<br />
paper sensor<br />
(Top of Form<br />
Sensor)<br />
It is highly recommended to check and clean the paper sensor every day.<br />
• Check if the LED on the paper sensor is flashing when you push a<br />
material under the sensor.<br />
• Clean the sensor as well as the reflection foil from paper dust and<br />
dirt.<br />
8.1.1 How to clean an ink cartridge<br />
Damage to the ink cartridge<br />
Wrong cleaning leads to damaged ink cartridges and bad print<br />
quality. Please stick to the described cleaning instructions of this <strong>User</strong><br />
Manual.<br />
Please do not use chemical solvents or any cleaning agents. Furthermore do not use paper<br />
towels, toilet paper, sponges, dry cloths or any other textiles with small abrasive fibers for<br />
the cleaning of the cartridge nozzles.<br />
Recommended cleaning utilities<br />
• Use only fiber-free tissues for cleaning the ink cartridge nozzles<br />
(see chapter 9.1 Consumables, on page 126). Please follow the<br />
instructions below.<br />
• Use only pure distilled water to damp the cleaning cloth. The water<br />
can etch dried ink residues and may reactivate clogged nozzles.<br />
Cleaning the<br />
nozzle plate<br />
• Dampen the cleaning cloth with a small amount of distilled water.<br />
• Cautiously press the cartridge nozzles onto the tissue and wait<br />
until the cloth soaks up a small amount of ink.<br />
• Slowly wipe the cartridge nozzles on the tissue surface, in the<br />
direction of the nozzle rows (see Figure 52).<br />
• Optional: Insert the cleaned ink cartridge into the printer and use<br />
the CLEAN HEADS function (Quick + Arrow down ) to purge<br />
the nozzles.<br />
92 <strong>User</strong> Manual Version 3.1
Pos: 66 /Bedienungsanleitungen/Geräte spezifisch/Drucker/8.1.x_Ü3_Cleaning_the_pen_board_contacts @ 2\mod_1265722269294_912.doc @ 11770 @ 33<br />
Cleaning the<br />
contacts<br />
• Dampen the cleaning cloth with a small amount of alcohol.<br />
• Do NOT bring the alcohol in contact with the nozzle plate (see<br />
Figure 53)!<br />
• Carefully wipe the contacts with the cloth.<br />
• Check if all contacts are free of ink stains. If not, continue wiping<br />
the contacts until all are shiny and stain free.<br />
• Optional: To check if all contacts are completely clean, use the<br />
following menu: SERVICE > HARDWARE TEST > Cartridge. If this<br />
test shows MISSING DOTS: no for each cartridge, the contacts are<br />
completely clean. For a more detailed description of the menu<br />
refer to the section Cartridges, on page 66 of this manual.<br />
Contacts<br />
Nozzle plate<br />
Figure 52: Cleaning the nozzle plate<br />
Figure 53: Nozzle plate and contacts<br />
<strong>User</strong> Manual Version 3.1 93
Pos: 67 /Bedienungsanleitungen/Geräte spezifisch/Drucker/8.2.x_Ü3_How to reset the printer @ 1\mod_1263547335243_912.doc @ 10311 @ 33<br />
8.1.2 How to clean the pen board contacts<br />
Cleaning the<br />
pen board<br />
contacts<br />
When exchanging ink cartridges, it may happen that ink from the ink<br />
cartridges is smeared onto the contacts of the pen boards. Therefore it is<br />
necessary to clean these contacts regularly.<br />
• Take out all ink cartridges.<br />
• Use only fiber-free tissues for cleaning the pen board contacts (see<br />
chapter 9.1 Consumables, on page 126).<br />
• Dampen the cleaning cloth either with a small amount of distilled<br />
water or cleaning alcohol.<br />
• Wrap the cloth around your finger and carefully wipe the contacts.<br />
• Repeat until no more ink is left on the contacts.<br />
Figure 54: Pen board contacts<br />
94 <strong>User</strong> Manual Version 3.1
Pos: 68 /Bedienungsanleitungen/Geräte neutral/8.2_Ü2_Troubleshooting @ 0\mod_1251203477457_912.doc @ 3102 @ 23<br />
Pos: 69 /Bedienungsanleitungen/Geräte spezifisch/Drucker/Troubleshooting (all printers)/8.2a_Ü3_The device cannot be turned on @ 3\mod_1280834344948_912.doc @ 24470 @ 23<br />
8.1.3 How to reset the printer<br />
To reset the printer to the factory settings, you have to start the printer in a special mode.<br />
Non-Mechanical Reset (resets all settings, except for mechanical settings):<br />
1. Turn off the printer<br />
2. Press AND hold the following key: Quick<br />
3. Turn on the printer<br />
4. Keeping holding the Quick key until the printer shows<br />
Non-Mechanical Reset<br />
Alignmt Values Saved<br />
5. Release the Quick key and the printer will be ready to use.<br />
Default Reset (resets all settings):<br />
1. Turn off the printer<br />
2. Press AND hold the following key: Home<br />
3. Turn on the printer<br />
4. Keeping holding the Home key until the printer shows<br />
Printer XXX<br />
Default Reset<br />
5. Release the Home key and the printer will be ready to use.<br />
Mechanical settings<br />
Make sure to re-enter all required mechanical settings (e.g. ADJUST<br />
TOF) after performing a default reset!<br />
8.2 Troubleshooting<br />
<strong>User</strong> Manual Version 3.1 95
Pos: 70 /Bedienungsanleitungen/Geräte spezifisch/8.2b_Sicherungswechsel_250V 2.5A T_KG5101.008_Table Top Drucker @ 3\mod_1280833946989_912.doc @ 24464 @<br />
Pos: 71 /Bedienungsanleitungen/Geräte spezifisch/Drucker/Troubleshooting (all printers)/Printing/8.2.X_Ü3_Weak_printout_due_to_worng_ink_type_selected_ALL PRINTERS @ 2\mod_1276846566086_912.doc @ 18721 @ 3<br />
8.3 The device cannot be turned on<br />
Condition Problem Solution<br />
The device cannot be turned<br />
on and gets no power.<br />
The power is cut or the fuses<br />
were activated.<br />
Check the correct connection<br />
of the power cable.<br />
Check the fuses of the<br />
device.<br />
Fuse exchange<br />
Attention!<br />
Disconnect the device from the power outlet before exchanging the<br />
fuses.<br />
Data<br />
Type<br />
Dimensions<br />
Voltage<br />
Glass tube microfuse<br />
5 x 20 mm<br />
250 V<br />
2.5 A (T)<br />
Figure 1: Exchange of the fuses<br />
Amount 1<br />
(one additional fuse<br />
included as spare)<br />
Use a flat screwdriver to take the fuse holder with the two small<br />
microfuses out of the power input module. The inner fuse is in use,<br />
while the outer fuse is only a spare. Change the blown fuse and insert<br />
the holder again.<br />
96 <strong>User</strong> Manual Version 3.1
Pos: 72 /Bedienungsanleitungen/Geräte spezifisch/Drucker/Troubleshooting (all printers)/Printing/8.2.1_Ü3_Printed_elements_positioned_incorrectly_AS-830/AS-930 @ 2\mod_1269248905680_912.doc @ 13724 @ 3<br />
Pos: 73 /Bedienungsanleitungen/Geräte spezifisch/Drucker/Troubleshooting (all printers)/Printing/8.2.X_Ü3_White_streaks_in_printed_text_or_graphic_PRINTERS WITHOUT CAPPING STATION @ 2\mod_1276782982099_912.doc @ 18702 @ 3<br />
8.3.1 No or only very weak printout with new ink cartridges<br />
Condition Problem Solution<br />
No printout can be seen on<br />
the material or the printout<br />
has very little contrast.<br />
Although the cartridges are<br />
new and a high print quality<br />
is set.<br />
The wrong ink type is<br />
selected.<br />
Make sure to select correct<br />
inky type in the printer menu<br />
for the ink cartridges used in<br />
the printer. If the used ink<br />
type is not known select u<br />
USER INK as ink type in the<br />
printer menu.<br />
PRINTER CONFIG. > INK ><br />
SET INK TYPE ><br />
u USER INK<br />
8.3.2 Printed elements positioned incorrectly<br />
Condition Problem Solution<br />
Texts or other elements are<br />
not located in the<br />
appropriate position on the<br />
material.<br />
The print unit is in the wrong<br />
position.<br />
Manually reposition the print<br />
unit as described in chapter<br />
5.5, on page 32.<br />
Figure 55: Position of element on material<br />
<strong>User</strong> Manual Version 3.1 97
Pos: 74 /Bedienungsanleitungen/Geräte spezifisch/Drucker/Troubleshooting (all printers)/Printing/8.2.X_Ü3_White_streaks_in_printed_text_or_graphic_in_between_cartridges_ALL FIXED HEAD @ 2\mod_1277726696585_912.doc @ 21362 @ 3<br />
8.3.3 White streaks in printed text or graphic<br />
Condition Problem Solution<br />
White streaks show up in<br />
printed text or graphics (see<br />
Figure 57).<br />
Ink dried in the nozzles or<br />
cartridge malfunction.<br />
Always store the ink<br />
cartridges in an airtight box.<br />
Perform a Clean Heads print<br />
by pressing the Quick and<br />
Arrow down keys<br />
together.<br />
Clean the ink cartridge and<br />
the pen board contacts as<br />
described in 8.1, on page<br />
92.<br />
Print the Cartr. Print Patt<br />
service print form the<br />
SERVICE -> SERVICE PRINT<br />
menu to detect a possible<br />
cartridge malfunction. If the<br />
cartridge has a malfunction,<br />
replace it.<br />
Check the cartridge from the<br />
SERVICE -> HARDWARE TEST<br />
-> Cartridge<br />
menu to detect a possible<br />
cartridge malfunction. If the<br />
cartridge has a malfunction,<br />
replace it.<br />
Figure 56: White streaks in text<br />
98 <strong>User</strong> Manual Version 3.1
Pos: 75 /Bedienungsanleitungen/Geräte spezifisch/Drucker/Troubleshooting (all printers)/Printing/8.2.1_Ü3_The printed ink doesn't dry on the substrate @ 3\mod_1279804829363_912.doc @ 24149 @ 3<br />
8.3.4 White streak in printed text or graphics (in between cartridges)<br />
Condition Problem Solution<br />
White streak shows up in<br />
printed text or graphics. The<br />
white streak is located in<br />
between the print area of<br />
two cartridges (see Figure<br />
57).<br />
Ink dried in nozzles<br />
Cartridge has a mechanical<br />
defect<br />
Check if this is actually the<br />
problem. See solution in<br />
chapter 8.3.3, on page 98.<br />
Check if this is actually the<br />
problem by performing a<br />
Cartr. Print Patt from<br />
the SERVICE > SERVICE<br />
PRINT menu. If the cartridge<br />
has a malfunction, replace it.<br />
Print area of 1. cartridge<br />
Print area of 2. cartridge<br />
Preview of print layout in PC software<br />
Print area of 1. cartridge<br />
Print area of 2. cartridge<br />
Actual printout with white streak<br />
Figure 57: White streaks in between two cartridges<br />
<strong>User</strong> Manual Version 3.1 99
Pos: 76 /Bedienungsanleitungen/Geräte spezifisch/Drucker/8.x_Ü2_Error_Messages @ 2\mod_1265641574257_912.doc @ 11615 @ 2<br />
8.3.5 The printed ink doesn’t dry on the substrate<br />
Condition Problem Solution<br />
The used ink doesn’t dry fast<br />
enough.<br />
The printout looks partly<br />
smeared.<br />
The drying time is too short.<br />
There is too much ink on the<br />
printout.<br />
The material-ink combination<br />
is not suitable.<br />
Reduce the print quality (e.g.<br />
2x6dpi instead of 3x6dpi) to<br />
decrease the amount of ink.<br />
If available, put a conveyor<br />
behind the printer to extend<br />
the drying time.<br />
Reduce the transport speed<br />
to extend the drying time.<br />
Try another kind of ink (see<br />
9.1.1, on page 126). Vary<br />
the material-ink<br />
combinations.<br />
If available, use an infrared<br />
light dryer (ask your local<br />
<strong>Neopost</strong> dealer).<br />
100 <strong>User</strong> Manual Version 3.1
Pos: 77 /Bedienungsanleitungen/Geräte spezifisch/Drucker/8.x_Ü3_How to read an error messages entry @ 2\mod_1277217445578_912.doc @ 18851 @ 3<br />
Pos: 78.1 /Bedienungsanleitungen/Geräte spezifisch/Drucker/Error Messages/01_NO PAPER @ 2\mod_1265617203247_912.doc @ 11272 @<br />
Pos: 78.2 /Bedienungsanleitungen/Geräte spezifisch/Drucker/Error Messages/02a_PAPER_JAM_OR_WRONG_PAPER_WIDTH @ 2\mod_1265617312631_912.doc @ 11275 @<br />
8.4 Error Messages<br />
8.4.1 How to read an error message entry<br />
• Protocol code:<br />
Three digit number that is sent by the printer via the serial interface when this error<br />
occurs.<br />
• Display message:<br />
Text that is shown in the printer display. The text in the display always includes the<br />
error code as reference for the operator.<br />
• Cause:<br />
What caused this error.<br />
• Elimination:<br />
Steps the operator can take to avoid this error.<br />
Protocol<br />
code<br />
Display message<br />
Cause<br />
001 NO PAPER !!<br />
CODE: 01<br />
Elimination • Refill feeder<br />
• Check separation<br />
• Check for paper jam<br />
• Check that paper sensor can<br />
detect the paper when it<br />
enters the printer<br />
• Check paper sensor distance<br />
to material<br />
Timeout because no paper front<br />
edge was detected during printing<br />
• Adjust/teach-in paper sensor<br />
• Check paper sensor in<br />
HARDWARE TEST<br />
• Check paper sensor cable<br />
• Check JP 20, 21 and 22 on<br />
mainboard (only for service<br />
technician)<br />
• Clean paper sensor/ reflector<br />
<strong>User</strong> Manual Version 3.1 101
Pos: 78.3 /Bedienungsanleitungen/Geräte spezifisch/Drucker/Error Messages/03a_PAPER_TOO_SMALL_OR_WRONG_PAPER_WIDTH @ 2\mod_1265617369854_912.doc @ 11278 @<br />
Protocol<br />
code<br />
Display message<br />
Cause<br />
002 PAPER JAM OR WRONG PAPER<br />
WIDTH!<br />
Expected paper size exceeded<br />
CODE: 02<br />
Elimination • Check for paper jam<br />
• Check for double feed papers<br />
• Measure actual paper size<br />
• Compare paper size in<br />
transport direction with size<br />
set in printer<br />
• Compare paper size in PC<br />
software with size set in<br />
printer<br />
• Check if a wrong paper size is<br />
locked<br />
• Check if paper gets stuck on<br />
any machine parts<br />
• Check if the belt(s) is running<br />
in the correct position<br />
• Check paper position on<br />
vacuum belt (see chapter X)<br />
• Check for varying paper sizes<br />
(e.g. inserts in a magazine)<br />
Printer with separate feeder:<br />
• Check that the paper size in<br />
transport direction is larger<br />
than the distance paper<br />
sensor to feeding system<br />
Printer with integrated feeder:<br />
• Check if the feeding<br />
components are worn<br />
• Increase the value in the SET<br />
PAP.TOLERANCE menu<br />
102 <strong>User</strong> Manual Version 3.1
Pos: 78.4 /Bedienungsanleitungen/Geräte spezifisch/Drucker/Error Messages/04_ERROR_PAPER_SENSOR @ 2\mod_1265617418639_912.doc @ 11281 @<br />
Pos: 78.5 /Bedienungsanleitungen/Geräte spezifisch/Drucker/Error Messages/05_Increase_The_Gap! @ 2\mod_1265617469330_912.doc @ 11284 @<br />
Protocol<br />
code<br />
Display message<br />
Cause<br />
003 PAPER TOO SMALL OR WRONG<br />
PAPER WIDTH!<br />
CODE: 03<br />
Elimination • Measure actual paper size<br />
• Compare paper size in<br />
transport direction with size<br />
set in printer<br />
• Compare paper size in PC<br />
software with size set in<br />
printer<br />
• Check if a wrong paper size is<br />
locked<br />
• When using material with nonrectangular<br />
edges or with<br />
press cut sections turn off the<br />
PAPER SENSOR in the menu<br />
• Attach a holding-down device<br />
when using uneven materials<br />
(e.g. foil-wrapped magazines)<br />
• Adjust/teach-in paper sensor<br />
• Check paper sensor in<br />
HARDWARE TEST<br />
Expected paper size too small<br />
Fixed Head Printer with one<br />
print unit:<br />
• If your material is preprinted<br />
on the reverse side<br />
set the PAPER SENSOR to Off<br />
and blank colourpaper.<br />
Fixed Head Printer with more<br />
than one print unit:<br />
• Clean the reflector of the<br />
paper sensor<br />
• Check that the reflector is<br />
aligned parallel to the paper<br />
sensor<br />
• Check if the reflector is<br />
damaged<br />
Printer with separate feeder:<br />
• Check if paper gets stuck on<br />
any machine parts<br />
• Check if the paper enters the<br />
printer parallel aligned<br />
• Check paper sensor cable<br />
• Check if the belt(s) is running<br />
in the correct position<br />
Protocol<br />
code<br />
Display message<br />
Cause<br />
004 ERROR PAPER SENSOR CHECK<br />
THE SENSOR!<br />
Unexpected paper sensor signal<br />
CODE: 04<br />
Elimination • Clean the paper sensor<br />
• Clean the reflector<br />
• Adjust/teach-in paper sensor<br />
• Check paper sensor in<br />
HARDWARE TEST<br />
• Call service<br />
<strong>User</strong> Manual Version 3.1 103
Pos: 78.6 /Bedienungsanleitungen/Geräte spezifisch/Drucker/Error Messages/06_Reduce_Paper_Speed! @ 2\mod_1265617538818_912.doc @ 11287 @<br />
Pos: 78.7 /Bedienungsanleitungen/Geräte spezifisch/Drucker/Error Messages/09_PRINTING_ERROR_REPEAT_LAST_ADDRESS @ 2\mod_1265617707328_912.doc @ 11296 @<br />
Pos: 78.8 /Bedienungsanleitungen/Geräte spezifisch/Drucker/Error Messages/10b_FEED_MOTOR_JAMMED @ 2\mod_1265618016578_912.doc @ 11305 @<br />
Protocol<br />
code<br />
Display message<br />
Cause<br />
005 INCREASE THE GAP! Ok TO<br />
CONTINUE!<br />
CODE: 05<br />
Elimination • Check separation system<br />
• Check if the feeding<br />
components are worn<br />
Gap between two products is too<br />
small or malfunction of paper<br />
sensor<br />
Printer with separate feeder:<br />
• Decrease the speed of the<br />
feeding system<br />
Protocol<br />
code<br />
Display message<br />
Cause<br />
006 REDUCE PAPER SPEED! Ok TO<br />
CONTINUE!<br />
Feeding speed and print data<br />
transfer do not match<br />
Elimination<br />
CODE: 06<br />
Printer with separate feeder:<br />
• Decrease the speed of the<br />
feeding system<br />
• Connect the feeder to the<br />
according interface on the<br />
printer<br />
• Set FEEDER CTRL. MODE to<br />
limit overspeed.<br />
• Reduce the amount of print<br />
data (see chapter X)<br />
Protocol<br />
code<br />
Display message<br />
Cause<br />
009 PRINTING ERROR REPEAT LAST<br />
ADDRESS.<br />
Printer internal error detected<br />
CODE: 09<br />
Elimination • Check if the last printed pages<br />
were printed correctly<br />
• Reprint any faulty pages<br />
using the REPEAT PAGES<br />
feature from the Quick<br />
menu<br />
104 <strong>User</strong> Manual Version 3.1
Pos: 78.9 /Bedienungsanleitungen/Geräte spezifisch/Drucker/Error Messages/12_No_INK!!_U#_C# @ 2\mod_1265618218243_912.doc @ 11311 @<br />
Pos: 78.10 /Bedienungsanleitungen/Geräte spezifisch/Drucker/Error Messages/13_CHECKSUM_ERROR_! @ 2\mod_1265618265761_912.doc @ 11314 @<br />
Pos: 78.11 /Bedienungsanleitungen/Geräte spezifisch/Drucker/Error Messages/14_CHECKSUM_ERROR_! @ 2\mod_1265896733283_912.doc @ 11938 @<br />
Pos: 78.12 /Bedienungsanleitungen/Geräte spezifisch/Drucker/Error Messages/15_CHECKSUM_ERROR_! @ 2\mod_1265896765800_912.doc @ 11962 @<br />
Protocol<br />
code<br />
Display message<br />
Cause<br />
010 FEED MOTOR JAMED! Ok TO<br />
CONTINUE!<br />
Elimination<br />
CODE: 10<br />
Turn off and disconnect the<br />
machine from the power supply<br />
before trying to eliminate this<br />
error!<br />
• Check if the feeding system<br />
can be moved by hand<br />
The movement of the feeding<br />
system is rough-running<br />
• Check if any paper is stuck in<br />
the machine<br />
Protocol<br />
code<br />
Display message<br />
Cause<br />
012 NO INK !! CHANGE CARTRIDGE<br />
CODE: 12<br />
Ink level counter has reached the<br />
set empty level<br />
Elimination • Insert a new ink cartridge and<br />
reset the ink level counter<br />
Protocol<br />
code<br />
Display message<br />
Cause<br />
013 CHECKSUM ERROR ! MAKE<br />
DEFAULT RESET<br />
Error in buffered RAM<br />
CODE: 13<br />
Elimination • Perform a default reset • If the error occurs again after<br />
the default reset call service<br />
Protocol<br />
code<br />
Display message<br />
Cause<br />
014 CHECKSUM ERROR ! MAKE<br />
COUNTER RESET<br />
Error in buffered RAM<br />
CODE: 14<br />
Elimination • Perform a default reset • If the error occurs again after<br />
the default reset call service<br />
<strong>User</strong> Manual Version 3.1 105
Pos: 78.13 /Bedienungsanleitungen/Geräte spezifisch/Drucker/Error Messages/16_CHECKSUM_ERROR_! @ 2\mod_1265896768206_912.doc @ 11966 @<br />
Pos: 78.14 /Bedienungsanleitungen/Geräte spezifisch/Drucker/Error Messages/17_CHECKSUM_ERROR_! @ 2\mod_1265896783800_912.doc @ 11970 @<br />
Pos: 78.15 /Bedienungsanleitungen/Geräte spezifisch/Drucker/Error Messages/18a_CHECKSUM_ERROR_!_BDR ONLY! @ 2\mod_1265896785113_912.doc @ 11974 @<br />
Pos: 78.16 /Bedienungsanleitungen/Geräte spezifisch/Drucker/Error Messages/19_CHECKSUM_ERROR_! @ 2\mod_1265896786253_912.doc @ 11978 @<br />
Pos: 78.17 /Bedienungsanleitungen/Geräte spezifisch/Drucker/Error Messages/20_BUFFER_OVERFLOW! @ 2\mod_1265618324295_912.doc @ 11317 @<br />
Protocol<br />
code<br />
Display message<br />
Cause<br />
015 CHECKSUM ERROR ! TESTMACRO<br />
RESET<br />
Error in buffered RAM<br />
CODE: 15<br />
Elimination • Perform a default reset • If the error occurs again after<br />
the default reset call service<br />
Protocol<br />
code<br />
Display message<br />
Cause<br />
016 CHECKSUM ERROR ! SETTING<br />
RESET<br />
Error in buffered RAM<br />
CODE: 16<br />
Elimination • Perform a default reset • If the error occurs again after<br />
the default reset call service<br />
Protocol<br />
code<br />
Display message<br />
Cause<br />
017 CHECKSUM ERROR ! RESET<br />
PENVALUES<br />
Error in buffered RAM<br />
CODE: 17<br />
Elimination • Perform a default reset • If the error occurs again after<br />
the default reset call service<br />
Protocol<br />
code<br />
Display message<br />
Cause<br />
019 CHECKSUM ERROR ! RESET<br />
DROPVALUES<br />
Error in buffered RAM<br />
CODE: 19<br />
Elimination • Perform a default reset • If the error occurs again after<br />
the default reset call service<br />
106 <strong>User</strong> Manual Version 3.1
Pos: 78.18 /Bedienungsanleitungen/Geräte spezifisch/Drucker/Error Messages/21_UNPRINTED_ADRESSES!_FINISH_THE_JOB @ 2\mod_1265618418236_912.doc @ 11320 @<br />
Pos: 78.19 /Bedienungsanleitungen/Geräte spezifisch/Drucker/Error Messages/22_PROGRAM_ERROR_MAKE_DEFAULT_RESET @ 2\mod_1265618469973_912.doc @ 11323 @<br />
Pos: 78.20 /Bedienungsanleitungen/Geräte spezifisch/Drucker/Error Messages/23_ERROR_UART-A(B)_RESET_THE_PRINTER @ 2\mod_1265618506397_912.doc @ 11326 @<br />
os: 78.21 /Bedienungsanleitungen/Geräte spezifisch/Drucker/Error Messages/24_DISPLAY_TIMEOUT_RESET_THE_PRINTER @ 2\mod_1265618599463_912.doc @ 11329 @<br />
Pos: 78.22 /Bedienungsanleitungen/Geräte spezifisch/Drucker/Error Messages/25_CHECK_CARTRIDGE(s)_HIT_OK_TO_CONTINUE @ 2\mod_1265618631465_912.doc @ 11332 @<br />
Protocol<br />
code<br />
Display message<br />
Cause<br />
020 BUFFER OVERFLOW !<br />
CODE: 20<br />
Elimination • Check if the data cable is<br />
connected correctly at the<br />
printer and at the PC<br />
Overflow of the received buffer<br />
• Exchange the data cable<br />
Protocol<br />
code<br />
Display message<br />
021 UNPRINTED ADDRESSES!FINISH<br />
THE JOB<br />
CODE: 21<br />
Cause<br />
Address has not been<br />
completely printed<br />
Elimination • Do not carry out any<br />
modifications in the printer<br />
menu during the print job<br />
Protocol<br />
code<br />
Display message<br />
022 PROGRAM ERROR MAKE<br />
DEFAULT RESET<br />
CODE: 22<br />
Cause<br />
Error in the program flow<br />
Elimination • Perform a default reset<br />
Protocol<br />
code<br />
Display message<br />
023 UART-A ERROR RESET THE<br />
PRINTER<br />
CODE: 23<br />
Elimination • Turn on the PC before turning<br />
on the printer<br />
Cause<br />
PC was powered on or off<br />
• Restart the printer<br />
Protocol<br />
code<br />
Display message<br />
024 DISPLAY TIMEOUT RESET THE<br />
PRINTER<br />
CODE: 24<br />
Cause<br />
Error of display controller<br />
Elimination • Restart the printer<br />
<strong>User</strong> Manual Version 3.1 107
Pos: 78.23 /Bedienungsanleitungen/Geräte spezifisch/Drucker/Error Messages/27a_Feed_Motor_Controller_FAULT_CALL_SERVICE! @ 2\mod_1265618746220_912.doc @ 11341 @<br />
Pos: 78.24 /Bedienungsanleitungen/Geräte spezifisch/Drucker/Error Messages/28_ERROR_PEN_BOARD#_CHECK_CABLE_OR_BOARD @ 2\mod_1265618803191_912.doc @ 11344 @<br />
Pos: 78.25 /Bedienungsanleitungen/Gerte spezifisch/Drucker/Error Messages/29_ERROR_CARTRIDGE_#_CHECK_CONNECTION @ 2\mod_1265618885914_912.doc @ 11347 @<br />
Protocol<br />
code<br />
Display message<br />
025 CHECK CARTRIDGE(S) START TO<br />
CONTINUE<br />
CODE: 25<br />
Cause<br />
Cartridge no. # of print unit no.<br />
# is not inserted<br />
Elimination • Insert missing cartridge(s) • If a cartridge is inserted:<br />
Turn off the machine and<br />
then take out the cartridge<br />
and clean the contacts on the<br />
cartridge and the contacts in<br />
the pen board. Insert the<br />
cartridge again.<br />
Protocol<br />
code<br />
Display message<br />
027 FEED MOTOR CONTROLER<br />
FAULT! CALL SERVICE!<br />
CODE: 27<br />
Cause<br />
Motor controller damaged<br />
Elimination • Call service<br />
Protocol<br />
code<br />
Display message<br />
028 ERROR PEN BOARD CALL<br />
SERVICE<br />
CODE: 28<br />
Elimination • Check for the SCSI cable if<br />
any contacts are bent<br />
Cause<br />
Error on the pen board<br />
• Call service<br />
• Make sure that the SCSI cable<br />
is tightly screwed to the<br />
printer and the print unit<br />
108 <strong>User</strong> Manual Version 3.1
Pos: 78.26 /Bedienungsanleitungen/Geräte spezifisch/Drucker/Error Messages/30_RAM_ERROR_Call_Service @ 2\mod_1265618941710_912.doc @ 11350 @<br />
Pos: 78.27 /Bedienungsanleitungen/Geräte spezifisch/Drucker/Error Messages/31_PRINTER_ERROR_WRONG_BOARD/FIRMWARE @ 2\mod_1265618996662_912.doc @ 11353 @<br />
Pos: 78.28 /Bedienungsanleitungen/Geräte spezifisch/Drucker/Error Messages/32_MACRO_LOADING_ERROR_RAM_MEMORY_IS_FULL! @ 2\mod_1265619042535_912.doc @ 11356 @<br />
Pos: 78.29 /Bedienungsanleitungen/Geräte spezifisch/Drucker/Error Messages/33_MACRO_TOO_HIGH_Reduce_to_#_Inches @ 2\mod_1265619098268_912.doc @ 11359 @<br />
Protocol<br />
code<br />
Display message<br />
029 ERROR CARTRIDGE # CHECK<br />
CONNECTION!<br />
CODE: 29<br />
Cause<br />
Connection between cartridge<br />
contacts and pen board contacts<br />
is faulty<br />
Elimination • Take out the Cartridge and clean the contacts of the Cartridge and<br />
the contacts in the pen board. Insert the Cartridge again and press<br />
the Ok button. The printer will do another connection test.<br />
If the contact problem could not be solved, the message THE<br />
PROBLEM IS NOT SOLVED! may appear. Please try another ink<br />
Cartridge.<br />
If the problem is still not solved, call service.<br />
Protocol<br />
code<br />
Display message<br />
030 RAM ERROR CALL SERVICE<br />
CODE: 30<br />
Cause<br />
RAM error on CPU board<br />
Elimination • Call service<br />
Protocol<br />
code<br />
Display message<br />
031 PRINTER ERROR WRONG<br />
BOARD/FIRMWARE<br />
CODE: 31<br />
Cause<br />
Board – Firmware – PCB do not<br />
match<br />
Elimination • Load the correct firmware<br />
version<br />
Protocol<br />
code<br />
Display message<br />
032 MACRO LOADING ERROR RAM<br />
MEMORY IS FULL!<br />
CODE: 32<br />
Cause<br />
Insufficient memory for the<br />
macro<br />
Elimination • Reduce the size of the macro<br />
<strong>User</strong> Manual Version 3.1 109
Pos: 78.30 /Bedienungsanleitungen/Geräte spezifisch/Drucker/Error Messages/34_FONT_ERROR _!!_LOAD_FLASH_FONTS! @ 2\mod_1265619140985_912.doc @ 11362 @<br />
Pos: 78.31 /Bedienungsanleitungen/Geräte spezifisch/Drucker/Error Messages/35a_PAP._WIDTH_TOO_SMALL @ 2\mod_1265619233592_912.doc @ 11371 @<br />
Pos: 78.32 /Bedienungsanleitungen/Geräte spezifisch/Drucker/Error Messages/47_ERROR_SMC1_RESET_THE_PRINTER @ 2\mod_1265619864479_912.doc @ 11401 @<br />
Pos: 78.33 /Bedienungsanleitungen/Geräte spezifisch/Drucker/Error Messages/48_ERROR_SCC_RESET_THE_PRINTER @ 2\mod_1265619936371_912.doc @ 11405 @<br />
Pos: 78.34 /Bedienungsanleitungen/Geräte spezifisch/Drucker/Error Messages/50_PAGE_DATA_TOO_LARGE_RESET_THE_PRINTER @ 3\mod_1297873197378_912.doc @ 30385 @<br />
Protocol<br />
code<br />
Display message<br />
033 MACRO TOO HIGH REDUCE TO x<br />
INCHES<br />
CODE: 33<br />
Cause<br />
A macro sent from the PC does<br />
not fit into the print area<br />
Elimination • Reduce the height of the<br />
macro to # inches<br />
Protocol<br />
code<br />
Display message<br />
034 FONT ERROR LOAD FLASH<br />
FONTS!<br />
CODE: 34<br />
Cause<br />
Error in the flash prom<br />
Elimination • Call service<br />
Protocol<br />
code<br />
Display message<br />
035 PAP. WIDTH TOO SMALL MIN.<br />
VALUE:<br />
CODE: 35<br />
Elimination • Check if the paper size is<br />
within the printer<br />
specifications<br />
Cause<br />
Wrong paper width during paper<br />
size measurement or at job<br />
start from PC<br />
• Check if the paper sensor<br />
triggers before the rear edge<br />
of the paper<br />
• Check if the correct paper size<br />
is sent from the PC.<br />
Protocol<br />
code<br />
Display message<br />
047 ERROR SMC1 RESET THE<br />
PRINTER!<br />
CODE: 47<br />
Cause<br />
ERROR in the SMC1 module<br />
Elimination • Reset the printer • Call service<br />
Protocol<br />
code<br />
Display message<br />
048 ERROR SCC RESET THE PRINTER!<br />
CODE: 48<br />
Cause<br />
ERROR in the SCC module<br />
Elimination • Reset the printer • Call service<br />
110 <strong>User</strong> Manual Version 3.1
Pos: 78.35 /Bedienungsanleitungen/Geräte spezifisch/Drucker/Error Messages/51_FONT_LOADING_ERROR:_RAM_MEMORY_IS_FULL @ 2\mod_1265620546317_912.doc @ 11420 @<br />
Pos: 78.36 /Bedienungsanleitungen/Geräte spezifisch/Drucker/Error Messages/52_FONT_LOADING_ERROR:_WRONG_DATA/TIMEOUT @ 2\mod_1265620582349_912.doc @ 11423 @<br />
Pos: 78.37 /Bedienungsanleitungen/Geräte spezifisch/Drucker/Error Messages/53_ERROR:_NON-Existent_Font_Selected! @ 2\mod_1265620640678_912.doc @ 11426 @<br />
Protocol<br />
code<br />
Display message<br />
050 PAGE DATA TOO LARGE RESET<br />
THE PRINTER!<br />
CODE: 50<br />
Elimination • Set the menu PAGE DATA<br />
SIZE to maxim<br />
Cause<br />
Data sent from the PC is too<br />
large<br />
• Turn off the printer and then<br />
on again<br />
• Check if the data cable is<br />
connected correctly at the<br />
printer and at the PC<br />
Protocol<br />
code<br />
Display message<br />
051 FONT LOADING ERROR RAM<br />
MEMORY IS FULL!<br />
CODE: 51<br />
Cause<br />
Insufficient memory for the font<br />
Elimination • Reduce number of fonts used<br />
in print job<br />
Protocol<br />
code<br />
Display message<br />
052 FONT LOADING ERROR WRONG<br />
DATA/TIMEOUT<br />
CODE: 52<br />
Elimination • Check if the data cable is<br />
connected correctly at the<br />
printer and at the PC<br />
• Check if you use the official<br />
printer driver<br />
Cause<br />
Undefined or faulty data were<br />
detected by the printer<br />
• Try to run the print job from<br />
a different PC<br />
• Call service<br />
<strong>User</strong> Manual Version 3.1 111
Pos: 78.38 /Bedienungsanleitungen/Geräte spezifisch/Drucker/Error Messages/54_ERROR_PRINT_DATA_CHECK_THE_PRINTOUT @ 2\mod_1265620692945_912.doc @ 11429 @<br />
Pos: 78.39 /Bedienungsanleitungen/Geräte spezifisch/Drucker/Error Messages/56_ERROR_PEN_CABLE_# @ 2\mod_1265620747852_912.doc @ 11432 @<br />
Pos: 78.40 /Bedienungsanleitungen/Geräte spezifisch/Drucker/Error Messages/61_NO_CONFIGURATION_PCB_DETECTED @ 2\mod_1265620794400_912.doc @ 11435 @<br />
Protocol<br />
code<br />
Display message<br />
053 ERROR: NON-EXISTENT FONT<br />
SELECTED!<br />
CODE: 53<br />
Elimination • Do not repeat pages after a<br />
job has ended<br />
• Do not turn off the printer<br />
during job data transfer<br />
Cause<br />
A print job selects a font which<br />
is not available (loaded) in the<br />
printer<br />
• Unlock the font in the printer<br />
menu<br />
• To interrupt a print job use<br />
the Cancel and the Ok<br />
keys on the printer<br />
Protocol<br />
code<br />
Display message<br />
054 ERROR PRINT DATA CHECK THE<br />
PRINTOUT<br />
CODE: 54<br />
Elimination • Check if the data cable is<br />
connected correctly at the<br />
printer and at the PC<br />
• Check if you use the official<br />
printer driver<br />
Cause<br />
Undefined or faulty data were<br />
detected by the printer<br />
• Try to run the print job from<br />
a different PC<br />
• Set the menu SOFT FONT<br />
ERROR to cont. print.<br />
Attention! This setting can<br />
cause faulty data in the<br />
printouts. Check the<br />
following pages for<br />
garbage characters!<br />
Protocol<br />
code<br />
Display message<br />
056 ERROR PEN CABLE CHECK CABLE<br />
CODE: 56<br />
Elimination • Check if the head cable is<br />
damage<br />
Cause<br />
Wrong PEN ID read<br />
• Call service<br />
Protocol<br />
code<br />
Display message<br />
061 NO CONFIGURATION PCB<br />
DETECTED!<br />
CODE: 61<br />
Cause<br />
No PCB (printed circuit board)<br />
detected<br />
Elimination • Call service<br />
112 <strong>User</strong> Manual Version 3.1
Pos: 78.41 /Bedienungsanleitungen/Geräte spezifisch/Drucker/Error Messages/62_FIRMW./CONFIG_PCB_DOES_NOT_MATCH @ 3\mod_1293006012340_912.doc @ 28972 @<br />
Pos: 78.42 /Bedienungsanleitungen/Geräte spezifisch/Drucker/Error Messages/63_ERROR:_Non_Existent_Macro_Selected @ 2\mod_1265620898465_912.doc @ 11441 @<br />
Pos: 78.43 /Bedienungsanleitungen/Geräte spezifisch/Drucker/Error Messages/64_ERROR:_PEN_power_supply_damaged! @ 3\mod_1297873414116_912.doc @ 30391 @<br />
Pos: 78.44 /Bedienungsanleitungen/Geräte spezifisch/Drucker/Error Messages/73c_PAP._WIDTH_TOO_LARGE @ 2\mod_1274867079355_912.doc @ 17623 @<br />
Protocol<br />
code<br />
Display message<br />
062 FIRMWARE/CONFIG PCB DOES<br />
NOT MATCH!<br />
CODE: 62<br />
Elimination • Load the correct firmware;<br />
make a default reset (press<br />
and hold the home key<br />
during power-on).<br />
Cause<br />
Firmware and PCB do not match<br />
• Call service<br />
Protocol<br />
code<br />
Display message<br />
063 ERROR: NON-EXISTENTMACRO<br />
SELECTED!<br />
CODE: 63<br />
Elimination • Do not repeat pages after a<br />
job has ended<br />
• Do not turn off the printer<br />
during job data transfer<br />
Cause<br />
A print job selects a macro<br />
which is not available (loaded)<br />
in the printer<br />
• Unlock the font in the printer<br />
menu<br />
• To interrupt a print job use<br />
the Cancel and the Ok<br />
keys on the printer<br />
Protocol<br />
code<br />
Display message<br />
064 ERROR: PEN POWER SUPPLY<br />
DAMAGED!<br />
CODE: 64<br />
Elimination • Update the printer to firmware<br />
version 4.8 or higher<br />
Cause<br />
Pen power supply damaged<br />
• Call service<br />
Protocol<br />
code<br />
Display message<br />
073 PAP. WIDTH TOO LARGE MAX.<br />
VALUE:<br />
CODE: 73<br />
Elimination • Check if the paper size is<br />
within the printer<br />
specifications<br />
Cause<br />
Wrong paper width during paper<br />
size measurement or at job<br />
start from PC<br />
• Check if the correct paper<br />
size is sent from the PC.<br />
<strong>User</strong> Manual Version 3.1 113
Pos: 78.46 /Bedienungsanleitungen/Geräte spezifisch/Drucker/Error Messages/75_NO MAC ADDRESS FOUND (ONLY 619-Platine) @ 3\mod_1283169650711_912.doc @ 27270 @<br />
Pos: 78.47 /Bedienungsanleitungen/Geräte spezifisch/Drucker/Error Messages/76_NO TCP CONNECTION DETECTED! (ONLY 619-Platine) @ 3\mod_1283169654710_912.doc @ 27276 @<br />
Pos: 78.48 /Bedienungsanleitungen/Geräte spezifisch/Drucker/Error Messages/78_NO PEN BOARD DETECT! RESET THE PRINTER!_FW_V_4.8 @ 3\mod_1290009693885_912.doc @ 28363 @<br />
Pos: 78.49 /Bedienungsanleitungen/Geräte spezifisch/Drucker/Error Messages/79_UNKNOWN CONFIGURAT. FOR THIS DISPLAY!_FW_V_4.8 @ 3\mod_1290010237086_912.doc @ 28382 @<br />
Protocol<br />
code<br />
Display message<br />
074 ERROR: TCP-PORT<br />
CODE: 74<br />
Cause<br />
An error occurred during<br />
initialising the TCP device<br />
Elimination • Call service<br />
Protocol<br />
code<br />
Display message<br />
075 NO MAC ADDRESS FOUND<br />
CODE: 75<br />
Cause<br />
MAC address not set in the<br />
board memory<br />
Elimination • Call service<br />
Protocol<br />
code<br />
Display message<br />
076 NO TCP CONNECTION DETECTED!<br />
CODE: 76<br />
Cause<br />
No TCP connection could be<br />
established<br />
Elimination • Plug in the TCP cable<br />
Protocol<br />
code<br />
Display message<br />
078 NO PEN BOARD DETECT! RESET THE<br />
PRINTER!<br />
CODE: 78<br />
Cause<br />
No PCB (printed circuit<br />
board) and no PEN board<br />
detected<br />
Elimination • Connect all pen boards • Call service<br />
Protocol<br />
code<br />
Display message<br />
079 UNKNOWN CONFIGURAT. FOR THIS<br />
DISPLAY!<br />
CODE: 79<br />
Cause<br />
No PCB and no graphic<br />
display detected.<br />
Elimination • Connect the graphic display • Call service<br />
114 <strong>User</strong> Manual Version 3.1
Pos: 79 /Bedienungsanleitungen/Geräte spezifisch/Drucker/8.x_Ü2_Warning_Messages @ 2\mod_1265641665046_912.doc @ 11623 @ 2<br />
Pos: 80 /Bedienungsanleitungen/Geräte spezifisch/Drucker/8.x_Ü3_How to read a warning message entry @ 2\mod_1277218478098_912.doc @ 18855 @ 3<br />
Pos: 81.1 /Bedienungsanleitungen/Geräte spezifisch/Drucker/Warning Messages/AA_Warning:Non-Existent_Font_Selected! @ 2\mod_1265634364380_912.doc @ 11492 @<br />
Pos: 81.2 /Bedienungsanleitungen/Geräte spezifisch/Drucker/Warning Messages/AB_Warning:Non-Existent_Macro_Selected! @ 2\mod_1265634652878_912.doc @ 11496 @<br />
8.5 Warning Messages<br />
8.5.1 How to read a warning message entry<br />
• Protocol code:<br />
Two digit number that is sent by the printer via the serial interface when this warning<br />
occurs.<br />
• Display message:<br />
Text that is shown in the printer display. The text in the display always includes the<br />
warning code (two letters) as reference for the operator.<br />
• Cause:<br />
What caused this warning.<br />
• Elimination:<br />
Steps the operator can take to avoid this warning.<br />
Protocol<br />
code<br />
Display message<br />
Cause<br />
13 Warning:non-existent font<br />
selected!<br />
CODE: AA<br />
Elimination • Do not repeat pages after a<br />
job has ended<br />
• Do not turn off the printer<br />
during job data transfer<br />
Selected font does not exist in the<br />
printer and the menu SOFT FONT<br />
ERROR is set to cont. print<br />
Attention! This setting can<br />
cause faulty data in the<br />
printouts. Check the following<br />
pages for garbage characters!<br />
• Unlock the font in the printer<br />
menu<br />
• To interrupt a print job use<br />
the Cancel and the Ok<br />
keys on the printer<br />
Protocol<br />
code<br />
Display message<br />
Cause<br />
14 Warning:non-existent macro<br />
selected!<br />
CODE: AB<br />
Selected macro does not exist in<br />
the printer<br />
Elimination • Do not repeat pages after a<br />
job has ended<br />
<strong>User</strong> Manual Version 3.1 115
Pos: 81.3 /Bedienungsanleitungen/Geräte spezifisch/Drucker/Warning Messages/AC_Error_Macro_ID_Report_Err._2_Vendor @ 2\mod_1265634861445_912.doc @ 11500 @<br />
Pos: 81.4 /Bedienungsanleitungen/Geräte spezifisch/Drucker/Warning Messages/AD_Position_Warning!_Reduce_Left_Margin! @ 3\mod_1291916084519_912.doc @ 28622 @<br />
Pos: 81.5 /Bedienungsanleitungen/Geräte spezifisch/Drucker/Warning Messages/AE_Warning:Wrong Data/Barcode_Selected! @ 2\mod_1265635086372_912.doc @ 11508 @<br />
Pos: 81.6 /Bedienungsanleitungen/Geräte spezifisch/Drucker/Warning Messages/AF_Error_Barcode_Data_Report_error_to_vendor @ 2\mod_1265635400728_912.doc @ 11512 @<br />
Pos: 81.7 /Bedienungsanleitungen/Geräte spezifisch/Drucker/Warning Messages/AG_Macro_Too_Large_Or_Worng_Hor.Position @ 2\mod_1265635501737_912.doc @ 11516 @<br />
Protocol<br />
code<br />
Display message<br />
Cause<br />
15 Warning macro ID report to<br />
vendor<br />
Error in the mailing software<br />
CODE: AC<br />
Elimination • Contact the software<br />
manufacturer<br />
Protocol<br />
code<br />
Display message<br />
Cause<br />
16 Position warning! reduce left<br />
margin!<br />
CODE: AD<br />
Elimination • Check paper size in layout<br />
• Check if print layout fits onto<br />
paper<br />
Print layout sent from the PC<br />
exceeds paper size set in the<br />
printer (in transport direction)<br />
• Check LEFT MARGIN setting<br />
in printer menu<br />
• Check whether the<br />
“Keepalive” function from<br />
FlexMail was activated. If so<br />
please deactivate it.<br />
Protocol<br />
code<br />
Display message<br />
Cause<br />
17 Warning: wrong data/barcode<br />
selected!<br />
CODE: AE<br />
Elimination • Check the barcode data in the<br />
PC program<br />
The printed detected faulty data for<br />
an internal barcode<br />
• Check if the data cable is<br />
connected correctly at the<br />
printer and at the PC<br />
Protocol<br />
code<br />
Display message<br />
Cause<br />
18 Warning barcode datareport to<br />
vendor<br />
Error in the mailing software<br />
CODE: AF<br />
Elimination • Contact the software<br />
manufacturer<br />
116 <strong>User</strong> Manual Version 3.1
Pos: 81.8 /Bedienungsanleitungen/Geräte spezifisch/Drucker/Warning Messages/AH_Macro_Height_Does_Not_Match! @ 2\mod_1265635595996_912.doc @ 11520 @<br />
Pos: 81.9 /Bedienungsanleitungen/Geräte spezifisch/Drucker/Warning Messages/AI_Macro_ID#_In_Use_Macro_Load_Ignored @ 2\mod_1265635649876_912.doc @ 11524 @<br />
Pos: 81.10 /Bedienungsanleitungen/Geräte spezifisch/Drucker/Warning Messages/AJ_Image_Height_Exceeds_The_Maximum_Value @ 2\mod_1265635768480_912.doc @ 11528 @<br />
Pos: 81.11 /Bedienungsanleitungen/Geräte spezifisch/Drucker/Warning Messages/AK_Warning:_Wrong_True_Type_Font_Data! @ 2\mod_1265636491951_912.doc @ 11532 @<br />
Protocol<br />
code<br />
Display message<br />
Cause<br />
19 Macro too large or wrong hor.<br />
position!<br />
Macro too large for print area<br />
CODE: AG<br />
Elimination • Reduce macro size<br />
• Reduce macro size or change<br />
the hor. Position<br />
• Check the paper size set in<br />
the printer menu or PC<br />
software<br />
Protocol<br />
code<br />
Display message<br />
Cause<br />
20 Macro height does not match!<br />
CODE: AH<br />
Error in PC software, difference<br />
between macro size sequence and<br />
real macro size<br />
Elimination • Call service • Error in Data transmission<br />
Protocol<br />
code<br />
Display message<br />
Cause<br />
21 Macro ID# in use macro load<br />
ignored!<br />
CODE: AI<br />
A macro with the same id number<br />
is already stored in the printer<br />
Elimination • Reset the printer<br />
Protocol<br />
code<br />
Display message<br />
Cause<br />
22 Image height exceeds the<br />
maximum value!<br />
CODE: AJ<br />
Print data outside of the printing<br />
area<br />
Elimination • Reduce image size • Check the position of the<br />
print data, including empty<br />
lines, Text wrap in the text<br />
box.<br />
<strong>User</strong> Manual Version 3.1 117
Pos: 81.12 /Bedienungsanleitungen/Geräte spezifisch/Drucker/Warning Messages/AN_Warning:_Unit#_Is _Not_Available! @ 2\mod_1265636727644_912.doc @ 11576 @<br />
Pos: 81.13 /Bedienungsanleitungen/Geräte spezifisch/Drucker/Warning Messages/AO_SERVICE_WARNING_MAX_CONSUMTIME:_UxCy_Centaur @ 2\mod_1265636729691_912.doc @ 11580 @<br />
Pos: 81.14 /Bedienungsanleitungen/Geräte spezifisch/Drucker/Warning Messages/AP_SERVICE_WARNING_REGULATOR:_UxCy @ 2\mod_1265636732113_912.doc @ 11584 @<br />
Pos: 81.15 /Bedienungsanleitungen/Geräte spezifisch/Drucker/Warning Messages/AQ_Warning:_Rotate_Font_Feature_NOT_Enabled! @ 2\mod_1265636734410_912.doc @ 11588 @<br />
Protocol<br />
code<br />
Display message<br />
Cause<br />
23 Warning: wrong TrueType font<br />
data!<br />
CODE: AK<br />
Elimination • Do not repeat pages after a<br />
job has ended<br />
• Do not turn off the printer<br />
during job data transfer<br />
A print job selects a font which is<br />
not available (loaded) in the printer<br />
and the menu SOFT FONT ERROR is<br />
set to<br />
• Unlock the font in the printer<br />
menu<br />
• To interrupt a print job use<br />
the Cancel and the Ok<br />
keys on the printer<br />
Protocol<br />
code<br />
Display message<br />
Cause<br />
26 Warning: unit# is not available!<br />
CODE: AN<br />
Print data are sent for a non<br />
existing print unit<br />
Wrong printer driver selected<br />
Elimination • Select the correct printer<br />
driver for your printer model<br />
Protocol<br />
code<br />
Display message<br />
Cause<br />
27 Service warning<br />
MAX_CONSUMTIME: UxCy<br />
CODE: AO<br />
Maintenance interval of the print<br />
cartridge is exhausted<br />
Elimination • Confirm with the Ok key<br />
and exchange the print<br />
cartridge<br />
Protocol<br />
code<br />
Display message<br />
Cause<br />
28 Service warning regulator: UxCy<br />
CODE: AP<br />
Maintenance interval of the<br />
regulator is exhausted<br />
Elimination • Exchange the regulator for the<br />
concerning print unit<br />
118 <strong>User</strong> Manual Version 3.1
Pos: 81.16 /Bedienungsanleitungen/Geräte spezifisch/Drucker/Warning Messages/AR_Warning:Wrong_Data _Check_The_Printout! @ 2\mod_1265636736786_912.doc @ 11592 @<br />
Pos: 81.17 /Bedienungsanleitungen/Geräte spezifisch/Drucker/Warning Messages/AX_Warning:_NO_ink!_change_cartridge @ 2\mod_1265636709939_912.doc @ 11544 @<br />
Pos: 81.18 /Bedienungsanleitungen/Geräte spezifisch/Drucker/Warning Messages/BC_INK_TYPE_IS_INCOMPATIBLE! @ 2\mod_1265636718268_912.doc @ 11560 @<br />
Pos: 81.19 /Bedienungsanleitungen/Geräte spezifisch/Drucker/Warning Messages/BD_Feature_Disabled_In_This_Mode @ 2\mod_1265636720409_912.doc @ 11564 @<br />
Protocol<br />
code<br />
Display message<br />
Cause<br />
29 Warning:rotate font feature not<br />
enabled!<br />
CODE: AQ<br />
The menu PRINTER CONFIG. ><br />
BOOT DEFAULTS > TEXT ROTATION<br />
is set to off and the printer<br />
received a control sequence for<br />
rotated text<br />
Elimination • Set the menu PRINTER<br />
CONFIG. > BOOT DEFAULTS ><br />
TEXT ROTATION to on.<br />
Protocol<br />
code<br />
Display message<br />
Cause<br />
30 Warning:wrong data check the<br />
printout!<br />
CODE: AR<br />
Elimination • Check if the data cable is<br />
connected correctly at the<br />
printer and at the PC<br />
Undefined or faulty data were<br />
detected by the printer<br />
• Try to run the print job from<br />
a different PC<br />
• Check if you use the official<br />
printer driver<br />
Protocol<br />
code<br />
Display message<br />
Cause<br />
33 Warning: no ink! change<br />
cartridge<br />
CODE: AX<br />
A ink cartridge is out of ink and the<br />
menu PRINTER CONFIG. > ERROR<br />
HANDLING > ERROR LOW INK ><br />
EMPTY CARTRIDGE is set to cont.<br />
print<br />
Elimination • Exchange the ink cartridge<br />
Protocol<br />
code<br />
Display message<br />
Cause<br />
37 Ink type is incompatible!<br />
CODE: BC<br />
This combination of different ink<br />
types is not compatible due to<br />
different energy settings<br />
Elimination • Use only one type of ink<br />
<strong>User</strong> Manual Version 3.1 119
Pos: 81.20 /Bedienungsanleitungen/Geräte spezifisch/Drucker/Warning Messages/BE_PAPER_SENSOR_SHOULD_BE_VERIFIED @ 2\mod_1265636723269_912.doc @ 11568 @<br />
Pos: 81.21 /Bedienungsanleitungen/Geräte spezifisch/Drucker/Warning Messages/BF_SPEED_TOO_HIGH_FOR_THE_INK_TYPE @ 2\mod_1265636725488_912.doc @ 11572 @<br />
Pos: 81.22 /Bedienungsanleitungen/Geräte spezifisch/Drucker/Warning Messages/BG_FONT_LOADING_WARNING @ 2\mod_1265884878154_912.doc @ 11862 @<br />
Pos: 81.23 /Bedienungsanleitungen/Geräte spezifisch/Drucker/Warning Messages/BH_MACRO_LOAD_WARNING @ 2\mod_1265884878279_912.doc @ 11866 @<br />
Pos: 82 /Bedienungsanleitungen/Geräte spezifisch/Drucker/8.x_Ü3_Additional_Error_Messages @ 2\mod_1277120986227_912.doc @ 18815 @ 3<br />
Protocol<br />
code<br />
Display message<br />
Cause<br />
38 Feature disabled in this mode<br />
CODE: BD<br />
Address repeating not available in<br />
read and print mode<br />
Elimination<br />
•<br />
Protocol<br />
code<br />
Display message<br />
Cause<br />
39 PAPER SENSOR SHOULD BE<br />
VERIFIED!<br />
CODE: BE<br />
The paper sensor is detecting paper<br />
before starting to print or<br />
measuring the paper size<br />
Elimination • Remove any paper under the<br />
sensor<br />
Protocol<br />
code<br />
Display message<br />
Cause<br />
40 Speed limitation for the ink type<br />
CODE: BF<br />
The speed of the transport system<br />
is too high for the selected ink type<br />
Elimination • Reduce the speed of the<br />
transport system<br />
Protocol<br />
code<br />
Display message<br />
Cause<br />
41 Font loading warning RAM<br />
memory is full!<br />
Insufficient memory for the font<br />
CODE: BG<br />
Elimination • Reduce number of fonts used<br />
in print job<br />
Protocol<br />
code<br />
Display message<br />
Cause<br />
42 Macro load warning RAM<br />
memory is full!<br />
Insufficient memory for the macro<br />
CODE: BH<br />
Elimination • Reduce the size of the macro<br />
120 <strong>User</strong> Manual Version 3.1
Pos: 83.1 /Bedienungsanleitungen/Geräte spezifisch/Drucker/Monitor Messages/M01_Checksum error flash -> RAM transfer @ 2\mod_1271940887638_912.doc @ 16833 @<br />
Pos: 83.2 /Bedienungsanleitungen/Geräte spezifisch/Drucker/Monitor Messages/M02_USB-EPROM Read @ 2\mod_1271941102636_912.doc @ 16837 @<br />
Pos: 83.3 /Bedienungsanleitungen/Geräte spezifisch/Drucker/Monitor Messages/M03_USB-EPROM Write @ 2\mod_1271941243073_912.doc @ 16841 @<br />
Pos: 83.4 /Bedienungsanleitungen/Geräte spezifisch/Drucker/Monitor Messages/M04_EPROM Record S0 Checksumm Error @ 2\mod_1271941245182_912.doc @ 16845 @<br />
Pos: 83.5 /Bedienungsanleitungen/Geräte spezifisch/Drucker/Monitor Messages/M05_EPROM none PPC @ 2\mod_1271941247276_912.doc @ 16849 @<br />
8.5.2 Additional Error Messages<br />
No. Message Cause<br />
M01<br />
MONITOR-ERROR: M01<br />
FAULT: xxxxxxxx<br />
CHKSUM:ssss-ssss<br />
Checksum error while transferring<br />
the flash into the RAM memory<br />
Elimination • Restart the printer<br />
No. Message Cause<br />
M02<br />
MONITOR-ERROR: M02<br />
READ USB-EEPROM<br />
RETRY, Call SERVIC<br />
USB-EPROM could not be read<br />
Elimination • Retry • When error still occurs call<br />
service<br />
No. Message Cause<br />
M03<br />
MONITOR-ERROR: M03<br />
WRITE USB-EEPROM<br />
RETRY, CALL SERVIC<br />
USB-EPROM could not be written on<br />
Elimination • Retry • When error still occurs call<br />
service<br />
No. Message Cause<br />
M04<br />
MONITOR-ERROR: M04<br />
S0 FAULT CHECKSUM<br />
REF: xx NOW: xx<br />
Checksum of record S0 is faulty.<br />
REF = reference value<br />
NOW = actual value<br />
Elimination • Transfer the hex file again<br />
• Check if hex file is correct<br />
• When error still occurs call<br />
service<br />
No. Message Cause<br />
M05<br />
MONITOR-ERROR: M05<br />
INVALID FILE -PPC<br />
Identifier of hex file is not valid.<br />
None PPC type.<br />
Elimination • Check if hex file is correct<br />
<strong>User</strong> Manual Version 3.1 121
Pos: 83.6 /Bedienungsanleitungen/Geräte spezifisch/Drucker/Monitor Messages/M06_EPROM Unexpected address S0 @ 2\mod_1271941249182_912.doc @ 16853 @<br />
Pos: 83.7 /Bedienungsanleitungen/Geräte spezifisch/Drucker/Monitor Messages/M07_EPROM Image too large @ 2\mod_1271941734242_912.doc @ 16857 @<br />
Pos: 83.8 /Bedienungsanleitungen/Geräte spezifisch/Drucker/Monitor Messages/M08_EPROM Record S3 Checksum Error @ 2\mod_1271941844975_912.doc @ 16891 @<br />
Pos: 83.9 /Bedienungsanleitungen/Geräte spezifisch/Drucker/Monitor Messages/M09_EPROM Unexpected address S3 @ 2\mod_1271941923553_912.doc @ 16895 @<br />
Pos: 83.10 /Bedienungsanleitungen/Geräte spezifisch/Drucker/Monitor Messages/M10_Checksum error flash S7 @ 2\mod_1271941992443_912.doc @ 16899 @<br />
Pos: 83.11 /Bedienungsanleitungen/Geräte spezifisch/Drucker/Monitor Messages/M11_EPROM Image too large @ 2\mod_1271942098442_912.doc @ 16903 @<br />
No. Message Cause<br />
M06<br />
MONITOR-ERROR: M06<br />
UNEXPECTED ADDRESS<br />
xxxxxxxxx<br />
While data transferring a faulty<br />
address <strong>range</strong> was detected in<br />
record S0<br />
Elimination • Check hex file<br />
No. Message Cause<br />
M07<br />
MONITOR-ERROR: M07<br />
IMAGE TOO LARGE<br />
Hex file size too large<br />
Elimination • Check hex file<br />
No. Message Cause<br />
M08<br />
MONITOR-ERROR: M08<br />
S3 FAULT CHECKSUM<br />
ADR: xxxxxxxx<br />
Checksum of record S3 is faulty<br />
Elimination • Transfer the hex file again<br />
• Check if hex file is correct<br />
• When error still occurs call<br />
service<br />
No. Message Cause<br />
M09<br />
MONITOR-ERROR: M09<br />
UNEXPECTED ADDRESS<br />
xxxxxxxxx<br />
While data transferring a faulty<br />
address <strong>range</strong> was detected in<br />
record S3<br />
Elimination • Check hex file<br />
No. Message Cause<br />
M10<br />
MONITOR-ERROR: M10<br />
S7 FAULT: xxxxxxxx<br />
CHKSUM:ssss-ssss<br />
Wrong checksum of hex file<br />
Elimination • Transfer the hex file again • When error still occurs call<br />
service<br />
122 <strong>User</strong> Manual Version 3.1
Pos: 83.12 /Bedienungsanleitungen/Geräte spezifisch/Drucker/Monitor Messages/M12_EPROM Error Flash Erase @ 2\mod_1271942448456_912.doc @ 16907 @<br />
Pos: 83.13 /Bedienungsanleitungen/Geräte spezifisch/Drucker/Monitor Messages/M13_EPROM Error Flash Write @ 2\mod_1271942719798_912.doc @ 16911 @<br />
Pos: 83.14 /Bedienungsanleitungen/Geräte spezifisch/Drucker/Monitor Messages/M14_Checksum error after updating the flash @ 2\mod_1271942784454_912.doc @ 16915 @<br />
Pos: 83.15 /Bedienungsanleitungen/Geräte spezifisch/Drucker/Monitor Messages/M15_WRITE USB-EWPROM @ 2\mod_1271942877078_912.doc @ 16919 @<br />
No. Message Cause<br />
M11<br />
MONITOR-ERROR: M11<br />
IMAGE TOO LARGE<br />
Too many file parts in hex file or<br />
hex file too large<br />
Elimination • Check hex file<br />
No. Message Cause<br />
M12<br />
MONITOR-ERROR: M12<br />
FAULT FLASH-ERASE<br />
Error while erasing the flash<br />
memory<br />
Elimination • Restart the update • When error still occurs call<br />
service<br />
No. Message Cause<br />
M13<br />
MONITOR-ERROR: M13<br />
FAULT FLASH-WRITE<br />
Error while writing on the flash<br />
memory<br />
Elimination • Restart the update • When error still occurs call<br />
service<br />
No. Message Cause<br />
M14<br />
MONITOR-ERROR: M14<br />
FAULT: xxxxxxxx<br />
CHKSUM:ssss-ssss<br />
Checksum error after updating the<br />
flash<br />
Elimination • Restart update • When error still occurs call<br />
service<br />
No. Message Cause<br />
M15<br />
MONITOR-ERROR: M15<br />
WRITE USB-EEPROM<br />
RETRY, CALL SERVIC<br />
USB-EPROM could not be erased<br />
Elimination • Retry • When error still occurs call<br />
service<br />
<strong>User</strong> Manual Version 3.1 123
Pos: 83.16 /Bedienungsanleitungen/Geräte spezifisch/Drucker/Monitor Messages/M16_READ USB-EEPROM @ 3\mod_1299069292099_912.doc @ 30666 @<br />
Pos: 83.17 /Bedienungsanleitungen/Geräte spezifisch/Drucker/Monitor Messages/M21_CPU-HwERR @ 3\mod_1299069326307_912.doc @ 30672 @<br />
Pos: 83.18 /Bedienungsanleitungen/Geräte spezifisch/Drucker/Monitor Messages/M22_WRITE USB-EEPROM @ 3\mod_1299069364682_912.doc @ 30678 @<br />
Pos: 84 /Bedienungsanleitungen/Geräte neutral/8.3_Ü2_Technical Support @ 0\mod_1250692530984_912.doc @ 2793 @ 22<br />
No. Message Cause<br />
M16<br />
MONITOR-ERROR: M16<br />
READ USB-EEPROM<br />
RETRY, CALL SERVIC<br />
USB-EPROM could not be read<br />
Elimination • Retry • When error still occurs call<br />
service<br />
No. Message Cause<br />
M21<br />
MONITOR-ERROR: M21<br />
CPU-HwERR: xxxxxxxx<br />
RETRY, CALL SERVIC<br />
Addressing error in the CPU<br />
Elimination • Retry • When error still occurs call<br />
service<br />
No. Message Cause<br />
M22<br />
MONITOR-ERROR: M22<br />
WRITE USB-EEPROM<br />
RETRY, CALL SERVIC<br />
USB-EPROM could not be updated<br />
for Monitor Version Number<br />
Elimination • Retry • When error still occurs call<br />
service<br />
124 <strong>User</strong> Manual Version 3.1
Pos: 85 /Serviceanleitungen/Geräte spezifisch/Drucker/8.3_Technischer Kundendienst_Printer_specific @ 2\mod_1265189705629_912.doc @ 11240 @<br />
Pos: 86 /Bedienungsanleitungen/Geräte neutral/9.0_Ü1_Consumables and Accessories @ 0\mod_1246022409821_912.doc @ 2022 @ 11<br />
8.6 Technical Support<br />
If you experience technical issues or problems that aren’t mentioned or solved in this <strong>User</strong><br />
Manual, please contact your local authorized <strong>Neopost</strong> dealer.<br />
Please prepare the following information about your device:<br />
• Exact name of the device (label plate).<br />
• Serial number and year of manufacture (label plate).<br />
• Occasionally: The installed firmware version of the device (will be displayed during<br />
the machine initialization, after switching the device on).<br />
• Occasionally: Information about PC software used in connection with the device.<br />
• General information about peripheral devices (conveyors, dryers, feeders, etc.).<br />
• A detailed description of all failures and error messages.<br />
• Setting dump. The setting dump will help the <strong>Neopost</strong> support determining the cause<br />
of a problem. Please see the description for SETTING DUMP, on page 75.<br />
• Input buffer dump. Please see the description for INPUT BUFFER DUMP, on page 76.<br />
• Print file of the print job that causes the problem. Please see chapter 11.7, on page<br />
143 for an instruction on how to create a print file.<br />
• Print samples showing the problem.<br />
• The database used for the print job.<br />
<strong>User</strong> Manual Version 3.1 125
Pos: 87 /Bedienungsanleitungen/Geräte neutral/9.1_<strong>Neopost</strong> Website, offers and prices @ 0\mod_1253102495694_912.doc @ 3364 @<br />
Pos: 88 /Bedienungsanleitungen/Geräte neutral/9.1_Ü2_Consumables @ 0\mod_1253021759325_912.doc @ 3302 @ 12<br />
Pos: 89 /Bedienungsanleitungen/Geräte spezifisch/Drucker/Tinten/9.1_Ü3_Standard inks for [Channelname] address printers @ 1\mod_1260895786690_912.doc @ 8582 @ 3<br />
9 Consumables and Accessories<br />
For information about prices and special offers please visit the <strong>Neopost</strong> website or contact<br />
you local dealer.<br />
www.neopost.com<br />
9.1 Consumables<br />
9.1.1 Standard inks for <strong>Neopost</strong> address printers<br />
The following list of available <strong>Neopost</strong> inks represents the status up to the time of the<br />
publishing of this <strong>User</strong> Manual.<br />
Please contact your authorized <strong>Neopost</strong> dealer for updates in availability or special offers.<br />
General ink specifications:<br />
• Hewlett Packard Thermal Inkjet 2.5 Technology cartridges<br />
• 600 dpi native resolution<br />
• 300 nozzles per cartridge, 12.7 mm (0.5”) print swath<br />
• 40 ml or 42 ml ink volume per cartridge (depending on ink type)<br />
1.35 or 1.42 fl oz (USA), 1.41 or 1.48 fl oz (UK)<br />
Ink name and part number<br />
Spot Color red C6168A<br />
Part number: 4128920H<br />
Spot Color green C6169A<br />
Part number: 4128919G<br />
Spot Color blue C6170A<br />
Part number: 4103180V<br />
Spot color yellow<br />
Part number: 9200200R<br />
Description and application<br />
Spot color ink for printing<br />
accentuations and marks on<br />
standard stock.<br />
Spot color ink for printing<br />
accentuations and marks on<br />
standard stock.<br />
Spot color ink for printing<br />
accentuations and marks on<br />
standard stock.<br />
Spot color ink for printing<br />
accentuations and marks on<br />
standard stock.<br />
Fast Dry Ink<br />
Part number:<br />
Versatile Black<br />
Part number:<br />
4128918F<br />
4127666B<br />
Pigmented ink for sharp and<br />
dark black prints on standard<br />
stock.<br />
Pigmented ink with a fast dry<br />
time on coated stocks. One of<br />
our favorite inks!<br />
126 <strong>User</strong> Manual Version 3.1
Pos: 90 /Zubehör/Generelles Zubehör/KH-TX304-150_Reinraumtücher (Set mit 150 Stück) @ 1\mod_1255012570073_912.doc @ 5569 @ 32<br />
Pos: 91 /Bedienungsanleitungen/Geräte neutral/9.1_Ü2_Accessory devices @ 1\mod_1263378219095_912.doc @ 10203 @ 22<br />
IQ 2392A<br />
Part number:<br />
Max Glossy Ink<br />
Part number:<br />
9200030P<br />
9200033S<br />
An ink designed to produce the<br />
best results and fastest drying<br />
time when using an Infrared<br />
dryer in combination with the<br />
printer.<br />
Ink with a fast dry time on<br />
large variety of stocks.<br />
Black Dye Type: Q2344A<br />
Part number: 4133096H<br />
A dye ink for a variety of<br />
applications. The all-round ink.<br />
Ink #10<br />
Part number: 9200031Q<br />
Quick Dry Ink (IMS)<br />
Part number: 9200434K<br />
An ink designed for printers<br />
without a service or capping<br />
station. This ink requires very<br />
little print head maintenance.<br />
A special application ink for<br />
printing on most difficult<br />
substrates. Please ask your<br />
dealer or local <strong>Neopost</strong> branch<br />
for the additional operation<br />
instructions for this ink type.<br />
9.1.2 Cleaning Towels<br />
Name<br />
Part number<br />
Cleaning Towels<br />
4135465A<br />
Application<br />
150 fibre-free towels for cleaning the ink cartridges.<br />
<strong>User</strong> Manual Version 3.1 127
Pos: 92 /Zubehör/[Zusatzgeräte] (kein Zubehör)/n/a_Transportband CS-800 @ 0\mod_1253024900907_912.doc @ 3326 @<br />
Pos: 93 /Bedienungsanleitungen/Geräte neutral/10.0_Ü1_Technical Specifications @ 0\mod_1250854945863_912.doc @ 2861 @ 31<br />
9.2 Accessory devices<br />
9.2.1 <strong>Neopost</strong> CS-800 conveyor<br />
Name<br />
Part number<br />
<strong>Neopost</strong> CS-800 conveyor<br />
Please contact your authorized <strong>Neopost</strong> dealer<br />
Application<br />
Conveyor with continuous and shingle mode.<br />
Can be put on a table or installed on a special mounting.<br />
Weight<br />
10 kg / 22.05 lbs<br />
Transport speed<br />
0,2–0,9 m/s / 39.4–177.2 feet/minute continuously variable<br />
Dimensions L x W x H 860 x 286 x 86 mm / 33.9 x 11.3 x 3.4”<br />
128 <strong>User</strong> Manual Version 3.1
Pos: 94 /Bedienungsanleitungen/Geräte spezifisch/Drucker/AS-930/Technische Daten_AS-930_ONLY_619 @ 2\mod_1269595513183_912.doc @ 13936 @<br />
10 Technical Specifications<br />
Printer type<br />
Throughput<br />
Material format min. (width x height)<br />
(width = in material transport direction)<br />
Material format max. (width x height)<br />
(width = in material transport direction)<br />
Fixed Head<br />
39,000 postcards / hour (A6 postcards)<br />
135 x 70 mm /<br />
5.31 x 2.75”<br />
500 x 365 mm* /<br />
19.6 x 14.4”*<br />
Material thickness max. 6.35 mm / 0.25”<br />
Print area max. (width x height)<br />
(width = in material transport direction)<br />
Number of ink cartridges 3<br />
Print qualities<br />
<strong>Product</strong>ivity information during job<br />
Internal font 13<br />
Repeatable pages<br />
Memory<br />
Interfaces<br />
500 x 38 mm /<br />
19.6 x 1.5”<br />
150 x 300 dpi (fastest, least amount of ink)<br />
150 x 600 dpi<br />
200 x 300 dpi<br />
200 x 600 dpi<br />
300 x 300 dpi<br />
300 x 600 dpi<br />
600 x 300 dpi<br />
600 x 600 dpi (slowest, most amount of ink)<br />
Job, Service and Power On counter<br />
Ink level<br />
Ink cost, ink consumption<br />
Average job throughput, current throughput<br />
last 20 pages<br />
64 MB<br />
Ethernet (TCP/IP) / USB 2.0 / Serial (for<br />
service purposes)<br />
Dimensions L x W x H 425 x 380 x 280 mm / 16.7 x 14.9 x 11.0”<br />
Weight<br />
Power supply<br />
22 kg / 48.5 lbs.<br />
100 – 240 VAC at 50 ~ 60 Hz<br />
<strong>User</strong> Manual Version 3.1 129
Pos: 95 /Bedienungsanleitungen/Geräte neutral/11.0_Ü1_Appendix @ 0\mod_1251456841922_912.doc @ 3183 @ 31<br />
Temperature conditions<br />
Certifications<br />
10 - 31°C / 50.0 - 87.8°F<br />
20 - 80% relative humidity (non-condensing)<br />
CE, UL, cUL, FCC, RoHS<br />
* with paper side guide ‘large’ (included)<br />
130 <strong>User</strong> Manual Version 3.1
Pos: 96.1 /Bedienungsanleitungen/Geräte spezifisch/Drucker/Printer Driver & Cables to PC/Ü2_How to completely remove printer drivers from Windows Vista and Windows 7 @ 3\mod_1298277086228_912.doc @ 30442 @ 22<br />
11 Appendix<br />
11.1 How to completely remove printer drivers from Windows Vista<br />
and Windows 7<br />
1. Open the<br />
Windows Print<br />
Management<br />
• Type “print” into the search box and click on the program “Print<br />
Management”.<br />
2. Delete<br />
printers<br />
• Select the folder “All Printers (xx)”.<br />
• Delete your address printer from the list of printers.<br />
3. Remove<br />
driver package<br />
• Select the folder “All Drivers (xx)”.<br />
• Right-click on the driver of your address printer and select<br />
“Remove Driver Package...”. Do NOT select “Delete”!<br />
• A new dialogue window will open. Confirm by clicking on “Delete”.<br />
<strong>User</strong> Manual Version 3.1 131
Pos: 96.2 /Bedienungsanleitungen/Geräte spezifisch/Drucker/Printer Driver & Cables to PC/Ü2_How to completely remove printer drivers from Windows XP and Windows 2000 @ 3\mod_1298031435957_912.doc @ 30411 @ 22<br />
11.2 How to completely remove printer drivers from Windows XP<br />
and Windows 2000<br />
1. Uninstall<br />
printers and<br />
printer<br />
drivers<br />
• Open “Printers and Faxes” and delete your address printer.<br />
• Then open “File” > “Server Properties” and select the “Drivers” tab.<br />
• Remove all printer drivers beginning with “FS****-**”.<br />
For example “FS0204-2”.<br />
• Remove all printer drivers beginning with “AS***_vX”, “DA***_vX”<br />
or “RENA***_vX”.<br />
For example “AS700_v4”.<br />
2. Delete<br />
plug and play<br />
folders<br />
• Open the folder<br />
C:\Windows\System32\Spool\drivers\win32x86 or<br />
C:\Windows\System32\Spool\drivers\win32x64<br />
Please note: The location of the “Windows” folder might be different<br />
on your PC.<br />
132 <strong>User</strong> Manual Version 3.1
Pos: 96.3 /Bedienungsanleitungen/Geräte spezifisch/Drucker/Printer Driver & Cables to PC/USB 2.0 (619)/7.X.X_Ü2_How to use a pre-installed printer driver_ONLY_619 @ 3\mod_1296652778190_912.doc @ 29931 @ 3233<br />
• Delete any address printer related folders left here, except for the<br />
folder “3”!<br />
3. Delete .inf<br />
files<br />
• Open the folder<br />
C:\Windows\inf<br />
Please note: The location of the “Windows” folder might be different<br />
on your PC.<br />
• Search for oem**.inf files containing (= in the file) the words<br />
“Flex Systems” or “Satori”.<br />
• Delete all oem**.inf files that were found containing these words.<br />
For example “oem36.inf”.<br />
11.2.1 How to use a pre-installed printer driver<br />
It is not recommended to continue to use an old version of the printer<br />
driver. When setting up a new printer the printer driver, which is<br />
delivered together with the printer, should be installed.<br />
<strong>User</strong> Manual Version 3.1 133
11.3 USB connection<br />
1. Check<br />
installed<br />
printer driver<br />
2. Connect the<br />
printer to the<br />
PC<br />
• Make sure that the already installed printer driver is the correct<br />
one for your new printer. For example the printer model AS-710<br />
requires the printer driver for the AS-710.<br />
• Connecting the printer to the PC via the USB cable. The PC will<br />
show the following messages. See Figure 58 and Figure 59<br />
Figure 58: New hardware detected<br />
3. Identify the<br />
USB port<br />
number<br />
Figure 59: Found New Hardware Wizard<br />
• Identify the USB port number as described in How to identify the<br />
USB port used by the printer.<br />
4. Set the Port<br />
of the preinstalled<br />
driver<br />
• Open “Devices and Printers” on your PC (START > Control Panel ><br />
Printer and Faxes).<br />
• Choose the pre-installed printer driver and click on with the right<br />
mouse button.<br />
• Select “Properties” and select the tab “Ports”.<br />
• Select the matching USB port number.<br />
5. Test the<br />
connection<br />
• Select the printer driver in the “Devices and Printers” window.<br />
• Unplug the USB cable. The status will change to “Offline”<br />
• Plug the USB cable in again. The status will change to “Ready”<br />
• Now the printer is ready to use together with this pre-installed<br />
printer driver.<br />
The „Found New Hardware Wizard“ (see Figure 59) will appear each<br />
time the printer is turned on or plug into the PC. To avoid this you<br />
have to install the printer driver version which is delivered together<br />
with the printer.<br />
134 <strong>User</strong> Manual Version 3.1
Pos: 96.4 /Bedienungsanleitungen/Geräte spezifisch/Drucker/Printer Driver & Cables to PC/USB 2.0 (619)/7.X.X_Ü3_How to identify the USB port number @ 3\mod_1296549141672_912.doc @ 29849 @ 33<br />
11.3.1 Ethernet connection<br />
1. Check the<br />
installed<br />
printer driver<br />
2. Add a<br />
TCP/IP port to<br />
the printer<br />
driver<br />
3. Setup the<br />
Ethernet<br />
connection<br />
• Make sure that the already installed printer driver is the correct<br />
one for your new printer. For example the printer model AS-710<br />
requires the printer driver for the AS-710.<br />
• Add a “Standard TCP/IP Port” to the already installed printer driver<br />
as described in chapter 7.4.1, on page 84.<br />
• Setup the Ethernet connection between the printer and the PC as<br />
described in 7.4, on page 83.<br />
11.3.2 How to identify the USB port used by the printer<br />
In certain cases (e.g. further use of already installed printer drivers) it is necessary to<br />
identify the exact USB port number, when the printer is connected to the PC via USB.<br />
As most PC’s nowadays have more than one physical USB port. The USB port number can<br />
be used to identify the actual port where a device is plugged in.<br />
Depending on which PC USB port the printer is plugged in, the USB port number can be for<br />
example USB001, USB002 or etc.<br />
1. Set the<br />
printer to USB<br />
communication<br />
2. Connecting<br />
the printer<br />
3. Device<br />
detection<br />
• Check if the printer is set to USB communication in the printer<br />
menu: PRINTER CONFIG. > BOOT DEFAULTS > COMMUNICATION<br />
• If not, set it to USB.<br />
• Connect the printer to the PC with the USB cable.<br />
• Turn on the printer.<br />
• Wait until Windows detects the printer.<br />
4. Open the<br />
Device<br />
Manager<br />
5. Identify the<br />
printer device<br />
• Open the Widows Device Manager.<br />
Start > Control Panel > Hardware and Sound > Device Manager<br />
• The printer device will be shown under<br />
Universal Serial Bus controllers > USB Printing Support.<br />
See Figure 60.<br />
<strong>User</strong> Manual Version 3.1 135
Pos: 96.5 /Bedienungsanleitungen/Geräte spezifisch/Drucker/Printer Driver & Cables to PC/TCP /IP (619)/7.X.X_Ü3_How to test the Ethernet connectivity_ONLY_619 @ 3\mod_1296547073221_912.doc @ 29844 @ 22<br />
6. Identify the<br />
USB port<br />
number<br />
• Select the printer in the Device Manager and right-click onto it.<br />
• Select “Properties” and click onto the “Details” tab.<br />
• In the “Property” drop down list select “Bus relations”.<br />
• In the entry under “Value” the USB port number is shown. In the<br />
sample in Figure 61 the USB port number is “USB001”<br />
Figure 60: Device Manager<br />
Figure 61: Device Properties - Details<br />
136 <strong>User</strong> Manual Version 3.1
11.4 How to test the Ethernet connectivity<br />
Using the „ping“ command in the Windows Command Prompt, is an easy way to test the<br />
Ethernet connectivity of the printer. With this command you can test if the printer is<br />
correctly recognized via the Ethernet connection. To test the Ethernet connectivity perform<br />
the following steps.<br />
1. Check the<br />
IP address of<br />
the printer<br />
• To test the Ethernet connectivity of the printer you need the exact<br />
IP address which the printer uses.<br />
• To check the printer’s IP address got to the printer menu:<br />
SERVICE > CONFIGURAT. INFO<br />
• Note down the printer’s IP address.<br />
2. Open the<br />
Windows<br />
command<br />
prompt<br />
• On your PC select START > All Programms > Accessories ><br />
Command Prompt<br />
• Or type “cmd” in the search box of the Windows Start menu.<br />
• The Command prompt will open.<br />
3. Use the<br />
“ping”<br />
command<br />
• Type<br />
ping “IP address printer”<br />
into the Command prompt and hit the Enter key. For “IP address<br />
printer” type the exact IP address of your printer.<br />
• For example<br />
ping 192.168.50.218<br />
4. Ethernet<br />
connectivity is<br />
working<br />
properly<br />
• If the printer is correctly recognized in your network you will get<br />
the following reply in the command prompt.<br />
Figure 62: Command Prompt reply OK<br />
The reply from the printer is independent from the<br />
Online/Offline status of the printer. If configured<br />
correctly, the ping reply will be Ok either if the printer<br />
is OnlinTCP or Offline<br />
<strong>User</strong> Manual Version 3.1 137
Pos: 96.6 /Bedienungsanleitungen/Geräte spezifisch/Drucker/Printer Driver & Cables to PC/TCP /IP (619)/7.X.X_Ü3_Sample settings for Ethernet connection @ 3\mod_1296643959230_912.doc @ 29924 @ 32444<br />
5. Ethernet<br />
connectivity is<br />
NOT working<br />
properly<br />
• If the printer is NOT correctly recognized in your network you will<br />
get the following reply in the command prompt.<br />
Figure 63: Command Prompt reply NOT OK<br />
• In this case please reconfigure the Ethernet connection as<br />
described in this document.<br />
11.4.1 Sample settings for Ethernet connection<br />
The tables below show sample settings for the different possible usages of the Ethernet<br />
connection. Each table shows examples for the settings that have to be made in:<br />
• The printer menu.<br />
• The PC used to send data to the printer.<br />
• The printer driver on the PC used to send data to the printer. In order to make the<br />
necessary settings, you need to a TCP/IP port to a printer driver.<br />
138 <strong>User</strong> Manual Version 3.1
11.5 Network connection between the printer (using a fixed IP) and<br />
the PC<br />
Printer settings PC settings Printer driver settings<br />
Port<br />
9100 The PC must be<br />
Port 9100<br />
number*<br />
properly connected number<br />
IP<br />
192.168.050.180 to the same local IP<br />
192.168.5.180<br />
Address**<br />
area network as<br />
Address<br />
Subnet 255.255.255.000<br />
the printer.<br />
Mask<br />
Gateway 192.168.050.180<br />
IP<br />
Address<br />
* The default port 9100 is commonly used by printers. Please make<br />
sure that this port is not blocked in your LAN or set to a port number<br />
that is used in your LAN.<br />
** The IP Address set in the printer must be valid in your LAN and<br />
must be permanently assigned to the printer in your LAN. Please<br />
contact your company’s network administrator for support.<br />
<strong>User</strong> Manual Version 3.1 139
11.5.1.1 Network connection between the printer (using a dynamic IP) and the<br />
PC<br />
Printer settings PC settings Printer driver settings<br />
Port<br />
9100 The PC must be<br />
Port<br />
9100<br />
number*<br />
properly connected<br />
to the same local<br />
number<br />
IP<br />
192.168.5.180<br />
area network as the<br />
Address*<br />
*<br />
printer.<br />
* The default port 9100 is commonly used by printers. Please make<br />
sure that this port is not blocked in your LAN or set to a port number<br />
that is used in your LAN.<br />
** Use the printer menu SERVICE > CONFIGURAT. INFO to check<br />
which IP Address is assigned to the printer.<br />
11.5.1.2 Direct Ethernet connection between the printer and the PC<br />
Changing the PC’s IP address<br />
Please note all your network settings before performing the<br />
configuration described below. When you want to use this PC in your<br />
LAN again, the network settings of this PC have to be reconfigured.<br />
Printer settings PC settings Printer driver settings<br />
Port<br />
9100 - - Port 9100<br />
number<br />
number<br />
IP<br />
192.168.050.185 IP<br />
192.168.50.177 IP<br />
192.168.5.185<br />
Address<br />
Address<br />
Address<br />
Subnet 255.255.255.000 Subnet 255.255.255.000 - -<br />
Mask<br />
Mask<br />
Gateway<br />
IP<br />
Address<br />
192.168.050.185 Gateway<br />
IP<br />
Address<br />
192.168.050.185 Gateway<br />
IP<br />
Address<br />
192.168.50.185<br />
Pay special attention when entering the IP address.<br />
140 <strong>User</strong> Manual Version 3.1
Pos: 97 /Bedienungsanleitungen/Geräte spezifisch/Drucker/AS-930/11.1_Ü2_Limitations of paper side guides_AS-930 only! @ 3\mod_1280242447859_912.doc @ 24394 @ 23<br />
<strong>User</strong> Manual Version 3.1 141
Pos: 98 /Serviceanleitungen/Geräte spezifisch/Drucker/11.1_Ü2_How_to_create_a_print_file @ 2\mod_1265124645371_912.doc @ 11210 @ 22<br />
11.6 Limitations of paper side guides<br />
Name Part number Illustration<br />
2x Paper side guides ‘small’<br />
(included)<br />
Paper side guide ‘medium’<br />
(included)<br />
Paper side guide ‘large’<br />
(included)<br />
4134932V<br />
41341933W<br />
4134934X<br />
Range of adjustment of the different paper side guides<br />
The specifications (in mm/inches) refer to the print media dimension, transverse to the<br />
transport direction.<br />
Minimum<br />
85mm<br />
3.35“<br />
Maximum<br />
140mm<br />
5.52“<br />
125mm<br />
4.92“<br />
200mm<br />
7.87“<br />
280mm<br />
11.02“<br />
225mm<br />
8.86“<br />
285mm<br />
11.22“<br />
365mm<br />
14.37“<br />
142 <strong>User</strong> Manual Version 3.1
11.7 How to create a print file<br />
Depending on the software you use, there are two ways to create a print file.<br />
1. Create a<br />
print file<br />
directly from<br />
the software<br />
• Open the print dialog window in your software (usually File ><br />
Print).<br />
• Activate the "Print to file" checkbox as shown in Figure 64.<br />
• Click on the “OK” button.<br />
Figure 64: Print dialog window<br />
• Select a file name and a location to save the print file in the “Print<br />
to file” dialog window shown below. Use the default file type “.prn”<br />
(printable file).<br />
Figure 65: Print to file dialog<br />
<strong>User</strong> Manual Version 3.1 143
Pos: 99 /Serviceanleitungen/Geräte neutral/40_Ü2_How to update the firmware version @ 2\mod_1266936194803_912.doc @ 12482 @ 2<br />
2. Create a<br />
print file by<br />
changing the<br />
port of the<br />
printer driver<br />
to file print<br />
• Select the “Printer and Faxes” menu from the “Start” menu of<br />
Microsoft Windows.<br />
• Right-click on the printer, you want to create a print file for, and<br />
select “Properties”.<br />
• Select the tab “Ports” and choose “FILE:” as the port for this<br />
printer.<br />
• Click on the “OK” button.<br />
Figure 66: Printer port properties<br />
• From now on the “Print to file” dialog window will open, when<br />
sending data to this printer.<br />
• Select a file name and a location to save the print file. Use the<br />
default file type “.prn” (printable file) (see Figure 65).<br />
144 <strong>User</strong> Manual Version 3.1
Pos: 100 /Serviceanleitungen/Geräte neutral/41_Ü3_Firmware update via USB port GRAPHIC DISPLAY & 619 ONLY @ 3\mod_1294834232529_912.doc @ 29242 @ 3<br />
11.8 How to update the firmware<br />
11.8.1 How to update the firmware<br />
The firmware can only be updated via the USB port of the<br />
printer. When starting the printer in the update mode, it will<br />
automatically use the USB port.<br />
1. Before you<br />
begin<br />
• Use the SETTING DUMP feature, located in the SERVICE menu, to<br />
print out all current printer settings. You will need this information<br />
later.<br />
• Make sure that the correct printer driver is installed and that the<br />
driver is working correctly when connecting the printer via USB.<br />
Install the printer driver first<br />
Please make sure to install the printer driver before you connect to<br />
the printer to the PC. Make sure that the connection via the USB port<br />
is working correctly by printing sample pages before you attempt the<br />
firmware update.<br />
2. Preparation • Turn off the printer.<br />
• Connect the printer to an USB port of your PC.<br />
• Unpack the .zip file containing the firmware onto the hard disk of<br />
your PC.<br />
3. Put the<br />
printer into<br />
the update<br />
mode<br />
• Press the Ok , the Arrow left (Run paper) and the Arrow Up<br />
(Test Print) keys together and hold them.<br />
• While holding these three keys turn the printer on.<br />
• On the display the message Waiting for Download appears.<br />
<strong>User</strong> Manual Version 3.1 145
4. Send the<br />
firmware file<br />
to the printer<br />
• Use the software tool PrintFile, as described below, to send the<br />
firmware to the printer.<br />
To update the firmware via an USB Port you will need the software tool PrintFile. This free<br />
software uses an installed printer driver to send the firmware file to your printer. Download<br />
your free copy at http://www.lerup.com/printfile/.<br />
Please perform the following steps, to send the firmware file to your printer:<br />
1 • Execute the Setup.exe and configure<br />
the software as shown in the picture<br />
on the right.<br />
• Click on “OK”<br />
2 • Close the program and restart it<br />
• Click on “Settings…”<br />
3 • Click on “Text file…”<br />
146 <strong>User</strong> Manual Version 3.1
4 • Enable “Send to printer”<br />
• Click on “OK”<br />
• Click on “Save”<br />
5 • Open the program, then click on<br />
“Print File…”<br />
6 • Search for the Hex file (.hex) of the<br />
Firmware<br />
• Click on “Open”<br />
7 • Choose the printer driver of your<br />
printer model.<br />
• Click on “OK”<br />
• The download starts now.<br />
5. Completing<br />
the update<br />
• When the update is completed the message Download completed<br />
End of programming is shown in the printer display.<br />
• Turn the printer off.<br />
<strong>User</strong> Manual Version 3.1 147
Pos: 101 /Bedienungsanleitungen/Geräte spezifisch/Drucker/11_x_Ü2_Additional information texts in main display_Table_Top_printers @ 2\mod_1271235880723_912.doc @ 14712 @ 2<br />
6. Starting the<br />
printer for the<br />
first time after<br />
the update<br />
• If you were updating from a firmware version < 4.7 then perform<br />
the steps below. If not continue with step “7. Checking the<br />
firmware version”.<br />
• Press and hold the Home key and turn on the printer. This<br />
will perform a default reset.<br />
• Keeping holding the Home key until the printer shows<br />
Printer Name<br />
Default Reset<br />
• Use the Setting Dump, printed at the beginning of this process,<br />
to set the previous mechanical alignment values.<br />
7. Checking<br />
the firmware<br />
version<br />
• Check the now installed firmware version in the printer menu:<br />
SERVICE > CONFIGURAT. INFO > Firmware:<br />
• Now the firmware update is completed.<br />
IMPORTANT!<br />
If an error message appears during the update process, just turn the<br />
printer off and on. Check if you are sending a compatible Flashware<br />
file. Try to resend the file.<br />
148 <strong>User</strong> Manual Version 3.1
Pos: 102 /Bedienungsanleitungen/Geräte spezifisch/Drucker/11.x_Ü2_Ink package ID number @ 2\mod_1269249230092_912.doc @ 13727 @ 2<br />
Pos: 103 /Bedienungsanleitungen/Geräte spezifisch/Drucker/11.x_Ü3_Ink package ID number 6030206 @ 3\mod_1298296700989_912.doc @ 30527 @ 31<br />
11.9 Additional display texts<br />
Under certain circumstances, additional information texts may be shown in the main<br />
display. In the table below you find descriptions for the different information texts.<br />
Information in main display<br />
Test<br />
WaitEOT<br />
NoData!<br />
PapRUN<br />
NoPaper<br />
EmerMode<br />
Description<br />
The printer is running test prints.<br />
A pause command was sent to the printer. It will only<br />
continue with the print job, when the Ok key is<br />
pressed.<br />
The data for a page was not sent completely to the<br />
printer.<br />
The printer is running a paper run test.<br />
Data but no paper. E.g. the feeder is empty.<br />
The printer is in emergency mode, because the<br />
internal model identification is damaged. In this<br />
unlikely event the printer will only work with a<br />
reduced performance to prevent the printer from any<br />
damage. Please contact your <strong>Neopost</strong> branch or<br />
dealer.<br />
11.10 Ink package ID number<br />
The id number of the loaded ink package clearly indicates the settings and ink parameters<br />
currently used in your printer. With this ink package id number changes and updates can<br />
easily be tracked.<br />
11.10.1 ID: 6030206<br />
The following settings and parameters are used with this id number:<br />
Ink type<br />
d BLACK DYE<br />
v VERSATILE BLAC<br />
Note<br />
Limitation on shuttle-head printers (AS-700 and AS-<br />
710) only:<br />
The maximum carriage speed is limited to 0.526<br />
mm/s / 103.5 ft./min. This ensures a constantly high<br />
print quality and increases the life time of the ink<br />
cartridge.<br />
m MAX GLOSSY<br />
f FAST DRY BLACK<br />
i IQ INK<br />
<strong>User</strong> Manual Version 3.1 149
Pos: 104 /Bedienungsanleitungen/Geräte neutral/11.4_Ü2_Declaration of conformity @ 0\mod_1251457298475_912.doc @ 3186 @ 12<br />
Pos: 105 /Bedienungsanleitungen/Geräte spezifisch/Drucker/CE & FCC Declarations/Declaration of conformity_Introduction @ 2\mod_1270642943823_912.doc @ 14383 @<br />
Pos: 106 /Bedienungsanleitungen/Geräte spezifisch/Drucker/CE & FCC Declarations/Machinery and EMC directive @ 2\mod_1270640778289_912.doc @ 14370 @<br />
x #10 INK<br />
s SPOT COLOUR<br />
q IMS INK<br />
u USER INK<br />
t KH-UV2 TEXT<br />
g KH-UV2 GRAP (graphics)<br />
Default: BLACK DYE<br />
Limitation on shuttle-head printers (AS-700 and AS-<br />
710) only:<br />
The maximum carriage speed is limited to 0.526<br />
mm/s / 103.5 ft./min. This ensures a constantly high<br />
print quality and increases the life time of the ink<br />
cartridge.<br />
Special application ink for printing on difficult<br />
substrate. Please read the additional operation<br />
instructions for this ink typ.<br />
Not optimized default parameter.<br />
This parameter can be used for all not <strong>Neopost</strong><br />
approved inks.<br />
Available for certain printer models only through a<br />
feature update.<br />
Special application ink for printing on plastic<br />
substrate. Requires an UV dryer.<br />
This setting should be used when printing text only<br />
jobs.<br />
Available for certain printer models only through a<br />
feature update.<br />
Special application ink for printing on plastic<br />
substrate. Requires an UV dryer.<br />
This setting should be used when printing jobs that<br />
include graphics (e.g. logo or barcode).<br />
The maximum transport speed is limited to 540 mm/s<br />
106.2 ft./min. This ensures a constantly high print<br />
quality and increases the life time of the ink cartridge.<br />
11.11 Declaration of conformity<br />
<strong>Product</strong>s presented in this guide conform to requirements of the following<br />
directives:<br />
EC-directives EC directive Year / Register No.<br />
Machinery directive<br />
EMC directive<br />
2006/42/EG<br />
2004/108/EG<br />
150 <strong>User</strong> Manual Version 3.1
Pos: 107 /Bedienungsanleitungen/Geräte spezifisch/Drucker/CE & FCC Declarations/CE Warning Class A Device_619_ONLY @ 3\mod_1297852620204_912.doc @ 30344 @<br />
Pos: 108 /Bedienungsanleitungen/Geräte spezifisch/Drucker/CE & FCC Declarations/FCC Note *USA* Class A Device_619_ONLY @ 3\mod_1299071436816_912.doc @ 30686 @<br />
Standards used Technical specification Standard<br />
Safety of machines DIN EN ISO 12100 1:2004-<br />
04<br />
Protective device including safe<br />
distance<br />
DIN EN ISO 13857:2008<br />
Noise emission DIN EN ISO 11200:2009<br />
Safety of electrical office machines EN 60950-1:2006-11<br />
Noise immunity DIN EN 55024 :2003-10<br />
Perturbing radiation DIN EN 55022:2008-07<br />
Industrial interference resistance DIN EN 61000-6-2:2006-03<br />
Interference resistance against:<br />
Discharges of static electricity DIN EN 61000-4-2:2009-12<br />
High-frequency electromagnetic fields DIN EN 61000-4-3:2008-06<br />
Fast transient electrical disturbances DIN EN 61000-4-4:2005-07<br />
Surges DIN EN 61000-4-5:2007-06<br />
Conducted disturbances, induced by<br />
high-frequency fields<br />
Magnetic fields with energy<br />
frequencies<br />
Short time disruptions, Voltage drops,<br />
fluctuations<br />
DIN EN 61000-4-6:2009-12<br />
DIN EN 61000-4-8:2009-10<br />
DIN EN 61000-4-11:2005-02<br />
Limit values for harmonic currents DIN EN 61000-3-2:2006-10<br />
Limit of voltage changes, -fluctuations<br />
and flicker in public low voltage mains<br />
DIN EN 61000-3-3:2009-06<br />
Warning<br />
This is an EN 55022 Class A product. In a domestic environment this<br />
product may cause radio interference in which case the user may be<br />
required to take adequate measures.<br />
FCC Note USA<br />
This equipment has been tested and found to comply with the limits<br />
for a Class A digital device, pursuant to Part 15 of the FCC Rules.<br />
These limits are designed to provide reasonable protection against<br />
harmful interference when the equipment is operated in a commercial<br />
environment. This equipment generates, uses and can radiate radie<br />
<strong>User</strong> Manual Version 3.1 151
Pos: 109 /Bedienungsanleitungen/Geräte spezifisch/Drucker/CE & FCC Declarations/FCC Note *CANADA* Class A Device_619_ONLY @ 3\mod_1299507984053_912.doc @ 30724 @<br />
Pos: 110 /Bedienungsanleitungen/Geräte spezifisch/Drucker/12.0_Ü1-Glossary_Printers_ONLY_619 @ 1\mod_1257944673371_912.doc @ 7353 @ 1<br />
frequency energy and, if not installed and used in accordance with<br />
the instruction manual, may cause harmful interference to radie<br />
communications. Operation of this equipment in a residential area is<br />
likely to cause harmful interference in which case the user will be<br />
required to correct the interference at his own expense.<br />
FCC Note Canada<br />
This Class A digital apparatus complies with Canadian ICES-003.<br />
Cet appareil numérique de la classe A est conforme à la norme<br />
NMB-003 de Canada.<br />
152 <strong>User</strong> Manual Version 3.1
12 Glossary<br />
Term<br />
Addressing<br />
ASCll<br />
Barcode<br />
Baud rate<br />
Bitmap<br />
Buffer<br />
Cartridge<br />
Character set<br />
Characters<br />
Description<br />
Addressing describes the process of printing an address<br />
information onto an object, so that it can be delivered by postal<br />
means. Usually addressing refers to applying the receivers<br />
address.<br />
see personalize and individualize<br />
ASCll is the abbreviation for "American Standard Code for<br />
Information Interchange". The printer commands used in this<br />
manual are entered in the form of ASCII codes. Also decimal or<br />
hexadecimal codes may be used.<br />
The data information of a print medium is converted into a<br />
single-line barcode. This is done in a language-neutral and<br />
character-neutral manner. A barcode is easy to create and<br />
readable with the help of simple opto-electronic devices. It is<br />
printed in addition to textual information.<br />
Baud rate is the speed with which the data are transferred<br />
between the computer and the printer on the serial interface.<br />
The computer and the printer must have the same baud rate. It<br />
may <strong>range</strong> between 1,200 and 9,600 baud, depending on the<br />
computer used. The baud rate is only determined when a serial<br />
interface is used.<br />
Bitmap represents a collection of dots as a graphic or text<br />
graphic in output devices (printer, monitor).<br />
The buffer is a storage memory area in the printer. In the<br />
buffer, information which is destined for input or output is<br />
stored until it is processed.<br />
A cartridge is an ink container with an integrated printhead.<br />
Inserting a new cartridge always includes inserting a new<br />
printhead.<br />
A character set is defined specific to its application. It is usually<br />
a combination of letters, ciphers, lines and symbols within a<br />
font. However, character sets may also exclusively consist of<br />
symbols.<br />
Characters are understood to be letters, numbers and symbols<br />
which can be printed.<br />
Coding Coding describes the printing of a code. This code can be a 1-D<br />
code (e.g. EAN 128) or a 2-D code (e.g. Datamatrix 200).<br />
Configuration<br />
In a configuration, particular printer settings are ascertained.<br />
You may set up several configurations and save each one of<br />
them under its individual configuration number.<br />
<strong>User</strong> Manual Version 3.1 153
Decap Time<br />
Default configuration<br />
Direct Addressing<br />
Printer<br />
dpi<br />
Driver<br />
Dye-Based Ink<br />
Escape character<br />
Escape sequences<br />
Ethernet<br />
Fixed-Head Printer<br />
Font<br />
Font cartridges<br />
The decap time of an ink type indicates, for how long an ink<br />
cartridge can be exposed, to the surrounding air without<br />
capping, before the ink starts to dry within the nozzles. Ink<br />
which is dried within the nozzles reduces the print quality when<br />
starting or resuming a print job.<br />
see ink, pigmented ink and dye-based ink<br />
Prior to dispatch, the printer’s default settings are programmed.<br />
These factory settings are saved under the configuration<br />
number “0”. They continue to be active until another<br />
configuration number is selected and setting modifications are<br />
carried out.<br />
A Direct Addressing Printer prints the address directly onto a<br />
substrate (e.g. an envelope). A non-direct way of addressing a<br />
substrate would be applying an address label.<br />
dpi (dots per inch) describes how mayn picture elements<br />
(pixels) are printed per inch (25,4 mm).<br />
see resolution<br />
see printer driver<br />
In dye-based inks the chromophore elements of the ink are<br />
solute particles (dye). An advantage of a dye-based ink is the<br />
longer decap time compared to a pigmented ink. An example<br />
for an dye-based ink is "Black Dye".<br />
see ink, pigmented ink and decap time<br />
The escape character EC is a command initiation within the<br />
ASCII. This character is not printed. The characters that follow<br />
after the escape character are detected by the printer as<br />
command codes.<br />
see PCL<br />
see PCL.<br />
Is a computer networking technology for local area networks<br />
(LAN).<br />
see TCP/IP<br />
In a Fixed-Head printer, the cartridges are in a fixed position<br />
during printing. The substrate are passed underneath the<br />
cartridges. This allows higher production speeds compared to<br />
Shuttle-Head printers.<br />
see Shuttle-Head<br />
A font is a collection of characters and symbols of the same font<br />
type and distance, the same size (height), line thickness and<br />
font direction. Fonts may be installed internally in the printer or<br />
may be loaded externally via font cartridges.<br />
They contain fonts which can be loaded in the printer.<br />
154 <strong>User</strong> Manual Version 3.1
Font inclination<br />
Font type<br />
HP TIJ 2.5<br />
Individualize<br />
Ink<br />
Ink Cartridge<br />
Interface cable<br />
Internal fonts<br />
Line thickness<br />
Loadable fonts<br />
LPI<br />
Macro<br />
Offline<br />
Online<br />
Operator Panel<br />
Paper jam<br />
Selectively, the font characters may printed vertically straight<br />
(normal) or – in a constant angle – inclined (cursive).<br />
Font type refers to the print design of a character set. Cour, for<br />
example, exhibits a different character design than LetGot or<br />
Helv.<br />
HP TIJ 2.5 is the abbreviation for „Hewlett-Packard Thermal<br />
Ink Jet 2.5“. It describes a certain generation of printing<br />
technology by Hewlett-Packard.<br />
Individualize describes the process of printing a largely custom<br />
document. Major parts of the document are individual for each<br />
receiver of the document. For example images, text blocks,<br />
offers, the language used, etc.<br />
see addressing and personalize<br />
Ink is a intensive dyed fluid, which is used to create picture<br />
elements on a substrate.<br />
see ink cartridge, pigmented ink and dye-based ink<br />
see cartridge<br />
The data transfer cable which connects your computer to the<br />
printer or to another peripheral device.<br />
The internal fonts are installed in the printer. They are an<br />
inherent part of the printer.<br />
The line thickness refers to the line width. A distinction is drawn<br />
between normal and bold line thickness.<br />
Loadable fonts (soft or download fonts) are stored on the hard<br />
disc of the PC. They may be transferred to the printer memory.<br />
Lines per inch. It is the measuring unit for the line density. The<br />
most commonly used line density for printing is 6 LPI.<br />
A macro is a block of commands and data (e.g. a graphic like a<br />
company logo) that can be downloaded to the printer. This<br />
macro can be used repeatedly without having to send the<br />
complete block of commands and data for every page.<br />
Downloading macros can increase the print speed. The<br />
downloading of macros is only supported by dedicated address<br />
printing software applications.<br />
While in Offline mode, the printer is not able to receive print<br />
data from the PC. In this status the printer settings can be<br />
changed.<br />
While in Online mode, the printer is able to receive print data<br />
from the PC.<br />
The operator panel contains the display and the key pad.<br />
Printer settings are carried out here.<br />
A paper jam occurs when the paper gets jammed during<br />
printing and when the paper transport is blocked.<br />
<strong>User</strong> Manual Version 3.1 155
Paper recognition<br />
Paper Sensor<br />
Paper size<br />
Parallel interface<br />
Parity<br />
PCL<br />
Personalize<br />
Pigmented Ink<br />
Point size<br />
Print area<br />
Print Cartridge<br />
Print file<br />
Print Unit<br />
Printer command<br />
see Top of form Sensor<br />
see Top of Form Sensor<br />
The paper size refers to the paper format which should be<br />
printed on. When turning the layout by 180°, the top margin<br />
value is automatically detected, so that it corresponds to the<br />
set value of normal layout orientation.<br />
The parallel interface, also termed Centronics interface, is a<br />
connection from the computer to the printer. By this interface,<br />
always 8 bits (= 1 byte) are transferred simultaneously<br />
(parallel).<br />
Parity a error detection method. which is carried out via a serial<br />
interface. During data transfer, errors in the transfer process<br />
are detected. Thereby the parity of binary “ones” in an<br />
information unit (e.g. a byte) is checked.<br />
PCL (= Printer Control Language) is a command language to<br />
control printers. It was developed by Hewlett-Packard.<br />
Personalize describes the process of printing individual<br />
information onto a static, preprinted document. The most<br />
common application of personalization is the printing of the<br />
salutation at the beginning of a letter (e.g. Dear Ms. Smith,).<br />
Usually the personalization includes the addressing of this<br />
document.<br />
see addressing and individualize<br />
In pigmented inks the chromophore elements of the ink are<br />
solid particles (pigments). The advantages of a pigmented ink<br />
are a shorter drying time and higher resistances (light-resistant<br />
and abrasion resistance) compared to dye-based inks. An<br />
example for an pigmented ink is “Versatile Black”.<br />
see ink and dye-based ink<br />
The point size is measured in pica points. One point is 1/72 of<br />
an inch.<br />
The print area covers the maximum width which is accessible<br />
for the ink cartridge.<br />
see cartridge<br />
For service purposes it can be necessary to redirect the print<br />
data, so that the data are not processed by the printer but<br />
stored in a file. This file is called a “print file”. The file format is<br />
.prn (printable file).<br />
A print unit always consists of three cartridges. With one print<br />
unit a swath of 38 mm (1 ½“) can be printed. This is is<br />
equivalent to 9 lines of text (Font: Arial, Size: 12 pt.)<br />
see cartridge<br />
The printer command is entered via the software application in<br />
order to modify the active printer configuration.<br />
156 <strong>User</strong> Manual Version 3.1
Printer Driver<br />
Printhead<br />
Printhead carriage<br />
Printhead distance<br />
Read & Print<br />
Resolution<br />
Separating fingers<br />
Serial interface<br />
Setting<br />
Shuttle-Head Printer<br />
TCP/IP<br />
TIJ<br />
The printer driver translates the commands coming from a<br />
software application (e.g. Bulk Mailer Designer) into printer<br />
commands. A printer driver must fit to both the software<br />
application and the printer model.<br />
see cartridge<br />
The printhead is mounted at the movable printhead carriage.<br />
The correct distance between the cartridge nozzles and the<br />
paper is important for a clear and sharp printout. The<br />
recommended distance is about 1 millimeter.<br />
Read and Print (R&P) describes a production process in which<br />
the information to be printed onto a document (e.g. address<br />
onto an envelope) is obtained, shortly before the actual<br />
printing, by a reading device (e.g. a camera or a barcode<br />
reader). The information is NOT printed sequential (e.g. from a<br />
database).<br />
In a R&P production process each document is assigned exactly<br />
to one piece of information (e.g. one entry from a database).<br />
The assignation is done by the reading device.<br />
The resolution tells you how many picture elements a print<br />
process can print per area. Usually the resolution is stated in<br />
dpi (dots per inch) Apart from the resolution, the drop size and<br />
the accuracy of drop positioning determine the print quality.<br />
see dpi<br />
The separating fingers enable single-sheet feed from a print<br />
media stack. The sheets above the bottom sheet are held back.<br />
A serial interface transfers data consecutively (bit by bit) from<br />
the computer to the printer. It is connected with the help of a<br />
RS-232-C connector.<br />
A selection of ar<strong>range</strong>d configurations.<br />
In a shuttle-head printer, the ink cartridge is moved back and<br />
forth by a carriage. Therefore it is possible to print over a wide<br />
area.<br />
see Fixed-Head Printer<br />
TCP/IP is the abbreviation for the communication protocols<br />
“Transmission Control Protocol” and “Internet Protocol”. These<br />
protocols are used for the communication between devices<br />
within computer networks.<br />
see Ethernet<br />
TIJ is the abbreviation for “Thermal Ink Jet”. Hereby a picture<br />
element (= ink drop) is created with the help of thermal<br />
energy.<br />
<strong>User</strong> Manual Version 3.1 157
Pos: 111 /Bedienungsanleitungen/Geräte neutral/13.0_Ü1_Index_sprachneutral @ 1\mod_1259159763086_0.doc @ 7837 @ 1<br />
Top of Form Sensor<br />
(TOF)<br />
USB<br />
The Top of Form sensor (or paper sensor) detects the front and<br />
rear edges of each material. A correct detection is necessary to<br />
position the printed image and to stop the printer in case of a<br />
jam. The Top of Form Sensor is either a contrast or a reflection<br />
sensor.<br />
USB is the abbreviation for “Universal Serial Bus”. It is used to<br />
establish communication between devices. For example<br />
between a PC and a printer.<br />
158 <strong>User</strong> Manual Version 3.1
13 Index<br />
Accessories .....................................126<br />
Additional display texts .....................149<br />
Additional error message...................121<br />
Barcode ..........................................153<br />
Baud rate........................................153<br />
Cancel a print job.............................. 41<br />
Cartridge menu................................. 24<br />
Character set...................................153<br />
Cleaning .......................................... 12<br />
Cleaning ink cartridge ........................ 92<br />
Cleaning the contacts ........................ 93<br />
Cleaning the nozzle plate.................... 92<br />
Consumables ...................................126<br />
Conveyor ........................................128<br />
Cost per cartridge ............................. 23<br />
Default reset ...................................148<br />
Default settings ................................ 95<br />
Delete a print job .............................. 41<br />
Display ............................................ 22<br />
Disposal........................................... 13<br />
Dpi........................................... 57, 154<br />
Dynamic IP ...................................... 86<br />
Error message ........................... 76, 101<br />
Factory settings ................................ 95<br />
Firmware ........................................145<br />
Firmware update ..............................145<br />
Fix IP .............................................. 86<br />
Fixedhead printer .............................. 18<br />
Fuse................................................ 96<br />
Glossary .........................................153<br />
Handling ink cartridges ...................... 27<br />
Ink cartridge ......................... 13, 26, 92<br />
Key panel......................................... 20<br />
LED................................................. 19<br />
Location........................................... 13<br />
Macro ..................................... 109, 155<br />
Main display ..................................... 22<br />
Maintenance ..................................... 92<br />
Material thickness.............................. 31<br />
No Data ......................................... 149<br />
No Paper ........................................ 149<br />
Non-mechanical reset ........................ 95<br />
Number of pages per cartridge ............ 23<br />
Offline ........................................19, 24<br />
Online.........................................19, 24<br />
Operator panel.................................. 20<br />
Orientation ....................................... 36<br />
Paper sensor.......................... 50, 62, 92<br />
Paper side guides ............................ 142<br />
Paper size ...................................... 156<br />
Parity ............................................ 156<br />
PC................................................... 10<br />
PC Software...................................... 36<br />
Pen board contacts ............................ 94<br />
Pictograms .........................................9<br />
Place of installation............................ 11<br />
Power cable ...................................... 16<br />
Power supply .................................. 129<br />
Print direction ..............................36, 59<br />
Print file ........................... 125, 143, 156<br />
Print quality......................23, 54, 57, 58<br />
Printer driver .................................... 36<br />
Printhead distance ........................... 157<br />
<strong>Product</strong>ivity ...................................... 23<br />
Repairs ............................................ 12<br />
Reset counter ................................... 22<br />
Reset printer .................................... 95<br />
Scope of delivery............................... 14<br />
Secondary Functions.......................... 20<br />
Service .......................................12, 92<br />
<strong>User</strong> Manual Version 3.1 159
=== Ende der Liste für Textmarke Inhalt ===<br />
Setting ...........................................157<br />
Side guides .....................................142<br />
Software application ..................... 36, 54<br />
Spare parts ...................................... 12<br />
Support ........................................... 92<br />
Technical Specifications.....................129<br />
Technical Support ............................125<br />
Test print ......................................... 37<br />
Throughput ...................................... 23<br />
Top Margin ..................................... 156<br />
Top of form ...................................... 50<br />
Troubleshooting ................................ 95<br />
USB ................................................ 16<br />
Warning message....................... 76, 115<br />
160 <strong>User</strong> Manual Version 3.1
9204019U-B<br />
edition 08/04/2011 - 9204019U-B