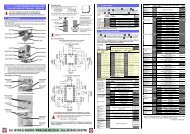
to download the Eurotherm piccolo⢠Manual in PDF format
to download the Eurotherm piccolo⢠Manual in PDF format
to download the Eurotherm piccolo⢠Manual in PDF format

Create successful ePaper yourself
Turn your PDF publications into a flip-book with our unique Google optimized e-Paper software.
User <strong>Manual</strong><br />
Piccolo Range<br />
4.4 Alarms<br />
Alarms are used <strong>to</strong> alert an opera<strong>to</strong>r when a pre-set level has been exceeded. They are<br />
<strong>in</strong>dicated by flash<strong>in</strong>g <strong>the</strong> alarm number and <strong>the</strong> red ALM beacon <strong>in</strong> <strong>the</strong> display.<br />
Up <strong>to</strong> three process alarms may be configured us<strong>in</strong>g <strong>the</strong> Quick Start Codes, section 4.1.1. or<br />
‘P’ Codes P21 <strong>to</strong> P29.<br />
They may also switch an output, usually a relay, <strong>to</strong> allow external devices <strong>to</strong> be operated when an alarm occurs (‘P’<br />
code P11 <strong>to</strong> P14).<br />
Each alarm can be configured <strong>to</strong> <strong>the</strong> types listed below:-<br />
Alarm Type<br />
Full Scale Low<br />
Full Scale High<br />
Deviation Low<br />
Deviation High<br />
Deviation Band<br />
Description<br />
The alarm is shown if <strong>the</strong> process value falls below an absolute threshold<br />
The alarm is shown if <strong>the</strong> process value rises above an absolute threshold<br />
The alarm is shown if <strong>the</strong> process value deviates below <strong>the</strong> setpo<strong>in</strong>t by a set threshold<br />
The alarm is shown if <strong>the</strong> process value deviates above <strong>the</strong> setpo<strong>in</strong>t by a set threshold<br />
The alarm is shown if <strong>the</strong> process value deviates above or below <strong>the</strong> setpo<strong>in</strong>t by a set threshold<br />
In addition <strong>to</strong> <strong>the</strong> above alarms <strong>the</strong> follow<strong>in</strong>g alarm types may be configured:-<br />
Sensor Break If <strong>the</strong> sensor becomes open circuit <strong>the</strong> alarm message Sb.r is flashed <strong>in</strong> <strong>the</strong> display. The controller<br />
control outputs can be configured <strong>to</strong> output a ‘safe’ value. ( ‘P’ code P36).<br />
Excess Current<br />
Loop Break<br />
An alarm will be <strong>in</strong>dicated if <strong>the</strong> current is exceeded. (‘P’ code P33).<br />
Current alarms can be Load, Leakage, Overcurrent<br />
The loop is considered <strong>to</strong> be broken if <strong>the</strong> PV does not respond <strong>to</strong> a change <strong>in</strong> <strong>the</strong> output <strong>in</strong> a given<br />
time. (‘P’ code P34).<br />
If an alarm is not configured it is not shown <strong>in</strong> <strong>the</strong> list of level 2 parameters shown <strong>in</strong> section 4.7.2.<br />
4.4.1 To Set Alarm Setpo<strong>in</strong>ts<br />
The levels at which alarms operate are adjusted by <strong>the</strong> alarm setpo<strong>in</strong>t parameters AL1, AL2 or AL3. By default,<br />
<strong>the</strong>se can only be set <strong>in</strong> Opera<strong>to</strong>r Level 2*, (section 4.7.2). If <strong>the</strong> controller is configured <strong>to</strong> measure load<br />
conditions, parameters Ld.AL, LE.AL, Hc.AL are used <strong>to</strong> set alarm setpo<strong>in</strong>ts for load currents.<br />
Press until <strong>the</strong> required alarm setpo<strong>in</strong>t is shown *.<br />
Press or <strong>to</strong> raise or lower <strong>the</strong> alarm setpo<strong>in</strong>t.<br />
Press <strong>to</strong> accept <strong>the</strong> value.<br />
* The alarm setpo<strong>in</strong>t parameters can be ‘promoted’ <strong>to</strong> Level 1 us<strong>in</strong>g iTools (section 10.5.3).<br />
4.4.2 Alarm Indication<br />
If an alarm occurs, <strong>the</strong> red ALM beacon will flash <strong>to</strong>ge<strong>the</strong>r with <strong>the</strong> alarm number, for example AL1. If more than<br />
one alarm is present each alarm number is flashed <strong>in</strong> turn. Any output (usually a relay) attached <strong>to</strong> an alarm will<br />
operate. An alarm relay can be configured, us<strong>in</strong>g <strong>the</strong> Quick Start Codes or <strong>the</strong> ‘P’ codes P11 <strong>to</strong> P14, <strong>to</strong> be<br />
energised or de-energised <strong>in</strong> <strong>the</strong> alarm condition. It is normal <strong>to</strong> configure <strong>the</strong> relay <strong>to</strong> be de-energised <strong>in</strong> alarm so<br />
that an alarm is <strong>in</strong>dicated if power <strong>to</strong> <strong>the</strong> controller fails.<br />
4.4.3 To Acknowledge an Alarm<br />
There are three ways <strong>in</strong> which an alarm can be acknowledged:<br />
1. In all cases an alarm can be acknowledged <strong>in</strong> Level 2, or <strong>in</strong> Level 1 if it is a latch<strong>in</strong>g alarm, as follows:-<br />
Press <strong>to</strong> select Ac.AL (Alarm Acknowledge). This parameter is always present <strong>in</strong> opera<strong>to</strong>r level 2, unless a<br />
function key has been configured for Alarm Acknowledge (‘P’ code P71, P72 or P73).<br />
Press or <strong>to</strong> select YES.<br />
Press<br />
<strong>to</strong> accept.<br />
2. By operat<strong>in</strong>g an external pushbut<strong>to</strong>n attached <strong>to</strong> Digital Input 1 or 2, if ei<strong>the</strong>r of <strong>the</strong>se have been configured for<br />
Alarm Acknowledge (‘P’ code P51 and P52).<br />
3. Press or or if any of <strong>the</strong>se but<strong>to</strong>ns have been configured for Alarm Acknowledge (‘P’ codes P71,<br />
P72 and P73).<br />
If <strong>the</strong> alarm is still present <strong>the</strong> ALM beacon will light cont<strong>in</strong>uously and <strong>the</strong> alarm message will cont<strong>in</strong>ue <strong>to</strong> flash.<br />
The action which takes place depends on <strong>the</strong> latch<strong>in</strong>g type of <strong>the</strong> alarm configured, as described <strong>in</strong> <strong>the</strong> next<br />
section.<br />
☺<br />
‘P’ codes are found<br />
<strong>in</strong> section 5.2.<br />
26 Part No HA031260 Issue 1 May -12