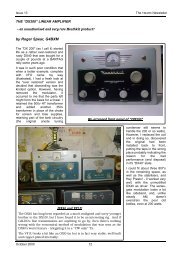
2115_ Gee_MkII_Tropical.pdf - VMARSmanuals
2115_ Gee_MkII_Tropical.pdf - VMARSmanuals
2115_ Gee_MkII_Tropical.pdf - VMARSmanuals

Create successful ePaper yourself
Turn your PDF publications into a flip-book with our unique Google optimized e-Paper software.
7. Operate the T.B. switch to the<br />
expanded strobe time base (S.T.B.) position<br />
and check that there are about three pips<br />
along the time base and that the time bases<br />
are steady.<br />
8. With the clearing switch in the<br />
" up " position signals should be received,<br />
although it is possible that only one pulse<br />
may be visible and that may be drifting<br />
along the trace. Check that the received<br />
pulse (or pulses) may be stopped and caused<br />
to drift slowly in either direction by means<br />
of the frequency control.<br />
9. Check that the gain control operates<br />
to increase signal amplitude when turning<br />
clockwise and to bring up " noise " on the<br />
tube in the extreme position.<br />
inspection, notwithstanding the fact that the<br />
latter may not be due for some considerable<br />
time.<br />
Inspection schedule.<br />
18. Remove indicating unit, ' receive<br />
and voltage control panel from the aircraft<br />
for subsequent bench testing and replace<br />
them with units which have been thoroughly<br />
bench tested. Check that the new units<br />
have had all authorised modifications incorporated<br />
by reference to the labels on<br />
the units.<br />
19. Carry out a full initial installation<br />
procedure as laid down in para. 55 to 58.<br />
BENCH TESTING.<br />
10. On the receiver, if an R.F. unit, Introduction.<br />
type 24B or 25B is being used, check that 20. A test set, type 210 will be required<br />
the spot frequency switch is in the required for R.F. adjustment and other items of test<br />
position, and the loading unit switch is gear may be required in the event of faults<br />
set to correspond.<br />
developing.<br />
11. If an R.F. unit, type 26B or 27B 21. Inspect both units thoroughly for<br />
is firled, check that the tuning control broken valves, or valves not properiy<br />
is set to the required reading and that inserted in sockets, for broken wiring and<br />
the loading unit switch is set to correspond. loose connections and for burned or charred<br />
parts.<br />
13. The anti-jamming selector should<br />
be set to position " N "<br />
22. Make sure that all authorised modifications<br />
have been made on both units,<br />
13. After disconnection of the P.E. as indicated on the modification labels.<br />
set see that all aircraft cables are replaced<br />
on the V.C.P. 23. See that units are thoroughly clean.<br />
14. Check that all cables are in good<br />
condition and are connected kly.<br />
15. Inspect aerial for any sign of damage.<br />
Record keeping.<br />
16. Fill in any records that may be<br />
required, e.g. serial numbers of changed<br />
units.<br />
PERIODIC INSPECTION.<br />
Introduction.<br />
17. The periodic inspection is a more<br />
thorough inspection which will be carried<br />
out at regular intervals. These intervals<br />
should correspond if possible with the<br />
" minor " aircraft inspection. If, however,<br />
a unit is found to be faulty and requires<br />
repairing it will be necessary to treat it as<br />
though it were undergoing its periodic<br />
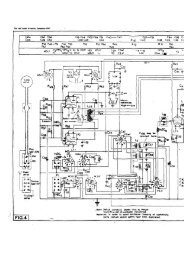
24. Connect up the bench set in accordance<br />
with fig. 1, omitting the aerial until<br />
ready to test the receiver. Remove the<br />
indicating unit dust cover, switch on and<br />
check that the supply voltage is 80V. i 1<br />
volt. If not, adjust the V.C.P.<br />
Indicating unit, type 266.<br />
25. Set the time base switch to " S.T.B.,"<br />
the clearing switch to " calibration pips "<br />
and the p.r.f. switch to " normal." The<br />
picture should appear as in fig. 8, i.e. there<br />
should be nine 150 kc/s pips between every<br />
pair of raised pips.<br />
26. Check the setting of VR.ll (first<br />
divide by 5 stage). Loosen the locking<br />
control of VR11 and rotate in one direction<br />
until a point is reached where the divider<br />
goes out of adjustment and the picture -<br />
will either jitter or the number of pips<br />
will alter from 10 to either 8 or 12. Note