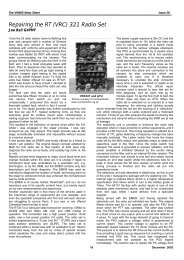
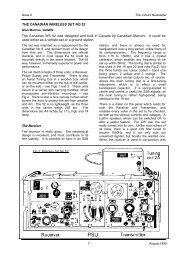
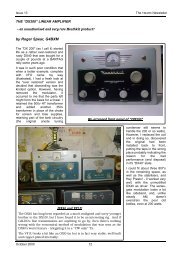
2115_ Gee_MkII_Tropical.pdf - VMARSmanuals
2115_ Gee_MkII_Tropical.pdf - VMARSmanuals
2115_ Gee_MkII_Tropical.pdf - VMARSmanuals

Create successful ePaper yourself
Turn your PDF publications into a flip-book with our unique Google optimized e-Paper software.
,- the scale setting of VRl1. Rotate the control<br />
in the opposite direction until the divider<br />
again commences to jitter or divide by 12<br />
or 8. Note the new scale setting and<br />
reset VR.ll to a position on the scale midway<br />
between the settings noted. Relock the<br />
control.<br />
/-<br />
r<br />
r<br />
27. Set the time base switch to "M.T.B."<br />
Set VR.12 (second divide by 5 stage) in<br />
a similar manner to that given in para.<br />
26 above. The number of minor calibration<br />
pips should alter from 4 to 5 or 6 (counting<br />
one but not both raised pips) depending<br />
on the setting of VR12. Set to five pips.<br />
Relock control after adjustment.<br />
28. Set VR.14 (third divider stage,<br />
divide by 6) in a similar manner to that<br />
given in para. 26 and 27 above. For the<br />
correct setting there will be twentyfive<br />
15 kc/s pips on each of the main time<br />
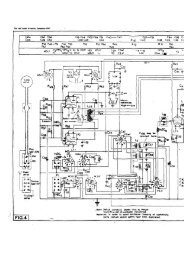
base traces as shown in fig. 8. For the<br />
setting on either side of this position there<br />
will be 20 or 30 pips.<br />
29. Adjust VR.13 (" A " strobe position<br />
control) until a raised pip (zero mark)<br />
occurs just at the beginning of the M.T.B.<br />
Switch to S.T.B. when the raised pip on<br />
the " A" strobe time base should now<br />
occur to the right of the centre along the<br />
trace. If this is not so re-adjust VR.13<br />
and relock.<br />
30. Switch the 617 switch to divide by<br />
seven position. Re-check the setting of<br />
VR.14 after performing the above and after<br />
setting correctly, relock VR.14 and set<br />
the p.r.f. switch back to normal.<br />
3 1. The following adjustments should<br />
only be carried out if necessary :-<br />
32. Adjust VR15 so that :-<br />
(a) The minor calibration pips on<br />
S.T.B. are greater than in.<br />
(b) The minor calibration pips on<br />
M.T.B. are greater than 1/16 in.<br />
(c) Base line between calibration<br />
marks shall be clear and free from<br />
distortion and all calibration marks<br />
clear on both M.T.B. and S.T.B.<br />
33. Adjust VR2 so that the main<br />
Time base amplitude is 4 in. 1 118 in.<br />
34. Adjust VR1 so that the strobe<br />
time base amplitude is 4 in. & 118 in.<br />
A.P. 2557B, Vol. I App. I1<br />
35. Adjust VR3 so that the main time<br />
bases are central on the tube face.<br />
36. Adjust VR4 so that the strobe time<br />
bases are central on the tube face.<br />
37. Adjust VR8 so that the spacing<br />
between main time basc traces is 1.118 in.<br />
+ 118 in.<br />
38. Adjust VR9 to give 11 to 14 150<br />
kc/s pips on "A" strobe traces of S.T.B.<br />
39. Adjust VRlO so that the mean<br />
length of the " B " and " C " strobe traces<br />
is equal to that of the " A " strobe. The<br />
difference in length between the " B " and<br />
" C " strobes shall not exceed one minor<br />
division. For this test the " B " and " C "<br />
strobe markers should be approxima~ly<br />
halfway along the M.T.B. The spacing<br />
between " A " and " B " strobe traces<br />
and between " A " and " C " strobe traces<br />
should not exceed 3/32 in.<br />
40. On both M.T.B. and S.T.B. the<br />
" B " and " C " strobes must be inverted<br />
with respect to the " A " strobes and their<br />
amplitude shall be the same as that of the<br />
" A" strobes within f 20°/,. The strobe<br />
time bases should not overlap into each<br />
other when viewed with receiver noise at<br />
full gain.<br />
41. On M.T.B. check that the strobe<br />
markers will move from one end of the trace<br />
to the other. For each step on the switch<br />
the strobe marker should jump about<br />
63 to 7 small divisions. The total rotation<br />
of each fine strobe control should cover<br />
about 7;1 small divisions.<br />
Receiver, type R.3645 and loading unit,<br />
type 51.<br />
General.<br />
42. Throughout the following tests the<br />
anti-jamming switch must be kept in the<br />
" N " (normal) position.<br />
43. Connect a vertical " whip " serial,<br />
(type 257 rod) together with the loading<br />
unit, type 51 as used on the aircraft ; the<br />
length of feeder cable should be similar<br />
to that used in the aircraft. The " whip "<br />
aerial should be mounted on an earthed<br />
plate or wire mesh screen of at least 4 ft.<br />
diameter, the thln end of the whip being<br />
well away from surrounding objects.