DryCal® Nexus NS - Mesa Labs
DryCal® Nexus NS - Mesa Labs
DryCal® Nexus NS - Mesa Labs

Create successful ePaper yourself
Turn your PDF publications into a flip-book with our unique Google optimized e-Paper software.
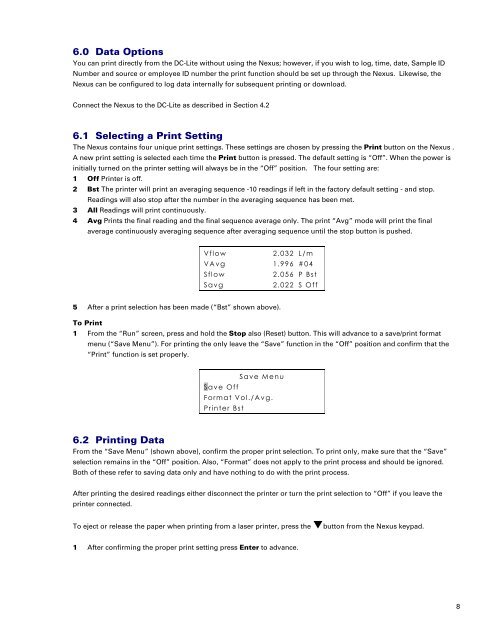
6.0 Data Options<br />
You can print directly from the DC-Lite without using the <strong>Nexus</strong>; however, if you wish to log, time, date, Sample ID<br />
Number and source or employee ID number the print function should be set up through the <strong>Nexus</strong>. Likewise, the<br />
<strong>Nexus</strong> can be configured to log data internally for subsequent printing or download.<br />
Connect the <strong>Nexus</strong> to the DC-Lite as described in Section 4.2<br />
6.1 Selecting a Print Setting<br />
The <strong>Nexus</strong> contains four unique print settings. These settings are chosen by pressing the Print button on the <strong>Nexus</strong> .<br />
A new print setting is selected each time the Print button is pressed. The default setting is “Off”. When the power is<br />
initially turned on the printer setting will always be in the “Off” position. The four setting are:<br />
1 Off Printer is off.<br />
2 Bst The printer will print an averaging sequence -10 readings if left in the factory default setting - and stop.<br />
Readings will also stop after the number in the averaging sequence has been met.<br />
3 All Readings will print continuously.<br />
4 Avg Prints the final reading and the final sequence average only. The print “Avg” mode will print the final<br />
average continuously averaging sequence after averaging sequence until the stop button is pushed.<br />
Vflow<br />
2.032 L/m<br />
VAvg 1.996 #04<br />
Sflow<br />
2.056 P Bst<br />
Savg<br />
2.022 S Off<br />
5 After a print selection has been made (“Bst” shown above).<br />
To Print<br />
1 From the “Run” screen, press and hold the Stop also (Reset) button. This will advance to a save/print format<br />
menu (“Save Menu”). For printing the only leave the “Save” function in the “Off” position and confirm that the<br />
“Print” function is set properly.<br />
Save Menu<br />
Save Off<br />
Format Vol./Avg.<br />
Printer Bst<br />
6.2 Printing Data<br />
From the “Save Menu” (shown above), confirm the proper print selection. To print only, make sure that the “Save”<br />
selection remains in the “Off” position. Also, “Format” does not apply to the print process and should be ignored.<br />
Both of these refer to saving data only and have nothing to do with the print process.<br />
After printing the desired readings either disconnect the printer or turn the print selection to “Off” if you leave the<br />
printer connected.<br />
To eject or release the paper when printing from a laser printer, press the button from the <strong>Nexus</strong> keypad.<br />
1 After confirming the proper print setting press Enter to advance.<br />
8