DryCal® Nexus NS - Mesa Labs
DryCal® Nexus NS - Mesa Labs
DryCal® Nexus NS - Mesa Labs
You also want an ePaper? Increase the reach of your titles
YUMPU automatically turns print PDFs into web optimized ePapers that Google loves.
9 To save a reading sequence, press and hold the Read button until a reading is taken. It will automatically continue<br />
to take the remaining readings based on the print setting selected. For more information on print settings see<br />
Section 6.1.<br />
10 If you do not wish to save the next reading sequence, press the Print button and toggle to the “Off” position.<br />
Then press the Save button. This will return you to the “Save Menu”. Toggle “Save” to the “Off” position with<br />
the or buttons and proceed to the “Run” screen by pressing Enter three times.<br />
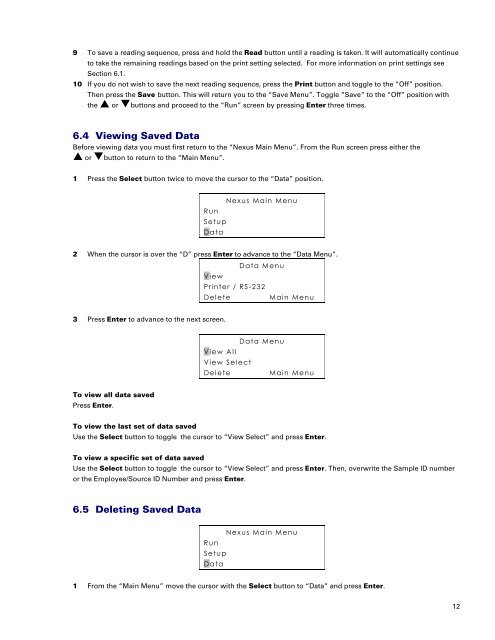
6.4 Viewing Saved Data<br />
Before viewing data you must first return to the “<strong>Nexus</strong> Main Menu”. From the Run screen press either the<br />
or button to return to the “Main Menu”.<br />
1 Press the Select button twice to move the cursor to the “Data” position.<br />
<strong>Nexus</strong> Main Menu<br />
Run<br />
Setup<br />
Data<br />
2 When the cursor is over the “D” press Enter to advance to the “Data Menu”.<br />
Data Menu<br />
View<br />
Printer / RS-232<br />
Delete<br />
Main Menu<br />
3 Press Enter to advance to the next screen.<br />
Data Menu<br />
View All<br />
View Select<br />
Delete<br />
Main Menu<br />
To view all data saved<br />
Press Enter.<br />
To view the last set of data saved<br />
Use the Select button to toggle the cursor to “View Select” and press Enter.<br />
To view a specific set of data saved<br />
Use the Select button to toggle the cursor to “View Select” and press Enter. Then, overwrite the Sample ID number<br />
or the Employee/Source ID Number and press Enter.<br />
6.5 Deleting Saved Data<br />
<strong>Nexus</strong> Main Menu<br />
Run<br />
Setup<br />
Data<br />
1 From the “Main Menu” move the cursor with the Select button to “Data” and press Enter.<br />
12


