

Walk-Through For Mills - Haas Automation, Inc.
Walk-Through For Mills - Haas Automation, Inc.
Walk-Through For Mills - Haas Automation, Inc.

Create successful ePaper yourself
Turn your PDF publications into a flip-book with our unique Google optimized e-Paper software.
X START PT – Enter the X axis dimension reference point from work zero offset.<br />
Y START PT – Enter the Y axis dimension reference point from work zero offset.<br />
ANGLE – Enter the angle at which the text is to be engraved along that linear path.<br />
TEXT HEIGHT – Enter the text height value.<br />
R PLANE – Enter the location of the retract point above the part.<br />
DEPTH – Enter the depth at which the text is to be engraved.<br />
DIGITS – Enter the number of digits (1 to 10) to be engraved. Not the serial number.<br />
SERIAL NUMBER – Enter the starting serial number.<br />
Advanced Users: In full CNC Mode, this is a G47 command.<br />
VQC Mo d e<br />
VQC Mode is described in the Mill Operator’s Manual (96-8700).<br />
DXF Fi l e Im p o r t e r<br />
This feature can quickly build a CNC G-code program from a DXF file, a drawing file format exportable from<br />
many desktop CAD applications. Compatible DXF files are made up of arcs, lines, circles, vertices, and/or<br />
points. Refer to your CAD application’s documentation for details on how to export a DXF file. When importing<br />
a DXF file, you define its features one by one as tool paths; G-code is generated for each tool path that can<br />
then be placed in any new or existing program.<br />
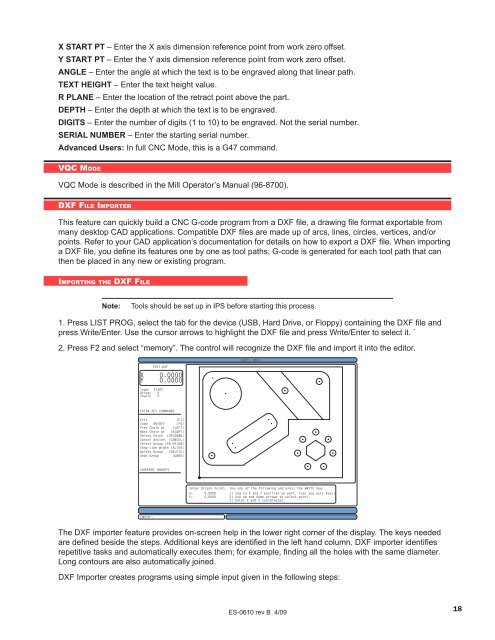
Im p o r t i n g t h e DXF Fi l e<br />
Note:<br />
Tools should be set up in IPS before starting this process.<br />
1. Press LIST PROG, select the tab for the device (USB, Hard Drive, or Floppy) containing the DXF file and<br />
press Write/Enter. Use the cursor arrows to highlight the DXF file and press Write/Enter to select it. `<br />
2. Press F2 and select “memory”. The control will recognize the DXF file and import it into the editor.<br />
TEST.DXF<br />
X 0.0000<br />
Y 0.0000<br />
Type: START<br />
Group: 0<br />
Chain: 0<br />
EDIT: EDIT<br />
EXTRA KEY COMMANDS<br />
Exit<br />
(F1)<br />
Zoom ON/OFF (F4)<br />
Prev Chain pt (LEFT)<br />
Next Chain pt (RIGHT)<br />
Select Point (UP/DOWN)<br />
Cancel Action (CANCEL)<br />
Select Group (PG UP/DN)<br />
Chng Line Width (ALTER)<br />
Delete Group (DELETE)<br />
Undo Group (UNDO)<br />
CURRENT GROUPS<br />
Enter Origin Point: Use one of the following and press the WRITE key:<br />
X: 0.0000 1) Jog to X and Y position on part. (Use jog axis keys)<br />
Y: 0.0000 2) Use up and down arrows to select point.<br />
3) Enter X and Y coordinates.<br />
INPUT:<br />
The DXF importer feature provides on-screen help in the lower right corner of the display. The keys needed<br />
are defined beside the steps. Additional keys are identified in the left hand column. DXF importer identifies<br />
repetitive tasks and automatically executes them; for example, finding all the holes with the same diameter.<br />
Long contours are also automatically joined.<br />
DXF Importer creates programs using simple input given in the following steps:<br />
ES-0610 rev B 4/09<br />
18


