

Walk-Through For Mills - Haas Automation, Inc.
Walk-Through For Mills - Haas Automation, Inc.
Walk-Through For Mills - Haas Automation, Inc.

You also want an ePaper? Increase the reach of your titles
YUMPU automatically turns print PDFs into web optimized ePapers that Google loves.
Se t u p Mo d e<br />
Select Setup Mode by moving the highlighted tab to the Setup tab and pressing Write/Enter.<br />
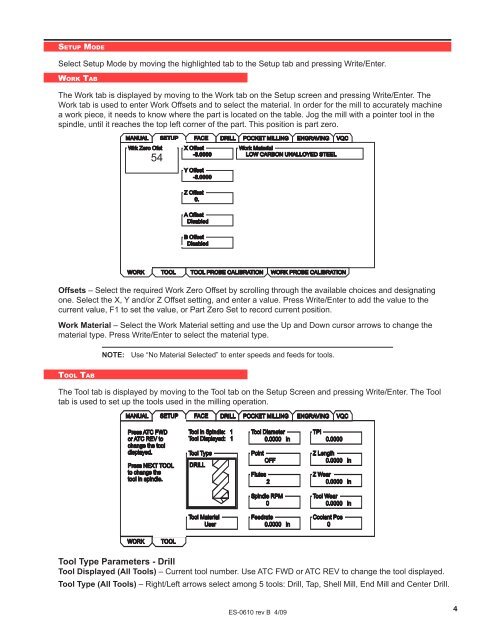
Wo r k Ta b<br />
The Work tab is displayed by moving to the Work tab on the Setup screen and pressing Write/Enter. The<br />
Work tab is used to enter Work Offsets and to select the material. In order for the mill to accurately machine<br />
a work piece, it needs to know where the part is located on the table. Jog the mill with a pointer tool in the<br />
spindle, until it reaches the top left corner of the part. This position is part zero.<br />
MANUAL SETUP FACE<br />
Wrk Zero Ofst<br />
54<br />
XOffset<br />
-8.0000<br />
YOffset<br />
-8.0000<br />
DRILL POCKET MILLING ENGRAVING VQC<br />
Work Material<br />
LOW CARBON UNALLOYED STEEL<br />
ZOffset<br />
0.<br />
AOffset<br />
Disabled<br />
BOffset<br />
Disabled<br />
WORK<br />
TOOL<br />
TOOL PROBE CALIBRATION<br />
WORK PROBE CALIBRATION<br />
Offsets – Select the required Work Zero Offset by scrolling through the available choices and designating<br />
one. Select the X, Y and/or Z Offset setting, and enter a value. Press Write/Enter to add the value to the<br />
current value, F1 to set the value, or Part Zero Set to record current position.<br />
Work Material – Select the Work Material setting and use the Up and Down cursor arrows to change the<br />
material type. Press Write/Enter to select the material type.<br />
NOTE: Use “No Material Selected” to enter speeds and feeds for tools.<br />
To o l Ta b<br />
The Tool tab is displayed by moving to the Tool tab on the Setup Screen and pressing Write/Enter. The Tool<br />
tab is used to set up the tools used in the milling operation.<br />
MANUAL SETUP FACE DRILL POCKET MILLING ENGRAVING VQC<br />
Press ATC FWD<br />
or ATC REV to<br />
change the tool<br />
displayed.<br />
Press NEXT TOOL<br />
to change the<br />
tool in spindle.<br />
Tool in Spindle: 1<br />
Tool Displayed: 1<br />
Tool Type<br />
DRILL<br />
Tool Diameter<br />
0.0000 in<br />
Point<br />
OFF<br />
Flutes<br />
2<br />
Z Length<br />
0.0000 in<br />
ZWear<br />
0.0000 in<br />
Spindle RPM<br />
0<br />
Tool Wear<br />
0.0000 in<br />
Coolant Pos<br />
0<br />
WORK<br />
TOOL<br />
Tool Type Parameters - Drill<br />
Tool Displayed (All Tools) – Current tool number. Use ATC FWD or ATC REV to change the tool displayed.<br />
Tool Type (All Tools) – Right/Left arrows select among 5 tools: Drill, Tap, Shell Mill, End Mill and Center Drill.<br />
ES-0610 rev B 4/09<br />
4


