

Walk-Through For Mills - Haas Automation, Inc.
Walk-Through For Mills - Haas Automation, Inc.
Walk-Through For Mills - Haas Automation, Inc.

You also want an ePaper? Increase the reach of your titles
YUMPU automatically turns print PDFs into web optimized ePapers that Google loves.
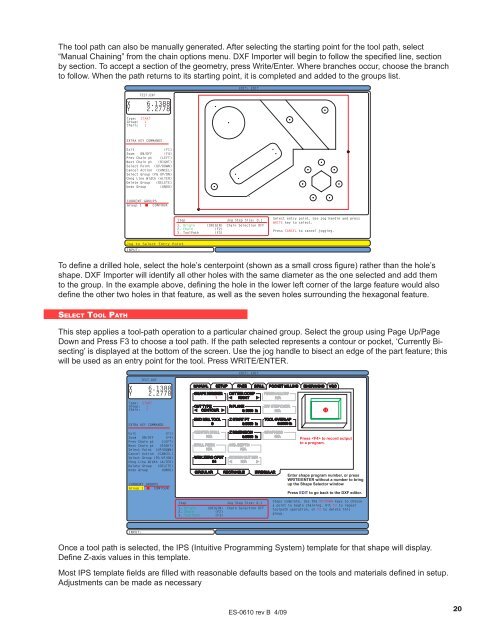
The tool path can also be manually generated. After selecting the starting point for the tool path, select<br />
“Manual Chaining” from the chain options menu. DXF Importer will begin to follow the specified line, section<br />
by section. To accept a section of the geometry, press Write/Enter. Where branches occur, choose the branch<br />
to follow. When the path returns to its starting point, it is completed and added to the groups list.<br />
TEST.DXF<br />
X 6.1388<br />
Y 2.2778<br />
Type: START<br />
Group: 1<br />
Chain: 1<br />
EDIT: EDIT<br />
EXTRA KEY COMMANDS<br />
Exit<br />
(F1)<br />
Zoom ON/OFF (F4)<br />
Prev Chain pt (LEFT)<br />
Next Chain pt (RIGHT)<br />
Select Point (UP/DOWN)<br />
Cancel Action (CANCEL)<br />
Select Group (PG UP/DN)<br />
Chng Line Width (ALTER)<br />
Delete Group (DELETE)<br />
Undo Group (UNDO)<br />
CURRENT GROUPS<br />
Group 1 CONTOUR<br />
Step Jog Step Size: 0.1<br />
1. Origin (ORIGIN) Chain Selection OFF<br />
2. Chain<br />
(F2)<br />
3. ToolPath (F3)<br />
Select entry point. Use jog handle and press<br />
WRITE key to select.<br />
Press CANCEL to cancel jogging.<br />
Jog to Select Entry Point<br />
INPUT:<br />
To define a drilled hole, select the hole’s centerpoint (shown as a small cross figure) rather than the hole’s<br />
shape. DXF Importer will identify all other holes with the same diameter as the one selected and add them<br />
to the group. In the example above, defining the hole in the lower left corner of the large feature would also<br />
define the other two holes in that feature, as well as the seven holes surrounding the hexagonal feature.<br />
Se l e c t To o l Pa t h<br />
This step applies a tool-path operation to a particular chained group. Select the group using Page Up/Page<br />
Down and Press F3 to choose a tool path. If the path selected represents a contour or pocket, ‘Currently Bisecting’<br />
is displayed at the bottom of the screen. Use the jog handle to bisect an edge of the part feature; this<br />
will be used as an entry point for the tool. Press WRITE/ENTER.<br />
EDIT: EDIT<br />
TEST.DXF<br />
X 6.1388<br />
Y 2.2778<br />
Type: START<br />
Group: 1<br />
Chain: 1<br />
MANUAL SETUP FACE<br />
SHAPE NUMBER<br />
1<br />
CUT TYPE<br />
CONTOUR<br />
CUTTER COMP<br />
RIGHT<br />
R PLANE<br />
0.1000 in<br />
DRILL POCKET MILLING ENGRAVING VQC<br />
EXTRA KEY COMMANDS<br />
END MILL TOOL<br />
0<br />
ZSTART PT<br />
0.0000 in<br />
TOOL OVERLAP<br />
0.0000 in<br />
Exit<br />
(F1)<br />
Zoom ON/OFF (F4)<br />
Prev Chain pt (LEFT)<br />
Next Chain pt (RIGHT)<br />
Select Point (UP/DOWN)<br />
Cancel Action (CANCEL)<br />
Select Group (PG UP/DN)<br />
Chng Line Width (ALTER)<br />
Delete Group (DELETE)<br />
Undo Group (UNDO)<br />
CURRENT GROUPS<br />
Group 1 CONTOUR<br />
WRK ZERO OFST<br />
54<br />
CIRCULAR<br />
Z DIMENSION<br />
0.0000 in<br />
RECTANGLE<br />
IRREGULAR<br />
Press to record output<br />
to aprogram.<br />
Enter shape program number, orpress<br />
WRITE/ENTER without anumber to bring<br />
up the Shape Selector window<br />
Press EDIT to go back to the DXF editor.<br />
Step Jog Step Size: 0.1<br />
1. Origin (ORIGIN) Chain Selection OFF<br />
2. Chain<br />
(F2)<br />
3. ToolPath (F3)<br />
Steps complete. Use the UP/DOWN keys to choose<br />
a point to begin chaining. Hit F3 to repeat<br />
toolpath operation, or F2 to delete this<br />
group.<br />
INPUT:<br />
Once a tool path is selected, the IPS (Intuitive Programming System) template for that shape will display.<br />
Define Z-axis values in this template.<br />
Most IPS template fields are filled with reasonable defaults based on the tools and materials defined in setup.<br />
Adjustments can be made as necessary<br />
ES-0610 rev B 4/09<br />
20


