download baltimore instruction manual
download baltimore instruction manual
download baltimore instruction manual

You also want an ePaper? Increase the reach of your titles
YUMPU automatically turns print PDFs into web optimized ePapers that Google loves.
STAGE F<br />
MAST & SPAR CONSTRUCTION<br />
At this point, your model should have a considerable<br />
amount of stuff on board. Take another look, correct<br />
any mistakes and touch up paint blemishes. Go over<br />
the plans again. Did you miss anything The Pride of<br />
Baltimore II has a lot of detail on the deck. When all<br />
looks well, get ready for the masts and spars.<br />
1. The Importance of Scale<br />
While the scale of masts is important, the yards and<br />
gaffs are probably the most critical spars to consider<br />
in regard to proper scale. Stubby, fat-ended yards<br />
stick out like sore thumbs, giving a model that<br />
unprofessional look. Care should be taken to assure<br />
that yards are tapered properly and to correct scale.<br />
It is sometimes difficult to taper a small yard, because<br />
breaking the yardarm is always a risk. However, the<br />
amount of time and effort spent making a yard are<br />
worth the investment when the end result is an overall<br />
appearance which is pleasing and scale-like.<br />
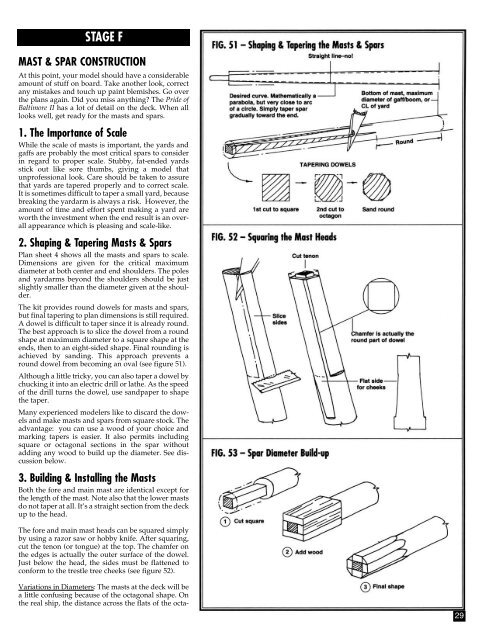
2. Shaping & Tapering Masts & Spars<br />
Plan sheet 4 shows all the masts and spars to scale.<br />
Dimensions are given for the critical maximum<br />
diameter at both center and end shoulders. The poles<br />
and yardarms beyond the shoulders should be just<br />
slightly smaller than the diameter given at the shoulder.<br />
The kit provides round dowels for masts and spars,<br />
but final tapering to plan dimensions is still required.<br />
A dowel is difficult to taper since it is already round.<br />
The best approach is to slice the dowel from a round<br />
shape at maximum diameter to a square shape at the<br />
ends, then to an eight-sided shape. Final rounding is<br />
achieved by sanding. This approach prevents a<br />
round dowel from becoming an oval (see figure 51).<br />
Although a little tricky, you can also taper a dowel by<br />
chucking it into an electric drill or lathe. As the speed<br />
of the drill turns the dowel, use sandpaper to shape<br />
the taper.<br />
Many experienced modelers like to discard the dowels<br />
and make masts and spars from square stock. The<br />
advantage: you can use a wood of your choice and<br />
marking tapers is easier. It also permits including<br />
square or octagonal sections in the spar without<br />
adding any wood to build up the diameter. See discussion<br />
below.<br />
3. Building & Installing the Masts<br />
Both the fore and main mast are identical except for<br />
the length of the mast. Note also that the lower masts<br />
do not taper at all. It’s a straight section from the deck<br />
up to the head.<br />
The fore and main mast heads can be squared simply<br />
by using a razor saw or hobby knife. After squaring,<br />
cut the tenon (or tongue) at the top. The chamfer on<br />
the edges is actually the outer surface of the dowel.<br />
Just below the head, the sides must be flattened to<br />
conform to the trestle tree cheeks (see figure 52).<br />
Variations in Diameters: The masts at the deck will be<br />
a little confusing because of the octagonal shape. On<br />
the real ship, the distance across the flats of the octa-<br />
29